Brake Controller Installation on 1978 Ford F100
Question:
i have a 1978 F-100 Ford with a flat 4 way plug already on truck. i am buying a trailer with electric brakes. how do i wire or make the 78 ford able to use the trailer brakes? do i have to re-wire the truck so the electric brakes will work? if so how do i do that?
asked by: John
Expert Reply:
To use the electric brakes on the trailer, you will need a brake controller to actuate them. I can highly recommend the Tekonsha Prodigy P2, part # 90885. The P2 is our best seller, it is very easy to use and set up.
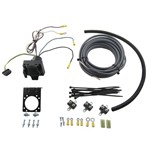
You will also need one of our Brake Controller Installation Kits. If you are needing a 6-way connector, use part # ETBC6. For a 7-way, use # ETBC7. The kits contain everything necessary to install a controller, including the adapter that will plug into your existing 4-pole connector. Unless you have some 10- or 12-gauge wire laying around, you will want to order an extra 10 feet of the duplex cable, part # 10-2-1.
Once that adapter is plugged into your existing 4-pole, the lighting connections are complete. There will be 4 wires remaining. The black and blue wires will be connected to the duplex cable included in the kit. The cable will then be run under the vehicle to the engine compartment, where the blue wire will run into the cab through the firewall and connect to the blue wire exiting the rear of the brake controller. The black wire in the cable will attach to the positive battery terminal via the 40-amp circuit breaker included in the kit. The white adapter wire will ground to the truck frame, and the purple wire which feeds the trailer back-up lights can be tapped into the reverse light circuit on the truck if needed.
That takes care of connections at the rear of the truck. The controller will need to mount under the dash within easy reach of the driver, typically to the right of the steering column so it will not get bumped into when entering and exiting the vehicle.
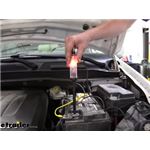
The controller will have 4 wires extending from the rear of the unit. The black and white wires will be run through the firewall. The black wire connects to the positive battery terminal, via a 20- or 30-amp breaker included in the kit. Your instructions for your brake controller will state which breaker is needed. The blue wire will connect to the wire ran from the trailer connector adapter at the rear of the vehicle that was mentioned earlier. The red wire connects to the brake stoplight switch. The stoplight switch can be found by following the arm of the brake pedal up under the dash. The switch will be located at the top of the arm. You will need a circuit tester like part # PTW2993 to probe the wires exiting the switch, until you locate the wire that only shows voltage when the brake pedal is pressed. Once found, use the quick tap included in the kit to tap the red wire into that circuit.
Some wiring will be needed to accomplish the installation, but I will link you to full instructions, an FAQ page and an install video that will explain the process.


Products Referenced in This Question
Deka Jacketed 2 Wire, 10 Gauge, Brake Wire - per Foot

- Wiring
- Wire
- Jacketed Wire
- 2 Wire
- 10 Gauge
- Deka
more information >
Tekonsha Prodigy P2 Trailer Brake Controller - 1 to 4 Axles - Proportional

- Trailer Brake Controller
- Proportional Controller
- Electric
- Electric over Hydraulic
- Automatic Leveling
- Under-Dash Box
- Dash Mount
- Up to 4 Axles
- LED Display
- Up to 360 Degrees
- Tekonsha
more information >
Universal Installation Kit for Trailer Brake Controller - 6-Way and 4-Way Flat - 10 Gauge Wires

- Accessories and Parts
- Trailer Brake Controller
- Installation Kits
- etrailer
more information >
Universal Installation Kit for Trailer Brake Controller - 7-Way RV and 4-Way Flat - 10 Gauge Wires

- Accessories and Parts
- Trailer Brake Controller
- Installation Kits
- etrailer
more information >

Product Page this Question was Asked From
Adapter 4 Pole to 7 Pole Vehicle End Trailer Connector

- Trailer Wiring
- Wiring Adapters
- Single-Function Adapter
- 0 - 5 Feet Long
- 4 Flat
- Plug and Lead
- 7 Round - Blade
- Tow Ready
more information >
Featured Help Information
Instructions
Miscellaneous Media


Continue Researching
- Article: Trailer Wiring Diagrams
- Shop: Brake Controller
- Shop: Trailer Hitch
- Q&A: What Amperage Circuit Breaker Should be Used for Brake Controller Install
- Video: Review of Carr Hoop II Replacement Mounting Brackets - CARRBR14702K2
- Video: Review of Carr Nerf Bars - Running Boards - LD Custom Fit Black Aluminum Side Step - CAR33MR
- Shop: B&W Heavy-Duty Trailer Hitch Receiver - Custom Fit - Class V - 2"
- Shop: Curt 3-Piece Trailer Hitch Receiver - Multi Fit - Class V - 2"
- Shop: B&W Heavy-Duty Trailer Hitch Receiver - Custom Fit - Class V - 2"
- Shop: Universal Installation Kit for Trailer Brake Controller - 7-Way RV and 4-Way Flat - 10 Gauge Wires
- Article: Brake Controller Installation: Starting from Scratch
- Q&A: Installing a Brake Controller on a 1988 GMC K 1500 Pickup Truck
- Shop: Air Lift LoadLifter 5000 Air Helper Springs - Rear Axle
- Shop: Air Lift LoadLifter 5000 Ultimate Air Helper Springs with Internal Jounce Bumpers - Rear Axle
- Shop: Firestone Ride-Rite Air Helper Springs - Double Convoluted - Rear Axle
- Shop: Suspension Enhancement
- Shop: Nerf Bars - Running Boards
- Article: Towing a Trailer? Let's Talk About Brake Controllers
- Shop: Tonneau Cover
- Search Results: wiring tools
- Article: Brake Controller 7- and 4-Way Installation Kit (ETBC7)
- Shop: Trailer Wiring
- Search Results: brake controller
- Q&A: What is the Difference Between a Class II and a Class III Hitch?
- Video: Choosing the Right Trailer Wiring
- Video: Choosing the Right Brake Controller
- Q&A: What is the Difference Between a 4-Way and 7-Way Trailer Connector
- Search Results: trailer brake controller
- Article: How to Choose the Right Trailer Hitch Class
- Q&A: Lug Nut Torque Chart for Trailer Wheels

on Trailer Wiring