
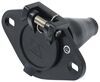
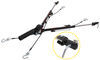
Towed Car Conversion Kit - Demco Stay-IN-Play Duo to Air Force One Flat Tow Brake System
(1 reviews)
Price: $994.69
Towed Car Conversion Kit - Demco Stay-IN-Play Duo to Air Force One Flat Tow Brake System
Item # SM99233
Retail:$1,259.00
Our Price: $994.69
You Save: $264.31


- All Info
- Reviews (1)
- Q & A (0)
- Videos (5)
- Photos
Demco Accessories and Parts - SM99233
- Tow Bar Braking Systems
- Conversion Kits
- Demco
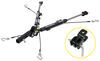
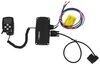
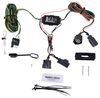
Use this kit to swap out the Demco Stay-IN-Play Duo on your towed vehicle for an Air Force One. Includes all the hardware and components you'll need.
Features:
- Converts the setup in your towed car from the Demco Stay-IN-Play Duo (SM99251) to the Air Force One (SM99243)
- Includes all of the hardware and components needed to complete the conversion on the vehicle and the RV
If you are changing out your RV with electric/electric-over-hydraulic brakes for one with air brakes, this kit will get you what you need to convert your flat tow setup. You'll save money and get all the components you need, with no extras.
99233 Demco SBS - (Formerly SMI) Conversion Kit from Demco SBS Stay and Play DUO to Air Force 1 Supplemental Braking System for Towed Vehicle and Motorhome with Air Brakes


Video of Towed Car Conversion Kit - Demco Stay-IN-Play Duo to Air Force One Flat Tow Brake System


Videos are provided as a guide only. Refer to manufacturer installation instructions and specs for complete information.


Video Transcript for Demco SBS Towed Car Conversion Kit Review
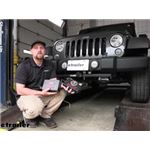
Hey everybody, Ryan here at etrailer. Today we're gonna be checking out the Demco Towed Car Conversion Kit. So essentially what this is gonna allow you to do is take the current Stay-IN-Play DUO System that you have, change up a few parts and turn it into the Demco Air Force One. So when it comes to flat towing a vehicle and everything, one of the more common themes that seem to happen is people like to change their motor homes up every few years, you know, and it makes sense. And a lot of times when people do that they end up getting bigger one that is a little more capable and a lot of those bigger ones have air brakes. Well, if your vehicle is set up already, like our Jeep was here today, with the Stay-IN-Play Braking System, this one only works with motor homes that have hydraulic brakes.
So if your vehicles set up like that and then you end upgrading motor homes to an air brake one you need to change something up to get the braking system to work and that's where this kit is gonna come into play. So essentially you're gonna be able to convert your vehicle that has the same play over to an Air Force One really easily. It uses a lot of the same components and so a lot of the work that's already been done, is transferable over to this one. So it really, you know, streamlines everything. Essentially, this one will just bolt kind of in place of this and a few things you have to do.
But for the most part, it's pretty simple and in the long run, that's gonna save you a lot of time and energy because you're not gonna have to deal with ripping a whole system out or getting a whole entire new kit and and setting everything else back up. So it's cool to see that they have these conversions like this and it just kind of caters to the people that you know are in this particular situation. And it feels good when you are in a kind of a goofy situation like that, to have something available to help figure out your problem. Other than that, though, you know there's really not a whole lot to this. It's kind of a kit for a particular situation.
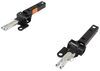
And so if you're in that situation you kinda already know what you need, but it does work out really well. It's gonna come with everything you're gonna need to get things switched over. I will say pay attention, make sure you have both of the airline fittings, so the one like this, this is the male side, this goes on the vehicle side. And then one like this, this is the female side, this will go on your motor home side. And just double, double check, make sure you have both of these.
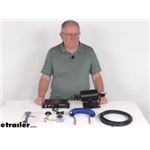
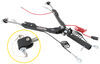
If you don't, you can always grab these separately not just to be on the safe side, but you know a lot of people are probably wondering how this is done and how easy it is to do. And it's really not too bad, on our Jeep, it was pretty straightforward. And then again, instead of depend on how your Stay-IN-Play, you know, is set up on your particular vehicle, if it's easy to get to, if it's tucked way back in there. So it's gonna change a little bit, but the idea is the same. So on the vehicle side, in our case, not really bad. And then obviously we had a little bit of work to do on the motor home, but let's just kind of check that out and, and kind of see what see what I did and, and how everything works out. To get your system converted on your vehicle side, first thing you're gonna wanna do is find where your old box was actually mounted it up, right And in our case, in our Jeep, it was right here behind our front bumper. So you're gonna remove the old box. And then obviously, you know this one will bolt right back up in the same area. It shouldn't give you really any issues. This one's actually smaller than the same place, So if anything you'll have more room, but from there it's kind of just hooking up, for the most part, what's already there. So on your Stay-IN-Play, you had a vacuum line that, you know, ran into the system. You're simply going to plug that into the vacuum port here on our Air Force One. Make sure to reuse your old check valve from your Stay-IN-Play DUO, because this kit doesn't come with the new one. So make sure to keep that in good condition when you take it apart. You can always grab the stuff separately too. You know, if you'd rather just pop a new one in there. And then you're gonna have a couple of your airlines. All right. So the one airline, this will be the port label "Air Out". So this is the airline that's actually going to your cylinder on your brake pedal inside of your vehicle. So originally this line, was to plug into the little nylon air fitting on your Stay-IN-Play DUO System. So plug in that, plug it right into the air, out valve, on your new system. And then as far as the air in valve, which is this one here, that's just going to plug your airline into it and that's gonna run to the front of your vehicle where you have that mail connector mounted up. So that's where the line goes into our fitting. Yours may look a little bit different. Chances are good you'll have a quick connect fitting where the line just kind of snaps into it. But the idea is the same here, you know, from the line up to the fitting and the purpose of this fitting, you want it to be accessible in the front there because the purpose of it, that's gonna provide us with a spot to take the tether or the air hose, rather, plug into there, and then the other end will obviously get plugged into the fitting on our motor home. That's going to allow the air to flow through here and into our system to help everything operate. And then from there it's essentially just two wires to hook up. So you have two black wires coming outta your Air Force. One. Doesn't matter which one you use in this situation to ground it, either one of them as long as they're both hooked up. So one wire is a ground, a crimp on a ring terminal, ground it out. In our case, we had one right here, so that worked out good. Then the other remaining wire will simply just get tied into the black wire from our breakaway switch. So our breakaway switch at the front, a few wires coming off. The black one, you're just going to use a butt connector and connect them two together. So, essentially on the vehicle side, that's it. And as long as you hook it up, like you have here, what you can do. on the inside of your vehicle, is use your G-Force controller as a switch for your indicator light. So just kind of clarify that we'll go up there check that out and and show you what we're talking about here. So inside of your vehicle, the G-Force controller, which originally was part of your Stay-IN-Play DUO System, you can leave this hooked up and intact and everything. And as long as you hooked up the wires like we told you to down by the operating unit, this essentially is going to be an on/off switch for the indicator light for your braking system, right So in the off position, whenever you're driving around town and you apply the brakes in your Jeep and, I'm sorry, your tow vehicle and you're not flat towing, the indicator light isn't gonna go off. But when you are ready to flat tow, turn it on. Whenever the brake pedals push down, then the indicator light is going to illuminate and let you know that your vehicle is braking behind your motor home. So right now I have the switch off. Our light is right here and I'm pushing the brake pedal. Obviously we don't have anything illuminating. And then if I turn it on, hit the brake pedal, now we can see it lighting up. So, kind of a cool trick and you know, it's not gonna be annoying having this light light up whenever you're just driving around town and not behind your motor home. So we checked out how everything works on the vehicle side and kind of how that, all them parts go on. So let's check out the other half of the kit, which is the motor home side. Now keep in mind, every motor home is gonna be set up a little bit different, but the idea on how to get this on, is all the same. So in our case, we're gonna be working just in front of the rear axle and finding the spot to mount up a tank and T end to the airlines. So underneath the motor home, now here's our air tank. And when you mount this up, you wanna make sure to mount it off, you know, high and out of the way, obviously not right next to moving and hot parts and whatnots. So a lot of times where all your airlines are anyway there's a bracket holding, you know, valves and everything. And I just utilized two bolts that we're already there to mount this up. So pretty straightforward. Once you have this mounted, we're gonna have three different airlines that we need to run. Two of them are gonna get connected just right here in front of all this into our main motor home airlines. So here is our connections located up here and we're gonna have a meter to air connection and a supplier air. So we'll first start with the meter to air. That is this one right here. Usually the hose is a little bit smaller. And one way to test this, if you pull the hose out, these are just quick connects, so you kind of push in and pull out. This is only gonna shoot air out whenever you push the brake pedal down. So it's usually pretty easy to find and what you're gonna do once you find it, cut the airline in half, you wanna make sure you have a good clean cut. So avoid a regular pair of snips. You wanna use a razor or a a tubing cutter tool or something along those lines and then clean the ends really good. You can take some brake cleaner or some type of solution and wipe them clean. And then these essentially just plug right into these quick connects, right So that completes the original airline. And then the new airline, the smaller one, so you'll have big bundle that comes in your kit for the meter there, it plugs into the T. So that metered airline will run down to our tank and get plugged into this fitting right here. So that one's all done. And I guess while we're right here we will show you where the supply line runs. We have a big T that goes into the supply line but then obviously a smaller hose that runs into the tank. So the supply line hose, we're gonna plug it into this T, or I'm sorry, into this fitting. And then this line is gonna run up to our supply line which is just above our metered air connection. So this is our supply line and it works the same way that we hooked up our metered air connection, cut the line, you know make sure they're clean and, snap everything together with the supply line though, before you cut it it's usually the thick one, you know, like this. Before you cut it, though, get up in the motor home with it, not running, hit the brakes a bunch and drain pretty much all the air out of it. You know, leave a few PSI in there and you'll know if it's a supply line when you go to pull this out or cut it in half. And if you get some air that just comes out, you know that's gonna be the supply line. So that's how that works. Hook it all up, clean cuts, you know make sure the hose is clean. Snap, everything together. One more line coming off of her tank. which is this one here, here it'll plug your hose, fitting into it. And this is gonna run all the way to the back of a motor home where we're gonna have a quick connect fitting that way we can plug our car into it. So essentially, it's gonna be really tough to see under here, but you get the idea. This is gonna run up and then just along the frame, all the way to the back. Usually there's other wires and and harnesses and stuff that you can follow, so it's pretty straightforward. Just like I said before when you're running these, make sure you're avoiding hot and moving parts. Pretty straightforward here at the back. You have this fitting you can bolt this where you find appropriate. I usually just go to the very bottom of our bumper or something like that where it's easy to get to and plug everything in. And then that line that we ran back again, you cut it clean and it literally just plugs into those quick connects. So super convenient and not really a whole lot to it. So once everything's hooked up, what you want to do is start up your motor home, let it run, let it build air pressure and then check for any leaks. So to do that, a lot of times you'll know right away you'll hear it hissing, or you can spray all the stuff down with soapy water and look for bubbles to form. If that's the case, what you want to do, if you have a leak is unplugged the line where it's leaking, recut it, clean it off and plug it back in and do it again. But as long as you have clean cuts and clean lines, you really shouldn't run into any issues. And with all that wrapped up, you know, essentially you're ready to hook up to your towed vehicle and do some flat towing. So when it comes down to it, you know it's a little bit of work, but not really all that bad for kind of taking what you already have, being able to convert it and have everything work properly with your new motor home. And that'll finish up our look at of the Demco Tow Car Conversion Kit..
Customer Satisfaction Score:
86% were satisfied with this product
14% of customers were not satisfied
- Wrong item was ordered
Customer Reviews
Towed Car Conversion Kit - Demco Stay-IN-Play Duo to Air Force One Flat Tow Brake System - SM99233
Average Customer Rating: 5.0 out of 5 stars (1 Customer Reviews)
Use this kit to swap out the Demco Stay-IN-Play Duo on your towed vehicle for an Air Force One. Includes all the hardware and components you'll need.by: Russel 10/05/2023
Working good. We had to add an air activation switch, that the kit didn’t come with, so our wireless coach link, that we have in the motor home, would indicate when the tow vehicle brakes were on and when they were off.
1
1
See what our Experts say about this Demco Accessories and Parts
- Can Demco Stay N Play DUO Install on RV that Has Air BrakesIt's not recommended to try and use the Demco Stay N Play DUO on a vehicle with air brakes but Demco does make a conversion kit for your exact situation with the Towed Car Conversion Kit - Demco SBS Stay-IN-Play DUO to Air Force One Supplemental Braking System # SM99233 which comes with everything needed to make conversion. The problem with the DUO and air brakes is the exhaust brake setup and how the brake lights don't always illuminate when they are used which is what the DUO uses to...
view full answer... - How Does Demco Coachlink Get Wired To Air Force One Braking System?The Coachlink # SM99945 you purchased has two wires, a black that gets connected to ground, and a red wire that needs to get connected to the cold side of the stop light switch that only gets power when your brake pedal is pressed however since you converted your system to the Air Force One you'll connect it to the reed switch. I went ahead and included a cutout to show you how it will get wired up depending on if you have a 2 or 3 wire reed switch.
view full answer...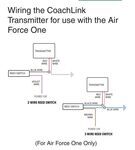
- Can Demco G-Force Controller and Coachlink SM99945 Both Be Installed On Towed Vehicle?So the G-force controller you have installed and the Coachlink # SM99945 you were looking at are for very different purposes, so you can't remove the G-force, but you can still install the Coachlink like normal. The Coachlink just tells you in your motorhome if the brakes in your towed vehicle are being applied or not. I went ahead and included videos for both the Coachlink and the conversion kit # SM99233 for you to take a look at.
view full answer... - Instructions to Use for the Demco SBS Air Force One Conversion Kit SM99233The instructions for the Demco SBS Air Force One Conversion kit # SM99233 you'd need to use would be the instructions for the Air Force One part # SM99243. You just need to use the motorhome side of the instructions. The instructions are linked to this page.
view full answer... - Parts Needed To Convert The Demco Stay-IN-Play Duo To Demco SBS Air Force OneWe have just what you need to convert your Demco Stay-IN-Play Duo # SM99251 to the Demco SBS Air Force One # SM99243. What you'll need, is the Towed Car Conversion Kit # SM99233. This kit includes all the hardware and components needed for installation.
view full answer... - Recommended Conversion Kit From SMI Stay-In-Play Duo to SMI Air Force OneTo convert from the SMI Stay-IN-Play DUO Supplemental Braking System # SM99251 to the SMI Air Force One Supplemental Braking System for Motor Homes with Air Brakes # SM99243 you will utilize the vacuum tube, the same breakaway switch, and much of the same wiring. The conversion kit you are seeking is part # SM99233 and I confirmed with my contact at the manufacturer this will give you everything you need.
view full answer... - Can Demco Duo be Used with Motorhome that has Air BrakesThe G Force Demco controller you have is part of the Demco Stay N Play DUO system part # SM99251 which wasn't designed for use with motorhomes with air brakes like the Air Force One part # DM26VR was. To convert what you have to be an Air Force One you'd need the part # SM99233.
view full answer...
Do you have a question about this Accessories and Part?
Info for this part was:

Edited by:
Lindsey S

Installed by:
Jeff D

Installed by:
Ryan G

Expert Research:
Jameson C

Video by:
Joshua S

Video by:
John S

Video Edited:
Jacob T

Video Edited:
Chris R

Updated by:
Wilson B

Updated by:
Kristina F

Updated by:
Amanda K

Written by:
Amanda M

Test Fit:
Bradley B
At etrailer.com we provide the best information available about the products we sell. We take the quality of our information seriously so that you can get the right part the first time. Let us know if anything is missing or if you have any questions.
Product Experts Available Now!
Call 1-800-940-8924
Thank you! Your comment has been submitted successfully. You should be able to view your question/comment here within a few days.
Error submitting comment. Please try again momentarily.