
Reese Quick-Install Custom Installation Kit w/ Base Rails for 5th Wheel Trailer Hitches
(58 reviews)
Price: $328.88
Reese Quick-Install Custom Installation Kit w/ Base Rails for 5th Wheel Trailer Hitches
Our Price: $328.88
Will this fit?
To see if this custom-fit item will work for you please tell us what vehicle you'll use it with.
Thank you! Your comment has been submitted successfully. You should be able to view your question/comment here within a few days.
Error submitting comment. Please try again momentarily.


Customers prefer these similar products
17% prefer this

9% prefer this


- All Info
- Reviews (58)
- Q & A (0)
- Videos (6)
- Photos
Reese Fifth Wheel Installation Kit
- Above the Bed
- Reese
- Custom
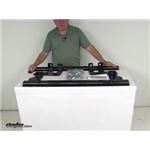
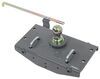
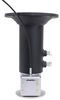
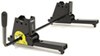
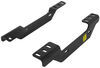
Custom brackets reduce the amount of drilling and time required to install your fifth-wheel trailer hitch. Brackets, base rails, and hardware included.
Features:
- Installation brackets mount beneath your truck bed to provide attachment points for 5th-wheel rails
- Base rails sit in truck bed and allow installation of 5th-wheel trailer hitch
- Custom brackets mount to existing holes in truck frame, minimizing drilling and measuring
- Cuts installation time in half when compared with universal bracket systems
- 10-Bolt rails and hardware included
- Compatible with Curt, Draw-Tite, Hidden Hitch, Husky, Reese, and Valley 5th-wheel hitches
- Will not fit Reese Elite Series (Signature Series) or Valley UBS hitches
- Sturdy, black powder coated steel resists corrosion
- 5-Year limited warranty
50054 Reese Custom Quick Installation Brackets
58058 Reese Fifth Wheel Rails - 10 Bolt Design
Item # RP50054-58
Installation Details

This Product Fits The Following Vehicles
- 2014 - 2020 Ram 2500 6-1/2 Foot Bed without OEM Prep Pkg
- 2014 - 2020 Ram 2500 8 Foot Bed without OEM Prep Pkg
- 2014 - 2014 Dodge Ram Pickup 2500 - 6-1/2 Foot Bed without OEM Prep Pkg
- 2014 - 2014 Dodge Ram Pickup 2500 - 8 Foot Bed without OEM Prep Pkg


Video of Reese Quick-Install Custom Installation Kit w/ Base Rails for 5th Wheel Trailer Hitches

Videos are provided as a guide only. Refer to manufacturer installation instructions and specs for complete information.


Video Transcript for Reese Quick Install 5th Wheel Base Rail Kit Installation - 2020 Ram 2500
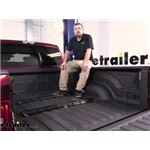
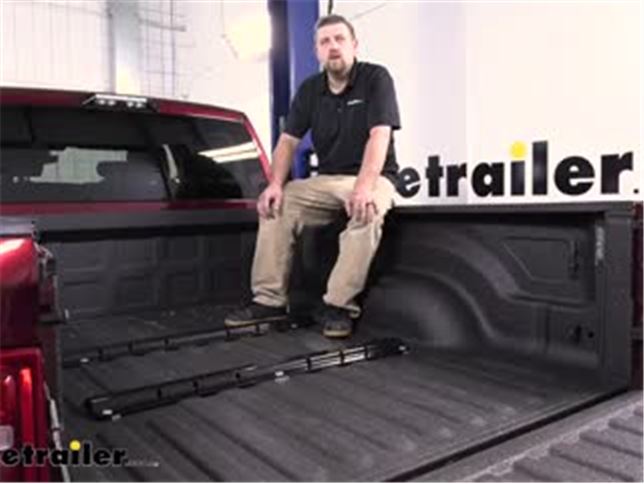
Ryan: Hey everybody, Ryan here at etrailer. Today, on our 2020 Ram 2500, we're going to be taking a look at and showing you how to install the Reese quick-install custom installation kit with base rails for a fifth wheel trailer hitch. So to me, probably my favorite thing about this kit is the fact that it is custom fit and design for the Ram 2,500. Honestly, whenever I was pulling a heavy trailer, that really gave me a peace of mind knowing that this is set up to specifically work with this truck. A lot of our customers have actually said one thing they're really impressed with is how well built this kit is, and to be honest with you, I'd have to agree with them. Everything's really thick and heavy duty.
It should last just as long as your truck.Now, since these rails do sit inside of the bed, they are going to take up a little bit of space, but not too much because they do have a relatively low profile. So I really don't see them getting in the way that often whenever you go to put your things in and out of the bed of your truck. So these rails are going to have multiple different slots here to work with different types of fifth wheel head configurations, and so these should pretty much work with just about any common fifth wheel head out there.Now, some questions we get in regards to these fifth wheel kits and is how much space are you going to have in the front here Some people like to have their tool box or another type of accessory, and that's definitely understandable. Today on our Ram, we have the short bed, and just to give you an idea, if you go from the bed to the very back edge of our rail here, looks like it's going to sit right about 21 and three quarters of an inch. But at the end of the day, a kit you really can't go wrong with, it's going to be really well built, last a long time, and worked with a lot of different types of those fifth wheel heads.
So it definitely has some versatility.Now, as far as the installation goes, it's really not too bad. I will say the most difficult part is getting to some of the bolts underneath the truck. Can be a little tight at times, but as long as you stay focused, shouldn't have an issue getting it installed. But speaking of that, let's go ahead and put it all together now.To begin our install, we're going to be underneath the bottom of our truck. First thing you're going to want to do is temporarily remove your spare tire, it's going to give us a lot more room to work, and then we can focus on this little heat shield right here.
To get this off, there's going to be a total of six 10 millimeter bolts. Two of them, I already went ahead and took out, because it's a little tricky to see. Those are going to be right here and here, attaching to this brace here. The other four are going to be here, here, here, and here. Once we have it removed, we can just set it off to the side.Now what we can do is lower our exhaust some, and that'll give us some more space to get all of her parts on.
So what you're going to do is come here to this rubber hanger. You can spray it down with some soapy water or some type of lubricant and get a pry bar. What you're going to do is just pry that rubber portion off of our exhaust. With it off like this, it should give us a little wiggle room here if we need it. On the driver's side of our frame rail, if you look, we're going to have our brake lines that run right here and some wiring. What we're going to do is separate them from the frame. So you can take a trim tool like this or a flathead screwdriver and try to just pry underneath the little connector there and just pop those off.Now we can hop up into the bed of our truck and figure out the placement for our rear rail here. So there's a few things to pay attention to whenever you're doing this. You're going to measure the distance from the edge of the bed itself. You don't want to measure from the tailgate, so this edge right here, and pay attention too, because the distance is different if you have a short or long bed. Find that measurement in instructions. And I like to do is measure from there, maybe mark a couple of two or three spots, and then we need to make sure that the rail is centered in the bed. So to find that, what I like to do is measure either from this line here in the bed or even the wheel well. So you'll go from here to here. Try to remember that distance, same on this side, and you want to center it. So you want this distance to be the same over here as it is here.Once you have that laid out, though, what I like to do is just maybe take a pen or pencil and just lightly trace around this, so that way we don't lose its placement. Now what we can do is get ready to pre-drill where our attachment points are going to be on the rail. So we're going to be using this hole here, this one here, this one right here in the center, and same on the other side, so this one right here and this one right here. So what I'm going to do is take a center punch, and you want to line it up as best you can in the dead center, that opening there, or just put an indention in it. That way we will hold those spots so we can pre-drill them out. Now I'm going to do this for all of these attachment points here. Now what I'm going to do is take a small drill bit and make some pilot holes. When you're drilling through this, not a bad idea just to double check underneath to make sure you're not going to accidentally drill into something of importance.Now we can move over to our wheel wells, and we're going to loosely install our side brackets. So these are side specific, so pay attention. Make sure you have the correct one. Quick way you can identify that is this angled edge here. The angle is going to face towards the front of the truck. So we are on the passenger side, just to give you an idea. So what this is going to do, these two holes here are going to line up with these two threaded holes here in the frame rail, and once we get this loosely on, you want to make sure that this hole here at the top lines up with the corresponding pilot hole that we drilled in our bed.Since these are threaded, not a bad idea to take a tube brush or something, clean out any debris that might be in there. Our truck does have a lot of undercoating on it, so that's something to pay attention to as well. What we're going to do is take these bolts and a conical tooth washer, make sure that the teeth on the washer are going to face our bracket like this. Then we're simply just going to line these up and get them started. With this undercoating, I like to really make sure they're going in straight by hand, because sometimes that undercoating cam throw the bolt off a little bit. You definitely don't want to cross thread it or anything like that. So once I know they're going, I'll just snug them down, but I won't tighten them down so tight that you can't actually move this bracket. You still want just a little bit of wiggle in it there.Over here on the driver's side, I went ahead and repeated that same process. Now, we can hop back up in our bed and I just moved our rail out of the way, and we can enlarge all of our holes to the amount specified in the instructions. So the two holes here in our bed that are closest to the front of our truck, once you punch through the bed, it actually goes down a little bit and hits the corrugation on the underside of her bed, and so I'm going to use a longer drill bit to drill through that corrugation as well. I'm going to do that for each one here closest towards the front of the trunk. So those same two holes closest to the front of our truck, or we're going to need to do is open just this first layer of metal up to a larger size. It's listed in the instructions. By opening that hole up larger, that's going to allow us to put in a spacer. I'm going to use a stepper bit to enlarge this open.So now that we have both of those holes enlarged, I'm just going to grab my vacuum and suck up all the shavings just to clean up our mess a little bit. It's not a bad idea, too, to either grab some spray paint or paint stick like this and just go around the holes that we drilled just to put a layer over that bare exposed metal. So now if we move to those larger holes that we made, we're going to grab these tube spacers, and these are just going to simply just sit down in there just like that. We can grab our rail and just slide that back into position, lining everything up.For these holes back here, we're going to take the long carriage bolts and just set them down in there. Same thing over here. This can be a little tricky trying to go all the way down through there, especially trying to get that spacer lined up a little bit. Probably just keep it in place like this for now. Once we get all the hardware loosely installed, we'll be able to kind of work that down in there. Now for the holes here towards the very back, we're going to take a U shaped spacer block, slide that under, take one of our shorter carriage bolts, drop that through. Same thing here in the center and here on the far end.So now underneath the truck, we can get our hardware in place that's going to secure to all the bolts that we dropped through. So we're going to start with the hardware that's closest to the front of our truck, and here's one of the bolts here. On these, we're going to take a conical tooth washer, make sure the teeth face up towards the bed. We're going to take a hex nut, and we're just going to get that hand tight for now. Now I did the same thing over here on the other side. It is a little bit trickier though, because this frame bracket don't give us a ton of space, so it does help to have an extra set of hands that can be up top of the bed, turning our bolt while you're below it holding on to the conical tooth washer and the nut.So now we can move on to this bolt here in the very center of our bed. What we're going to do is take a U shaped spacer block, conical tooth washer, and a hex nut. We'll get this hand tight as well. For the bolts that dropped down through our side plates here, what you're going to do is take the washer, the rectangle shape washer like this, or a spacer block rather. What I'd actually done is just taped a conical tooth washer to it just to make it one unit. Slide over our bolt, make sure that that tape isn't getting away, if you did do that. So once our bolt has passed through there, you can then take a hex nut and get it started hand tight, and we'll do the same thing on the other side.Now back up in the bed of the truck, what you're going to do is take the other rail and just set it here in the front. You're going to take your fifth wheel, put it into the openings here on that back rail, and the fifth wheel is actually going to more or less determine the location of our front mounting rail here. So I took a fifth wheel, connected it into the openings here in our front rail. What I'm going to do now is make sure that it is centered and square, and from there we can mark all of our attachment points. So I'll just do like you did the other one and make sure that distance is the same on each side.So now that we've verified our rail is centered and correct, I'm going ahead and use the punch and a hammer again to mark our attachment points. The attachment points we're going to be using is this one and this one. We're going to be using this one here in the center, and on the other side, this one here as well as this one. Now that we have them punched and marked, go ahead and take our fifth wheel out of the truck, move it out of the way as well as our rail, and get our holes drilled.So I went ahead and got all of our holes drilled out to the size in our instructions, vacuumed up our mess, and then covered up that bare metal with some paint, just like we did the other one. But then now we can slide our rail into position here on the end. So we're just going to take our carriage bolts, just drop them down. For the one in the center, we're going to to use a U shaped spacer block just like we did the other rail. Just slide that underneath it, take our carriage bolt, drop it down, and then we'll just have our carriage bolts again on these ends. So what I went and did is take our fifth wheel and set it back on the rails, and what this is going to do is just help keep everything true and where we want it while we're underneath the truck, finishing up, putting on the rest of our hardware.Underneath the truck where our hardware drops down on the sides, we can get our frame plates on. We're on the passenger side right now. We do have a wire that runs up along our frame around here, so I'm just going to use my trim tool and going pry that off so we have a little more room. But with that being said, we can take our bracket, and again, these are side specific, so be sure you have the correct side. Slide it in place. Be sure not to pinch a wire, this wire if you have it there. But these holes in the bracket are going to line up with holes in the frame. We're going to put bolts in there.So before we do that, we're going to take a U shaped spacer block, put it in between this bracket and the bottom of our bed, and then on each side, you're going to push your bracket against our frame there. Line up the hole in the bracket with the hole in the frame. Get a bolt, conical tooth washer, and get them started hand tight. If you're having trouble getting it lined up, sometimes what you can do is take a screwdriver or something and use that to help pry that into position. With our bracket in place, this bolt here, close to the front of the truck, we're going to take a conical tooth washer and a hex nut back on hand tight. We're going to use a little bit different combination for the bolt back here. We're going to take, again, one of these spacer blocks. I taped that conical tooth washer to it. We're going to slide that over the bolt, and again, finish it off with a hex nut. Because I have this on, I'm going to repeat the same process over on the other side.For our bolts here in the center, we're going to take a U shaped spacer block, conical tooth washer, and finish it with the hex nut. At this point, we can tighten all our hardware down, and we're going to do this in a particular order. We're going to start with the center bolts and work our way to the sides. The bolts that we're going to tighten down first will be all the hardware that's actually attaching our rails to the truck bed and the mounting brackets. So once you have all the hardware that's connecting the rails to the brackets all tight, you're going to want to come back and tighten down the bolts that are actually connecting the brackets to the frame rail.So now we're going to use that same tightening sequence, except this time with a torque wrench. We torque all the hardware down to the amount specified in the instructions. Now that all the hardware's torqued down to the proper spec, I went ahead and just re-secured our exhaust and reinstalled the heat shield the opposite way that we removed it, and that'll finish up our look at and our installation of the Reese quick install custom installation kit with base rails on our 2020 Ram 2,500.
Customer Satisfaction Score:
99% were satisfied with this product
1% of customers were not satisfied
- Wrong item was ordered
Customer Reviews
Reese Quick-Install Custom Installation Kit w/ Base Rails for 5th Wheel Trailer Hitches - RP50054-58
Average Customer Rating: 4.8 out of 5 stars (58 Customer Reviews)
Custom brackets reduce the amount of drilling and time required to install your fifth-wheel trailer hitch. Brackets, base rails, and hardware included.by: Roger T.03/03/2016
Overall the install went pretty good. I used two 2x2's with stops to hook at the end of the bed to set the proper distance to the rear rail. See image. The only real problem was with the hole location on the right inside of the rear rail. After I drilled it and crawled under the truck I discovered that there was no way to get to the bolt to install the nut because it was under the welded on sway bar bracket. I moved over to the next hole towards the center and drilled another hole and installed a 1/2-13x3 1/2" bolt with nut and washer. This hole came smack dab in the center of the bed support channel under the bed. Perfect! See other image.


by: Dennis A.03/24/2018
Nissan Titan
Purchased with a Reese Titan 16000 lb hitch. Instructions were clear and easy to follow. Thanks the ETAILER'S videos I installed myself without any issues. There were a few tight squeezes to reach areas, but not too bad.


Dennis A.

3/24/2019
No issues. Great hitch system.
by: Dave M.03/12/2017
2016 Dodge Ram Pickup
What a great product. The quick install brackets made installation very easy. Took about 2 1/2 hours. Was installed on a 2016 Ram 2500 Cummins with rear coil springs.


by: Kelly 02/10/2024
Easy to install with basic tools. Worked on a little for a few days . Probably about three hours total. Highly recommend.
by: George04/07/2023
2017 Ram 2500
ordered on 3/30/23, was promised delivery on 4/3, actually got on 4/5 and only received rails without installation kit. called E-Trailer - told installation kits are backordered for 2 months - AND THEY NEVER TOLD ME so I had to cancel my RV hitch install and find order a different kit
by: Dennis 04/30/2021
2014 Ram 2500
Custom 5th wheel, rail mounting kit w/rails was short a bag of hardware. It took one phone call and I received what I needed in two days. Customer care was excellent.
by: Adam01/26/2019
2014 Dodge Ram Pickup
This installation kit for my 2014 Ram 2500 and Reese hitch worked perfectly. I installed it myself without a single problem. Couldn't be happier with the quality and the instructions were pretty easy to decipher. I had this installed in about 4 hours by myself.

Adam S.
1/26/2020
A year later and everything is still perfect just like the day I bought it. Ive been pulling a 5th wheel since i installed this kit with nothing but confidence.
by: Eric02/09/2018
Install wasn't too bad. Only gave it 3 stars because the slots for the 5th wheel or gooseneck hitch are a little sloppy. sure it makes it easier to install or remove the hitch, but the little jerks of the hitch moving when taking off from a stop or slowing down too fast are annoying. Guess I shouldn't have gotten the spacing perfect and I wouldn't have the issue.
by: Doug S. Ray, Michigan 05/02/2018
2017 Ram 2500
Arrived on time. Everything was in the box and in great shape. Instruction along with you tube made the job easier. Thanks to friends with big barns to get out of the Michigan weather.
Will continue to purchase through Etrailer Corporation again. Great prices and Customer Support.
Doug M.
5/2/2019
Fantastic I installed it with a friend which was needed. I measured three times and drilled once. It turned out perfectly because when I was done I []ped in my hitch and it fell in without any forcing involved. Just a note I purchased the Reese hitch from a friend and didnt have it with me at the time of my installation of the rails. So it was a huge relief to see it fit perfectly. The quality of the product also played a big part of the install.
by: Michael 04/30/2020
Dodge Ram Pickup
The brackets are made well and feel very high quality. Install was pretty easy and straight forward but I think the instructions are not totally accurate for my truck. On my 2020 Ram 2500 gas truck one of the bolts I had to drill ended up right on top on an exhaust hanger mount. I triple checked the measurements too. I got it to work but could not get it as tight as I wanted and definitely can’t get a torque wrench on it. Only an open end wrench would fit. Overall though I do recommend this mounting system for the bed rails.
by: Michael 03/26/2020
I installed this kit myself with the instructions that came with the kit. The instructions were very easy to understand and the kit was fairly easy to install on my truck. The rails worked perfectly with my fifth wheel hitch.
by: Vince06/02/2017
2016 Dodge Ram Pickup
the RP50054-58 brackets fit my 2014 Ram 2500 perfectly. I installed them myself for a 1999 Reese 22K Hitch in about 4 hours. no issues at all.
you may want to watch this youtube video that is a step by step install on a 2016 Ram 2500. It REALLY helped!!
the name of the video is-
"Installation of the Reese Quick Install 5th Wheel Base Rail Kit on a 2015 Ram 2500 - etrailer.com"
by: Gregory01/18/2021
This product worked great but the install is a bit of a pain. The installation video kind of skipped over the part about mounting the drivers side forward bracket to the frame. This bracket mounts in a blind tight spot between the fuel tank and frame rail. Once moving the wiring harness and cleaning the bolt holes the install went ok but you need some long ratchets and extensions and long skinny arms. If you’re not very comfortable in your ability, have someone else install it for you.
by: KC01/22/2017
It is always a nerve racking prospect to drill holes in the bed of your truck. So follow the old rule of measure twice cut (drill) once, but up the formula to - read the instructions twice, measure twice (even three times) and drill once. But drill slowly and smoothly. I had trouble getting the spacers into the corrugation areas because I rammed the drill thru a bit fast and left lots of rough metal edges which prevented the spacers from slipping into place. Installation is relatively straight forward per instructions. Watching the etrailer install video helps as well.
by: Dean P06/19/2015
Very Happy with fifth wheel kit. Much heavier duty than expected. Easy to installed, but time consuming. Two men makes it go alot faster. Tried it out with my camper, great! Service excellent. Over and above what I expected! Thanks for quick shipping. DP
by: Arlin T.04/27/2017
The rails and frame mounts worked like they should. The left front rail bracket was a little hard installing being the fuel tank was real close. If I were to do it again I would order the outboard frame mount kit.
by: James05/11/2020
2020 Ram 2500
The product arrived quickly and was of high quality. I had watched the video and pre-read the instructions. The video spent quite a bit of time discussing the heat shield being in the way....sure. But, made no mention of the bracket going in next to the gas tank! That 4th bracket kicked my butt :o It is all in and fit great! Thanks!!!
by: George K02/28/2017
2017 Ram 2500
The kit had ample hardware... one hole had to be enlarged for fitment.... working around the diesel fuel tank was a bit challenging.... but overall a good, straightforward kit.
by: Bob R04/01/2015
I am very pleased with this item. Item arrived in just a few days with free shipping. Instructions were included. Pay attention to instruction. Comes with two versions based on rails. Self install with two people went smooth.....
by: Jim W05/24/2019
Package showed up yesterday as scheduled. I watched the video and read the instructions prior to starting. Installed it this morning without any issues. took about 2 1/2hours including a trip back inside to review the video. great product with easy to understand directions. Only suggestion is before you start get rid of all the paper instructions which are not applicable. Great product and service. Thanks
by: Kyle 02/07/2020
Easy install, better with 2 people and truck on jack stands.
by: Kevin02/10/2018
Good instructions, good quality and all the mounting was included.
by: Andrew04/28/2016
2015 Dodge Ram Pickup
Took a little longer to install than expected but not having a lift didn't help. Overall fit my 2015 RAM 2500 Larmie 8ft box great.
by: Amie P07/11/2015
2014 Dodge Ram Pickup
Get me fully informed to where my package was. Also improved on the lead time of the brackets. Excellent company to work with.
by: Ryan .o02/18/2017
2017 Ram 2500
Nice brackets they bolt up in perfect location but make sure you have a ratcheting 19 mm. It says 18 but it's 19mm ....
25
58
Show More Reviews
See what our Experts say about this Reese Fifth Wheel Installation Kit
- Could Andersen Ultimate Fifth Wheel Hitch Adapter Fit 2015 Ram 2500 with Fluid TankDo you have a set of fifth wheel rails installed in your truck yet? If not, can you measure 11 inches forward from your rear axle center to see where the front rail would be placed? That will tell you if a set of fifth wheel rails like the part # RP50054-58 would fit and not interfere with your tank. This rail kit is a custom install kit for your 2015 Ram 2500 which means it would install in quite a bit less time than a universal kit and would minimize drilling.
view full answer... - Fifth Wheel Rail Kit Recommendation for 2019 Ram 2500A few years back Dodge decided to start referring to their trucks as just "Ram" so in your case you'd need to look up a 2019 Ram 2500 which we have fits for and I attached a link to see them all. I personally wasn't a fan of the change in branding. For a fifth wheel rail kit that fits your 2019 Ram 2500 I recommend the Reese kit part # RP50054-58 which is custom fit for your truck. This means a shorter install time and minimal drilling.
view full answer... - Fifth Wheel Hitch Recommendation for 2020 Ram 2500 With RamboxesThe problem with the Ramboxes is that they make the inside of the truck bed narrower which can cause the side of the trailer's pin box to impact the bedsides. However, using a Sidewinder replacement pin box changes the pivot point between the hitch and the fifth wheel 22 inches rearward, which will prevent any damage. The Sidewinder is a pinbox specific item, the one you need will depend on which model number your fifth wheel uses. Somewhere on the existing pinbox there should be a ID plate...
view full answer... - Curt Fifth Wheel Bracket Kit that Fits 2016 Ram 2500Sometimes the brand is stamped into the rails, but that's not always the case. Do you have a set of rails installed in a truck that you are looking for a brand for or are the rails not installed in anything at all.
view full answer... - Reese Custom Installation Kit w/ Base Rails for 2019 Ram 2500 and Pro Series HitchThe Reese Quick-Install Custom Installation Kit w/ Base Rails for 5th Wheel Trailer Hitches, # RP50054-58, is a confirmed fit for the 2019 Ram 2500 with 6-1/2 Foot Bed without OEM Prep Pkg. These installation brackets mount beneath your truck bed to provide attachment points for 5th-wheel hitch, the base rails sit in truck bed and allow installation of 5th-wheel trailer hitch. Compatible not only with your Reese hitch but also with Curt, Draw-Tite, Hidden Hitch, Husky and Valley 5th-wheel...
view full answer... - B&W Turnoverball with Base Rails for 5th Wheel Trailer HitchesIt does appear that the Reese Quick-Install Custom Installation Kit w/ Base Rails for 5th Wheel Trailer Hitches, # RP50054-58, will work with your B&W Turnoverball Underbed, # BWGNRK1012. I was unable to have Reese confirm but it has brackets similar to that of the B&W Custom Installation Kit w/ Base Rails for 5th Wheel Trailer Hitches, # BWRVK2602 and B & W did confirm their two kits can be used together.
view full answer... - 5th Wheel Trailer Weight Compatibility With Ram 2500 Short Bed for Safe TowingWithout knowing the year of your truck and the axle ratio I can't confirm your towing capacity. There are a couple of ways to figure it out but the best way is to call the Ram dealer and give them your VIN number to find your Gross Combined Weight Rating (GCWR). This is the complete weight that your truck and trailer combination can be and then you simply subtract the actual weight of your truck along with the weight of the driver and any passengers and cargo. That will give you your...
view full answer... - Can 2015 Ram 2500 Crew Cab With 4WD and 6.7L Diesel Tow 19k Trailer With Andersen HitchAccording to the towing capacities in the manuals I looked up online, your 2015 Ram 2500 Crew Cab with 4-wheel drive and 6.7L diesel can tow 15,940 lbs if it is a long bed manual transmission, 16,120 lbs if it is a short bed manual, 17,020 lbs for a long bed automatic transmission, or 17,180 if it is a short bed automatic. So those would be the max you can tow with that truck, even with the 20,000 lb capacity of the Andersen Ultimate Connection 5th Wheel Trailer Hitch System # AM3200. The...
view full answer... - Recommended Sliding 5th Wheel Hitch for Use on a 2017 Ram 2500According to the online version of the owner's manual for your 2017 Ram 2500 it states that the towing weight limits for a 5th wheel trailer are 25,000 lbs Trailer Weight and 5,000 lbs Tongue Weight. You will be able to safely pull your trailer with the 2500 model. The best option that we have when it comes to a sliding 5th wheel hitch is to use the Hijacker Autosliding 5th wheel hitch. The Demco Hijacker that I recommend is the 18K # DM8550034 along with the base rails # DM8552025-71...
view full answer...
- Outboard Or Inboard 5th Wheel Installation Kit 2014 Ram 2500An outboard 5th wheel installation kit will be much easier to install compared to an inboard 5th wheel installation kit. In most cases, the frame brackets used on an outboard kit will have mounting bolts that attach outside the frame rail. On inboard installation kits, the frame brackets have mounting bolts that will be on the inside of the frame rail. The longer base rails for the outboard kit are required because the mounting holes are outside the frame rail and not inside the frame rail...
view full answer... - How to Fifth Wheel Tow with a Ram Box Equipped TruckThe only solution for towing a fifth wheel on a Ram Box equipped truck is is to use a Reese Sidewinder in conjunction with a B&W rail mounted hitch like the # BWRVK3255 Patriot and a mounting kit like # RP50054-58. There are two 5th wheel towing difficulties posed by the fact that the Ram Box option narrows the truck bed. First, when the pin box pivots the corner of it will strike the inside of the bed side near the top, damaging it. Secondly, the latching handle typically cannot be pulled...
view full answer... - How To Use Anderson Ultimate 5th Wheel Hitch On 2018 Ram 2500 with RamBoxIn order to use the Andersen Ultimate Connection 5th Wheel Trailer Hitch System with Adapter - 20,000 lbs part # AM3200 on a 2018 Ram 2500 with RamBox you'll need the Reese Quick-Install Custom Installation Kit w/ Base Rails for 5th Wheel Trailer Hitches part # RP50054-58. According to Anderson, in order to prevent any issues with the RamBox, the red coupler needs to be turned 180 degrees so it sits in front of the hitch. That reduces your offset to 1 inch but if you have a 6-1/2 foot bed...
view full answer... - Cost Effective Fifth Wheel Hitch for 2020 Ram 2500 Short Bed Towing 2021 Grand Design ReflectionI looked up your 2021 Grand Design Reflection 337RLS and it has a tapered nose which allows short bed truck clearance without a slider hitch so I would recommend a fixed hitch. The most cost effective fifth wheel hitch that is still a really great hitch is the Reese # RP30047 which if you had the factory rail kit would require the # RP30154 to install or if you didn't have the OEM rail kit you'd need the Reese rail kit part # RP50054-58 and you'd be set.
view full answer... - Fifth Wheel Hitch and Rail Kit Recommendation for 2017 Ram 2500 with RamboxesFor a rail kit for your 2017 Ram 2500 short bed without the OEM rail kit you'll want the custom fit part # RP50054-58 which will install much easier than a universal kit and will minimize drilling. You'll then need a fixed hitch like the part # RP30047 since you are going to have to use a Sidewinder pin box on your trailer. Due to your truck having the Ramboxes you have to install a Sidewinder in place of the pin box on your trailer so that you won't hit the boxes as you make turns. Sidewinders...
view full answer... - Reese 5th Wheel Trailer Hitch for Short Bed 2014 Ram 2500I have attached a link to a help article "4 STEPS TO CHOOSING YOUR FIFTH WHEEL PIN BOX" and "FIFTH WHEEL TRAILER HITCH INFORMATION AND INSTALLATION TIPS" that hopefully you will find helpful. According to the specs available to me for the 2012 Keystone - Cougar, 331MKS, it has a GVWR of 12,090 lbs. please verify this against your specific vehicle. If what you refer to as a "standard Reese fifth wheel hitch" being something along the lines of the Reese 5th Wheel Trailer Hitch - Dual Jaw...
view full answer... - Will Reese Quick-Install Custom 5th Wheel Brackets Fit 4 and 10 Bolt Rails in a 2015 Ram 2500The rails used in the universal installation kit # RP30035 are the same as the ones used in Quick-Install kit # RP50054-58. The 4-bolt rails, 30124, would also work. The instructions for kit # RP50054-58, linked for reference, show installation using both types of rails. The installer must not have looked far enough into the instructions to see it.
view full answer... - Does 2014 Ram 2500 Short Bed Need Slider Hitch to Tow Fifth Wheel TrailerYes, if your truck bed is shorter than 8 feet in length you will need a slider hitch to allow you to have the needed turning clearance without hitting the cab of your truck to the nose of the trailer. A slider hitch like the Reese 16k part # RP30075 would be a great option. For a rail kit that is confirmed as a fit for your 2016 Ram 2500 short bed you'd want the Reese rail kit part # RP50054-58. This is a custom fit kit for your truck that will minimize drilling and install time. It also...
view full answer... - Recommended 5th Wheel Trailer Hitch Install Bracket and Rail Kit for a 2017 Ram 2500 Power WagonDespite the Power Wagon package the bracket kits for your truck are the same as any 2017 Ram 2500. I checked with Reese to make sure there aren't any variances that would cause an issue. I recommend part # RP50054-58 for your hitch. It's a custom kit to make the install quicker and reduce the amount of drilling. I've linked an install video on a 2016 2500 for you as well. I'm not sure which fifth wheel hitch you're using but since the Power Wagon only comes in a short bed these days...
view full answer... - Fifth Wheel Rails, Hitch and Sidewinder for 2016 Ram 2500 with Ram BoxFor your 2016 Ram 2500 with the Rambox and without the factory rail kit you would need to start with a fifth wheel rail kit confirmed as a fit. For that I would recommend a custom install kit like the part # RP50054-58 as it will minimize drilling and install time when compared to a universal kit. I attached an install video for this on a 2016 Ram 2500 just like yours. Then for the Blue Ox Patriot you would want the part # BWRVK3200. This will fit the Reese rails and will attach to the...
view full answer... - Automatic Sliding Fifth Wheel Hitch Recommendation for 2020 Ram 2500 Short Bed without OEM Rail KitThe best automatic sliding hitch we offer that can fit your 2020 Ram 2500 short bed without the factory rail kit is the Demco Hijacker Autoslide part # DM8550034. The other most popular auto sliding option is the Pullrite hitches but I have read many online reviews on other sites and forums where people compare the two saying that the Demco costs less and tends to be more reliable so I would highly recommend it for you. The Demco is height adjustable unlike the Pullrite. Also, the Demco...
view full answer... - Can 2020 Ram 2500 with Ram Box Tow Fifth Wheel TrailerThere is a way to tow a fifth wheel trailer with a Ram truck like your 2020 model that has the Ram Box but it requires the use of a fixed hitch and a pivoting pin box like a Sidewinder. The Sidewinders move the pivot point up higher which allows the vehicle and trailer to make turns without bed rail interference from the narrower Ram Boxes. So you'd want a custom install fifth wheel rail kit part # RP50054-58 with a fixed hitch like the Reese part # RP30047 and you'd be good as long as...
view full answer... - How To Reuse Reese Above Bed 5th Wheel Base Rails On a 2019 Ram 2500Yes, the Reese Quick-Install Custom Installation Kit w/ Base Rails for 5th Wheel Trailer Hitches part # RP50054-58 which is a fit for a 2019 Ram 2500 is available without the above bed base rails, the Reese Quick-Install Custom Bracket Kit for 5th Wheel Trailer Hitches part # RP50054. That said, you are not supposed to reuse any of the hardware so you may need the Replacement Hardware Kit for Reese 5th Wheel Base Rails part # RP58504 as well.
view full answer... - Fifth Wheel Rail Kit Recommendation for Installing B and Patriot in 2020 Ram 2500 Long BedTo install the B and W Patriot hitch part # BWRVK3255 in the bed of your 2020 Ram 2500 long bed you'd just need a set of standard above-bed fifth wheel rails like the Reese part # RP50054-58. This will install the easiest and won't require any frame driling.
view full answer... - Recommended Fifth Wheel Rail Kit for 2019 Ram 2500For a fifth wheel rail kit that fits your 2019 Ram 2500 I recommend the Reese kit, # RP50054-58 which is custom fit for your truck, meaning a shorter install time and minimal drilling.
view full answer...
Do you have a question about this Fifth Wheel Installation Kit?
Info for this part was:

Expert Research:
Mike L

Expert Research:
Michael H

Expert Research:
Jameson C

Expert Research:
Jeffrey L

Expert Research:
Victoria B

Video Edited:
Zack K

Video Edited:
Joshua S

Video Edited:
Jacob T

Video by:
Andrew K

Video by:
Chris R

Video by:
Jonathan Y

Updated by:
Lindsey S

Updated by:
Wilson B

Updated by:
Isabelle B

Installed by:
Jeff D

Written by:
Laura H

Test Fit:
Jared G

Test Fit:
Brent H

Test Fit:
Ryan G

Test Fit:
Bradley B
At etrailer.com we provide the best information available about the products we sell. We take the quality of our information seriously so that you can get the right part the first time. Let us know if anything is missing or if you have any questions.
Product Experts Available Now!
Call 1-800-940-8924
Roger T.
3/3/2017
Truck was traded in with the rails still mounted in the bed.