
To see if this custom-fit item will work for you please tell us what vehicle you'll use it with.
Thank you! Your comment has been submitted successfully. You should be able to view your question/comment here within a few days.
Error submitting comment. Please try again momentarily.
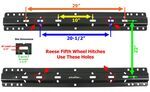
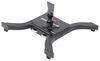
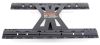
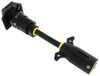
Install your fifth-wheel trailer hitch in half the time with this -specific bracket kit. Requires no drilling and provides a custom fit for your . Includes everything you need for installation.
Features:

Videos are provided as a guide only. Refer to manufacturer installation instructions and specs for complete information.
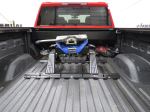
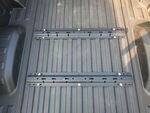
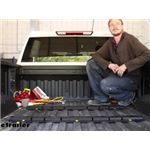
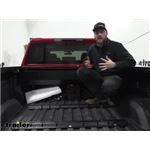
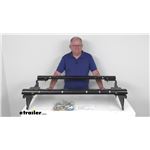
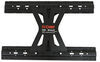
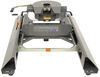
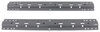
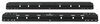
Hi there, Chevy owners. Today, on your 2022 Chevrolet Silverado 2500, we're gonna be taking a look at and showing you how to install CURT's base rails. And this is what our base rails look like when they're installed. You can see that they sit above the bed, but they really don't stick up very high, about an inch above the top part of your higher corrugation there. And they are fairly smooth, so I do prefer base rails that are like this where all the bolts are carriage bolts and they're down in the lower section. That way, things are still smooth on top here.
So if you we're gonna pick up like drywall and plywood and stuff like that, you could still slide it in here and slide it out without it causing any damage to it. CURT's rails are fairly easy to install. It's one of the easiest ones out there to install. And between CURT, I would say the only one that I might prefer over the CURT is the B&W that we sell, just because the B&W's so amazingly consistent and their machining's fantastic. But these are really nice rails.
They have a good powder coating on 'em, and they're a similar design to the B&W. So I do like these ones a lot too. There's other manufacturers we have like Demco. I don't really prefer their rails because they'll use large bolts that go down through the top of the rail and then you lose that ability to slide plywood in and out without potentially scoring up the wood. You almost need like a scrap sacrifice piece to go in first.
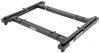
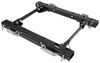
With these rails, though, they do stay permanently in your truck like this. So just keep that in mind when you're going to load things in and out that this is gonna be here forever. But again, they don't stick up very high and they're smooth, so they shouldn't really interfere too much with your operation. You can use any fifth wheel from CURT with them as well as many of the other manufacturers as they've got various holes for the various sizes, depending on the weight ratings that you're looking to pull. Now, to make sure that your installation goes a little bit easier, I'd recommend pulling down your spare tire.
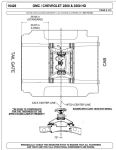
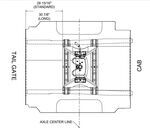
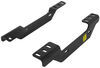
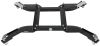
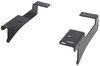
That'll also ensure too that when you go to drill through your holes, there's minimizing your chance you're actually gonna hit the tire or anything when drilling down through the bed. Your tools in your truck will slide in through this point back here. There's probably a lock in there, and you can use your ignition key to open it. If you referred to your owner's manual, you should have all the procedures and everything in there, where your tools are located, and how to utilize them. We'll begin our installation here in the back of our truck. We'll need to center the rail side to side. And then we're also gonna measure from the rear of our truck bed, not the tailgate but the actual bed of the truck here, to the appropriate distance and make our mark. Now, that is gonna vary depending if you've got a short or a long-bed truck so make sure you refer to your instructions for the appropriate distance based on your truck bed. So we've gone ahead and made our marks here. Now, this does have a pretty thick spray-in bed liner in it too, and you might wanna add just a little bit of that length to it, maybe like a 16th of an inch or a 32nd of an inch just to compensate for the thickness of that coating there, just helps offset for that. Once you've got it marked and laid out, we can go ahead and mark the holes that we're gonna be be drilling. I went ahead and marked them here on the rail, so you can see we're gonna be doing the center here towards the rear of the truck. And then if you go in our third square slot there on each side, we've also got those marked. So those are gonna be the ones we're gonna be drilling. So I'm gonna go ahead and mark each one of these in the center of the square. I like to mark it just because it's a little bit easier to see when drilling. The black spray-in bed liner makes it just kinda hard to see especially 'cause before we go to the full size that we're gonna be drilling it out too. We're gonna start with an eighth-inch drill bit just to do some small pilot holes that we can also verify are gonna properly line up with our rails. 'Cause that way, if it's a small hole and you didn't do something quite right, you could easily fill that in with some silicone and never even really know that you made a mistake. So I went ahead and marked each of those. We've got our small drill bit now, and we're gonna go ahead and just drill a pilot hole down on each one of those. And there we go. Once we drill down through it, you wanna make sure you don't drill too far, kinda keep control of it. 'Cause there potentially could be something that you could drill into below it. So just once you pass through, make sure you pull it up, stay in control of your bit. So we're now on the passenger side wheel well. We're gonna do this on the driver side as well 'cause the fender liner here does kinda hang down in front the side of our frame, which makes it difficult to hold our plates up there. So if you want, you could take the entire fender liner out, or you could just take out a few screws here and fold it back out of your way. We're gonna use a T15 Torx to remove the fasteners here. We're gonna take out all three that are right here. And then we should be able to fold it back out of our way to be able to hold our side plates up there. Yeah, that should be plenty fine for us. You can even maybe use like a bungee cord or something like that to hook into the loop to help hold it back. So here, we have our side plate. This is the passenger side plate. The angles with the slotted holes in them are gonna go above our frame rail, and you want the single hole here to be towards the front and the larger with the two holes towards the rear. So it's just gonna kinda sit like this on the side of the frame. So we'll just slide this in place here. And sometimes, you gotta go the right direction to get it to be able to roll into position. And now we're gonna look underneath and we're gonna hold this up, making sure that it does line up with the holes that we just drilled out. But you might have a difficult time seeing if it lines up because of the heat shield here. So you can go ahead and remove this heat shield as well. We're gonna use a 13-millimeter wrench. So we're gonna remove the bolt here, there's another one back here, and there's a couple more towards the middle of the vehicle underneath, a total of four. And then we can get that heat shield out of there. It's gonna have to get out of the way anyway for us to put our hardware in. And it'll make it a whole lot easier to be able to verify that our holes are lining up. And we're just using a 13-millimeter wrench here. You might be able to fit a socket and a ratchet in there 'cause it is kind of a big gap. But I probably recommend a flex head to be able to get in there. Then once we remove this one here, we're gonna get the one towards the back that's on the side of the frame. And there's gonna be two more, more towards the center of the vehicle. And now, we're holding our side plate up. We pulled that heat shield out of the way. And if you look straight up through our holes, you can see that the two pilot holes we made do line up with the slotted holes in our side plate. So with everything lined up good, we're gonna go back now and enlarge all of our holes to a 9/16 size. Now, you might not have a 9/16 drill bit. You could also use a step bit. This is something probably more common that you'll have that you can get in your local automotive store or hardware store. I actually like to use the step bit after I do this anyway, just to kinda de-burr and clean up the holes. Once you've got 'em all drilled out, we're gonna clean up our holes here. We're just gonna use our vacuum. And then to help protect it from rust and corrosion, we're gonna go back with just some either clear coat or if you have black, you can use black spray paint as well. Something that'll match, just to seal it up to protect it from the bare metal being exposed to moisture. So we'll now take our bolts here. We're just gonna drop 'em down through our rail. And then we can head back down below to get our side plates up and start getting everything secure. So now, we're gonna put in some hardware for our side plate. The front attachment hole for our side plate's gonna be this slotted hole that you see there, just behind those two smaller holes. It's gonna use the larger carriage bolt that comes in our kit. This is a larger diameter than the ones that we dropped down up top. You'll get a fish wire to be able to feed it in, and you'll get a large spacer plate. Make sure that the spacer plate does slide over the square so you know you got the right one. 'Cause the other spacers are gonna have a smaller square hole 'cause this again is a larger diameter bolt. So you'll slide your spacer over your coiled end of your fish wire. Thread your bolt onto the fish wire. And after your bolt's threaded on there, take the bolt and push it in first. Kinda get it lined up just right to get it to slide into the little slot there. It's a tight fit but there you go. You see it will poke in there. Once you poke that in, just kinda push it in there some. And you can take your spacer. You can drop it down in there. And then we'll pull our bolt back out. And I like to put an angle at the end of the fish wire here just to keep it from being able to push back into the frame. Just giving it a bend there, kinda like a little hook. So that way, we got that prepared for putting our side plate up into position. So now, we're gonna grab our rail. Go ahead and take your fish wire and push it through the single hole here on the side of your side plate. We can then lift our rail up on top of the frame rail. Then use your coiled wire that we just had that we attached it to, to pull the bolt back through the side of the frame rail. And then we'll undo our carriage bolt there, the coiled wire on it. And we're gonna take a nut and thread it onto the end to hold that in place. This is gonna be a larger nut than the rest of your hardware. You'll get two larger ones. We'll take our nut and thread it on there. You can just do it kinda loose for now so we can maneuver it here in the back. 'Cause the rear portion here is gonna be held in place by a U bolt. So here's the U bolt that we're gonna use for our rear attachment. You can see the lower hole there and the upper hole. This is gonna slide around the frame from the inside towards the outside through the holes here in our rear side plate. Just kinda lift up on your side plate and slide your U bolt around the frame, and line it up with those holes. That'll slide through there. And then we'll take the smaller nuts that come in our kit and thread it onto our U bolt. And again, we're gonna leave these just a little bit loose here to start so we can get the hardware started on the ones that we dropped down through our bed and our base rails. Kinda get all the hardware started and then I like to tighten it down after I get it all started. 'Cause that way, if you need to maneuver stuff just to the, you know, forward, backward, left, or right a little bit, you can do that. So we're now underneath the vehicle. We're looking straight up. We need to start attaching the bolts that we dropped down through our base rail now. So I'm gonna start with the middle one here just real quick so you can see how this is gonna work. It's a little easier to see. We're gonna use very similar hardware for the side plate ones. So it's gonna start with, and I actually usually find it easier to just start these, but you need to put one of these split ones in place. This takes up space between the corrugation 'cause you can see this part's raised and this part is lowered. So if we just put our plate up here and try to tighten it down, it can actually crush these sections and bring 'em flat together. And we don't want that. We wanna keep our corrugation in the shape that it's in. So this piece we can usually slide up right after we get it started. So we'll take the square hole plate here, slide that up. I usually put some side pressure on the bolt to keep from pushing it back up through the bed. Just a couple of threads on there to get it started. Then we can take our split one, line that up on top there, and then we can go ahead and snug this down. And we're just gonna snug it down just hand-tight again, so if we need to ever so slightly maneuver the rail left or right, we can do that. Now, we'll head to our side plate. We've got two bolts that we had dropped down through there. So for our side plate, it's gonna use, again, the same hardware as that middle one. You're gonna put on a spacer with the square hole. You might have to push up slightly or our bolt's being a little funny, not quite lining up, just get it pulled a little bit. That's why we wanna leave things just a little bit loose. Get our nut started on there. Sometimes, you have to hold up on the side plate just a little bit. Be able to slide that up there and have enough threads poking through. And we'll get our nut started. Just a couple of threads is all you'll need to start 'cause you need to put that split spacer up there. We can just kinda slide that in, sneak it in after we get it started there. I'm gonna go ahead and sneak in the other one. And then we can get the remaining hardware on there. Usually, if you got the one started, you can kinda tighten this one down some. And that way, it'll kinda hold it up there for you, making it easier to get that other one started. 'Cause that way, you got more threads poking down now. And similarly, I'll put a little bit of pressure on it, whether it's towards the front, the rear, the side. Just kinda pulling on that spacer helps keep the bolt from wanting to push up into the frame. And then we'll snug down this hardware hand-tight and, again, make it just loose enough just so we can maneuver it. So now, we're gonna head over to the other side on the driver side of the frame rail and put our side plate on the same way we did the passenger side. The only real difference is between the two sides is you always wanna check for things on your frame so you're not pinching any wiring or anything like that between your U bolt and your side plate. So on the other side, on the driver side, we can see we do have some wiring right here. So we've got our trim panel tool here. Just kinda pop that stuff out of the side of the frame with it. That way, you can take your U bolts here and go between them and then give it a twist. And now, we can get our side plate installed there, and we won't damage our wiring. So I went ahead and got the other side installed. And now, we can go back and tighten it down. I did also hop back up top real quick and just made sure my rail was centered side to side and lined up front to back, lined up all my marks and everything. And then we can come back down here and finalize snugging it down. We're gonna use a 3/4-inch socket for all the hardware. I'm gonna start with the ones holding the base rail in place. That way, the base rail doesn't move out of that center position that I put it in. And then we can do the side plates attaching it to the frame. For the side plates that go straight down through the bed that hold the base rail, should be able to probably use a long socket. I mean, a long extension with a socket to get up onto these ones up here. You may or may not need a swivel to get access to those. Looks like we're gonna need a swivel probably at least for the passenger side here because of the exhaust. Bring our swivel in and we can get up there and get these snug down. And then on the driver side, you might wanna take your swivel off of there and actually your socket too. 'Cause then you can slide your extension up between the wiring and then slip your socket back on to be able to snug these ones down. And we can go ahead and torque this hardware. Our rear rail's gonna be used as a template with our fifth wheel to line up the front one, so we don't want this one to be able to move. So we'll just finalize torquing these here. And we'll head to our side plates here. The U bolt's gonna use the same size socket. And now, we'll go ahead and tighten down our larger front bolt. That one's gonna utilize a 15/16 socket. And we can torque that as well. So now, for our front rail, we're gonna take our fifth wheel legs from the fifth wheel that you've got. Go ahead and slide it into the rear rail. And you can lift up on the other side. Slide your other rail in place. Get it to drop down in there. I have to maneuver around just a little bit to get it to line up. Be careful, watch your fingers when you're doing this. There we go, we got that in there. So I do like to take the pins and just slide the pins in place. That just helps ensure that when we get this all tightened down, that we've got it tightened in a way that our pins are gonna slide in and out easily. So we're just gonna slide 'em through there. And then it's probably a good idea to just grab your tape measure and get it centered side to side. 'Cause there will be just a little bit of play between the components. So just checking the measurement there, checking the measurement over here. Actually looks really good. So at this point, we can make our marks just like we did on the rear rail. They're gonna go in the same location. The only real difference is the middle one here was towards the rear of the truck. On our front rail, we're gonna use the one that's towards the front of the truck. And we're gonna do the same as last time. Start with a pilot hole and then we'll step it up after we just verify that everything looks okay. Once you've made all your pilot holes, just double-check that the two rear holes on each side, they do line up with the side plates. That's all good. Go ahead and move your base out of the way. Slide your rail out of the way and enlarge 'em to the 9/16 size. So after we got 'em all enlarged, just like the rear rail, we vacuumed up all the mess, hit 'em with some spray paint to cover up the exposed metal. And we just put our rail back, put our feet for our fifth wheel back in there, and put the pins back in there. And then we can take our hardware now and drop it down through each point. Then we'll grab our tape measure one more time just to make sure that it's as centered as best it can be here. Usually, once you get the pins in and everything like this, though, usually make sure that it kinda stays there for you but we're just gonna double-check it. And yeah, we're looking good there. So we'll head underneath now so I can get our hardware on. For the middle bolt and the other two side bolts that are towards the front of the vehicle, you're all gonna use the same hardware on these. They will not go through your side rails. You're gonna use the spacer that has the hole in the center. And that's to keep the corrugation from crushing. And then just like the other ones, you're gonna use the spacer that has the square hole that'll slide over your bolt. You can put some side pressure on it and then start your nut. And this is gonna be the same for all three of these front bolts. Now, the rear side bolts, those are gonna go through our side plates. And they're gonna use the same hardware as our rear. After you get your small spacer above the side rail between the bed and the rail to keep the corrugation from crushing, we'll take the spacer with the square plate, slide it in place, put a little bit of side pressure on it, and then start our nut on there. And then we're gonna do the same thing for the rear bolt on the other side. After you've got 'em all started, we can go back and tighten 'em down, and we're gonna torque 'em just like we did the rear ones. I will say for some of these, it's gonna be a little difficult getting your torque wrench in there. So you would likely wanna invest into a 3/4-inch crow's foot to be able to get to some of the ones like over where our fuel tank is. Our crow's foot is similar to a socket, but it will be almost like a combination between a socket and an open wrench head. It'll have a place to clip onto your socket and be a little open wrench. And what we're gonna use here is just similar to a crow's foot, but rather than having an open end, it has a box end. So if you can find those, those work really well for these tight spaces. 'Cause sometimes crow's feet, especially from a cheaper manufacturer, will wanna spread open. This'll give you a much better contact on the bolt. Once you get all your hardware torqued, that'll complete the installation for the rails. At this point, we can put our heat shield back up as well as our spare tire. You will need to do some minor trimming to clear the U bolt. So just give that, use some shears or tin snips just to cut that out. Do be careful after you use tin snips or shears. It can make those edges kinda sharp, so just pay attention to that. And then that'll fit right back up in there. We can just put the hardware right back in. Once you've got your heat shield back on, you can come over to your fender liners and also reinstall those. I'd recommend doing the heat shield first. A little bit of access from the side will make reinstalling the heat shield easier. You'll just need to take whatever fifth wheel that you wanna use, drop it in place, and you should be good to go. If you we're using pieces from your kit to help you get set up like this, you can go ahead and finish reassembling this piece with the rest of the head and the rest of the parts that get it installed. I do like to usually just verify if I pull the pins out and it does pull in and out of there smoothly. Nice and smooth. So yeah, at that point, you just can't ask for anything better. If you go to pull this up and it's kinda tight, you might need to loosen the hardware and shift them a little bit. But usually, if you put your pins in like we we're doing, you're good to go. And that completes our installation of CURT's base rails on our 2022 Chevrolet Silverado 2500..
Average Customer Rating: 4.6 out of 5 stars (107 Customer Reviews)
Install your fifth-wheel trailer hitch in half the time with this vehicle-specific bracket kit. Requires no drilling and provides a custom fit for your vehicle. Includes everything you need for installation.Installed on a 2021 GMC Denali DRW. The installation instructions and video need to be updated they are somewhat miss leading as to the difficulties of install. The driver side front rail nuts are almost Impossible to install because of gas tank. They will be impossible to torque without dropping the gas tank. Your will also have to remove the dual rear wheels to torque the frame plates Took almost 5 hours to install. Other than that have yet to use hitch.

Perfect fit, did not have to drill any holes in frame to mount it, has held up great so far, as a professional installer it went so much better than a hitch and rail kit that fits multiple vehicles.
Installed these bed rails on my 2020 Silverado Duramax 2500HD. Heavy duty rails and of good quality. Install time was around 3 hours. Definitely remove spare tire and heat shield. I did find it very difficult to torque 2 of the nuts on the driver's side front rail. Everything else no problem. I did spray some undercoating on the frame rail ends and nuts. Just did that for extra protection and it will make it easier to see if there is any movement when towing.
I installed myself on my 21 GMC Sierra 2500HD, Denali, Duramax. Took me around 3hrs to do with basic shop tools. Over all the unit itself is very nice. Heavy well treated metal, bolts are all good quality. Not one single alignment issue. Sucks that the truck manufacturers can’t make some sort of pre setup locations as it was some tight finger tip spots. But that’s not to the fault of This item at all.
Great install! Had no issue with the installation of this unit. Directions were easy to follow. Great product and will be trying it out real soon 3975CK Crossroad Cameo 5th wheel!

Allen

3/22/2023
Great, no issue with the unit, works as it should! Installation when I installed was easy.
I ordered this to install in my 2020 Silverado 2500. The install was easy and took close to 2 hours. Have not pulled my fifth wheel yet so really no idea how this will hold up. Everything was in the box nothing missing. Shipping took 2 days to get to my house. Very happy so far with everything I have ordered fro you.
Didn’t receive the rails and etrailer didn’t even know it until I contacted them. I had to postpone my appointment to have it installed. They didn’t seam to care
Installed this on my old truck so now it being installed on my 2023 GMC Denali. Show not in stock and not available until Dec. Needed it quickly so I called Curt and they had them in stock. Made my order through Etrailer because I knew they were reliable. Made the purchase and received it in 5 days including the weekend. Could have purchased it elsewhere, but knew they would get it for me quickly. Thank you Robert S and everyone else that worked on the order.
This went in perfectly, very happy with the installation.
E-trailer has detailed instructions and videos for anyone to install there on hitch.
Awesome works great
Missing most of the hardware the Two of the three boxes were totally destroyed

Jenny N.
3/27/2023
Oh no, this is very unfortunate. Customer Service will be in touch with you so we can have the missing hardware shipped out.
did a great job on the install and assisted after the install when I had questions as this was my first 5th wheel hitch.
The hitch looks strong enough but the installation was difficult for a man over 65 with big hands installed on my 2021 Chevy 2500.there were some very hard to get at places to get spacers and nuts on bolts took me 6 hours by myself probably would have been quicker and easier with two people.haven’t tried it yet will let you know how well it works.
Wasn't to bad to install. Dropping the spare helped. The bolts above the fuel tank was the hardest. The instructions were not bad either. But I'm a cnc tech so no worries. My only issue with the rails is no split washers or self locking nuts. I've already ordered them to replace the originals. I don't like the idea of them loosening up. Even a little. I also looking at building some custom cross braces. Don't like just attaching to the bed.
product arrived around noon today (3-20-24) Box was in excellent shape and intact.
High quality materials. Installation was fairly easy; however I have a mechanic with a lift in his backyard shop that made access to the truck easy. Would not hesitate to make this purchase again.
Works great, when 5th wheel attachment or gooseneck is not attached. The rails do not get in the way of using truck bed.
Tricky to install with plastic bed liner. But when finished. Great product
Fast delivery,easy install,great service!! Thanks etrailer
I would give it a 3 star review. The product itself was perfect. The package arrived in tact, but 2 parts were missing. Upon contacting you, I was told they would send out replacements. I was hoping they would overnight them since I had an appointment 2 days later for the installation of the 5th wheel rails. But they were sent standard usps mail. So I had to cancel the appointment. I ended up installing them myself, which took more than 6 hours, which the directions said 1 1/2 hours for a novice. Also, the measurements on the directions said 28 15/16" from the tailgate to the front edge of the rear rail. I drilled the pilot hole, and it wasn't even close. It ended up being 28 1/2" and I even have spray in bedliner. So I have mixed emotions about the purchase. They are installed, and seem very sturdy.
I received my rail kit on time and everything appears to fit my truck as I was told it would
I received this product in great shape,easy to order from and quick. I am installing this product when the weather breaks her in the northeast

Dennis
1/21/2023
Put a lot of miles on with this product. No issues towing with this model
Arrived fast, good instructions and quality kit.
Deliver was on time, arrived in good condition, all material ordered seems to be complete and in place.
Product looks correct and what I ordered. But packaging was busted open and hardware was loose out of bag. I opened everything up and confirmed all hardware was accounted for. Better packaging would be recommended.

Do you have a question about this Fifth Wheel Installation Kit?
Info for this part was:
At etrailer.com we provide the best information available about the products we sell. We take the quality of our information seriously so that you can get the right part the first time. Let us know if anything is missing or if you have any questions.


Jenny N.
10/21/2021
You are correct that the bolt location is difficult to access. I reached out to Curt who advised that depending on the application and installer, it can be easier to remove the wheels for additional working room.