
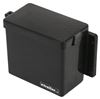
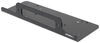
Battery box protects your automotive, marine, or RV battery against impacts, contaminants, and leaked battery acid. Ventilated lid features cable ports and locking tabs. Reinforced handles for safe grip. Molded plastic is impact and UV resistant.
Features:
Specs:

Videos are provided as a guide only. Refer to manufacturer installation instructions and specs for complete information.
Jake: Hey, guys. This is Jake here at etrailer. Today we're going to be taking a look, and I'm going to show you how to install, the NOCO Snap-Top Battery Box. Now the box we have here, it's for a U1 battery, which is going to be your smaller lawnmower batteries, but they are available in many different sizes. Just see etrailer.This box is going to have a heavy-duty plastic construction which is going to hold up to those shocks. If you have it on your trailer, your battery's going to be okay inside.
It's going to have these vents on top so that your batteries can breathe. If you have an acid-based battery, the box will be able to hold in any leaky contaminants that might be coming out of your battery. If you have battery acid leaking, it's not going to get on your trailer and eat away at your trailer.It's going to come included with this strap and these anchors so that you can anchor it to your floor and know that your battery is not going to go anywhere when you're traveling. Let's go ahead and take our strap off so we can take a better look at the inside. So to remove it, you just push on both sides of the snap box, and you can pop the lid off.In here you'll see that we have our lawnmower battery in here right now.
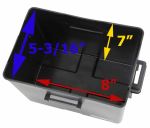
This is going to be a perfect size. It is not going to be too much room for the battery to move around on the inside, but it'll still give you that adjustability, so that if your battery does move, it's not going to damage any wires. Along with that being said, these slots here are going to be designated for your wires to travel up the side of your box and into your box through these gaps they provide for you.Now, when setting your lid in place, the easiest way I have found is to hold both tabs. You do want to make sure that you set your box far enough off your wall if you're putting it up against the wall to be able to get your hand back behind it to be able to unlock that. Make sure that it's in these two slots, and you snap it into place.
This box is going to be able to handle temperatures from -20 degrees to 320 degrees, so you know it's going to be fine in or outside your trailer.Now, the thing I like most about this battery box is that because the terminals are covered by the lid, you're not going to have to worry about anything falling on it and shorting it out, potentially causing a fire. Well, now that we've gone over some of those features, let's go ahead and show you how we got it in place.Now, to start our installation, you do want to set your box in place to make sure you have it in the spot that you'd like. You want to make sure if you're putting it up tight against the wall like we are here, you want to make sure you can still get your fingers back behind to release these lid tabs. We have ours marked on the floor here.Then you want to take your two strap anchors and set them in place beside the box. So a little trick in order to know where exactly you put the anchors is on the bottom of the box you're going to see there's a little slot right here in the middle, and that is where your strap is going to go up and underneath.
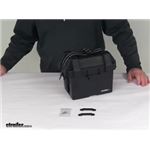
So you're going to want to take this anchor and set it directly in front of that slot right up against the box. Then your strap will go up underneath your anchor and under your box.Once you have your anchors in their desired places, you can take a marker and mark the spot on your trailer where you need to drill your pilot holes. In our case, we have a aluminum floor trailer, so we're going to have to drill those pilot holes to put the screws in it. If you have a wood floor on your trailer, you can just use the screws straight into the wood. Now we've got our marks, and we can drill our holes.Now we're going to just make sure everything is in the right place before we screw down our anchors. It looks like we're doing pretty good. We can remove our box and put our screws in. We'll go ahead and install the four stainless steel screws included in your kit.Now, with our two anchors in place, you can go ahead and take your included strap and run it underneath before you get your box in place. Then set your box in place and set our battery in place. You can set your lid in place. Make sure you get the front and the back to clip in. That's all secure.You're going to take your strap and run it through both of these eyelets and then back over just through the first one. Pull it tight and actually lock this buckle together. Want to make sure we these lined up. Pull it tight. You're going to take your buckle and slide it up.So here we have another strap just to show you what that looks like on the inside because it's kind of hard to see when we do it. That hook is going to hook onto this little bar there that goes across. So when you have your strap running through and back through, these teeth are going to grab onto it. You're going to slide it up into place, and it'll lock just like that.Now that we've got our battery in place, we can go ahead and hit the road. With that being said, that's going to do it for our look at the NOCO Snap-Top Battery Box.
Average Customer Rating: 4.8 out of 5 stars (19 Customer Reviews)
Battery box protects your automotive, marine, or RV battery against impacts, contaminants, and leaked battery acid. Ventilated lid features cable ports and locking tabs. Reinforced handles for safe grip. Molded plastic is impact and UV resistant.Exactly what I needed for my garden tractor battery that I am using in my generator enclosure.
Bought this to house a PWC/motorcycle battery that I installed in an old 13' whaler that was repowered with a new lightweight 4-stroke. New motor didn't require the same CCA's as the old one so the group 24 battery was no longer necessary. The new smaller battery fits perfectly in this case and the case is a huge space saver!

This box does exactly what I wanted it to. I use it to hold the car batter for my sprayer. Its lid has clips that hold the cover on and I don't need the strap. The plastic is not flimsy.
Quick turnaround. Very glad that the exact interior and exterior dimensions are emphasized on the website. That kind of attention to detail sets a company apart from the crowd.
Battery Box ,Battery Fits Just Right.Very Good Hold Downs. Just Right fore A boat Hatch.
Just the right size for a Small battery to give me lights in my enclosed when its not connected to my truck.
Received qwik and will work great for my mower batteries. Thanks
perfect for small battery
It is exactly what I thought it would b e!
Excellent product, good price, fast shipping and top-notch customer service.
GREAT SERVICE FAST DELIVERY
Great product........fast shipping.
Great service!
Do you have a question about this Battery Box?
Info for this part was:
At etrailer.com we provide the best information available about the products we sell. We take the quality of our information seriously so that you can get the right part the first time. Let us know if anything is missing or if you have any questions.


Thank you! Your comment has been submitted successfully. You should be able to view your question/comment here within a few days.
Error submitting comment. Please try again momentarily.