
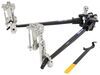
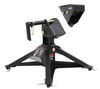
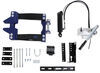
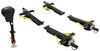
With an automatic active sway control system, this weight-distribution system has flexible, powder coated steel, spring bars that create a level ride for both your trailer and your tow vehicle. Includes 2-5/16" hitch ball. Shank sold separately.
Features:
Specs:
Note: Dual-cam sway control cannot be used with surge-type trailer brakes and is designed for Class III and Class IV hitches only. Should not be used with aluminum trailer frames without an isolator.
Create a stable ride for your tow vehicle and trailer with a weight-distribution hitch. Adding spring bars to your towing system applies leverage, which transfers the load that is pushing down on the rear of your vehicle to all the axles on both your tow vehicle and your trailer, resulting in an even distribution of weight throughout. The result is a smooth, level ride, as well as the ability to tow the maximum capacity of your hitch.
The tongue weight rating is the most important factor in determining which size weight-distribution system you should use. If the bars of the system you choose are rated too high for your setup, they will create a rigid ride, which can result in a bouncing trailer. If, on the other hand, the bars are not rated high enough, the system will be unable to properly distribute the weight, rendering it virtually useless.
To determine the proper weight rating for a weight-distribution system, you must first determine your trailer's tongue weight. Then add to that the weight of the cargo behind the rear axle of your tow vehicle. These two measurements make up the tongue weight rating for a weight-distribution system.

Videos are provided as a guide only. Refer to manufacturer installation instructions and specs for complete information.
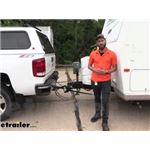
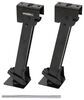
Hey guys, coming with the Etrailer. And today we're gonna be taking a look at the Reese Dual Cam II Weight Distribution hitch. Well if you're towing your trailer or maybe you're picking up a brand new trailer and you're noticing that your truck really just can't handle it, you're getting quite a bit of sag. Maybe your front axle starting to lift up a little bit and you're just not getting that traction or that breaking power that you normally have without all that weight on the back of your truck, that's where a weight distribution hitch like our Reese Dual Cam II, is gonna be the solution for you. Our cam brackets easily just clamp on using some bolts and nuts. So you don't have to worry about drilling into your frame which can take quite a bit of time, trying to drill through this thick metal.
The cams themselves can easily be adjusted to fine tune your towing experience that way. You have your trailer level and you get that ride quality that you're really looking for. The cam itself, so the bar actually is free unlike other designs and it allows it to kind of pop up over the cam, and then as it pops over during those tight turns or in a sway event it's gonna get further and further up this bar. And as it gets further up there's gonna be more tension forcing it back so that it gets back over to the hump of our spring bar here and back straight in line. There's three different tongue weight capacities for our spring bars here.
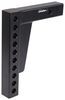
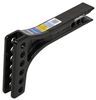
So we're gonna make sure that you actually weigh your trailer's tongue weight before you go ahead and purchase your hitch because you wanna make sure that you're getting the correct one that's gonna fully lift up your trailer and distribute that weight evenly. When it comes to the actual head assembly it does not come with a shank. So you will need to also purchase the correct shank. You may need to rise or drop depending on your setup for your truck versus your trailer. So you're gonna wanna make sure that you go ahead and measure the difference between your hitch on your truck and your coupler on your trailer.
Pre added adjustability you can also fine tune exactly the tilt up to 15 degrees of your hitch head here. All you have to do is simply loosen up your bolt here and then you can kind of move it back or forth and grip in with those teeth on our brackets. As far as installation goes, it is pretty straightforward. The only comment I would make is just the, in the directions it tells you to get your brackets all in place and tighten down, and then go ahead and throw on your cams. But in my opinion, it's a little bit easier if you kind of just have it real loose, put your cam on and then slide your bar over and make sure that you have it leveled because in the directions they're gonna tell you to line up this bracket right here with the top of your spring bar, and you can get it level but once you start tightening this down you might have some issues where it's just a little bit off.
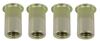
So it's a lot easier just getting it in place with that. And you can really see that it's actually there. But let me go ahead and show you how we did that. So before you decide which weight distribution hitch is gonna be right for your trailer, you're gonna wanna first know exactly what your tongue weight is. To do that you can either take 10 to 15% of your gross vehicle, weight rating or you can get a much more accurate count of what your actual tongue weight is using one of our Etrailer tongue weight scales and all we're gonna simply do is just take the weight off of our jack and put it onto our scale. And as we start taking that weight off of the jack you can see we're sitting right around 500 pounds in tongue weight. Now our trailer isn't really loaded. So you're gonna wanna take into account anything that you would typically load into your trailer, just to make sure that you have an accurate tongue weight 'cause when you go camping and you usually store quite a bit of stuff inside your camper. We're gonna take some measurements just to see where our factory right height is. Right now on level ground we're looking right at 42 and then up front we're at 42 as well. So now at the weight of our trailer on our hitch here we're gonna go ahead and take some additional measurements to see how much sag we're really getting right now. So in the rear we're looking at 41 1/8, which means that sag us down about 7/8 of an inch. Front we're looking at 42 1/8 which means we only raised up an 1/8 of an inch which all in all is pretty good. It's super important that we keep as close as we can to our factory right head up front because this is the majority of your breaking power up front and also your headlights if they start getting up too high aren't really gonna display the road quite as clearly for you. So our next step's gonna be measuring the coupler height and it looks like we're sitting right at 22 1/4, maybe just an 1/8 of an inch higher. So now that we have that measurement, we're gonna go ahead and we are going to stick our shank into our hitch on our truck. Now this system does not come with a shank. You will have to purchase this separately. We have multiple options here at Etrailer but we're gonna be use it another reese today. We're gonna slide that in and this system also because it doesn't come with a shank will not come with a hitch pin. So you will have to get a pin and clip as well. So there's gonna be a separate bag that's gonna come with two bolts, two washers that'll say it's an adjustable washer. It's got these little teeth on it. There'll be a spacer, two nuts and two lock washers. And that's, what's gonna hold your head of your hitch onto your shank. Now our next step is going to be making sure that our hitch ball is an inch higher than that coupler height that we had which was 22 1/4 inches. So to make this easier, I'm just gonna hold that up and I'm gonna try and get us as close to 23 1/4 which looks like it's the second hole down. So now I'm gonna get some of my hardware ready. What I'm gonna do is I know there's a bunch of play in between my hitch head and my shank. So I'm gonna take this spacer and I'm gonna place that inside to kind of eat up some of that space. And then I'm gonna take my smaller bolt at your 4 1/2. And I'm gonna try and get this kind of set up in place And get that kind of poke through. This is definitely a good spot to have an extra set of hands just for that spacer isn't gonna wanna stay there for you. And on some applications you may not be able to get that spacer on the bottom hole. And Reese has said that it is okay. If you can only get the top, just go ahead and cut the spacer in half. All right, now that I got that slid in place you take my big bolt through, but before I do that I wanna get this adjustable washer on there and I'm gonna make sure that I have my teeth facing up against the teeth and on here. So we'll slide that bolt through, will slide right through, and then we can go ahead and put our other washer in place. And I'm just gonna throw on our locking washers and our nuts, just so that we don't have this fall off here. All right, now here's where we can go ahead to adjust, make sure that we're at the right height so, right about there is 23 1/4. So the next step is going to be inserting our spring bars and making sure the measurement for those is correct so that we have the tension correct. There's gonna be a chart in your instructions, with well stated three different coupler styles. There'll be A, B and C. A being if the coupler is mounted from the bottom of the frame, B being mounted to the frame but with a six inch frame or C like what we have here where it's a five inch thick frame and our coupler mounted up top. So on that chart, there's gonna be a bunch of different coupler heights. Our coupler height is falling into the 22 to 24 inch height range. So if we look at that and then look at coupler C, we're gonna see that when our spring bars are on the distance from being up like held up to the ground is gonna be 8 1/2 inches. So if I measure this right now I should have 8 1/2 inches. If not, then I'll have to adjust the head of my hitch here. It looks like I'm sitting right just barely above 8 1/2 inches which is right where I should be based on that chart. If I wasn't and I needed to make some adjustments this is where we would kind of move our hitch head up or down, 'cause this has about a 15 degree radius that you can kind of adjust it to. And that's where those teeth come into play. 'Cause this is what is gonna lock it into place as I move it up or down. So now I'm gonna go ahead and just tighten it down and then we'll torque it down to the specifications listed in your instruction manual. All right, that one's down. So now we're going to loosely put together our brackets. We're gonna take our upper cam weldment, which is this part right here. And we're just gonna slap that right on our frame. We won't know exactly what position this is gonna be in until we get our spring bars in place. But you may run into some fitment issues. On the other side, we have a breakaway switch and a ground that are right in the spot where bracket's gonna need to really sit. So I've pulled those off for now, but we're gonna get this rolling right now. We're gonna take our four inch bolt. Since we have a two inch frame, there is a 3 1/2 inch bolt. If you have a 1 1/2 inch frame, so you will need to measure that, just find out which bolts the correct size for you. I'm gonna put the bolt head side towards the outside with our nut on the inside. And I'm just gonna hand tighten that for now because we still have to put our other bolt in down to the bottom. So now we have our bracket loosely in place. I'm gonna go ahead and stick our bar in and pull that up. And then we want that line right here. We want the center of this bracket to match up with the center of the top of our little loop right here on our spring bar. So I'm gonna slide that. And so I get centered, which it feels right about there. And now we can go ahead and we're gonna start heading on our other bolts. So since I use that four inch bolt, I'm gonna use my 3 1/2 inch bolt down at the bottom. There's gonna be two black washers that are kind of bowed one way that had teeth on them. We're gonna slide our bolt in on the backside here on the inside of our trailer frame, we wanna get that as close up as we can 'cause there's a bunch of different holes here just depending on the length of your trailer frame, but we're gonna slide that through with our washer teeth facing our bracket. And we're gonna match that up. Hold on this side and I'm just gonna hand screw that in for now. We don't want it too tight just yet because we have one other bracket we're gonna slide in here. And you may have to actually just kind of take it off if it's fighting it too much. So we're gonna take this other weldment bracket and we're gonna slide that into place which honestly it'd be a big hassle and fight to do it that way even though the directions say to do it. After that we're just gonna go ahead and pull that bolt back off. It'd be much easier to slide it in. I'm just hand tightening this down. I'm gonna double check my spring bars one last time, make sure this bracket's exactly where I need it, which it looks like I kind of slid just a bit as I was tightening this, so let's move it. So now I'm just gonna go back and forth between the top and the bottom here. I'm gonna make sure that I'm getting both kind of tightened up evenly because we don't want our bar on the other side to bend one way or the other. We want to straight down, but we're in a snug this up nice and tight. Like I said, I don't wanna see that bar start to bend in under the frame, we wanna make sure that we're keeping it just nice and tight and straight with our trailer frame. So our next step is gonna be dropping in our carriage bolts. And as you can see, there's two different spots, up top and as well below. We wanna get it as close in as we can with our two inch frame here, we can't get that first slot. So we're gonna stick it into the second one. And if you look at the carriage bolt, it's square up top. So it's gonna sit in to that hole there and then round it on the bottom weldment so that it can accept it. So we're gonna stick those through. We'll take our conical washer, run our teeth, sticking up so that they bite into the bottom weldment. So we'll slide our washer up and then we're gonna put on our nut. And then we're just gonna repeat the same process over here. And once I have these fully tightened down with my wrench I'm gonna come back and torque them down to the settings that are also listed in your instructions. All right, now we can go ahead and tighten up our bolts and then torque everything back down. So our next step is going to be taking our bolt on cam and actually installing it here on our bracket. And we're gonna take our 1 1/4 inch bolts and slide on our lock washer, and that's how we are going to attach it. We're gonna use two, there'll be four included in your kit so that you can use two on each side. So to determine the placement of this we're gonna actually have to hold it up there and we're gonna wanna lift up our spring bar 'cause we want the top of our spring bar to be four inch, four inches below the top of our can here. So we'll take our tape measure. Let me put it from the center and right about where I have it looks to be good. We can take a better measurement once we have it kind of in place. So I'm just gonna stick one bolt in for now, make this a little bit easier and free up on my hands. So just double check in, I'm gonna kind of pull that out just a bit so I can get it right on the center. We're right at four inches for the top of our cam versus the top of our spring bar. Now for bolt placement, the directions list that you can use pretty much any one of these holes, except for if you have your bottom frame bolt coming through it. So right here, we have our bottom frame bolt. So I cannot use this hole, I'm gonna have to go up one and put it right here for our bottom. And we'll just hand tighten that in for now and then use our wrenches to snug that up and torque it down, understood. All right, now we're gonna go ahead and do the same thing over on the other side. So now we're gonna take our pins off. You'll wanna pull this little ring out and we can pull our pin out and then we're gonna try and get our bar, our spring bars up onto our holders here. And you may have to lift up a little bit. So I'm gonna use my jack 'cause I can't quite fully get up onto that cam. So we'll go ahead, and lift up just a bit, give us some more room here. It all lined up. And if you notice that you're not really lining up with your bracket and you need to readjust it, much easier way than the instructions really tell you to do, loosen up your bolts and then stick your cam back up on here, which is one bolt. And you can kind of slide that around and make sure you get it lined up nice and tight. That way it's actually where it should be. Honestly, they should just have it that way in the instructions, but they don't. So that's the way we're originally following it. But now we can go ahead, we'll take our tool, pop it right into place and we can pop our spring bars back on. That in place, we'll drop our pin in and we'll take our clip. We're gonna slide that through our hole and our pin and then pop the ring back around. We wanna make sure that rain comes all the way over that way it engages the pin and can't fall out. So our trailer hooked up and our weight distribution hitch activated. I'm gonna go ahead and take some measurements. Now before we we're at 42 inches and now we are sitting right at 41 1/2. So it only dropped us 1/2 inch. Front we we're at 42 inches as well, the start, and looks like we're at 42 inches. Well, I think that about does it for today's look at the Reese Dual Cam II Weight Distribution hitch. My name's Kevin, thanks for watching..
Average Customer Rating: 3.7 out of 5 stars (3 Customer Reviews)
With an automatic active sway control system, this weight-distribution system has flexible, powder coated steel, spring bars that create a level ride for both your trailer and your tow vehicle. Includes 2-5/16" hitch ball. Shank sold separately.I am more interested in dynamics and root cause, not marketing, in order to assess the most likely and practical solutions for trailer sway. Nevertheless, I thought to purchase this version of ‘anti-sway’ hitch primarily due to the simple potential of leverage about the fulcrum; it shows the most promise, if any. In fact, I purchased this due to towing dogma or convention… everyone says you must have anti-sway. I think this mandate is founded and further propagated on fear, a select few severe wagging occurrences written in stone on YouTube, perhaps imprecise loading techniques, among many other incidental yet contributory factors. I do, however, appreciate the benefits brought by WDH.
Given mass and momentum, the leverage moment of a trailer is considerable at its pivot, and while adding relatively insubstantial resistance may seem better than nothing.. that about sums it up, better than nothing, and not much more. Think holding a shovel at its handle end, then add dirt; its moment and its solution to counter that moment are considerable. Now start laterally oscillating that shovel, just try to stop it. Hence, in those rare conditions on that particularly lucky day, small advantage may be provided to ‘anti-sway’ mechanisms. Therefore, we purchase these hitches, as did I.
The reason for one star: compared to its predecessor, this new and improved version requires TREMENDOUS offloading of tension WHILE STILL ATTACHED TO THE TRUCK. Its predecessor uses chains and a bit of added height given by the hitch jack to decrease tension, no issue at all. New and improved version: see the attached photograph of the relatively acute angle at which my trailer suffers (and my truck is sitting at 2” higher than normal ride height) just to release enough tension from the WD bars to remove them with a HAMMER! I think most would agree to follow this operation, every single time to unhitch is completely unacceptable. I won’t have it. It is not etrailer with whom I am very agitated, but Reese. Someone actually signed off on the design of this monstrosity.
That said, I’ve been instructed by Wayne (an etrailer technician) that this is a normal unhitching operation, “almost get those rear wheels off the ground.” Like I’ve said… nope, it isn’t for me. I’ve also been informed by a representative the hitch is no longer returnable, as it is considered ‘used’ due to my 2-hour installation. Unless I purchase additional items, such as the ‘old’ cams and new chains, I have an $800 or $900 paper weight. The product is manufacture as expected, but it is the DELIVERY of prudent mechanical geometry and fundamental ergonomics that is quite inadequate.
If you must have a WDH with associated sway ‘control’, purchase the old version, Straitline. Avoid this failed design … for certain.
simple adjustment 1/2 ton 23 Silverado pulls 24' 5,500 lbs. easy.
Do you have a question about this Weight Distribution Hitch?
Info for this part was:
At etrailer.com we provide the best information available about the products we sell. We take the quality of our information seriously so that you can get the right part the first time. Let us know if anything is missing or if you have any questions.


Thank you! Your comment has been submitted successfully. You should be able to view your question/comment here within a few days.
Error submitting comment. Please try again momentarily.