
To see if this custom-fit item will work for you please tell us what vehicle you'll use it with.
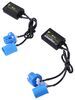
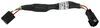
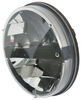
2 Dual beam LED headlights replace your Jeep Wrangler Unlimited's sealed-beam headlamps for an updated look and increased light output. Great White series features custom-cut lens optics and ultra-bright white diodes. Accepts standard H4 3-blade connection.
Features:
Specs:
Videos are provided as a guide only. Refer to manufacturer installation instructions and specs for complete information.
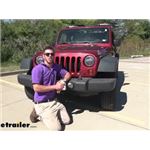
What is up, everybody Adam here with etrailer. Today, we have a 2013 Jeep Wrangler Unlimited, and we're gonna be taking a look at the Peterson Great White headlight conversion kit. If you own a Jeep, you're probably going off-roading, so bright lights are very, very essential in my opinion. I live in a rural area and there's a lot of deer running around. So I actually went ahead and replaced mine. They're obviously not the same 'cause I don't have a Jeep, but headlights are really, really important just to keep you safe and everybody else around you, of course, and everybody inside.
But if you're wanting to upgrade your Jeep, which I know a lot of you guys do like to do that, this is gonna be a great way to also reap the benefits and also make it look a little bit cooler. A lot of the emblems and stuff like that, you don't really reap the benefits. It just makes it look cool. So when you're driving down the road, people see it and they're like, "Oh, that's pretty cool." But with this, it's gonna look cool, but it's also going to increase the quality of your driving experience. Just driving with extremely bright LED headlights is just so cool just because you can see so much more than what you're used to.
Starting with the lens, a lot of the times these start to kinda fade and get a little fogged up. But it is UV and impact-resistant polycarbonate, so it's super strong. So if you do get a couple rocks up here, it's not gonna shatter and it isn't gonna fog up over time. And that's something I kinda like just because I don't really want to maintenance my headlights. I just want 'em to be clear all the time.
And the cool thing about this is it does on the inside, it's gonna have a little metalized reflector. So that's gonna increase the amount of light distance that you get. This little piece right here. And then, the whole entire casing itself, it is gonna have an aluminum construction. So it's not going to rust away over time.
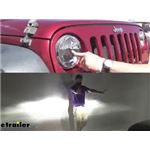
If you're looking for a headlight that's going to have a daytime running light function, this does not have it, but we have others on our website that do. I don't think that's a big deal just because we do have other running lights going on here. So I don't really think that's a huge deal for me. Some other options that you could go with, if you like the OEM look of the housing, you can just go with something like this. This is gonna be something super bright. It's gonna be just as bright as what these are, but the reflecting patterns is gonna be kind of the same as your OEM bulbs. So these are gonna be an upgrade. You can go this route, but there is a lot of different stuff. The wiring harness and the anti-flicker harness, I mean, that these came with is a lot smaller. So there's a lot less you have to deal with. So this is something you can do to maybe have a little bit more cost-effective option just because you don't have to buy the whole entire case. Some people like this little line that goes through there. I think it looks kinda cool, but some people aren't really a fan of it. So if you didn't wanna have this, you can go with something like this, and we do have these on our website. I actually have these on my car, which are awesome. So that is an option for you. I just like these a little bit better just because the wiring is a lot less to mess with. But we're gonna show you how to install it, but first, let's go inside and see exactly how much the bulbs that we replaced we're putting out to see if we're really gonna get any increase of lightage. Before we do anything, I'm gonna pull in the shop, turn all the lights on just to see exactly how bright these headlights are. These are factory headlights that came with this Jeep, so they're probably not that bright. So let's check. Alright, so here they are. These are actually not factory. So they are a little bit brighter and they're not as yellow as they usually come from the factory. But we have one that isn't even working. So we're obviously gonna see an improvement, but this is what we're working with. So remember that for when we test the new ones once we put 'em in. So let's go outside and rip the old ones off and put the new ones in. First things first, open up the hood. Simple. Easiest step. So once we get that open, we wanna prop it up. If I can figure out how this thing opened. Prop rod, prop rod, here we go. All right. So we're gonna have these little tabs here. One, two, three, four, five, and six on top. You can do this with a flathead or whatever. I just use this just 'cause we have the tool. It's not really that much better. But once you get it like that, you just pop that guy out. And the whole thing should come in. So when this pushes in, it spreads this out, so it makes it bigger than the hole. So it won't come out just like that. So just do that for the remaining five that we have up here. And put 'em in a safe place, don't lose 'em. So that's done. What you wanna do is it's gonna come out pretty easily, but you wanna be gentle. You wanna start with one side. There's gonna be little clips holding this in, kinda feels like it's right here. You're just gonna pull out. Like that. . Real gently. And then, we are gonna have these connected in the back. These are our bottom lights. So if you did want to kinda be efficient with your work, you can go ahead and grab bulbs like these. You just use our fit guide and you can swap these out for LEDs, 'cause these are incandescent and they'll end up going out like our headlights eventually, a lot quicker than LEDs. So might as well do it all. I know it's not that much work to get to this point, but since you're in here, do the work. Lights are cool, and it's a really easy way to upgrade your Jeep pretty easily and cost-effectively. And it's not just something that people are gonna see and they're gonna think it looks cool. It's also gonna be helpful whenever you're driving. So now that we're here, what I'm gonna do is I'm gonna start taking this off. We can do two different things, depending on whatever light you have. You need to take just the bezel off, which is just this little chrome piece, and then this will come out. Or we can take out this whole entire housing. So let's take a look at our lights and see what we're working with. So our headlights are not gonna come with any of the plastic housing that is on there right now. So we're gonna reuse that. So this is pretty simple. All we're gonna need is a T-15 inch bit. So this one is gonna be what, holds just this little chrome ring in, so that's all we're gonna take. So there's one here, here, here, and here. So a total of four. We don't wanna lose these. So be extra careful whenever you're taking these out, so you don't lose 'em. Once that's out, it will be loose, you might have to keep your hand on it. But all we really wanna do is just take this out. And this is gonna be different from Jeep to Jeep. So we're basically replacing a aftermarket headlight kit that failed. So we're gonna have a little bit of wiring we're gonna have to clean up. So basically, what we're looking for is gonna be this little green clip, which is in here somewhere. Let's go and find out exactly where it is. This is what we're replacing. This is what we're really looking for, and it seems like they used some zip ties. So we're gonna cut that. All right, so now with this guy exposed, so this is from the factory. So that's what you're looking for. It's gonna be a lot easier if you don't have aftermarket lights in here, we just had a lot of wiring we had to clean up. So all you really need to do with this, you take a screwdriver or something, you wanna pull this red piece back like that. And then, that's gonna release it. And then, we can throw all this away. And then, we have a lot shorter harness. That's why I really like these. Very, very short. So we're gonna have this side, which is gonna go to our headlight, the three-pronged. And then, this is gonna fit into our factory plug. So a lot quicker putting it back in with not so much harness going on. So once it's in there, we're gonna clamp that down and push that little red thing back. And then, we wanna make sure, 'cause this is a very, very stiff harness. So we do wanna make sure that we have this positioned to where it's not gonna be bending in a weird, odd way. 'Cause once that light is in there, it's gonna be sitting back. This connection's gonna be sitting right here. So you wanna make it to where this thing is nice and free, so it's not really bound up or anything. And there's only one way to put this on. So we're gonna have one bottom tab and that's where that little tab is gonna go. Just plug that in. Be gentle with it. And you wanna get it all the way on there. So it's like that. Perfect. And then, feed all that through. And then, we can line all this up. They have these little tabs here that should fit in around the same exact area. But as you can see, it's kinda round back here, so it doesn't fit in there perfectly. But it does at least get to where you want. And then now, what you wanna do, there's a little film on it. Now, that we're kinda done for the most part, we're gonna take that off. And there's two different ways you can really look to see which side's up. I mean, you can look at here and this just says top. But if you see the little line going through here, there's a little nick on top and that's also gonna go on top. So if you can't read that for some whatever reason, just look at that little black piece in the middle. So just line this up. We're gonna get that bezel off of our old headlight. Again, that's just this little chrome ring. And it will only go on one way, so the spacing is different between all of these. So it looks like this is lining up. You gotta put it on perfectly straight too. Just like that. Make sure it all lines up like that. And then, we can take these screws and put 'em back in. I would definitely suggest having an extra set of hands just so you don't drop this light or the hardware. Sorry, if you can't see it, but I'm just trying to get it started just so it doesn't fall when I go reach for the tool, 'cause I do need to hold this headlight in. And once you get one in, it's pretty much easy from there. Just be extra careful. There you go. And we can move on to the other ones and we're pretty much done. Now, we're good to go. We checked to make sure they we're working before we put all this stuff back in, so definitely do that just so you don't have to redo work. When we're gonna put it all back together, literally the same exact thing. We're gonna put these bulbs in, and then we're gonna put it in place, and then put those little plastic pins that you put somewhere safely. Put these big guys in first all the way around, and then you can take the rest of it and just plop it in. Just like that. Put everything back. Now, we're gonna go back inside to see how improved it is. Obviously, we're gonna see some improvement because we have both ones working. But I am curious to see what the spread looks like and also the color and everything like that. So inside we go. So as you can see, definitely a lot brighter. A bigger spread for sure. Let me put the brights on too. So with the low beams, you usually get a little bit wider of a spread because the light doesn't go near as far. But when we switch to the high beams, you see it gets a little bit more narrow. So it's gonna go a lot farther. So you get high beams and low beams and it looks really good. If you guys wanna come around this way, you guys will see what they look like all illuminated up. And that looks pretty cool. I have not really seen a Jeep with these headlights on it. And with them lit up, I think I like 'em better when they're lit up compared to just seeing them during the day, which obviously these are gonna be lit up majority of the time. So I think this is gonna look really, really cool going through those trails or just driving down the road. And that'll do it for our look at the Peterson Great White headlight conversion kit on our 2013 Jeep Wrangler Unlimited..
Info for this part was:
At etrailer.com we provide the best information available about the products we sell. We take the quality of our information seriously so that you can get the right part the first time. Let us know if anything is missing or if you have any questions.


Thank you! Your comment has been submitted successfully. You should be able to view your question/comment here within a few days.
Error submitting comment. Please try again momentarily.