
Summer Starts Here - Save up to 70%
To see if this custom-fit item will work for you please tell us what vehicle you'll use it with.
Thank you! Your comment has been submitted successfully. You should be able to view your question/comment here within a few days.
Error submitting comment. Please try again momentarily.


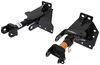
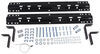
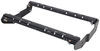
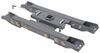
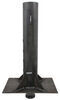
Fully welded vehicle trailer hitch is strong and durable. Draw-Tite's Tested Tough guarantee ensures that this hitch exceeds industry standards. The combination of an e-coat base and a powder coat finish provides excellent rust protection.
Features:
Specs:
Draw-Tite's Tested Tough program provides testing standards far superior to those outlined by the Society of Automotive Engineers (SAE), the go-to source for engineering professionals.
Each Draw-Tite trailer hitch receiver undergoes extensive fatigue testing and static testing with the ball mount that is either supplied or recommended for use with that particular hitch, thus ensuring results that are applicable to real life use. Fatigue testing is also conducted on hitches rated for use with weight-distribution systems.
In addition, Draw-Tite performs static testing on a simulated automobile, as opposed to the rigid fixture used for SAE testing, resulting in a more true-to-life scenario.
At etrailer.com we're committed to the products we sell, and to our customers. Our experienced and knowledgeable staff are available via both phone and email to address your questions and concerns for the lifetime of your hitch. The technicians at etrailer perform hitch installations on a daily basis, making them a valuable resource for do-it-yourselfers. The one-on-one, personal service you'll receive comes straight from an expert in the towing and automotive field. We've installed it, we've wired it and we've towed with it, so whatever your question, we can answer it.

California residents: click here
Videos are provided as a guide only. Refer to manufacturer installation instructions and specs for complete information.
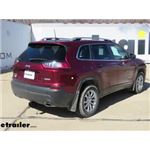
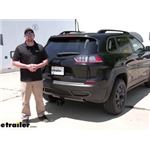
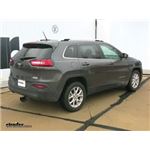
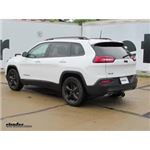
Speaker: Today we're going to be taking a look at, I'm going to show you how to install the draw tight class three trailer hitch receiver on our 2019 Jeep Cherokee. It's going to be a two inch by two inch receiver tube opening, will have a reinforced collar here just to get us a little extra stability. This hole here, it's going to be for your hitch pin. It's going to take a standard five eighths inch hitch pin. Hitch pin and clip does not come with the hitch. However, it can be found here at etrailer.com.
This hole here is going to be for a j pin stabilization device. And what that does, it takes any of the shake and play out of any of your hitch mount accessories. The safety chain loops are going to be a vertical style.How this hitch is different than others is they're welded to the side of our receiver tube. Some of the other hitches are going to be welded a flat plate this way or there's going to have a loop down at the bottom. The good thing about this being this way is, if you have a locking device here at the top, your j pin stabilization device or a different locking device, with your safety chain loops running this way, blocking devices is not gonna interfere with your hooks.
With the other styles that run flat, those tend to interfere with larger hooks.As far as our weight ratings go, we're gonna have a 500 pound max tongue weight, which is the downward pressure on the inside of the receiver tube. 5,000 pound gross trailer rate, which is the trailer plus the load included. You can use weight distribution with this hitch. Tongue weight and trailer weight is gonna stay the same. I always recommend checking the owner's manual of your vehicle to make sure the vehicle can withstand that amount of weight.
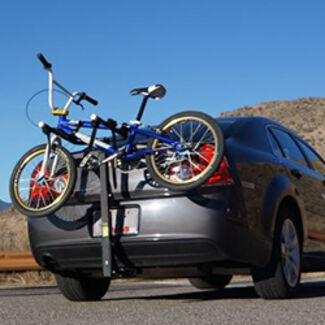
You're going to pick the lowest number between the vehicle and the hitch.Now, let's give you a few measurements to help you when deciding on any hitch mount accessories you may need such as a bike rack. inaudible 00:01:41 cargo carrier. From the center of the hitch pin hole to the outermost part of the bumper, it's going to be about five inches. This number's important for any of your hitch mount accessories that may fold up against your vehicle. From the ground to the top innermost part of the receiver tube is going to be about 13 inches.
This number is important for any of your hitch mounted accessories that may require extra ground clearance. Now that we've gone over some of the features, let's show you how to get it installed.Per our instruction, it's gonna tell us if you have exhaust ports like this, you need to take them down. It's gonna tell you that you have 13 millimeter bolts, three of them, that hold this exhaust port in place. On the '19, they're actually not nutted and bolted in. They're actually riveted in. So what I'm gonna do is I'm going to loosen my facia first to see if I can get enough room to move that out so I can get to that rotor. It's a 10 millimeter socket, four bolts right down here at the bottom.And we're going to have three different rotors on each side. We're gonna have two here, or one here on each side, and we're going to have one up on the top. The problem is the one on top is a little bit harder to get to the way it is. So, we're gonna take out these two to get this loose. We're going to lower our exhaust enough to where you can get our drill up on top. And we're just using a small drill bit. We're going to drill right through the center.Take a strap and we need to support our exhaust before we lower it. I like to hang it right on the springs because they're easily accessible. You're going to run it right underneath your pipe. And you're going to have a hanger on each side that has two bolts in it. This one, it's still detached, the back end didn't come all the way off. You can take some needle nose pliers and reach in and break that off, or you can take a little bit bigger drill bit if you want.I'm going to use needle nose and do the same thing to the other side. Go ahead and lower your exhaust a little bit. Don't let it put a whole lot of pressure up on the front side. Just enough that we can get our hitch up inside. The lower facia attaches to a panel. This panel right here is going to need to come down. There's gonna be . On older models, there's little clips that you can just push in and pull this panel off.For the '19, there's actually . At the top, there's four nuts. And they're right up inside here. There's four nuts that hold it in place. 10 millimeter socket. We'll take those off. And we'll set it aside for right now. That's when we need to trim down our lower facia. You find the center. Then, I just use a black marker. Three and a half wide, 3.75 high. We're gonna be taking out this square here. On our passenger's side, we're going to have wiring running underneath our frame rail. We're going to have to pop the fasteners out of the frame rail and let this hang, so we can get our hitch on our . up to our frame.These are going to be our mounting locations. You can't have the wiring underneath our hitch. So, screwdriver or a trim panel tool, we're just going to pop these out like this. And over here, I'm gonna let that hang like that for now. That's where to insert our hardware. You're going to have to pull wires like this, carriage bolt and spacer block. Go ahead and put your carriage bolt in your spacer block. Again, we're going to be using this hole, this hole, and this one up to the side. We're going to start with this one. Take your spring in, kind of put it a little bit of a bend in it. We're going to go through the hole and come out of this one.Take your carriage bolts and your spacer block, thread it on like this. Then pull it back down. Next one we're going to do is going be this one on this side. For this one, we're gonna pull it out. And then what we're going to do is we're going to take it and you're going to slide it, set it right back inside the frame rail. For this last one, we're gonna do it a little bit different. Go ahead and thread on your carriage bolt and spacer block on to your pull wire. We're gonna do a reverse feed. So, we're going to put the bolt up first, and the spacer block.You're going to repeat that process on the other side. On the outside of each frame rail, if you have this sealer right here, it's a good idea to shave that down so it's flat, so your hip sits flat against the frame. Then you just take a knife . It's just a rubber sealer. You're going to have some lock washers in your kit. They say to install these only if you need them. They're going to go on these outside ones in between the frame rail and the hitch just like that.Now, with an extra set of hands, we'll get our hitch into position. We're going to insert our pull wires in the corresponding holes in the hitch. And if you get your two bolts on the outside of your frame rail, pull them through the hitch, it'll help hold your hitch in place while you install your remaining hardware. Now you can remove your pull wires and take a conical tooth washer, teeth facing towards the hitch, and you're gonna put it on your mount.With a seven eighth socket, we're gonna tighten, and then torque all of our hardware to the specifications in the instructions. Go ahead and reinstall your exhaust. Secure it back into place. Then on the pressure side here, this wire, the kit's gonna come with a zip tie. From the zip tie right through the exhaust singer. And that's how we're going to secure up our wiring. Now, to reinstall our exhaust ports, what I'm going to do instead of re riveting it it back in there, I'm actually going to put 12 set of bolts with nuts. I'm going to start with the very top one up here. I'm gonna go ahead and insert it in the hole. Take your screwdriver, go ahead and get it onto your screw. Reach it up top. Clip on that. Then we can reach up on the onside and install the nut. We'll do the same thing for two side flanges. Once everything's back in place, we can remove our strap. That's going to complete our look at an installation on the Draw-tite class three trailer hitch receiver on our 2019 Jeep Cherokee.
Average Customer Rating: 4.7 out of 5 stars (110 Customer Reviews)
Fully welded vehicle trailer hitch is strong and durable. Draw-Tite's Tested Tough guarantee ensures that this hitch exceeds industry standards. The combination of an e-coat base and a powder coat finish provides excellent rust protection.
Great trailer hitch and lighting. Had an issue with part of the hitch causing a problem, but customer service (George) helped me with the issue.
Fantastic and holding up well however they did away with the J pin.
Additional modifications to hidden panels required on 2019 Jeep Cherokee that presumably does not exist on 2018 model (according to the how-to video viewed on this site).
Bolts, placement, etc. all perfectly align and is simple enough for any d-i-yer, however, I would have preferred to see a video of the install on an actual 2019 Jeep Cherokee so that there would have been no surprises as I encountered during the install.
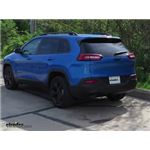
The look is great! I love not having to see the horizontal bar - only the hitch. No clearance challenges so far on hang down either.
I have nothing bad to say about this product super smooth installation I did it myself in my garage in about an hour and a half.
The delivery was prompt and the installation was very simple. The videos at etrailer were great. Another user posted having used a floor jack to help lift it into place. I tried that and it was a great tip.
I have had my trailer hitch for over a year. I have used it at least a dozen times. I have never had any problems.
I will continue to purchase through etrailer.
Fast delivery, excellent product and packed well. For me, this definitely was a two person job. The instructions don’t say anything about putting the backing plate for the facia back on but does say return it to the owner. I didn’t like the way the facia flapped around without the backing plate so I did some cutting (picture) and reinstalled it, much better.
The only drawback was being alone and trying to lift it by myself. I did. Laying on the ground. Otherwise, installation was simple.
The hitch shipped fast and was very informative on installation instructions also the video help too
The hitch is still sitting in a box in my garage. My mechanic tried to install it on my Jeep Trailhawk, had it fully installed but the rear plastic bumper fascia could not be reinstalled because the hitch interfered with the attachment points. I am trying to find a hitch where the receiver exits through the fascia at the removable opening in the fascia of the jeep like the Jeep original equipment hitch.

Easy installation. Took about 40 minutes and it was my first time doing it.
It took a little extra cutting because of the Trailhawk bottom cowling, but over all very easy install.
Lanny

3/9/2023
No problems at all. Supports our two bikes without any problems.
Fit like a glove on my 2021 Jeep Cherokee Altitude. Looks great, thank you!
So far so good. Hitch appears to be well built and was shipped complete. The instructions are printed so small you need a magnifying glass to read them and photos on the instructions are poor -at best. That said - the video of the installation is excellent and a must review prior to installation.

Todd
9/30/2022
used it once to pull a trailer to FL. worked fine
no garages in my area will install a hitch unless they order it. would have been nice to know. I have had a nice looking trailer hitch sitting in the back my jeep for a year.

Jenny N.
7/28/2022
I wanted to reach out to you in regards to your review on the hitch. I am sorry that you have not been able to have the hitch installed. I wanted to ask if you had used the locate local installers near me feature? It could lead to an installer that will install the hitch for you.
Helpful Links
To my door 22hrs after ordering ! 3 hr install. Quality product. Great instructions..Quality wiring… (I tapped into my fused accessory port in 2020 cherokee “trunk” and saved hrs without having to go to battery +)…..
Fast shipping, got here on time. I found a great installer, TNT Coating in Cheyenne who installed it the same day for me. I am very pleased, as TNT also sells this very product. Thanks for the quick ship of a quality product.

George G.
8/12/2022
Excellent!
The product was great! However the Jeep Cherokee is a real pain to work on. Be ready to drop the exhaust and remove the rear bumper. The easy harness and hitch took about 4 hours to install with a friend. It would of been worth the extra money to have it professionally installed. Not worth my time on this one.
Awesome product! I have a 2015 Jeep Cherokee, and when I was shopping around for hitches I did not like the look of a lot of them because a large bar stuck out across the entire bottom of the rear bumper. I went with this etrailer hitch because it is mostly hidden behind the bumper. Install was easy. It took me and one other person about 2-3 hours to install, and there was very helpful YouTube video to follow regarding the install. I used it to tow my Sea Doo Jet Ski and I have had absolutely no problems with the Hitch over the past year.
This is the second hitch I have ordered from E trailer.As the first time everything went awesome. Great Company to order from and very helpful Thank You again for the Great Service Mike R

Michael R.
8/13/2020
Great
Excellent knowledge
Overall happy with the product. The hitch installation was a breeze; however the wiring was a nightmare. The instructions aren’t really that clear so we went online in hopes someone has done it.. and from this website there was a video! BUT, it was completely different from the instructions.. very frustrating but we made it work. I wish it was a little higher because my drop hitch still isn’t enough to get the trailer up high enough... but it will do for now. Quality is great.
Install went fine. It was a trick getting muffler hanger rods to clear frame brackets. Had to push muffler towards front of vehicle and down at same time.. Plastic panel portion of the video needs edited, in the video of the 2019 jeep (facia tips). installer removes the panel, does not show reinstall or mods needed to the panel for the hitch. Panel and facia both need cut away. Panel holds facia in place so it is needed. I never took the panel down, same as installer of the 2020 video... All, and all good product decent instructions between vids and paper work. Installed on 2021 Cherokee with Facia tips...
I have installed many trailer hitches , some at Work , U haul ,some for friends .
This one was not the easiest to install ,
The instructions that came with are poor.
Look on line , you tube for better instructions.
Shipping was also slow, I paid for faster shipping .
The price was the lowest I could find.
2021 Jeep Cherokee Latitude LUX.
It would have been easier with help, second person and a car hoist
Installed on a 2019 Jeep Cherokee overland. This is a solidly constructed hitch and hides all but the receiver nicely. The instructions and video from etrailer are spot on. The recommendation for using bolts for the rivets is definitely easier as well. I installed this in about 2.5 hours, on the floor to help with height, since I was solo. Two people would make this far easier to line up, but its possible by yourself. The hard plastic piece (4:05 in the video) can be reinstalled with some creative cutting. Essentially, I cut it in half and notched the ends on both sides to fit into the hitch bar and around the receiver. The fascia flaps too much for my taste without reconnecting it to that hard plastic piece.
Do you have a question about this Trailer Hitch?
Info for this part was:
At etrailer.com we provide the best information available about the products we sell. We take the quality of our information seriously so that you can get the right part the first time. Let us know if anything is missing or if you have any questions.


Anthony
8/3/2019
Everything still working great, I’ve pulled a few trailers ranging from 1,000-3,500 lbs with zero issues. Highly recommend this hitch system