
Roadmaster Tail Light Wiring Kit with Bulbs
Item # RM-155
Retail:$85.05
Our Price: $73.64
You Save: 13%
Confirmed to Fit
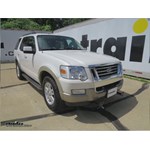
2004 Ford Explorer
Will this fit?
To see if this custom-fit item will work for you please tell us what vehicle you'll use it with.
In Stock
Thank you! Your comment has been submitted successfully. You should be able to view your question/comment here within a few days.
Error submitting comment. Please try again momentarily.


- All Info
- Reviews (248)
- Q & A (0)
- Videos (3)
- Photos
2004 Ford Explorer - Roadmaster Tail Light Wiring Kit with Bulbs
- Bypasses Vehicle Wiring
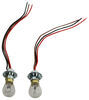
- Bulb and Socket Kit
- Universal
- Tail Light Mount
- Roadmaster
Use your towed car's signal lights without tapping into its wiring. This self-contained wiring kit bypasses your Toyota Tundra's electrical system, eliminating any concerns over violating the manufacturer's warranty.
Features:
- Lets you use your towed Ford Explorer's brake, running and signal lights without tapping into its wiring
- Bypasses towed car's electrical system completely - wiring is routed beneath the car
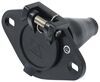
- Works via independent plugs and sockets mounted inside the tail lights
- Maintains manufacturer's warranty on towed car by avoiding any involvement with its electrical system
- Overall measurement of bulb: 2-1/4"
- Length of bulb from flange to top of bulb: 2"
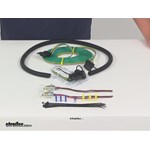
- Includes all necessary wiring, 2 lights, 2 sockets, zip-ties and instructions
- Made in the USA
- Limited Lifetime Warranty
Note: Towed car must have enough room inside the tail light lens housing for an extra bulb and socket.
155 RoadMaster Tail Light Wiring Kit with Bulbs
Installation Details


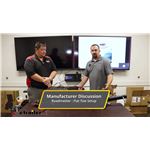
Video of Roadmaster Tail Light Wiring Kit with Bulbs


Videos are provided as a guide only. Refer to manufacturer installation instructions and specs for complete information.


Video Transcript for Roadmaster Tail Light Wiring Kit Installation - 2010 Ford Explorer
Today on our 2010 Ford Explorer, we're going to show you how to install the Roadmaster Bulb and socket kit with bulbs part number RM-155. We'll hook our tow vehicle up to the front here, we'll start by turning on the taillights. With those working, let's check the left blinker, then our left break. Now our right blinker and our right break. Now as you can see, we mounted our plug in the position we went right on top of the bumper structure there. That way we wouldn't have any issues once we had everything on and trying to get it installed. WE're going to take care of getting our bracket mounted for where our wiring's going to go up here in the front.
Now a lot of times, like this bracket on the top side, we need to elevate it just slightly, so we just took a little piece kind of bent it up there to where it'll kind of elevate it up to where it'll appear out from behind our bumper. Now for the socket wiring kit that we're putting in, we need this to be connected up there at the front. It needs to make a detour by the breaking system that we're using and then head to the back of the vehicle. What we're going to do is just take the majority of it, pass it right down through to where we can find it on the underside of the vehicle, get that ran back there where we want it you can see it just pop out there below the car. We'll take our loop, we're going to leave a little bit up here on top so we can get that connected, then just run it right back. Slack out to the mean, there we go, and over there to our bug side.
I'm going to pass that thought he bracket and we're going to be trimming that off just behind that inaudible 00:02:10 plug. We'll bring in the rubber cap that's on the back of the socket. That's going to slide over all four of our wires. Now we need to strip the end off of each one here. Then we'll put them in their respective spots here in the back. The white wire, that's going to be our ground.
Next one we have is TM, that's trailer marker, that's going to be our brown wire. Skip one there, we're going to go to RT, that's the right turn signal, that will be our green wire. Then finally our yellow wire, that's going to be our left turn signal. Now while it's not a necessary step, since these wires are going to just kind of be hanging out there exposed, you'll be able to see them behind the grill, let's take some electrical tape and just wrap them up as neatly as we can here. Now up here on the top, you can see we've just routed our wire right here. I'm going to use a zip tie just to hold the slack in it that we need right here on top. Now we're going to start routing our wire towards the rear of our vehicle.
We want to avoid any significant sources of heat, any pinch points, any sharp metal edges, anything that might damage the wire essentially. See how we're just kind of going over top of that pass shaft location, we don't' want it to get near there. We'll go right up from there into kind of the ear the spare tire is. Now let's use a couple more zip ties. Now we'll trim the plug end off of our four pull wiring, then we'll tart pulling each wire apart to separate them. Now we'll use our green, our brown and our white wire, we're going to run this up behind the passenger side tail light. To do this we're going to use a little pull wire. We've got airline tubing here, you could use a coat hanger, stiff piece of wire, but you just want to tape the three of them off. That way when we remove our tail light, we'll be able to pull them up to us. Now we'll stick them up in the small slot here and kind of direct it up towards the bottom of our tail light housing. Now we're going to take the two screws out of the side of the tail light here that require the 8mm socket. You want to pull that housing out. Now we want to separate the two clips on the outside here to kind of hold that tail light in place. Now let's pull our plugs off the backside here. They've all got just little push tabs on them. Let's set those aside. Now let's bring our pull wire on through. Now with our housing off, you can see we've pulled that lower light out and we're going to go right about here and drill just a small pilot hole in. When we do this, we'll kind of hold everything upwards, that way any particles will have a better chance of falling down and hitting the ground rather than going inside of our light. Now let's use our 1 inch hole saw and finish making our hole. Now let's take our socket and kind of bend our tabs out a little bit. For this application, we've got to be pretty careful about how we put it in there. Our bulbs are going to want to touch so we're going to put half of the socket inside of the light and we're going to use these teeth on the other half of the socket to keep it from going in. We'll bring about the top half of the teeth in, we'll let those make good contact as you can see right there. Then we're going to use the bottom teeth to kind of hold out on it slightly and we're just going to seal that up with some silicone to give us a nice seal that'll leave our bulbs separated just enough to where they'll both work properly on the front side. Now I'm just going to use some RTV silicone, we're going to go around there really well, make sure it gets a good hold. All right, now that should do it. We'll let this one sit to the side and let that sealant have time to kind of firm up while we take care of drilling out our other light. Now that we've got our sockets installed in our lights, let's get our wiring ready. We're going to start by taking just enough brown wire for what we need here. We're going to strip both ends of that back. Kind of place those together and give them a little twist to kind of make them from two wires into one wire. Yellow butt connector's going to slide down on there, get it crimped down. Anytime we make a crimp, we want to make sure we've got good connection there. Let's do the same for our white wire here. Now for the green one, we're just going to trim that off. Now I need one end of this, we'll strip it, and this one's going to get one of our blue butt connectors, slide that on and crimp it. Now for your green wire, I recommend tucking it down here because we don't want it to fall back in and disappear on us. The other ones are going to be kind of held in place by the other wires here. The end of our wires here where we still have our fish line attached, I'm going to trim the green off, leave the brown and white on there. Then we'll wrap that right back down to the underside of the vehicle. See if we reach under, we'll be able to find it there. We're going to pull that brown and white slack back down through. Now let's strip the end off of each of the wires coming from our light. The black one, I'm going to strip it off extra long and I'm going to fold it over. THat's going to give that yellow but connector more meat or more wire to grab on to. Do the same thing for my brown wire and then we'll strip off just a normal length for the red wire. Our red wire gets connected to our green wire. That's going to be for our passenger side turn signal. The black wire, it gets connected to our white wire, that's going to be for our ground. Then lastly, the brown wire, it gets connected to our brown wire, that's for our running lights. All right, I'll just use a little tape and wrap those up. All right, now we're ready to put our tail light back in. Right back into it's spot. Now we're going to add our yellow wire onto the brown and white wire that we passed out from under the car. Let's get these over to the driver's side. We're just going to run them right along that bumper structure there. We'll just keep working it on across here. We're just going to use zip ties as we go to keep everything up nice and secure. Right over the frame rail there. All right, perfect, now let's make our connections up there. Now for our wiring on this side, we're going to take our yellow wire, we'll cut that off, strip the end, and on this one, we're going to add a little blue butt connector. Now let's do our brown wire. Same treatment on this one. Now for the white one, we're going to do it the same way we did the white one on the other side. We're going to strip it, or cut it, then we'll strip both ends. This is going to get a yellow butt connector. Now let's take about 5, 6, 7 inches of the tag end, the one that's connected to our full wire. Cut, strip, this time we're going to add on a rain terminal. Then we can take a self-tapping screw, we'll get it anchored right into the body. Now again, our black wire that's going to go to our white wire and since we've got that larger butt connector, we need to strip some extra off. Our brown's going to go to our brown, and our red to our yellow. Now we're going to tape this side up just like the other side. We'll just slide our connectors back on. Get our bolts started and get them secure. That's going to complete today's installation of the Roadmaster bulb and socket kit, part number RM-155 on our 2010 Ford Explorer.
Customer Satisfaction Score:
94% were satisfied with this product
6% of customers were not satisfied
- Wrong item was ordered
- Did not arrive in time
- etrailer mistake
Customer Reviews
Roadmaster Tail Light Wiring Kit with Bulbs - RM-155
Average Customer Rating: 4.7 out of 5 stars (248 Customer Reviews)
Use your towed car's signal lights without tapping into its wiring. This self-contained wiring kit bypasses your vehicle's electrical system, eliminating any concerns over violating the manufacturer's warranty.by: James B.05/13/2024
2012 Jeep Wrangler Unlimited
Went pretty easy. Holes for bulbs do fit in the rear lights. I had to use a 6way plug that had a 4way line on it also.
by: James 04/05/2024
Always completely satisfied with Etrailer service and products! Jamie B is very knowledgable and courteous!
by: Peter 02/28/2024
2020 Chevrolet Equinox
This was a good option for our 2020 Chevy Equinox because it does not tie into the tow vehicle electrical system and runs directly from the Motorhome electrical system.
by: Rex07/27/2022
Put this into a 2002 Jeep Liberty. Good directions. Drilled out the lower part of tail light housing and install bulb sockets into it. You may have to deburr the tail light housing a bit and manipulate the tangs on the bulb socket but is fine. I put in 1157 LED bulbs :) Good stuff!


by: KW03/02/2016
1998 Jeep Wrangler
This product was easy to install but it took some time routing the wiring harness from the front bumper to the rear. Pick up some extra zip ties, you will need several. The lighting system is independent allowing for the use of LED bulbs. Great product.


by: Lawrence 04/17/2024
easy install one year later still working perfectly
by: Joseph 04/22/2024
it worked well
by: Jay 05/16/2024
1994 Suzuki Sidekick
very well made and packaged
by: robertbenita06/30/2013
2013 Ford Fiesta
Found this item was wired with the brake lights for the brown wires and turn/running lights for colored wires and this fact kept me from getting this done very rapidly. Once identified, went together really nicely and actually grounded to frame for higher light output. I upgraded 3 wire into 2 wire converter with "Roadmaster Brite-lite 3 to 2 Wiring Converter" and they are as bright as the lights already in the housing. Except for that wiring issue, it would have been excellent. As to performance after install, great. Customer service was nice from Roadmaster as well. Did receive a call back message from etrailer a couple days later.
by: Ken G.10/20/2016
2013 Dodge Durango
I purchased a Blue Ox base plate, Air Force One braking system, and a light kit for my 2013 Durango. I could have not asked for an easier process with selecting and ordering, also the tutorials and videos were a great help in determining what was the best system for me . Everything arrived as planned and in great condition. This is not my first time using etrailer.com and my prior experience was equally good.

Ken G.

10/23/2017
After using the items I reviewed, about 6,000 miles, I am more than satisfied. The towing setup is easy to hook up and unhook and the braking system is second to none. All of the installation was completed by myself and a friend, both of us have a technical background him more than me and we found the videos of the installation extremely helpful.Thank you for following up and providing excellent products as well as support services.
by: Bill07/22/2023
Great customer service fast delivery and reasonable price. Been purchasing from ETrailer for years
by: Gary Y08/18/2016
I like this product and would definitely buy it again. I like not having to splice into the vehicle wiring and install diodes, etc. It is a clean installation with good instructions. All I have to do to hook up the lights is raise the hood of the towed car and pull out the pigtail and hook it to the motorhome. It is powered by the motorhome and does not run down the battery in the towed car. Great product.

Gary Y.
8/19/2017
Works great! Would definitely recommend it.
by: Albert 10/28/2023
great kit i have installed them before
by: Frank S.05/25/2013
2010 Jeep JK
Great idea. After years of towing with magnetic lights now all I have to do is plug it in, and I'm done.
The kit kit comes with more parts and wire than I needed and was simple to install on my 2010 JK.

Frank S.
6/27/2014
Thanks Patrick. It works so well I forgot I had it.
by: Kim P.01/20/2015
This kit really simplifies wiring tail lights on a vehicle that will be towed. No cutting into the vehicle's wiring and adding isolation diodes. Very functional and easy to install.
Kim P.
1/26/2016
The parts are working perfectly. Thank you.
by: Robert11/12/2017
I have used the brake light wiring kit on 2 other towed vehicles. It is an easy install, does not compromise the original factory wiring and works well.

Robert
11/12/2018
Easy install, working well 1 year later.
by: Jack05/08/2019
Kit was of good quality components. I would recommend about twice a much protective wire wrap along with extra of the smaller butt connectors. Fortunitely I had what I needed on hand. I also used a larger ring terminal.

Jack M.
5/9/2020
Works great. 2002 Jeep Wrangler tail lights have plenty of room for the extra tail light bulbs.
by: W. Dore 07/19/2016
2007 Honda CR-V
Great product, not a bad install and works great. I chose to cut off both 4 flat connectors and I installed a 4 round connector with spring cover on the front of my CRV. Looks and work out great.

W. D.
7/19/2017
Still working fine.
by: Joel08/16/2014
2007 Jeep Wrangler Unlimited
Good instructions. Everything need is included for 4flat connections. One bulb socket arrived with the ground (black) wire loose in the bag. The solder joint had failed. Resoldered but had to remove the other wires and rubber insert from the bulb socket to avoid melting. Not a shining example for Roadmaster.
Joel
8/16/2015
no issues, working as expected
by: Kevin M.08/31/2019
2002 Toyota Tacoma
Nice to not have to splice into vehicle wiring harness. Separate bulb assembly in existing tail light housing works great for towing our "TOAD" behind motor home.
Kevin M.
9/2/2020
Still works great after a year of towing to many destinations.
by: EdP08/10/2017
2017 Chevrolet Sonic
A very clever idea for an easy, neat, simple installation to safely operate tail lights on a towed vehicle. We installed this kit on our 2017 Chevy Sonic and it works great.

Edp
8/15/2018
Thanks for the follow up. Everything is working just fine, no problems, nothing but good performance.
by: Simon 08/11/2023
2007 Mini Cooper
This time it went without a hitch. last time was another thing. hopefully moving forward its all good.
thankyou
by: Chasfm1105/14/2020
I really didn't want to install a separate bulb kit but our Equinox light was not compatible with our motor home. I was also installing a trailer lighting harness for the Equinox at the same time and doing them together made a lot of sense. I found this kit to be easy to manage and that drilling into the rear light housings not nearly as difficult as I had imagined. I would share a picture of the result but fortunately there is nothing to see - everything fit right into the Equinox's rear lamp structure. I compared the original lights with those from the kit driven by the RV and found them to be a great match. I upgraded the kit bulbs to LEDs for greater longevity.
by: Christopher S.08/23/2015
1999 Mazda Miata
I purchased this wiring kit for use in my 1999 Mazda Miata.
I did not want to cut into the OEM wiring harness, even using the diode method to safeguard the system. I felt that the fully separate wiring harness was more to my way of thinking for getting my car ready to tow.
I did not follow the included instructions that said to run the flat 4 wiring beneath the car, zip tying it along the way free of the exhaust and moving parts. I ran it through the firewall, beneath the dash, under the center console, and under the carpeting back into the trunk area. I then installed the bulb holders as instructed in my OEM Miata taillight fixtures.
I am happy to have all the wiring up and out of the way of potential road hazard damage, as well as the hot and/or moving parts beneath the car.
It works perfectly, and I am glad that I purchased this kit, and also that I decided to install it the way I felt best to do so.
It took much longer my way, but I'll never have to mess with it again.
by: Gordon 06/29/2023
Watched video and installed with no issues. Great product! Will buy again for future vehicles.
25
248
Show More Reviews
See what our Experts say about this Roadmaster Flat Tow Wiring Harness
- Parts Needed to Flat Tow a 2002 Honda CR-V Behind a Motor HomeThe Blue Ox base plates, # BX2238, do not fit the 2002 Honda CR-V. They are designed for the 2005 to 2006 CR-V. For a 2002 you would use # BX2232. Instructions do come with the base plates and I will also send you a copy of them. We do not yet have a video showing installation. In addition to the base plates you will also need a compatible tow bar like the Blue Ox Avail, # BX7420. I usually recommend this tow bar because it is versatile and it comes with another part you will need, safety...
view full answer... - Recommendations on Installing RoadMaster EZ Base Plate # 521181-5 on 2012 Scion xDAfter consulting my source at Roadmaster, I found that for the installation of the RoadMaster EZ Base Plate Kit # 521181-5 for your 2012 Scion xD, trimming of the spoiler, air dam, grille, or plastic fascia may be required and trimming of the lower air dam, air deflector, cowling and/or rock guard is required. The instructions for proper installation of # 521181-5 are linked. They are very detailed and show all the modifications that are required on your 2012 Scion xD. If you are looking...
view full answer... - Parts Needed to Flat Tow a 2012 Jeep Wrangler Sport Behind a Motor HomeFirst, there are 5 items you will need to flat tow your 2012 Jeep Wrangler Sport: base plates, tow bar, safety cables, lighting, and supplemental braking. Base plates provide the proper attachment point for a tow bar. Roadmaster has different base plates depending on how the vehicle is equipped, see link. After you select the base plates for your specific model, you will need a tow bar. I recommend the Falcon 2, # RM-520. It is the most popular Roadmaster tow bar. I have linked instructions...
view full answer... - Parts Needed to Flat Tow 2013 Jeep Wrangler Unlimited with LoD Signature Series Bumper Behind an RVI can't say if any of the tow bars we have will fit that adapter you found but we have an adapter that could work. Take a look at adapter # BX88296. It is specifically designed for an aftermarket bumper with 7/8" diameter lug pins. And it is made in the USA. With it you can use the Avail tow bar # BX7420 that has a maximum arm spacing of 38 inches. The other option is to have Blue Ox universal base plates # BX88266 installed on the bumper if there is enough space. Then you could place...
view full answer... - Parts Needed to Flat Tow a 2016 Kia Soul Manual TransmissionYou will need to put the ignition of your 2016 Kia Soul in the ACC position so that the steering wheel will be unlocked. The correct base plate kit for your 2016 Kia Soul with a manual transmission would be the # RM-522114-4. The base plate kit you referenced is for older model Souls so it would not be the correct one. In addition to the base plates, you will also need a compatible tow bar, safety cables, lighting, and supplemental braking to flat tow your vehicle. The most popular compatible...
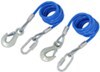
view full answer... - Flat Towing Package For 2012 Jeep Wrangler 4 DoorIn order to flat tow your 2012 Jeep Wrangler Unlimited 4 door, you will need base plates, tow bar, safety cables, lighting, and supplemental braking. For the tow bar I would go with Roadmaster Falcon 2 Tow Bar - Motorhome Mount - 2" Hitch - 6,000 lbs # RM-520 as this is a very popular option. For the base plates you can use Roadmaster Direct-Connect Base Plate Kit # RM-521448-5 which will work well with the Roadmaster Falcon 2 tow bar. Then you can use RoadMaster 68" Single Hook, Coiled...
view full answer... - Options for Installing RV Controlled Lights on a 2017 Chevy Malibu Being Dolly Towed You have a couple options for how to run your RV's tail lights when dolly towing your 2017 Chevrolet Malibu. The simplest option would be to install the Heavy Duty Magnetic Tow Lights - 20' Wiring Harness with 4-Way Flat Trailer Connector item # TL21RK. These lights have a magnetic base that will attach the lights to your trunk and then you will run the wiring harness over the top of your car and plug directly into the 4-way connector on your motorhome. This is the simplest and least invasive...
view full answer... - What Tow Bar Wiring Kit Is Needed For A 2001 Chevrolet TrackerThe RoadMaster Tail Light Wiring Kit with Bulbs, part # RM-155, will not work on a 2001 Chevrolet Tracker. There will not be enough room in the taillight housing to fit the extra bulb. The tow bar wiring harness you will need for your 2001 Chevrolet Tracker is the RoadMaster Universal Hy-Power Diode Wiring Kit, part # RM-154. On your 2001 Chevrolet Tracker with the 3-wire system (separate brake and turn signals) this wiring kit will use the vehicles brake lights to function as both brake...
view full answer... - Parts Needed to Flat Tow a 2003 Subaru ForesterSounds like your tow bar is not a Roadmaster tow bar and you are in need of an adapter to go from your base plate kit # 913-1 to your tow bar. Which if this is the case check out the FAQ article I attached to the right. If your tow bar isn't listed there you will need to upgrade to a new tow bar. The most popular compatible tow bar is the Falcon 2, # RM-520. For safety cables you can use # RM-643. The coiled design helps keep the cables off of the ground. For lighting you can use the...
view full answer... - Parts Recommendation to Flat Tow a 2014 Ford EdgeI checked the owners manual for your 2014 Ford Edge and under the recreational towing section there was no mention of needing to pull a fuse. Because of that I would not recommend you install the Roadmaster Fusemaster you have or pull any fuses. To flat tow your vehicle you will need to first start with a base plate kit. If you have adaptive cruise control you would want the part # 524426-1, without adaptive cruise control you would want part # 4408-1. In addition to the base plates,...
view full answer... - Parts Needed to Flat Tow a 2012 Volkswagen Jetta with 2.0 Liter Gas Motor Behind an RVRoadmaster lists base plates # 521236-1 for the 2.5 liter gas motor and 2.0 liter diesel motors of the 2012 Volkswagen Jetta but does not include any of the other 8 motor options for this vehicle. What I recommend is the Blue Ox base plates # BX3831 because they fit all models except the 2.5 liter models. For a compatible tow bar I recommend the Alpha, # BX7380. This tow bar is rated for 6,500 pounds and comes with safety cables so you will not have to buy any separately. I have linked...
view full answer... - Towing 2012 Jeep Wrangler Unlimited Sarah Behind a Motor HomeI can tell you that you can flat tow your 2012 Jeep Wrangler Unlimited Sahara if it has a manual transmission. I could not get information for flat towing models with an automatic transmission. The best place to check for flat towing procedures and restrictions is your owners manual. If you check your owners manual and determine that you can flat tow your vehicle, then there are 5 basic components of flat towing that you will need. Those are base plates, a tow bar, safety cables, tow light...
view full answer... - Base Plates for 2013 Honda CR-V That Work With Demco Aluminator Tow BarThere is a great option for base plates that will fit your 2013 Honda CR-V and work with your Demco Aluminator tow bar, which is from the same manufacturer, Demco. - Demco Tabless Base Plate Kit # DM9519328 Both will fit your 2013 CR-V and work seamlessly with your Aluminator tow bar so you don't need any type of adapter or other part. Along with the tow bar and base plates, there are a number of other parts you will need in order to flat tow your 2013 Honda CR-V if you don't already...
view full answer... - Flat Towing Wiring Options for 2002 Chevy TrackerTo see the various recommended wiring options for flat towing your 2002 Chevy Tracker, click the provided link. The most simple option would be a magnetic mount light set-up like part # RM-2120. A magnetic mount system has the advantage of remaining completely independent of the wiring system of the Tracker, which would keep the wiring of the Tracker completely isolated from the wiring of the RV. A more permanent solution would be a Roadmaster 6-Diode Universal Wiring Kit, # 154-792-118158....
view full answer... - Sway Control Activates On 2015 Ford F-250 When Flat-Towing 1999 Jeep WranglerIf you have anti-sway on your 2015 F-250, adding weight to the rear of the truck may not keep the system from becoming activated. The best solution would be to go slower when driving on roads with uneven surfaces. The # RP66022 you came from is a weight distribution system that is intended to be used with trailer towing and is not designed to flat-tow a vehicle. There are 5 items needed when you flat-tow a vehicle. If you do not have all the items needed I will make some recommendations...
view full answer... - How to Locate Installer for Blue Ox Base Plate on 2012 Honda CR-VIn order to find locations for the installation of the Blue Ox Base Plate Kit - Removable Arms # BX2258 on your 2012 Honda CR-V you can either follow the link at the bottom of this page, or use the "Locate installers near me" link on the actual product page. In addition to the base plate kit you will need the following to flat tow your vehicle: -Blue Ox Alpha 2 Non-Binding Tow Bar - Motorhome Mount - 2" Hitch - 6,500 lbs # BX7380 -Roadmaster Tail Light Wiring Kit with Bulbs # RM-155 -Roadmaster...
view full answer... - Installation Of Tow Bar Wiring To Flat-Tow 2014 Ford FocusWe have not had the opportunity to make a video of an installation of the Roadmaster Tow Bar Wiring, part # RM-155 on a 2014 Ford Focus. We do have videos of the installation on other vehicles and you can check those out. The vehicle may be a different make and model but the installation would be similar. The installation instructions are attached. The # RM-155 bypasses the vehicle wiring completely which eliminates concerns about the electrical system on the Focus or the manufacturer's...
view full answer... - Parts Needed to Setup a New Motorhome and 2012 Ford Escape 2WD for Flat TowingAccording to Ford, the 2012 Ford Escape should not be flat towed, but I did a bit more research on towing the 2012 Ford Escape front wheel drive and found that it is possible if you install a transmission lube pump kit according to Remco Industries, a lube pump provider. You should confirm the towability and pre-tow procedures for your vehicle with your owners manual or contact the vehicle manufacturer for towing instructions. We do not carry transmission lube pumps at this time. The base...
view full answer... - What Parts are Needed to Flat Tow a 2009 Scion xB with Manual Transmission and No Fog LightsThe first thing you are going to want to do is consult the vehicle owners manual for the proper procedure on towing the vehicle. If you find that the vehicle can be flat towed you will need 5 items. First, you will need base plates. These provide a safe and secure attachment point on the vehicle for a tow bar. For your xB without fog lights, you would need Roadmaster base plates, # 1187-1A. I have included a link to the installation instructions for you. Next, you will need a compatible...
view full answer... - Will Blue Ox Portable Braking System work on 2005 Toyota CorollaThank you for your recent order. Yes, the Blue Ox Portable Braking System, # BLU37TR, will work on your 2005 Toyota Corolla. This system activates the brakes in your towed vehicle at the same time and with the same intensity as the brakes in your RV. In order for the brake lights to activate when you push the brakes on the RV, you will need to install a wiring kit on the Corolla. We offer three different installation options. The Roadmaster Separate Lighting Kit, # 154-792-118158, connects...
view full answer... - Parts Needed To Flat Tow A 2020 Chevrolet SparkOne thing unsure from your question is the transmission type. The 2020 Chevrolet Park should not to be flat towed with automatic transmission models. Per the note below from the owners manual: "Vehicles with an automatic transmission should not be towed with all four wheels on the ground. If the vehicle must be towed, a dolly should be used. See "Dolly Towing" following." If yours is a manual transmission, below are the parts you will need to flat tow your 2020 Chevrolet Spark LT with...
view full answer... - Diagram for Wiring the Sockets of the Roadmaster Taillight Kit part # RM-155 to the Wiring HarnessTo wire the sockets of the Roadmaster Taillight Kit part # RM-155 to the wiring harness you will just need to follow the diagram I attached that details where each wire goes. I also attached installation instructions and an install video for you to check out.
view full answer...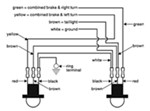
- Flat-Tow Wiring Harness and Supplemental Braking System for a 2016 Jeep CherokeeI do have options for you but neither the Roadmaster Tail Light Wiring Kit part # RM-155 or the Blue Ox Tail Light Wiring Kit part # BX88267 will fit your 2016 Jeep Cherokee as there is not enough room inside the tail light housing for the new bulbs. Instead, I recommend the Hopkins Custom Tail Light Wiring Kit for Towed Vehicles part # HM56208 as it is a completely plug and play kit that does not require you to cut any wires or the tail light housing. There won't be any issues using...
view full answer... - Does an RV Need a Trailer Wiring Converter to Use a Bulb and Socket Light Kit on 2004 Jeep WranglerThe Roadmaster bulb and socket kit # RM-155 requires a 4-Way trailer connector on the towing vehicle to power the bulbs. If your RV has a 4-Way already (or another common connector) then the signals are already converted and all you will have to do is install the bulbs and connect to the RV to power the lights. If the RV does not have a trailer connector then you will need to install one using a converter like # 119178KIT. I have linked isntructions for you to view. If the RV has a different...
view full answer...
Do you have a question about this Flat Tow Wiring Harnes?
Info for this part was:

Test Fit:
Joe V

Test Fit:
Nicholas E

Test Fit:
Shane T

Test Fit:
Randy B

Test Fit:
Jared G

Test Fit:
Andrew S

Test Fit:
Brent H

Test Fit:
Shane H

Test Fit:
Robert C

Test Fit:
Conner L

Expert Research:
Mike L

Expert Research:
Robert G

Expert Research:
Patrick B

Expert Research:
Michael H

Expert Research:
Jeff D

Expert Research:
Jameson C

Expert Research:
John H

Expert Research:
Adam R

Expert Research:
Lori W

Expert Research:
Jeffrey L

Video Edited:
Zack K

Video Edited:
Joshua S

Video Edited:
Jacob T

Video Edited:
Dustin K

Video Edited:
Chris R

Video Edited:
Zach D

Video Edited:
John S

Video by:
Andrew K

Video by:
Andrew L

Video by:
Alan C

Video by:
Jonathan Y

Updated by:
Lindsey S

Updated by:
Adele M

Updated by:
Wilson B

Updated by:
Hannah L

Updated by:
Isabelle B

Installed by:
Cole B
At etrailer.com we provide the best information available about the products we sell. We take the quality of our information seriously so that you can get the right part the first time. Let us know if anything is missing or if you have any questions.
Robertbenita
6/30/2014
Continues to work as it should! Very pleased with end product after installation by myself and continue to be happy every time I hook up since! Nice item! And customer service...Well they checked back with me a year later to see if I needed anything. How is that for the best customer service around! A