
Summer Starts Here - Save up to 70%
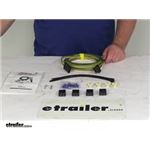
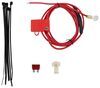
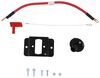
Carries brake and turn signals from your motorhome to your towed car while protecting against electrical feedback. Displays as a combined lighting system. Plugs into your 4-way flat connector.
Features:
Specs:
This kit will display on your towed car as a combined lighting system - also known as a 2-wire system. A combined lighting system uses the same light bulb to signal both braking and turning (in other words, the car signals a turn by flashing the brake light, while a separate/3-wire system light up independently of each other. Add a wiring converter (118158 - sold separately) and 2 additional diodes to get a separate lighting system.
Because your vehicle has a combined lighting system - wherein the brake signals and the turn signals are carried on a single wire - a brake light relay (RM-88400 - sold separately) may be required if you use a supplemental braking system with your towing setup. A supplemental braking system depresses the brake pedal in your towed car every time you apply the brakes in your RV. So, if your towed car's brake lights illuminate when the brake pedal is pressed and the engine is off - as is the case when towing - then you need to install a relay to ensure that the lights on your towed car always act in accordance with the signals sent by your RV via the wiring harness. Without a relay, the brake signal from your towed car will override the turn signal sent by your RV when you slow down to make turns, creating a potential hazard.

Videos are provided as a guide only. Refer to manufacturer installation instructions and specs for complete information.
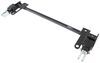
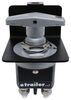
Hello neighbors. It's Brad here at etrailer. And today we're taking a look at installing the Demco diode wiring kit for a 2022 Ford Maverick. Now there's five main components when flat towing a vehicle. And on the vehicle side, we'll start with the base plate. And the base plate is just gonna attach to the frame of the vehicle, creating a solid mount to allow you to have your arms that are gonna attach to your towbar.
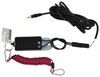
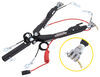
And that's gonna be your second component which is gonna be the connection point between the vehicle's base plate and the hitch on the RV. Now you also have your safety cables which in case of an accidental disconnect are gonna keep the vehicle attached to the RV. You also have a supplemental breaking system and right here, we have our breakaway switch. So if the vehicle does become unhinged from the towbar it's gonna pull the cable putting the brakes on the vehicle, bringing it to a stop. That way it's not rolling down the highway.
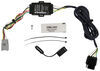
You also have your diode wiring which you can see is gonna be this umbilical. That's gonna transfer the light signals from the seven pole on the RV to the six pole on the vehicle. That way you have your running lights, your turn signals, and your brake lights. And that's just gonna keep you safe and legal letting people know behind you, what you're doing. So what does diode wiring do Well, many times when you see a flat towed vehicle you're gonna see some magnetic lights that are stuck onto the vehicle and that's gonna transmit the running lights, brake lights, and turn signals, or to the back of the vehicle on those, to let the people behind you know what you're doing.
But if you flat tow your vehicle often, instead of having to run those lights and drape the cable over you can tie into your factory lighting. And that way, when you hook up your umbilical, that's already gonna have that light signal transferring from the RV to the towed vehicle. Now, those light signals are transmitted through the umbilical and the kit is actually able to be purchased with, or without the umbilical. Some of your tow bars will have them integrated or come with the umbilical. So depending on which tow bar you have, you may need to pick up the kit that has one.
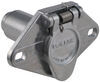
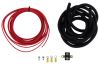
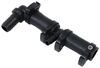
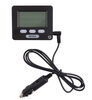
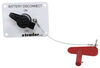
Now this kit, you are gonna be tying into the factory taillight wiring which can stray people away but really it's not too hard to do. And it's gonna be nice because when you plug it in you're gonna be ready to go. Your lights are gonna transmit that signal. And when you're just driving the vehicle around it's not gonna interfere with anything. So it retains all your factory operating of those taillights. So there are other options available as far as a bulb and socket kit, where you drill into the taillight and mount a separate bulb, and that way you don't have to tie into that taillight wiring. But sometimes that really opens it up to have moisture build up in your lens. And overall, this is a pretty easy one to do. And in fact, we did the install here in our shop and I'm gonna walk you through how to get it done. Now we have our fascia off because we're in the process of getting this set up for a flat tow setup. And if you're doing the same thing that's gonna be a lot easier to get your wires ran. So what I've actually done is just kind of make sure that I have a little bit of extra wire here, right on these mounts. And that's gonna allow us to really tie this in because if it's short it's gonna make it really hard to make those connections. So it's better to have just a little bit of extra. Now, some breaking systems are gonna require to tie into your diode wiring. So if that's a case, you might wanna route this up into the engine bay, just make a quick loop. And that way it's gonna be also easier to tie into that. But if your breaking system doesn't require that, no problem. We're gonna just route this back. Now, we also have a charge line here which you can add on when you're doing a flat tow set up. It's just gonna make sure that your vehicle is gonna get charged while towing. That way, when you get to the campsite or wherever your destination may be, your battery's not gonna be dead and you're gonna have to charge your towed vehicle. So you also gonna wanna run this at least up to where we're gonna be tying into the six pole because this will go into our connector. Now, as far as the rest of the diode wiring it's just gonna run back and I highly recommend taking off the skid plates. It's gonna make it a lot easier to run those wires. And just, throughout the whole process make sure that you're not touching anything that's hot, like the exhaust, or any moving parts, whether it be an axle, suspension, sway bar anything along those lines. So I've pulled mine up into the engine bay because of our braking system and just routed our way down. And you can see I've just used this sub frame support to tie it up. And that way it's not gonna make contact with the sway bar. And then I drop down this underbody panel, again just to make it easier. And plus once it's up here, in the underbody panel goes back up it's gonna keep it in place. It's not gonna be dangling down. So, just making some zip tie connections along the frame rail here just to kind of keep it up in place. And then you'll see at this point I've pulled our white wire. I cut the 4-pole off and strip this back and that's so we can attach to this factory ground. And it's also gonna be twofold because that extra white wire we're gonna be using to jump in between the diodes between the taillights. So, this is a good way to save yourself a little bit of extra wire. That way you don't have to pick up any extra. So this one seems to be a good grounding point and it's also gonna give us enough wire. Now from here, I also ran this up and made our split. So I have my green wire. I've pulled that and separated it from the yellow and brown. And just started to route this over using again, some of the factory wire loom, you can see my zip ties here kind of attaches some of the brackets and then I've made it right here. And I pulled this panel out, just so we can run this up to our taillight. Now, the other wires, since we split it this is gonna be going to our driver's side our yellow and brown here. So I kind of just made my way over here. Now the muffler is right here but we do need to get it in this pocket. So I think the way that I ran it here is gonna keep it up to where it's not gonna make contact. And we still have our wire going to where our taillight pocket is gonna be. So since we'll be tying into our taillight wiring we're gonna want to go ahead and get our taillights out. So an eight millimeter socket, there's gonna be two screws here so we'll go ahead and get those removed. Then you get your taillight out. A lot of times they'll have clips. This one's pretty easy here. You just kind of wiggle it back and forth and it should separate pretty easily. So just take your time. You don't want to damage any clips or anything like that. So just kind of give it a little bit of pressure work it back and forth, and those clips should pop out. So here's those clips. You can see kind of the angle that they sit. So pulling it kind of out towards myself here you can see I'm kind of at the diagonal here, that should allow that to pop out. So if you're having trouble, you can see where these pop in. You can kind of put a little pressure on those spots specifically. So since we're gonna be tying into the wiring to make this easier, we're gonna go ahead, just unclip this, push that tab in, pull this out and we can set our taillight aside. Now we need to pull back some of this insulation tape here and that's gonna allow us to get access to our wires. And something that I recommend is really pulling this back. There's a firm, kind of hard, line here that just kind of keeps these in place. You can kind of go all the way back there and tying into the wiring back here is gonna make it a lot easier. I think, personally, to get this plug back in sometimes when you put it this close, it's hard to kind of get some space here. So I'll go ahead and peel back our insulation. Now it can kind of be tricky. So if you're gonna cut this, be very, very careful obviously not to cut or damage any of the wires. So I've gone ahead and tested to make sure that we have our running light and also our break and turn signal wire here. So, you're gonna want to grab your solid purple and then your white with green stripe. Now be very careful because there's also a purple with a green stripe. So make sure you're not grabbing that one. And just to double check yourself, it should be the number one and two pin. So if you kind of look up top here, should be these two. So what we're gonna do is just go ahead and I'm gonna make a cut right about here. And then we're just gonna strip this back. And in the kit, there's actually two different color spade terminals, and it looks as if the purple one is a slightly smaller gauge wiring, which I think is gonna be great for these. So we can save these for the wires that we pull up, but for now, we'll go ahead. We'll strip this back And we can just put one spade terminal on each end of the wires here. So these are pretty small wires here. So you might want to just kind of twist them up kind of get some of the frays out, that way you can feed this into the spade connector. And then once we have those fed in, we'll just go ahead and get these crimped down. And after every connection that you make, I always go ahead and just kinda give it a quick tug just to make sure that it is good because it's very easy for these to kind of just pop out and you don't want to have to go back and trace 'em. So just make sure that it's a nice, solid connection there. So we'll go ahead and get the rest of the purple on these wires. Now we can fish wire up our brown and yellow wire and you can actually see pretty easily through here. So to make it a little easier you can use something to pull it up whether it be a string or I have an airline tube here and it just makes it a lot easier to route this wire up. So I'm gonna feed this down, tape those wires, and then pull this up. We'll just pull up all of our extra slack here. And then at this point, obviously we have quite a bit of extra wire, so I'm gonna just cut it right here. And that should give us plenty to work with. So now I'm gonna go ahead and just strip back these ends here. Now I mentioned earlier the ground wire that I mounted up a little bit earlier, and this is the extra white wire that I have, and this is gonna create a jumper between the two tail lights. So what I'm gonna do is strip this back as well because we're gonna need these, this to tie into our brown wire. So what I'm gonna do is go ahead, take the brown and the white wire. We're just gonna twist this nice and tight and that way we can get our spade connector on here. And then we can go ahead and put a spade terminal on our yellow as well. Now, the extra white wire here, we can feed this back down as we're gonna run this over to the other taillight. So, you can go ahead and just pull that slack back out just the same way that we routed the brown and yellow. So, now that we have spade connectors on all of our wires that we're gonna be tying into, we can go ahead and grab our diode. And on the diode, you can see it's labeled "in in" and then "out" on the single one the "out" is going to go to our plug to the taillight. So we'll go ahead and attach one here. And then we can actually go ahead and take the other diode and do the same thing. And our turn signal wire is going to be our yellow that we fed up and this is gonna tie into our white and green. So we can go ahead and just plug this in. And then we'll just take our other white and green wire that we have, and make the other connection. Now it doesn't matter which one you put it on as far as the "in". So we can go ahead and just slip this on our other diode, pretty similar. We're gonna just take our purple match that purple up to it. And then we'll have our white and brown. We're gonna tie this in. Ope. So that's why we check. You can see how easily that fell out. So I'm gonna go ahead and re-crimp this and make sure that it's holding on well, with that new spade connector on there I'm gonna go ahead and make these attachments. And I'm gonna try to also make sure that our wires are staying nice and kind of organized here. So you can see we got these all attached. So what I'm gonna do is just wrap this up with some electrical tape. You can zip tie it as well. It's up to you, but truly, really just trying to make sure that these wires don't pull out. So running some tape here right before all the connections and also right after the connections here, that's gonna kind of ensure that, over time these aren't gonna loosen up. It's gonna keep the stress off the wire so we can go ahead and do that. So now we have all these tied up and nice and safe. We can go ahead and plug in our tail light and get this put back into place. You may need to tuck this into the pocket but we have plenty of space to do that. Pop those pins back in. We'll tighten this up and then we're gonna go ahead, we will route our white wire across and then start taking off the tail light on the passenger side. You can see, I do have some extra wire here that we tied into the driver's side. And after all, we get our passenger light in. I'm gonna go back and just zip tie everything up, so it's nice and clean, but I do wanna show you the way that I routed our extra jumper wire. So I kind of just routed this down and passed it through this frame support here and then just kind of use some of the frame portion of where the hitch is. So I'm gonna go back and zip tie this up but you can see it's got a nice open pocket here. You just wanna make sure that its zip-tied. So it stays away from not only your hitch receptacle, but also your tire here as well. So I just routed it through this panel and then just pulling off some of the screws. It's gonna allow you to kind of have some access here. So I took the green, fed the white in zip, tied 'em up, and then I used the same fish wire technique to pull them up. Now our passenger side is gonna be pretty similar to our driver's side, but the wires do change colors. So let's walk through that. You can see, we have our orange with white, I'm sorry a white with an orange stripe. That's gonna be our one side. And that's where our jumper wire, so our white one, is going to tie into, and then we also have, it's like a violet with a purple stripe. That's gonna be tied into our green. So pretty easy again, we'll just make that attachment there with some tape and then we'll get this plugged back in. So we've got this back in place. I'm gonna go ahead and tie up those wires with some zip ties and then we're gonna head up front and make our connection to our six pole. Now with our fascia reinstalled we can go ahead and hook up our six pole. Now, before cutting wires, you're gonna wanna make sure that you have the fuses taken out of your charge line, if you have one, and also the power that's running to your braking system, because we are gonna be cutting into these. We don't want electricity going through 'em. So what we're gonna do is I've actually run a little bit of wire loom here just to kind of clean up some of this, that's up to you, but really find a spot where the wires are nice and even this is obviously, I have plenty. So when I ran my wires, I made sure to leave some but we can go ahead and cut these back. So now at this point, we're just gonna go ahead and strip the ends back just a little bit so we can get our six pole all hooked up. So here we have our wire stripped back and what I'm gonna do is feed our boot on. And that way we can make our attachment and this is gonna kind of seal it up once we're done. So what we have on the backside of our plug is pretty simple. You have multiple different spots here and you have a small flat head in order to loosen these up. Now, I highly recommend don't back them out all the way but pulling that screw back is gonna allow us to put our wires in and then tighten them into place. Now, there are labels here as to where to go. I'm gonna hook mine up and then I'll walk you through where they all need to be. So I have them all attached here and you're gonna see arrows with letters pointing to the hole that will, you'll have the corresponding wire. So your right turn signal is gonna be your green. Your left turn signal will be your yellow. GD is gonna be your ground for white. TM is gonna be your tail markers, so your brown, and then in the center here, since we have a charge line, that's gonna be your 12 volt accessory. So you can go ahead and get that on there. Now, before I cap this up I'm gonna take some dielectric grease just to kind of prevent moisture from damaging the wires and just kind of keep them healthy long-term. So we can go ahead and goop some of that on. So now we're gonna go ahead and take our boot and slide it on our six pole. And this is just gonna protect it long term. So once we have this slipped on, what I'm gonna do is take some electrical tape and I'm gonna just wrap it all around it, just to make sure that it's sealed up properly. Now to mount this up you can use your self tappers and just kind of drill those in here, just to kind of make that secure. But the kit comes with, or at least the base plate that we have, comes with this little bracket which also allows us to have our breakaway cable here. So you may need to clear that spot for the breakaway cable to fit and then use this bracket to align them all up. And also this vehicle has the active vents to open and close for the radiator. So just make sure that your wires are also out of the way you can zip tie 'em up to these plastic portions or the arms here, just to make sure that you have clearance for those to still work. And then once you have that all done, it'll just go ahead with your self-tapping screw and zip this down. So now before we hit the road, all we need to do is test to make sure that it works. Now, to test we're using a test box to simulate hooking up to an RV but you can also hook up to your RV and have that umbilical plugged in your seven-way. And then you're gonna run through the light sequence on the RV. So we're gonna start here with our left turn signal. Next, we'll do our right turn signal. Then we'll do our running lights. And then finally our brake lights With everything working properly, all that's left to do is finish up any of your flat tow components before hooking up, get in your car in flat tow mode, and hitting the road. And that was a look and installation of the Demco diode wiring for a towed vehicle on a 2022 Ford Maverick..
Average Customer Rating: 4.7 out of 5 stars (7 Customer Reviews)
Carries brake and turn signals from your motorhome to your towed car while protecting against electrical feedback. Displays as a combined lighting system. Plugs into your 4-way flat connector.
We installed the system with relative ease. We used a vehicle lift to install the wiring underneath the vehicle. Works nicely with our flat towing system.
Great product, easy directions
What I expected. Wish the harness had been two feet longer (installed on JLUR). The installation video one etrailer.com was a good resource. Worked as advertised.
Plug and play, pretty much, product works and is still working! Thanks.
Great product, but you need to be handy, and have some technical knowledge.
Do you have a question about this Tow Bar Wiring?
Info for this part was:
At etrailer.com we provide the best information available about the products we sell. We take the quality of our information seriously so that you can get the right part the first time. Let us know if anything is missing or if you have any questions.


Thank you! Your comment has been submitted successfully. You should be able to view your question/comment here within a few days.
Error submitting comment. Please try again momentarily.