
To see if this custom-fit item will work for you please tell us what vehicle you'll use it with.
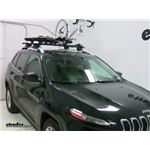
Extremely quiet, aerodynamic crossbars attach to Yakima towers to create a stylish roof rack for your vehicle. Rubber strips in T-slots push down to load carriers or accessories - no need to trim. Full-length aluminum bars maximize carrying capacity.
Features:
Yakima JetStream Crossbars - 50" Long - Black - Qty 2:Videos are provided as a guide only. Refer to manufacturer installation instructions and specs for complete information.
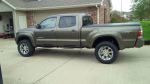
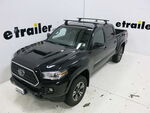
Hi, I'm Matt, with etrailer. If you're trying to haul those longer items that won't fit in the back of your bed, and you wanna get that clean finish to the top of your 2022 Toyota Tacoma, then the Yakima roof rack is gonna be a great option for you. So let's check it out. So with the Tacoma, you do have a decent amount of storage in your bed, and you can use it for a lot of items, but if you are trying to haul those really long items, you might be limited. Anything from a kayak to skis, or maybe a ladder or some lumber, you're probably not gonna be able to fit that in your bed. So the next best place is gonna be on top of your roof.
We are gonna have plenty of real estate. And what's really nice is if later on maybe you're doing some overlanding and you need a little bit more space, a little bit more support up there, you can actually get a ladder rack and make like a whole overlanding rig, so you can even put more items and accessories up here. Our kit today is gonna be made up of three parts. Up top we're gonna have our 50 inch JetStream crossbars. Beneath that, we're gonna have our BaseLine towers, and that's gonna connect to our fit kit.
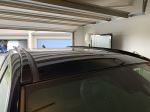
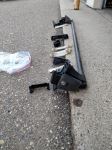
So let's look at our crossbars. So we're gonna have this designed to the shape. This is actually made the be more aerodynamic to help reduce wind noise. It's also gonna have this weather strip that's built into here. And this is also gonna help reduce any wind noise from getting into that T-channel.
It's gonna keep any debris from getting in there too. I do like that it is built in, so you don't have to cut anything to size. And the reason why you might want a T-channel, is if you have any of those T-channel accessories, and let's say you're really trying to maximize the real estate on these crossbars, and you don't have enough room to clamp your accessories on right there, well, with the T-channel, you can actually push it all the way to the top, and really maximize these crossbars. And beneath that, we're also gonna have an additional T-channel. What this one's doing is grabbing onto our towers.
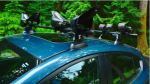
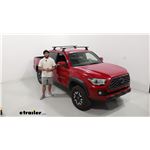
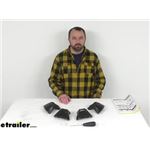
And your towers is what's connecting your fit kit to your crossbar. And if I remove this, you can kind of check out what's going on under here. What's neat about the Yakima towers is yes, there are a few bolts you're dealing with, there's gonna be two of them, and there's a little bit more to it as well, but these are some pretty advanced towers, because they can really accommodate to the shape of your roof, which is kinda important for us today, because our front crossbar, or the front of our truck, does taper in a little bit and does have a little bit of curving to it. So these towers are gonna make it possible to get us to have a level surface on top of our roof. But I'll put this end cap back on. And you probably notice that we have this little circle right here. That's just gonna be a plastic core. You can actually get this changed out later on for a metal locking core for more additional security, so no one can come by and take your rack. You can actually get this keyed alike to any other Yakima accessories as well. And this tower is gonna grab onto this fit kit. This fit kit is grabbing onto the gutter of our door and the top of our roof, and I'm really liking the fit we have right now. You can see how perfectly that contours to the shape of this edge, giving us a really clean finish. Let's get a few measurements real quick, just to see how this is gonna live on top of your Tacoma. So the first one I'm gonna see is gonna be the overall height. That's gonna be a little bit under five inches, which isn't too bad. It is something to consider if you're in any really low-clearance areas, especially when you have gear on top of this. So what I recommend doing is just taking the total height of your vehicle, your crossbars, and whatever's on top of those crossbars, so you know whether or not you can make it. Then we can get a measurement underneath, and that's gonna be about a little bit under 3 1/2 inches, which is also pretty good. That's gonna give you plenty of space when you do have those more bulky clamp-on accessories. Now there might be some really tight spots if you need to tighten something into place, but the fact that we can get in our bed and adjust that is gonna make this a lot easier. And we need to get our crossbar spread, and that is gonna be the distance from one crossbar to the other. So what I like to do is either measure from the end of one to the end of the other. And we're gonna have 32 inches right now. And that's gonna be set in your instructions. So really this is gonna be more of a fixed point, so you won't be able to change this. So it's important that you check that whatever gear you have is gonna be able to work with this crossbar spread. Now we are gonna have a little bit of overhang too, and this is gonna be pretty minimal. This is gonna be great if you have any accessories that have any smaller clamps that can get around here, and you want closer to the edge of your vehicle, just so they're a little bit easier to access, but it's not gonna stick out too far where you're gonna be likely hitting your head on them. As for how much this is gonna be able to hold weight-wise, your limiting factor is probably going to be your roof. Now what I'd recommend doing is just going into your owner's manual and checking that, and also checking what your fit kit is rated for. That should be in your kit as well. Then going from the lowest rated component and then not going above that, just so you don't damage anything. Now in my opinion, I think this is a really great rack for the Tacoma, because it does give us that clean finish to the top. It's also able to meet he contour to our roof as well. Now, if you are planning the really this out and make more of an overland setup with this, and you almost want a platform on top of your roof, then I'd recommend also checking out the Yakima OverHaul ladder rack, 'cause what's really neat about that, is you can get it keyed alike with what we have today, and that ladder rack's gonna be able to raise and lower some, so you can get everything even and aligned. We get a really clean setup. Now, if you're just looking at other roof racks, I'd also recommend recommend checking out the Thule roof rack, because that's also gonna have a really clean finish to it, and it's gonna be really easy to work with. Now this is pretty easy to work with too, but this is gonna have a bit of a cleaner, more custom-fit design, because we are able to accommodate to the shape of our roof. Now if you are curious about this installation, just stay tuned and we'll walk you through it. Let's start off the installation. We're gonna lay everything out. Now I'll go over them a little bit more in detail as we go through, but you'll probably also notice I have my front crossbars up there. It's gonna be the same process for both of them. Now the only difference is we might have a few different measurements and some different clamps, but I'll go over that later on. We're gonna start with getting our crossbar prepped. So what we're gonna do is flip this around, and what I like to do is just double check to see if we have an arrow somewhere on here, because we wanna make sure that arrow is facing forward. Now once you find that arrow, you can make your adjustments. I need to flip mine around. And from this point I like to take my end caps off. We have to use pulling that tab, it will slide right off most times. We've had these in the shop for a little bit, so they've taken a little bit of a beating. With that off, I can put on my towers. Now I'm gonna put the first one on, that's gonna be on the further side from me, so I'm gonna put it on in this orientation. The way we're gonna do that is by sliding it into this channel with that little block. Again, I'm pushing that all the way to the other side. And then I'm gonna repeat that process, but the one on my side only facing the opposite direction. Now we can get our M3 measurement, and that's just gonna be the distance from one tower to the other. Now a good trick you can do is to get that measurement from your instructions, and then take that number in half and go from this arrow that's in the center, just so everything's even. So that's just gonna look like this. If you need to make some adjustments, you can just easily just pull this in and push it out some. We can focus on the pitch and toe now. So you're gonna have two different points you can adjust. There's gonna be a bolt right here. This is gonna be your toe, and this one here is underneath this cap. I can actually show that if I just pull on this tab over here. And that's gonna reveal this bolt that's hiding out. Now we're in luck, because the settings of these are gonna be on two and B, so that's gonna be the center line for each one of them. So we don't have to adjust these anyhow. But on the front ones you are gonna have to adjust that a bit from one to A. I'll show you how to do that real quick. All you have to do is make sure this is loose, and just adjust it to wherever you need it to sit. So if it needs to sit in the A position then you need to sit further this away from you. Then you tighten that down. But I'm gonna put it back here, because we need it in the two position. Once this is tightened down, then we're gonna repeat that on the other side and put our bases down. And the way you put your base on is pretty simple. You are gonna have this opening right here, and this is gonna attach to this middle bar on your tower. You wanna make sure this opening is facing out away from the center of your crossbar. Then you're just gonna apply some pressure till it grabs on. I like to just twist mine a little bit to make sure it's not gonna fall off. Once you've done that, and you need to adjust for your toe, which we don't have to do on the rear side, but on the front side you will, you're just gonna loosen up this bolt, and you can actually just push this base around, and it's gonna change where that bar sits. After you made your adjustment, you place it where we need it to sit, and tighten it back down. With our crossbar prepped, we wanna make sure this is in the right orientation. So there's gonna be a thicker side of this. We want this to be facing forward, and the thinner side behind us. Now since we have the rear crossbars, they're gonna go behind the front ones. And for now we're just gonna roughly place this where it needs to sit. Typically, you wanna put down the front crossbar so you can find where the second one goes, where the rear one goes. Now if you reference your instructions, you'll find the M2 measurement. That's gonna be the distance from the top of your windshield to the front of your front crossbar. And then after that we're gonna use the M4 measurement to figure out the distance from the center of our front crossbar to the center of our rear crossbar. We wanna make sure we do that on both sides, just to make sure this is square. So after when you check it, it feels pretty good. We can also look at how it's fitting up here. So right now, this is actually just a tad bit shorter than I'd like, 'cause we don't have a whole lot of overhang with the way this is grabbing onto this tab on the side. It's not really grabbing on there the way I want. So what I'm gonna do is just flip this around again, just loosen up some, push it out a bit, and try again. We're gonna start securing this onto our roof. So to do that I'm gonna grab my clamps for the rear side, that's gonna be B49. They're gonna look a little bit longer than the front ones too. And what I'm gonna do is just open up this door, so we can grab onto my gutter. Also, it's not a bad idea just to press this tab in, secure it into place. We're gonna open up this access door, and then we're gonna put this hook where this opening is, underneath this middle block. Just like that. Now what can happen a lot of times is this is gonna be too tight to put this clamp on. So what you should do if you run into that is come over here to the swing bolt, loosen that up some. And what that's gonna do is raise this up, so it's a bit easier to do. The same thing for our drive bolt. If this is too tight, it's gonna be really difficult to get this in place. But once you've adjusted for that, I like to start with my swing bolt and tighten that down till we get a fair bit amount of pressure, not all the way down though. And then I'm gonna move over to the drive bolt. And what I'm trying to do here is tighten this enough, just so it can make contact with the gutter. Maybe just a slight bit of resistance, nothing crazy. And once it's done, I can repeat this process on the other side, and going back and forth until this is all the way tightened on top of our roof. And when you're getting nearer to the end, it'll let you know if it's all the way tight, (bolt clicking) if you hear that click. Just make sure you do that on both parts with both bolts. (bolt clicking) You know that's all the way tightened down. And now I can just close this access door, and close my door, and make sure this feels secure. And the last step is just gonna be putting this end cap back on. Gonna be these two little hooks that grab onto these two spots. So the trick is really just putting it on at an angle, then applying some pressure. (hooks clicking) That'll clip into place. And then you can load it up with whatever gear and accessories you have, and take it out for a ride. But that's a look at some of the features, and the installation, of the Yakima roof rack on top of our 2022 Toyota Tacoma. I'm Matt, thanks for watching.
Average Customer Rating: 4.8 out of 5 stars (273 Customer Reviews)
Extremely quiet, aerodynamic crossbars attach to Yakima towers to create a stylish roof rack for your vehicle. Rubber strips in T-slots push down to load carriers or accessories - no need to trim. Full-length aluminum bars maximize carrying capacity.Super happy with my purchase from e trailers purchased yakima roof rack. Knowledgeable sales rep.Help me through the process on purchasing my roof rack Recommended to anyone quality parts
Excellent solution for my 2023 Chevy Silverado. In the past, I have had rails installed on the roof of my pickup trucks, but I find the BaseLine towers to be a better solution, since they don't permanently change the truck. Plus, they are much more solid than SkyLine system on the rails.

Love my Yakima roof rack!! It exceeds my expectations.great product. Also thank etrailer for the tec support! great staff always there to help thanks again!!
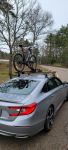
For a 2015 Mazda 3, 4 door sedan.
I used the 50" jetstream bars with the skyline towers and the #22 Landing Pads.
Went together easy, great quality, very solid feeling! And, easy to remove and install when needed.
Follow the instructions, and you can't go wrong on the self installation
Fit our Subaru Forester perfectly. Install was a breeze.
Really easy to install & work as specified. So happy with the customer support/service at etrailer.
Your notice of schemes was a lot better than the yakima site provided. They did not suggest the scheme you did.
But when the products arrived, the instructions were by yakima. Generally worked as instructed except the tower to tower transverse mounting dimensions needed to be tweaked for a perfect fit.
Still look and work great after a year. Fantastic investment and they didn't reduce my fuel economy. They don't produce a lot of wind noise either.
Ackage came 2 days early the install was somewhat easy (did it by myself)
Did not get to mount anything to it but seems really sturdy. One thing I can say is mark out your mounting points with provided stickers then put up and make adjustments to the roof rack.
I chose Yakima because I had one in the past and they were always reliable. Thule was my next choice but didn’t like the look of 53’ crossbars on my car. I really appreciated the easy to follow instruction that made installation a breeze. The kit came complete with everything I needed to install right out of the box. I purchased the 2 Hightower bike racks to go with the roof rack system and plan to safely secure both bikes for our trips. It was a bit heavier than I anticipated (combined with the bike carriers) which will hurt my MPG but having easy access to disassemble the bike carriers when not in use made it a no brained. Additionally, I love the look of the system on my car.
I waited several weeks for roof rack to arrive after ordering online. I am accustomed to Thule racks, but could not find any towers/bases to fit the 2019 Santa Fe. Once here, the Yakima rack mounted with ease and I look forward to hauling kayaks or basket on the roof.
Thank you etrailer.
Great bars and easy installation on my 2012 Prius C
The yakima jetstream crossbar looks beautiful. Quality is great. Took my vehicle for a test drive, and i didnt hear anything loose or broken from the bars. Very satisfied with the product and the instructions were great. It was my first time installing a roof rack too.
Solid build quality and easy installation on my '21 Mazda CX-5.
So far so good. Purchased these towers to use on a 2022 GMC Canyon with HD bars that I already had, primarily to carry my canoe. Yakima's fitting instructions worked perfectly and the whole system seems really solid.
The installation was super easy, and despite a long time stuck in shipping the delivery itself was extremely fast, and the package arrived in spotless condition. The manuals were very easy to follow, and the end result is absolutely amazing. I love that there's a rubber piece in the top rail that doesn't need to be cut, which makes it a very flush and smooth fit. I also love the modularity and the weight that it can handle, especially for the stuff i plan on carrying.
Lightweight and actually quite quiet with no attachments on them. With my bike racks there is a fair amount of noise but it doesn't come from just these. Mine is on a 2011 BMW 335.
Well packaged and on time
not installed yet but everything was delivered on time and in good condition
the product was exceptional. I would recommend it to anyone, who has a vehicle with a naked roof. It is a solid as a factory installed rack. Josh went out of his way to get me a replacement torque screw driver because the first one from Yakima was working properly.
Great product. Great service.
very informative and great work
Well you asked for it so;
I ordered this as part of my roof rack for a 2021 Nissan rogue. The complete roof rack set was unavailable le as one bracket was on back order and said would ship in under a month so I ordered everything else in the meantime. Little did I know it would take a over a year to get one stupid bracket and yes, I'm still waiting. I can't even return the items I bought because it's way past the 90 day policy even though they're brand new still in the box collecting dust. etrailer, this has been the worst experience I've had yet with you guys. Oh still waiting for my one bracket to complete my roof rack
Do you have a question about this Roof Rack?
Info for this part was:
At etrailer.com we provide the best information available about the products we sell. We take the quality of our information seriously so that you can get the right part the first time. Let us know if anything is missing or if you have any questions.


Thank you! Your comment has been submitted successfully. You should be able to view your question/comment here within a few days.
Error submitting comment. Please try again momentarily.