
Custom RCP Fit Kit for 4 Rhino-Rack RC and RV Series Roof Rack Legs - Fixed Mounting Points
(179 reviews)
Price: $111.71
In Stock
Custom RCP Fit Kit for 4 Rhino-Rack RC and RV Series Roof Rack Legs - Fixed Mounting Points
Item # RRRCP43-BK
Retail:$119.99
Our Price: $111.71
You Save: $8.28
Will this fit?
To see if this custom-fit item will work for you please tell us what vehicle you'll use it with.
In Stock
Thank you! Your comment has been submitted successfully. You should be able to view your question/comment here within a few days.
Error submitting comment. Please try again momentarily.


Need help with installation?
Locate installers near me- All Info
- Reviews (179)
- Q & A (0)
- Videos (1)
- Photos
Rhino Rack Roof Rack - RRRCP43-BK
- Fit Kits
- 4 Pack
- Rhino Rack
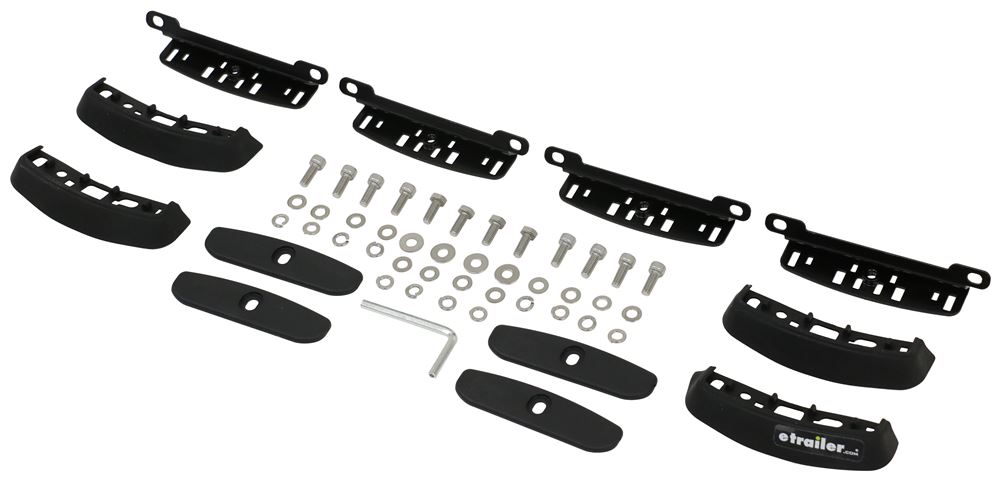
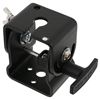
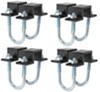
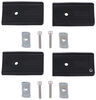
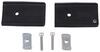
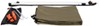
Custom fit kit lets you mount Rhino-Rack RC or RV series legs to a vehicle with fixed mounting points. Legs mount to vehicle with attachment studs. Molded inserts cover bases when the legs are removed. Includes 4 pads, covers, and mounting hardware.
Features:
- Custom fit kit allows you to mount 4 Rhino-Rack RC or RV series legs (sold separately) on your vehicle with fixed mounting points
- Threaded studs screw into fixed mounting points to provide attachment point for legs
- Legs slide onto studs and secure with hex bolts
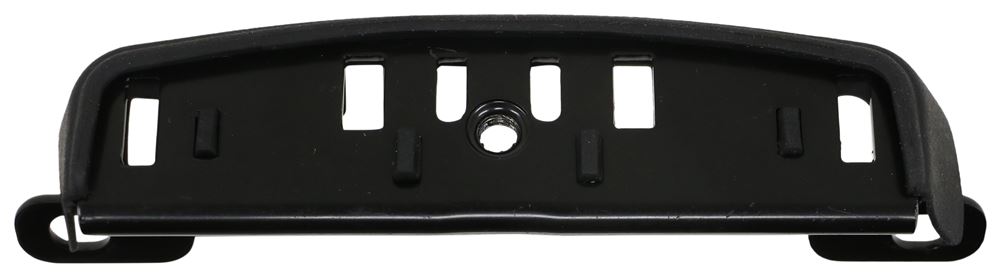
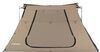
- Molded-rubber pads are designed to fit the contours of your roof
- Protect your roof from scratches and abrasions
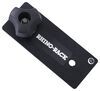
- Precision-molded inserts cover bases when the legs are removed
Specs:
- Application: Rhino-Rack RCH, RCL, RVH, and RVL roof rack legs
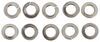
- Quantity: 4 pads, 4 covers, and mounting hardware
- 5-Year limited warranty
RCP43-BK Custom RCP Fit Kit for Rhino Rack RCH, RCL, RVH, and RVL Series Roof Rack Legs - FMP
Installation Details


Video of Custom RCP Fit Kit for 4 Rhino-Rack RC and RV Series Roof Rack Legs - Fixed Mounting Points


Videos are provided as a guide only. Refer to manufacturer installation instructions and specs for complete information.

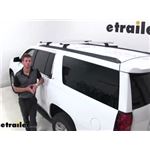
Video Transcript for Rhino Rack Roof Rack Installation - 2019 Chevrolet Suburban
Adam: Hi, everyone, Adam, with etrailer.com. Today we're going to be taking a look at the Rhino-Rack roof rack system on our 2019 Chevrolet Suburban. So we do have these silver 59 inch crossbars on here right now, but we also have them in black so if you think that'll look better on your Suburban, whatever one you think, just go ahead and grab the best one for you. So, we are going to be able to put up quite a decent amount of stuff on this roof rack. It does have a weight capacity of 165 pounds, so be sure to check your owner's manual of your vehicle to make sure it's going to be able to handle that weight, but it will take any T-Track Accessory and anything that'll wrap around the bars. If you have a J Style Kayak Carrier, Canoe Carrier, or even maybe even just a Cargo Carrier just to get all that luggage out of the cabins, free up some space for some of your passengers.So, I do have the Vortex Aero Bars on here right now.
And as you can see, it does have a nice aerodynamic shape to it so it's going to cut down on a lot of that wind noise that you get at high speeds. It is made of aluminum, so it's not going to rust away and it will be able to hold all of your T-Track Accessories up top, but we will have to trim this little rubber piece here. So the cap on the end here does have a key with it, but we do sell separately a locking core cap as well. So if you would like it to match our foot kit here, then go in etrailer.com and grab those, and we will actually have locks already built into these feet. A lot of them don't come with that, which is always nice, very easy to undo and it's just going to keep your roof rack from going anywhere.As you may be able to tell, we actually have some other mounting holes.
So we have different options whenever choosing where we're going to put our roof rack set up. I just chose the front two just because, but if the back is going to suit your needs better, you can go ahead. It's going to fit just the same on the back as it does in the front. So we are going to add to the height of our Suburban, so let's just go over some of those measurements, just so you know. From the top of our roof to the bottom of our bar is going to be about three and a half inches and from our roof here, all the way to the top of our bar is going to be about four and three quarter inches.And one of the best things is it does have fixed mounting points and it's really easy to install so let's just go ahead and show you how easy it is.
So one of the first things we want to do is assemble our feet. We are going to get two different pieces that's going to mount to our fixed rails and what we're going to do is actually slide this underneath. And there is a little rib here, so it's going to slip around this edge pretty nicely. Might have to stretch it a little bit to get to fit, once you get that we're going to push these little rubber knobs through, and then we can place this on our fixed rails on our Suburban. We are going to secure these down with our Allen bolts.
We're going to put a flat washer and then we are going to put our pressure washer, set it into place that's pushed down a little bit and then just drive them in by hand on both sides and they can go through, and take the tool that was provided and tighten them down properly.Now we can assemble our feet. Some are going to come already preassembled, and all it is is just going to be this plate and a screw. So what we're going to do is drop this down with our two washers in that hole, and then take this square piece and thread it on there. Now we can slide these in, after we remove our caps, we can go ahead and put our caps back on and lock them into place. You can repeat that same exact process for the other side. Now we can go ahead and put these on our roof.We're going to get them into place first, once we get them into place, we're going to adjust it just to make sure that this bar is evenly spread. And once it is, I'm going to try to hold this in the same spot I had it. Now what we're going to do, is going to take this bolt here and with both of our washers on there and put it down into this hole here. I'm going to start it with my hands a little bit, and then come in here with a 10 millimeter socket or wrench, tighten it down. I did notice that I couldn't fit a socket in there, and this wrench definitely gets the job done pretty easily. Once you're done there, you can put your cap in there and lock it into place. Make sure everything's nice and secure, and if it is you ready to load it up. Well everyone thanks for tuning in and taking a look at the Rhino-Rack roof system on our 2019 Chevrolet Suburban..
Customer Satisfaction Score:
97% were satisfied with this product
3% of customers were not satisfied
- Wrong item was ordered
- Too difficult to install
Customer Reviews
Custom RCP Fit Kit for 4 Rhino-Rack RC and RV Series Roof Rack Legs - Fixed Mounting Points - RRRCP43-BK
Average Customer Rating: 4.7 out of 5 stars (179 Customer Reviews)
Custom fit kit lets you mount Rhino-Rack RC or RV series legs to a vehicle with fixed mounting points. Legs mount to vehicle with attachment studs. Molded inserts cover bases when the legs are removed. Includes 4 pads, covers, and mounting hardware.by: Charles02/28/2022
Two stars because the provided hardware interferes with the factory rails when using the provided cover plates (to be installed when you remove the cross bars & towers). Had to source my own 12mm long cap screws because provided 16mm were too long. Otherwise works as advertised.
by: Sunshine08/31/2023
Super secure for our family's rods with minimal noise. Withstands 100mph winds. Easy to remove since they are on only for vacation.


by: Jeremy06/07/2021
Looks great! Was hoping for a quieter ride but am getting a lot of wind noise. I will be adding a wind Fairing to see if this helps.

Heather A.
6/10/2021
Thank you for your review. I recommend to make sure the rubber strip on the bottom of the Rhino Rack Aero bars is fully pressed into the channel before getting a wind fairing. If the rubber strip is not pressed into the channel it can create wind noise. If you are still bothered by the wind noise after checking that, I recommend to use the wind fairing part # RRRF4. This will help divert the wind over the bars.
by: Joel D12/04/2018
Great customer service with James on the front end. Arrived sooner than expected! Fairly easy setup. It took me a little over an hour.
We will be using it to haul paddle boards as well as a tandem road bike. One of our next purchases will be the batwing awning and possibly the Tag-a-long tent if we don’t get a roof top tent
by: Matt12/28/2021
2016 Chevrolet Suburban
I would have given a 5 but the instructions/video skipped some worthwhile info. Overall I’m pleased.
by: Daniel07/06/2021
Great product and aftermarket support.
by: Q06/07/2021
Great product, fast shipping, fits well with my Tahoe. Thanks!
by: Michael03/25/2024
by: Doug 07/18/2023
by: Luciano11/24/2021
by: Mark09/16/2020
by: Scott 08/27/2022
by: Patrick 04/27/2023
by: George 08/30/2023
by: Jeffrey 06/23/2023
by: Orie12/11/2021
by: Todd 03/31/2023
by: John 12/08/2022
by: Chad 08/07/2021
by: Neil12/25/2023
These were the only mounts I could find to fit a 2019 Toyota Highlander LE factory roof bolts. Have never used Rhino Racks before but was very happy to find their sturdy mounts for aero bar legs.
by: Danny10/05/2021
These Rhino-Rack products are solid. Installation was quite simple. It took me no more than 2 hours from taking off the OEM rails to getting the crossbars to tighten down.
Keep in mind that these legs were designed for the Toyota Prado (it even says so on the installation guide). Once you remove the Lexus OEM rails, you will notice a groove, about 3/4" deep and 1-1/8" wide, alongside the roof. If your GX does not come with the OEM rails, the grooves might already be covered up by the factory drip trim pieces (Toyota PN 75557-60050, 75555-60030). This Rhino rack kit does not come with any hardware to cover up the grooves. I was told they would not cause any leaks because the mounting points are tightly sealed.
But if you have severe OCD like me, those grooves will be bothering you (even though you can't see them). Instead of paying over $xxx for the OEM trims pieces. Fill them up with some 3/4"wide 3/8 inch thick insulation tape, then tape a strip of 1" wide, 1/8" thick neoprene rubber strip on top. The end product looks just like OEM. I hope my simple idea will help other fellow OCD survivors.


by: Elizabeth09/29/2023
Update to my review: etrailer sent additional strips to set into the gaps on the bottom side of the rails and there is no longer any whistling, so I've rerated my purchase to Excellent. I'm not sure if the strips for the bottom side (the side that faces the roof of the car) should have come with my rails to begin with or if they need to be purchased separately (etrailer sent them to me at no charge after my initial review). Covering those gaps with duct tape will also do the trick.
by: MissChiVus109/10/2023
The Rhino Rack BLOCKS my SUNROOF. It was recommended for my 2018 Highlander on the etrailer website. A 2018 Highlander with a sunroof is shown on etrailer in the install video. However, I can not open my sunroof. etrailer refuses to refund or exchange it and have no options for fixing this issue!
by: Brice10/02/2023
Rock solid attachment, the install didn’t go as smooth as hoped, but got it to work. Customer service was very available, though I do t think anything they could have done to make the install easier - chalked up to slight car model variations.
25
179
Show More Reviews
See what our Experts say about this Rhino Rack Roof Rack
- Roof Rack Recommendation for Using a Rooftop Tent on a 2018 Chevy Suburban with Flush RailsDefinitely! From my available specs on your 2018 Chevy Suburban, you have flush factory rails on your roof. If this is the case, I recommend the following setup: - Rhino-Rack Vortex Aero Crossbars - Aluminum - 59" # RRVA150B-2 (black) or # RRVA150S-2 (silver) - RCH Legs for Rhino-Rack Crossbars and Pioneer Platforms - Fixed Mounting Points # RRRCH4 - Custom RCP Fit Kit # RRRCP43-BK With this setup, the height between the roof and the bottom of the crossbar is about 3-1/2 inches, so you...
view full answer... - Correct Rhino-Rack Roof Rack Parts for a 2017 Chevy TahoeThose Rhino-Rack crossbars and legs will fit your 2017 Chevy Tahoe, yes, but you also need a fit kit to complete the roof rack system. Here is the full parts list: 59" Vortex Crossbars - # RRVA150B-2 RCH Legs - # RRRCH4 RCP Fit Kit - # RRRCP43-BK I'm not a fan of how we organize our videos so I can completely understand where you're coming from. We do, however, have an installation video of this exact system on a 2019 Chevy Suburban that I'm linking for you to reference.
view full answer... - Recommended Roof Rack for 2019 Chevy Tahoe and 16 Foot CanoeIt sounds like you are wanting a roof rack for your 2019 Chevy Tahoe. I recommend the Rhino-Rack roof rack consisting of: Rhino-Rack Vortex Aero Crossbars - Aluminum - Black - 59" Long - Qty 2 # RRVA150B-2 RCH Legs for Rhino-Rack Crossbars # RRRCH4 Custom RCP Fit Kit # RRRCP43-BK This system is rated for 220 lbs total capacity versus the Yakima 165 lbs or the Thule 150 lbs for this vehicle. The Vortex bars will work with your kayak carrier, canoe carrier, and cargo box. It sounds like...
view full answer... - Recommended Roof Rack To Mount Yakima SkyBox On Roof Of 2017 GMC Yukon XLIn order to mount the Yakima SkyBox Rooftop Cargo Box - 18 cu ft # Y07336 on top of your 2017 GMC Yukon XL, I recommend looking into Rhino-Rack Vortex Aero Crossbars 59" Silver # RRVA150S-2 or Black # RRVA150B-2. You will also need Legs # RRRCH4 and Fit Kit # RRRCP43-BK. This roof rack is a very high quality system that features aerodynamic crossbars, which will have reduced wind noise and vibration when compared to other styles of crossbars. I think these crossbars look really nice on...
view full answer... - Roof Rack and Assisted Loading Kayak Carrier Recommendation for 2019 Chevy SuburbanWe have just what you need! For a roof rack for your 2019 Chevy Suburban I recommend the Rhino Rack Vortex Aero Bar roof rack part numbers # RRVA150B-2, # RRRCH4, and # RRRCP43-BK. I really like this rack as it attaches to the factory fixed mounting points of your vehicle's roof, has aero shaped bars which helps prevent wind noise and rivals the really expensive roof racks at a much better price. Then for a kayak carrier I'd recommend the Thule Hullavator part # TH898. This will attach...
view full answer...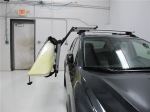
- Roof Rack For 2018 Chevy Tahoe With Flush Side Rails For Thule XXL Cargo BoxWe do have a roof rack that will fit your 2018 Chevy Tahoe with flush side rails that will allow you to use a XXL Thule cargo box, the Thule Force XT XXL Rooftop Cargo Box # TH6359B. The rack that will work for your '18 Tahoe is from Rhino-Rack and is made up of the following parts: - Rhino-Rack Vortex Aero Crossbars # RRVA150B-2 - RCH Legs for Rhino-Rack # RRRCH4 - Custom RCP Fit Kit # RRRCP43-BK Not only will this Rhino-Rack system allow you to mount any accessory on your Tahoe,...
view full answer... - Does Thule Outbound Rooftop Cargo Bag Fit 2020 GMC YukonThe Thule Outbound Rooftop Cargo Bag # TH868 isn't a vehicle-specific fit, it is universal. So it will fit your 2020 GMC Yukon so long as your Yukon has a roof rack or raised side rails. I don't believe the Yukon has raised side rails so you would need to have a roof rack in order to use the Thule Outbound Rooftop Cargo Bag # TH868. If you don't have a rack you can add one, and I really like the option from Rhino-Rack. The reason for that is you get a really high quality rack at a better...
view full answer... - Can a Thule SUP Taxi XT and Thule Hullavator Be Used Together I do have an option for you but there would not be enough space on the crossbars for your 2017 GMC Yukon XL to use both the Thule SUP Taxi XT Stand-Up Paddleboard Carrier part # TH810001 and the Thule Hullavator Pro Kayak Carrier part # TH898 together. If you need to carry both a kayak and paddle board on the roof of your Yukon XL at the same time then you could still use the Thule SUP Taxi XT but you would need to substitute the Thule Hullavator for the Malone DownLoader Kayak Carrier...
view full answer... - Comparing Inno and Rhink Rack Roof Rack Systems for 2017 GMC YukonThere are a couple of things that set the Rhino Rack system using # RRVA150B-2, # RRRCH4, # RRRCP43-BK apart from the Inno system that uses parts # INXB138-2, # INXS350, # INTR154 you're looking at. I'll start out by saying that when it comes to installation, they will install in basically the same manner on your 2017 GMC Yukon, so there's no real benefit of one over the other. Comparing the two, I generally think that having the extra few inches of bar space that the Rhino Rack provides...
view full answer... - Upgrading Factory Crossbars On 2019 Chevy Tahoe To Accommodate The Thule Hullavator TH898Since your 2019 Chevy Tahoe has factory side rails that the crossbars are connected to, you are able to install longer crossbars to gain the necessary 4" overhang on each side so that the Thule Hullavator # TH898 can be installed. I think your best option is to go with Rhino-Rack Vortex Aero Crossbars Silver - 59" # RRVA150S-2 (or black # RRVA150B-2) along with the necessary Legs # RRRCH4 and Fit Kit # RRRCP43-BK. This will be long enough to accommodate the Hullavator and other accessories....
view full answer... - What Parts do I Need for a Complete Roof Rack System for a 2016 GMC Yukon XL?I have a great solution for you. Unfortunately, the Yakima CoreBar Crossbar System for Retrax XR Series Tonneau Covers are only installable on truck beds. It will not fit on your flush factory rails on your 2016 GMC Yukon XL Denali. With that being said, for a great roof rack with a 220-pound weight capacity on your vehicle, I recommend the following roof rack setup: - Rhino-Rack Vortex Aero Crossbars - Aluminum - Black - 59" Long - Qty 2 # RRVA150B-2 - RCH Legs for Rhino-Rack Crossbars...
view full answer... - How Much Height Does Rhino-Rack Vortex Aero Crossbar System Add to 2019 Chevy TahoeThe Rhino-Rack Vortex Aero Crossbar System part # RRVA150B-2, part # RRRCH4, and part # RRRCP43-BK which is a fit for a 2019 Chevrolet Tahoe with FLUSH side rails will add around 3-1/2" to the height of the rails.
view full answer... - Rooftop Storage and Cargo for a 2015 GMC YukonYou've got a couple of great options for the 2015 GMC Yukon in terms of rooftop storage. Prior to purchasing any rooftop solution, you'll want to verify your vehicle's roof capacity. This capacity will include the cargo solution itself (Be it a bag, box, or basket) and anything loaded inside of that solution. You can verify this capacity with your owner's manual or vehicle manufacturer. If you're looking for something straightforward and don't plan on carrying anything else on your...
view full answer... - Recommended Cross Bars for 2017 GMC YukonRhino Rack and Thule both make great roof racks that are similar in quality, looks, and function. Typically, the Rhino Rack products tend to be more cost-effective. We actually don't have any Thule crossbars that will fit your 2017 GMC Yukon XL. I recommend the Rhino Rack Vortex Aero Crossbars # RRVA150B-2 with the RCH Legs # RRRCH4 and the Custom RCP Fit Kit # RRRCP43-BK. These are 59" aerodynamic-style crossbars that install onto the flush mounted rails on your vehicle. They also come...
view full answer... - Recommended Roof Rack for a 2015 Cadillac Escalade w/ Side RailsTo mount the Thule Force XT XXL Rooftop Cargo Box item # TH6359B you will need to add a roof rack to your Escalade. It looks like the 2015 models came with flush mounted rails that run front to back. You will want the roof rack by Rhino Rack and it includes the following parts: Rhino-Rack Vortex Aero Crossbars - 59" Long - Qty 2 item # RRVA150B-2 RCH Legs for Rhino-Rack Crossbars - Qty 4 item # RRRCH4 Custom RCP Fit Kit for 4 Rhino-Rack RC Fixed Mounting Points item # RRRCP43-BK This...
view full answer...
- Will a Thule Motion XT Roof Box Fit on Rhino Rack Crossbars on a 2017 GMC YukonYes. The Rhino Rack Roof Rack Kit for 2017 GMC Yukon comes with parts # RRVA150S-2, # RRRCH4 and # RRRCP43-BK, which is a complete roof rack kit and has all the parts you need to install a fully functional roof rack. The aero style bars that come with this roof rack kit are compatible with virtually all cargo boxes, including the Thule Motion XT XL # TH629806. There is also an XXL version of the Motion XT with part # TH6359B that would also fit on these bars. I've linked a review and installation...
view full answer... - Best Type of Crossbar To Use with the Thule Hullavator on a 2017 GMC Yukon XLThe Thule Hullavator Pro Kayak Carrier part # TH898 can indeed be used with both square crossbars via clamp-on attachments as well as aero crossbars via the track system. However, I would not say that one is stronger than the other. Roof rack manufacturers do extensive testing on their track systems and I cannot say I have ever heard of anyone having an issue with the tracks deforming. The main reason I recommend using aero crossbars is because they are much quieter than the square crossbars....
view full answer... - Parts Needed To Install a Rhino-Rack Pioneer Platform Roof Tray On a 2016 Chevrolet TahoeI have an option for you as the factory cross bars on your 2016 Chevrolet Tahoe are not a suitable mounting point for the Rhino-Rack Pioneer Platform Roof Tray # RR45TB. You will need to replace your factory cross bars with the Rhino-Rack Vortex Aero Crossbars # RRVA150B-2, RCH Legs # RRRCH4 and Custom RCP Fit Kit # RRRCP43-BK. Then you will be able to use 2 of the Pioneer Platform Mounting Kits # RR43105 to attach the Rhino-Rack Pioneer Platform Roof Tray # RR45TB. This entire system...
view full answer... - Roof Rack Options for a 2017 GMC Yukon and 2010 Honda CivicI do have options for you but a custom fit roof rack for a 2017 GMC Yukon will not fit a 2010 Honda Civic. Instead, you will need to decide which vehicle you would prefer to have the roof rack on or purchase one for both vehicles. For your 2017 GMC Yukon, I recommend the Rhino-Rack Vortex Aero Crossbar System which is composed of part # RRVA150B-2, part # RRRCH4, and part # RRRCP43-BK. For your 2010 Honda Civic, I recommend using the Rhino-Rack Vortex Aero Crossbar System which is composed...
view full answer... - Recommended Roof Rack for Drywall and Lumber on 2019 Chevy TahoeFor your 2019 Tahoe, I recommend the Yakima system consisting of: Yakima HD Crossbars - Aluminum - Black - 60" Long # Y01157 SkyLine Towers # Y53TR HD Bar SL Adapters # Y03541 Landing Pad 17 # Y00243 I also recommend adding locks # Y07204 This system will give you strong crossbars with tie down points integrated as well as a load capacity of 165 lbs. It will work well for your drywall, plywood, and loads of lumber within that weight capacity.
view full answer... - Rhino Rack Pioneer Platform Roof Rack For A 2015 GMC Yukon Denali With Factory Flush Rails I was having a hard time confirming with Rhino Rack that the Pioneer Platform # RR68AB would work, BUT after some digging, it is 100% possible! You actually have two different ways of doing this, one with the backbone system and one without. You can get this fit kit # RRRCP43-BK which mounts to the two holes on all four sides of your flush rails on your 2015 GMC Yukon Denali. These feet # RRRCH4 will connect to you those brackets. I've used this on a 2019 Suburban which is basically the...
view full answer... - Rhino Rack Roof Rack Recommendation for 2017 GMC Yukon XLRhino Rack has a roof rack that fits the flush rails on your 2017 GMC Yukon XL and would work well, but it's not the # RRRSP43. Instead you'd want the Rhino Rack roof rack part numbers # RRVA150B-2, # RRRCH4, and # RRRCP43-BK which will give you an aero bar roof rack confirmed as a fit.
view full answer... - Roof Rack Recommendation for 2019 GMC Yukon with Flush Roof RailsFor your 2019 GMC Yukon that has flush mounted rails that run front to back I would recommend the Rhino Rack roof rack part numbers # RRVA150B-2, # RRRCH4, and # RRRCP43-BK. I really like the Rhino Rack roof racks as you get a high-end roof rack at a much better price than the competitor brands.
view full answer... - Compatibility of 65 Inch Long Aero bars for 2015 Chevy SuburbanSure thing. For your 2015 Chevy Suburban, you can use the following components to get your 65 inch aero bars: Rhino-Rack Vortex Aero Crossbars- 65" Long # RRVA165B-2 Metal Cores # RRVA-LEC4 RCH Legs - Fixed Mounting Points # RRRCH4 Custom RCP Fit Kit # RRRCP43-BK This will give you 65 inch long aero bars on your Suburban. It will utilize the same confirmed fit legs and fit kit of the 59 inch roof rack system confirmed to fit your 2015 model.
view full answer...
Do you have a question about this Roof Rack?
Info for this part was:

Video by:
Chris R

Updated by:
Wilson B

Updated by:
Alex H

Written by:
Daron K

Video Edited:
Zach D

Test Fit:
Adam E
At etrailer.com we provide the best information available about the products we sell. We take the quality of our information seriously so that you can get the right part the first time. Let us know if anything is missing or if you have any questions.
Product Experts Available Now!
Call 1-800-940-8924
Jenny N.
3/9/2022
I reached out to the manufacturer and it was the first time that they had heard of this being reported.