
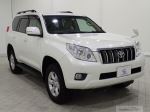
To see if this custom-fit item will work for you please tell us what vehicle you'll use it with.
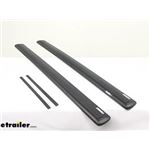
Premium, aerodynamic crossbars attach to Thule feet to create a quiet, stylish roof rack for your vehicle. Dual rubber strips in T-slots let you easily mount accessories - no trimming required. Simple to center and install with integrated scales.
Features:
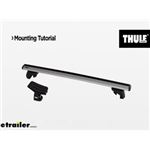
Thule WingBar Evo Crossbars 53" - Black - Aluminum - Qty 2:Videos are provided as a guide only. Refer to manufacturer installation instructions and specs for complete information.
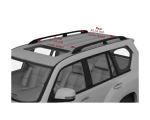
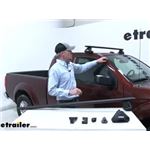
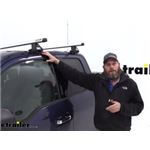
Today in our 2016 Nissan Frontier, we're going to be doing a test fit on the Thule Evo WingBar roof rack system for naked roofs for the Nissan Frontier. This Thule Evo WingBar roof rack system is going to allow you to carry roof mount accessories on your Nissan Frontier. Things like bike racks, kayak carriers, cargo baskets, and much more. That way it'll free up space for our truck bed. It's designed specifically to work with your Nissan Frontiers naked roof. With it in place, you can see that there's no movement so you can rest assured your accessories will be safe.
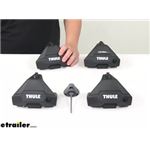
It features aerodynamic aluminum roof bars, you can pick these up on either black or silver right here at etrailer.com. Now these are going to be a lot quieter than your traditional round or square bars. It'll help eliminate some of that wind noise or that drag when we're heading down the road.It'll work with your standard clamp on accessories as well as your T-slot accessories. Will simply pivot that end cap to the side and rather than having to remove that rubber strip or take it out and trim it, we can just slide that inaudible 00:01:10 right through the center and position it anywhere we want inside that bar. The crossbars are held in place by four Thule Evo feet.
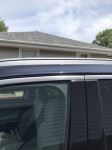
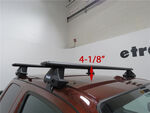
These are going to set them up roughly three and an eighth of an inch from the top of the roof to the underside of the bar. That way we're going to have more than enough room for those clamp on accessories to grab a hold of the bar without them making contact with the roof. Now the Evo feet are padded here where they make contact with the roof. That way they won't harm or scratch that finish.If you look underneath the cover here, you can see that it's going to protect our hardware from the elements. It's also going to deter theft.
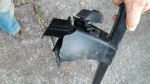
That way no one's going to tamper with it or try and take it off of our frontiers roof. Now the bolt that tightens it to our frontiers roof is right through here and the tool is included. Now with my door open, you can see how the clip comes down and attaches to the inside of the frame here. Now these clips are specifically designed to work with your frontiers so you can see how they're going to match the molding of the inside of the door and then we can replace our weatherstripping and our doors going to shut this fine. Again, that cover is going to protect all of that so no one can remove it and if we'd like to, we can replace the plastic lock cores with the Thule metal inaudible 00:02:26 cores to add more security.
That way nobody can get it on there and remove that.Now this roof rack system does have a weight capacity of 220 pounds. This is a step up compared to some other roof rack systems. We're going to be able to carry a lot more accessories with this one. You do however want to check with your frontiers owner's manual to see if your roof can support that much weight. I've already got my front crossbar in place. We need to set up the rear. Let's go ahead and do it together. I've got one side ready to go, we just need to prepare the other side. The first thing we'll do is we'll take our Evo clamp foot and we'll assemble this. So what we can do is we can take off the door here, you'll need to make sure it's unlocked first, so the lock needs to be returned to the horizontal position. Then we can just pick up on it slightly and then pull out just like that. We'll set that aside, then we can turn it over and we can grab our rubber pad.Now, they are all numbered. The front and rear pads are different, so you need to look at your instructions and make sure that you have the correct one. For our rear crossbar, we need to be sure we have number five, two, five. Now they only install one way, you simply just line it up with the way it looks on the bottom of the foot and then press it in place. Now surrounding the pad, it just has a little lip that will snap into the bottom of the plastic portion here. So just look over it and make sure that it is clipped in place. Once you think you've got it, give it a good pull, make sure it's not coming off. If it is, just give it another good squeeze and then you should have it. Now from here we can grab our actual clamp. Now these two are also numbered. You can find that right here on the underside. For our rear crossbar, we're looking for 342. It's going to be located again right here. Then we can take it, push it in place, and we're going to be listening for like a slight click.Once it's done that we can pull it out and make sure it's in there. If you have it in there, it shouldn't come out, so you'll be able to move around like this. Now we're ready to slide it onto our crossbar. We can go ahead and turn our crossbar open. Before we actually install our foot onto our channel underneath, we need to set our scale. Per our instructions, we need to set it to 45 so it's numbered. You don't have to worry about seeing this, you're going to be able to see it on yours. I'm going to go ahead and set mine to 45 and the numbers get larger this direction. So just set it to where you can see the 45 and then you're ready to slide it in place. So as I'd mentioned, the foot slides onto the channel here.The way you slide it in place is, you'll need to unlock the brakes on the inside of the foot here. So you can see the two metal pieces here we want to do is take a thumb on both and push. You can see how it moves like this. We'll get it lined up, press in, and then it will allow us to slide it in place. We're going to slide it all the way on until the foot makes contact with the scale here. Then we've got the correct measurement. From here we can install our end cap and we're ready to set it in place on our frontier. Now we want to be sure that our doors are opened up and then we can gently set it in place in the general area. Now for the next part will need to draw down the weather seal around the inside of our doorframes so we can actually just pull down and we're going to be right in this area here, so let's go and do that for both sides.Now the next thing we need to do is take a measurement from the front of our cross bar here to the front of the crossbar here. That will give us our placement for the rear bar. But before we do that, let's talk about how we got the position for our front crossbar. So per our instructions, we take a measurement from our windshield and measure up to the foot pack here. Most of the time you take a measurement from the corner of the windshield, but for the frontier, you need to do it more towards the center of the windshield. You can see how it kind of arches downward. That's going to cause the crossbar to move further forward and that's what we want. We want to take a measurement from more of the center of the windshield that will mark out your line for where your foot pack is going to be. If we we're to measure it from the corner, it would cause it to go back and it would throw off the whole rear bar. So again, just be sure you measure up from the center of the windshield to the end of the foot pack.So now that being said, let's go ahead and grab our measurement for the placement of our rear crossbar. From the front to the front, we're looking at about 27 and a half inches. For our instructions, we'll be sure and do that for both sides. So I'm going to pull down that weather stripping just to make sure it's out of the way and what we want to do is make sure that clamp hooks on to the bottom of the frame here. So I'm actually just pushing up in place with my thumb. I'm going to hold it there. Then I'll take my included tool and take up some of that slack. That way the hook stays there. Now when we feel that resistance, we can stop and then move over to the other side and do the same thing. Once we've taken that slack out of both sides, then we can begin tightening them down. Now as we're doing this, we want to be sure we're alternating side to side. That way it makes it nice and even on both sides.Then once you get it to where it's almost tightened down all the way, our included tool is unique in that it will click when it's properly torqued down. So once we get it to where it's almost tight, just listen for that audible click. Once everything's all tightened up, we can go ahead and put on our cover, make sure it snaps in place, we'll walk it up, and then let's not forget to replace our weather stripping and then we can close up the door and we're all set. With everything installed, we're ready to load up our favorite roof mount and accessory and hit the road. But that's going to complete our test fit of the Thule Evo WingBar roof rack system for naked roofs on our 2016 Nissan Frontier.
Average Customer Rating: 4.8 out of 5 stars (685 Customer Reviews)
Premium, aerodynamic crossbars attach to Thule feet to create a quiet, stylish roof rack for your vehicle. Dual rubber strips in T-slots let you easily mount accessories - no trimming required. Simple to center and install with integrated scales.
So far its the best roof rack you can get today! Had no issues when driving through rugged and bumpy terrains all day.
I've had the roof rack for a year now and we only use it sporadically in the winter to put the ski box ontop of the car but it works great. Very easy to install and remove and very sturdy. Previously I had the kind that bolted into the roof of my SUV and had a terrible experience with that (we lost the rack and kayaks on the freeway and it tore holes in my roof). The clamp style is the only kind we'll get from now on because they are much sturdier and no risk of losing them. Definitely recommend them.
I just got my packages and had it installed within the hour very satisfied
No problems installing. The rack is doing fine.
Product was right fit for my vehicle and installed perfectly. Etrailer was knowledgeable and got the goods to me quickly. Enjoyed working with them and will again.
Easy to install, fit and finish are top notch.
I've owned this roof rack for a year now, and it has served my purposes (carrying my kayak around on my truck) quite well. It was fairly easy to assemble, largely because the entire instruction guide was in pictures.
I have had to retighten the rack a couple of times since putting it on the roof, so I tie the kayak down to the front and back of the truck as well as to the roof rack. I suspect the ocean kayak puts a bit of lift on the roof rack resulting in the loosening.
Korren @ e-trailer found these longer bars for me and I'm enormously grateful for her doing so!!
Worked perfectly on my 2020 GMC Sierra. Looks and works great.
I have almost always had roof rails on my vehicles. My F150 had no rails and I was nervous about clamp style rack holders given what I tend to carry on top. These have been great and I am positive I have overloaded them numerous times.
53” Thule bars fit our 2021 RAV4 Hybrid! Most people appear to be using 47” bars for the 2021 RAV4 with flush roof rails, but that’s smaller than I wanted. I sometimes carry a sheet of plywood, or a kayak plus a cargo box, and wanted a wider rack for that. I had heard that upsizing to the 53” bar was potentially not possible because the mounting slots on the bottom of the bar may not accommodate the rail locations relative to the bar length. ETrailer helped me out with some dimensions, so I bought the 53” bar knowing it would be close. There is only about a quarter inch of play on either side on the rear bar, but it fit (the front bar had more play, since the towers are a bit further apart at the front).
I’m SO happy with the result! Now I can carry what I want on the rack, and have room to spare! It looks pretty good too!
I've always trusted Thule bars. I have an old Xsporter on my truck that works really well and it has held up over time. I needed to get a Thule rack for my Jeep Grand Cherokee and found that etrailer had all the parts I needed specified for my model. That was one of my favorite things about the site. No need to search around for the different parts to attached onto the factory rails. Once I received the rack and components, it was really easy to install. I pretty much watched the etrailer videos before hand.
I have the older Hullavator 897XT to haul my kayak in. With the WingBar Evo, I found I needed to get a slightly longer bolt (6-1.00 x 30), which I got from the local Ace hardware store, to attached the Hullavator support bracket to the WingBar. Once I got those bolts set up, I was on the water with the kayak the next day.
Talked to the customer service a few times and they are great friendly people. And I can understand what they are saying.
Thule is an excellent product and the fit on my 2017 Chevrolet Colorado is perfect. The good people at etrailer were super helpful in getting the correct fit parts to me as quickly as possible, especially during a tough year for all. I’ve found my Thule racks to be the perfect tool to take our kayaks on our adventures!
I’ve been searching for a set of crossbars for my 2021 Crosstrek. After looking at several different companys,, I decided to go with etrailer.com and get the Thule Wingbar Evo Crossbars and Evo Raised feet. Ordering was quick and shipping was even faster! Installed them in about an hour with no issues. I love the way they look, and the construction is solid. Shout out to the staff for doing a great job and for the great communication from placing the order, confirmation, updates and shipping the order. You will not be disappointed!
Great quality products! Easy installation with properly guided instructions. One of the best tracking information, from ordering to delivery. Would strongly recommend etrailer to anyone looking for roof or hitch bike racks.
Cross bars have been working very well. No issues with them
The bars are strong and fairly quiet, especially considering that I mount them on the main cab of my pickup truck and not on top of the canopy. My biggest concern is that the rubber strip that runs the length of the bar to reduce wind noise was badly damaged when I slid my canoe up on to the bars. Given the weight of the canoe, I'm accustomed to getting one end on a bar and sliding it back into position. Given the sensitivity of the rubber, is started pulling away from the bar and shredding when sliding the gunwales over the top of the bar. I'll try to be more careful, but a roof rack needs to be more utilitarian in my humble opinion.
Items arrived later than expected despite cancelling an month long order due to waiting stock on a different set up that was in stock. Once it arrived the box was all torn up and the person that delivered it just dropped it in the garage with the boxes spilling out of the bigger box. Love Thule products, etailer and the shipping supplier not so much,
Easy to install with the anchors and crossbars, and still holding up great a year later.
Excellent system
Perfect for our BMW X3. Excellent quali ty!
These bars are light weight and easy to set up. However, the measurements in the directions were not right to fit them to my vehicle, and they were really difficult to adjust once the bars were on the roof. They seem to be snug on the roof and working well, I did a test drive yesterday at varying speeds and they are secure. They don't cause any unpleasant noise - you'd forget they were on there.
Great product from Thule. Fit my 2022 Ford Ranger perfectly and is very strong and secure when installed. Excellent customer service from trailer and extremely fast shipping.
I bought the Thule Evo Roof Rack to transport my kayak on my Lexus 300H. Thule will advise you on their website that his particular rack is not right for a Lexus 300H (i.e., they don't make a roof rack for a Lexus 300H); it is really for a Camry, but etrailer told me that is worked, I trusted them and they were correct. After all, a Lexus sedan is really a fancy Camry, but Thule will not acknowledge this point. It works great. Thule makes a solid product.
Superb quality. Of course, it is from Thule and they are expensive for sure. But, you really get what you pay for!
And, just consider how expensive it would be if using something more affordable (cheap generic brand) and the racks/bars take off from the roof with the box on the highway!
These will not take off, super sturdy and fits the car perfectly.
Just be sure to get the right kit.
And follow the paper instructions coming along the parts.
Can recommend these, were for Nissan Leaf 2021.
And not to forget the etrailer company, they did their part as well with flying colors. All parts arrived in time and were correct!

Do you have a question about this Roof Rack?
Info for this part was:
At etrailer.com we provide the best information available about the products we sell. We take the quality of our information seriously so that you can get the right part the first time. Let us know if anything is missing or if you have any questions.


Thank you! Your comment has been submitted successfully. You should be able to view your question/comment here within a few days.
Error submitting comment. Please try again momentarily.