
To see if this custom-fit item will work for you please tell us what vehicle you'll use it with.
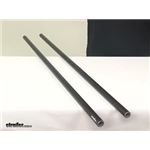
These multipurpose, galvanized steel crossbars supply the backbone for your aftermarket roof rack system. Works with accessories that clamp around the bars. Pair with Yakima towers, fit kit, and RoundBar SL Adapter to create a complete roof rack.
Features:
Yakima 58" RoundBar MD:Videos are provided as a guide only. Refer to manufacturer installation instructions and specs for complete information.
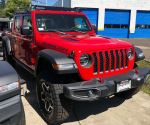
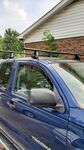
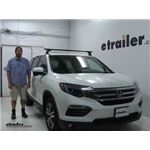
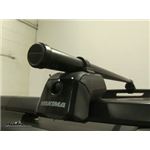
Speaker 1: Today in our 2016 Honda Pilot, we're going to be test fitting the Yakima Round Bar Roof Rack System consisting of part numbers Y00409, these are the round crossbars on the top here, and these are 58 inches long.We'll also be using part number Y03536, and this is the Round Bar Adapter Kit for the Yakima towers.We'll also be using part number Y00146. These are the Baseline Towers designed for naked roofs.Finally, to attach it to the vehicle, we're using the Base Clip Fit Kit part number Y06152.This is going to be the same for the rear bars as well. These are great sturdy cross bars for your roof, and car carry a wide variety of accessories such as bike racks, cargo carriers, excuse me, cargo baskets, and cargo boxes.While, they are exceptionally sturdy, they do cause noise while you drive. Now, you can purchase fairings that you can find on etrailer.com to help cut down that wind noise and drag, or you can upgrade to the Yakima core bars that also utilize this tower system.Moving onto the towers themselves, at the end caps here, we do have these plastic portions that can be removed and replaced with the Yakima SKS Lock Core System, so you can secure it to your vehicle and make it key to like with the accessories that you're hauling.Removing our end cap here you can see how everything attaches to the vehicle itself. We have the clamp that attaches to the door frame, as well as the pad underneath. So, your vehicle isn't going to get damaged or scratched once this is installed, because the clamp is also padded once it's being installed.So, let's go ahead and show you how the rear bar gets put into place.
We already have it partially assembled on our lovely table over here, With all the parts that you need right in front of it. So, our first step is, we're going to take our adapter kit for the round bar and attach it to our tower.This is a very easy process. You simply take the plastic portion here, push it in on the top, you're going to hear a little bit of a click. We'll take our round bar adapter, attach it to the screw in the center. We'll pull out this tab here, so we can get to the screw, flip it upside down.
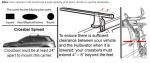
We're just going to loosely tighten it so we can get it in place on our bar.Move over to our bar, slide this into place. To help out with this, we're going to flip it on its side here like so. Now we'll take our measuring tape here and measure out the distance between the two towers. You'll find this in your instructions.Move this out a little bit. Now normally what you would do, is you would find the center of the bar and measure out to both sides.
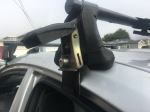
We already know where we had to be at so, kind of cheated a little bit. There we go. Now we'll tighten it down. I'd like to point out something here in a second. That's the tightening tool that comes with the kit.
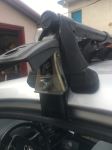
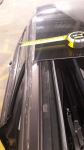
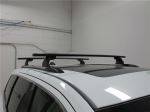
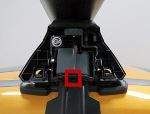
It does give those audible clicks so you know when everything is torqued to its specifications without overtightening it.Now, one thing I'd like to point out, looking at the underside of our tower here, you're going to see three notches on each side here. One, two three. One, two, three. Knowing which side is the front is very important because that determines the pitch and the tow that you set. The pitch is on this side and we have it set to B, which is the middle notch. The first notch, A, B, C, and so on.On the other side the tow is set to two. One, two, three. We tighten it down with this screw here, which has already been done. Just be sure to take a look at this in your instructions when you're tightening everything down.Next, we'll take our pad here, pointing out that the arrow's going to be facing away from the vehicle, we'll snap that into place on the bottom, and now we're ready to set this on the room of our vehicle.Set it down gently, as to not damage our vehicle while we're doing this. Now, at this point, we're going to measure from center to center of the bars on both side to keep it even, and then we'll make sure that's it's even side to side too.Alright, we're going to want to make a couple adjustments here. Double check the measurements since I kind of had to move it a little. Alright. Looks like we're even on both sides too. Now we can open up our rear doors and start installing our clamps. This isn't necessarily the steps that they have you do in the instructions, but, I find that it make it a little bit easier on us while we're installing this, so we don't have the clamps accidentally making contact while we're setting them into place.So, our first step is we're going to loosen up the bolt here. You can see how this raises up like so. We're going to take our included clamp. We're actually going to loosen this up a little bit, going to push that in, and then, we're going to tighten that bolt that we just loosened up. You see how it's now going against the vehicle. We'll repeat this process on the other side as well.There's some other items you can put on this roof rack system. It can be anything from your ski and snowboard carriers to your kayak carriers as well. A wide variety of objects. Once we have this loosely installed, we'll get it snug up against the door frame on both sides. We'll go back and forth until it's completely tight, and then you hear those clicks from the tool. See how it's tightening down around there There we go. Close that up.Now we can put on our end caps on both the bars and our towers. I'd like to give you a couple final measurements here to give you an idea of how high it sits off the roof once it's installed. From the center of the roof to the bottom of the bar's going to be about two and five eighths of an inch, and from the center to the top is going to be about three and five eighths inches as well. So, that's more than enough space for your accessories that wrap around your bars, so it's not going to make contact with your roof and scuff it up at all.Also, you can still utilize your sunroof once these are installed as well. These bars do have a carrying capacity of 220 pounds once installed, but you should always check your vehicle's manual to make sure your roof can take those weights and go by their recommendations.There you have it, for the Yakima Round Bar Roof Rack System on our 2016 Honda Pilot.
Average Customer Rating: 4.8 out of 5 stars (270 Customer Reviews)
These multipurpose, galvanized steel crossbars supply the backbone for your aftermarket roof rack system. Works with accessories that clamp around the bars. Pair with Yakima towers, fit kit, and RoundBar SL Adapter to create a complete roof rack.Free delivery that showed up in 3 days!!! Can't beat it. The crossbars with the Control Towers and LandingPad 9 fit perfectly on my Honda Element. Had them installed in about 30 mins. Don't have my cargo box yet and wanted to test strength, so I had my 110lb wife standing on them with no issues (yes, the car was parked). Plan to take a long camping trip next week with a cargo box on top...wife will be in the vehicle:-)
Works perfectly. I am always impressed that Yakima continues to make parts for the "old roundbars" since they have since moved on to the superior JetStream bars.
Kimberly has shown that great customer service is not dead! etrailer and Kimberly are great to work with and have earned my business and will always be the 1st and last place I look for my rack+ needs!
As for the application, I needed more space to fit my cargo box on top of my 4Runner TRD Pro’s rack. I came up this this… Thank you!
A great company to do business with, and lots of merchandise in stock. I orderd a roof rack for my truck on Tuesday morning and it was on the porch when I returned from work on Thursday. I will deffinitely order more from etrailer.com
Excellent selection of rack parts. Very useful installation videos help when choosing between products. Easy ordering process. Quick delivery.
Really easy to install & work as specified. So happy with the customer support/service at etrailer.
One quick phone call and Gwendolyn figured out exactly what I needed for our new car to use my old Yakima rack.
necessary for using the widest cross bar option (78"). East to install

Love my Yakima roof rack!! It exceeds my expectations.great product. Also thank etrailer for the tec support! great staff always there to help thanks again!!
Ackage came 2 days early the install was somewhat easy (did it by myself)
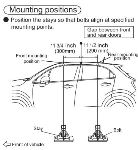
Did not get to mount anything to it but seems really sturdy. One thing I can say is mark out your mounting points with provided stickers then put up and make adjustments to the roof rack.
Great first experience dealing with you guys! Shipped fast, and was a faster install. You gave me the right parts and it went together in a flash.
Will definitely be doing business with you all again.
I have a 10th gen Civic sedan and I was dying to get the perfect roof rack set for my car. At the time of my purchase there was not many visuals of what the rack system looked like on this car.
I purchased the:
•Yakima 50in Jetstream crossbars
•Yakima baseline towers
•bc182 & bc183 clips
•Yakima 46in fairing
Overall I love how it looks on my car! During This COVID pandemic I have been camping more, and this is the perfect foundation! First off, the 46in fairing is the perfect fit for the 10th gen civic! Wind noise is low also with the help of the aerodynamic crossbars. My main concern was the fuel efficiency. On long road trips I still average 38-40 mpg with the rack on. My daily commutes I average 34 mpg without Econ on.
I have been using Yakima racks for around 40 years and have never had any problems. However, I am amazed at the price increases over the years. Etrailer prices were by far lower than most. Overall, a very excellent purchase.
The rack has been so useful since I purchased it. Staff at etrailer.com were exceptionally helpful in getting the best option for my car and answering questions. I recommend this company, for its 110% customer service, excellent prices and timely delivery.
Haven’t used them yet but they should work as expected
So far so good. Purchased these towers to use on a 2022 GMC Canyon with HD bars that I already had, primarily to carry my canoe. Yakima's fitting instructions worked perfectly and the whole system seems really solid.
first try was missing what was needed
Etrailer helped. It was great!
Kit worked perfectly on my 2021 Subaru Forester. The whole install took 30 minutes. Never been disappointed with etrailer.
Yakima Crossbars were as you would expect - steel bars coated in a soft black coating (be mindful when you are utilizing these with the top mounts as the clamp will eat through the soft coating when you tighten them down). I had issues with my yakima round bar setup as the brackets and tower system were allowing water to leak in. This is in no way reflective of what youll experience but Yakima has superb support. I spoke with them twice on my issue and out of their kindness they shipped me an entire setup to replace my existing one for free.
Great service - great price
Great service - great price
Product works as advertised thus far. When you buy the yakima towers, you are required to purchase these as well to fit the rounder bars (I feel sure there are other adapters for other bar shapes). These should have come with the towers in my opinion, and I resented having to shell out more $$ to purchase these "must have" adapters to mount my bars. 3 star overall rating based on function, price. Delivery and packaging was top-notch through etrailer.
I ordered a Yakima Roof Rack for my Toyota Prius from eTrailer.com. Part of the reason for purchasing from eTrailer.com was the promise that the racks were made specifically for the car and would not dent the roof.
I received the rack on July 31, and installed the racks on my Prius according to instructions included with the racks. Our tandem kayak is 65 lbs . The towers were placed on the outer most part of the roof as indicated by the instructions. Yakima saddles were attached to the crossbars to hold the kayak. Nothing was close or touching the top of the roof. We transported the kayak to a nearby lake, 6 miles, and back. The next day we removed the racks from the roof and noticed 4 dents on the top of the roof. It was obvious that transporting the kayak on the rack caused the dents.
We had to pay $100 to have the dents removed from the Prius roof.
I cannot continue to use this rack that puts dents in the car's roof. I was extremely disappointed in the racks. In reading the Toyota manual and contacting them by phone, there is no mention of using or not using roof racks.
I was shocked to learn from Rachel at eTrailer.com that your company takes absolutely no responsibility for this Yakima product they sell. The best they can do is to pass the buck and refer us to Yakima.
Very disappointed, and out a lot of money for a product that damages your car. Will not recommend or buy here again. eTrailer.com does not even deserve one star in this review.
Typical Yakima cross bars. Coating is a little too easy to cut or gouge, but probably needs to be that way to get the grip it provides. Good enough solution for me, and allows me to continue to use all the attachments I've accumulated over the years that require a round bar
Great product fast shipping


Do you have a question about this Roof Rack?
Info for this part was:
At etrailer.com we provide the best information available about the products we sell. We take the quality of our information seriously so that you can get the right part the first time. Let us know if anything is missing or if you have any questions.


Thank you! Your comment has been submitted successfully. You should be able to view your question/comment here within a few days.
Error submitting comment. Please try again momentarily.