
Summer Starts Here - Save up to 70%
This solar panel will save you the headache of finding a dead battery in your RV. Keep it attached to your battery in the off season to maintain battery health and keep it fully charged. Connects to your battery with ring terminal cable.
Features:
Specs:
Note: Not intended for use with lithium batteries.
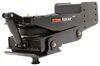
If you've ever gotten your RV from storage and found it with a dead battery, this Redarc solar system is a perfect solution. It provides an easy way to charge your RV batteries and keep them in good working order with clean, renewable power. Using the 50-watt solar panel, this system collects solar energy to create DC power that passes through a solar charge controller and into your battery.
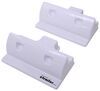
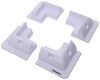
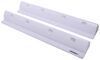
The solar panel mounts permanently to your roof using the included corner brackets. The solar controller will monitor the battery, maintaining it and preventing it from being overcharged.
The charging process starts with the solar panel, which mounts permanently with screws or other mounting hardware (sold separately). When solar energy interacts with the silicon cells in the panel, it generates a flow of DC electrical current that charges your battery. Each of the monocrystalline cells is made from a single crystal of silicon, so the electrons that create the current have more space to move, making this panel more efficient than one with polycrystalline cells. And in optimal sunlight conditions, the panel produces 50 watts per hour.
The solar controller prevents harmful overcharging by adjusting the power generated by the solar panel before it reaches your batteries. It uses pulse width modulation technology to regulate the output through pulses that provide a consistent charge. Typically, PWM controllers are a good fit for smaller systems, rather than using more expensive MPPT solar controllers.
The controller is compatible with multiple battery types and includes preset charging profiles for sealed/gel and AGM batteries. The optional remote - sold separately - is required for flooded/wet cell and calcium batteries.
LED indicators provide information on the current solar panel output. The lights will tell you if the panel is providing a charge, if the battery is charging, and if the battery is fully charged. This will charge a battery reading at least 9V in a 12V system, or a battery bank reading 18V in a 24V system.
While this kit will work perfectly for a hands-off approach to giving your battery an extra boost, the optional Redarc Remote Monitor (RED83VR - sold separately) is an easy way to upgrade your setup. This remote would be required if you want to use this system with flooded or calcium, as it is the only way to change the solar controller's battery type.
This monitor's digital display lets you see the solar array's charging status, read your battery's voltage, check electrical usage, and other info. Since your solar charge controller is likely to be installed somewhere close to your battery bank, being able to check on your solar status from inside your RV using this remote will be far more convenient. While not necessary, this is an upgrade we highly recommend.
Videos are provided as a guide only. Refer to manufacturer installation instructions and specs for complete information.
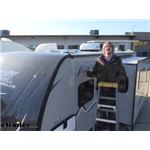
Hi there Coachman owners. Today in your 2021 Coachman Spirit Ultra Light, we're gonna be taking a look at and showing you how to install REDARC's 50 Watts solar panel kit. Here you can see our solar panel installed on top. This is a 50 watt panel and it is a monocrystalline panel, which is the preferred style for efficiency. There's two different types of solar panels, you got your monocrystalline and your polycrystalline. Your monocrystalline typically has a higher wattage value at a smaller footprint than your polycrystalline one.
So the polys are usually a little bit bigger giving you the same output of a smaller monocrystalline one. Now there's kind of pros and cons to both there. I personally prefer the monocrystalline because you can get a higher total wattage on your roof 'cause they're slightly smaller packages, but since they're slightly smaller, that means that they are a little bit more susceptible to obstruction because they are smaller. So if half the panel gets blocked, you're gonna lose more wattage versus like a polycrystalline that's got a larger area, so less of it could potentially get blocked. So it's kind of up in the air which one you think is gonna be better for your situation but I prefer the monocrystalline just because it has a little bit, a little more dense as far as its power package is concerned.
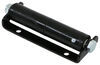
We've got it mounted up using REDARC's mounting system. And this is quite a bit different than the Go Power ones we use here. The Go Powers use just kind of like a Z metal bracket to attach it to the bottom of the panel. These ones here are kind of a little bit more aerodynamic to allow the wind to go over it. That should help reduce some wind noise the solar panels can potentially get 'cause with those Zee brackets, it's pretty much just a panel sitting up here and your air goes above and across.
This just kind of helps to direct that over. It makes it a little bit more aerodynamic. That also can help reduce the drag on it, so you're not gonna have so much stress on the wind, trying to pull your panel off. I know with the Go Powers, they usually recommend that you stay kind of a little bit further back to prevent that air going over your trailer. The REDARC didn't really have any recommendations like that in their instructions so it looks like that these types of solid brackets here probably that you get a little bit closer to the front of your motor home before we have to worry about that drag issue.
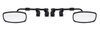
The solar panel does have just standard MC4 connectors on it so I do like that the REDARC stayed with standard connections there on the panel itself. They do switch over to Anderson connectors for the rest of their components, but you do get an adapter with your kit here. So it does have an MC4 to Anderson adapter, so that way it can switch over to Anderson. I would have preferred if REDARC just would've stuck with MC4 all the way down, it would have been a little bit more standard, it would work better with some of other competitor's components as well. I don't really like when they switch connectors, but it all seemed to work out okay. The component right here on top, if you have a solar prep package on your trailer or RV, you're gonna have one of these MC4 connectors mounted on top. A solar-ready trailer actually has a small connector on the side, for ones that you just plug in and set on the side. So it is important to know the difference in solar ready and solar prep. This one didn't have the solar preps so we did add BMC4 connector on top to make this a much cleaner installation. The Anderson connector style that it comes with really doesn't let you kind of plug it into a roof. REDARC does have some roof mounted connectors, which you're gonna have to cut the wires to mount them up and there really isn't a good mounting solution to get it installed on an RV roof. It'd be great for like a conversion van, but for this, it just really isn't an ideal type of bracket. The Anderson style, if you do wanna run those, you could use like a vent or like your refrigerator vent, something like that, to run your wires down through the vent, to get 'em inside. So that is a way that you're able to get those in. I don't personally like that way, 'cause it does leave a chance for wicking to occur on the wires to bring 'em in. We've got a lot of sealants here at etrailer though, so you can seal those up when you're running them through to help prevent that. But if you have a rooftop connector, that's usually your best bet for getting solar installed without the risk of any moisture contamination inside your roof. As far as the installation goes with this package, you do get all the components that you need, but you are gonna probably need some extra hardware. You don't get a lot of hardware as far as for mounting any of the components, the brackets didn't come with any hardware, and actually there's no holes drilled in the brackets, which was a little annoying. You have to drill your own holes into the brackets to mount it onto the roof. I guess it's a little more custom that way, but it just seemed like a lot of extra steps that didn't necessarily need to be there. There could have been holes already there. And it also didn't come with the hardware. We did have to write a lot of the hardware. There was only a few pieces. I believe they we're actually for the controller display. That was the main hardware that you got, which actually doesn't come with your full solar panel kit, that's an add on item that I do highly recommend. I would say, as far as the install goes, this will take you a little bit more time to install than maybe like a Go Power one, just because it has the Anderson style connectors, so you have to do a little bit more cutting and maybe swapping over some connectors to make it integrate a little bit easier. It's not really a whole lot of extra work though. I would say, compared to the Go Power though, I do prefer the Go Power over the REDARC. The displays are just a little bit more user-friendly, they operate with lithium batteries, they have the standard MC4. So the whole kit just kinda seems to work better for your trailers and RVs. Now where I think the REDARC's really gonna shine though, is with you guys out there that have conversion vans and in bed campers. Particularly with the in bed campers, 'cause an Anderson connector is pretty common on those for plugging in heavy loads on your in bed camper. So with this using the Anderson connectors, this would probably integrate into those very easily and probably be the best option for that style of camping setup. Here, you can see our solar controller. You'll connect to your batteries and your solar panels using Anderson connectors. It's a little strange. I'm not a big fan of the Anderson connector here 'cause solar panels typically use MC4 connectors. REDARC does have adapters though that goes from MC4 to the Anderson, so that way you can adapt it over. I just really liked the MC4 better. They seem to be a better sealed connector. These ones here seem like they aren't really sealed, hardly at all, that's why it's installed inside a compartment here. We don't wanna expose this to moisture. Yeah, they're also very large connectors in comparison with an MC4, so it makes it a little bit more difficult to route. You may have to cut your wires and re-splice them back together due to the large size of these cables. They feel a little bit inappropriate for a trailer or RV. This feels like, this is almost like a bigger, heavier duty component that's probably more appropriate for like a truck with an in bed camper or a conversion van or something like that. Seems like this is more where this would be geared towards. Go Power has got a lot of great products that is designed for solar ready vehicles or solar ready trailers and RVs. So I found that those just kind of integrate into the motor home a little bit better than what the REDARC does here. With the REDARC, there is still a nice controller. It's nice and heavy duty. I don't like that it doesn't have a display built into it. So if you wanna see any outputs, you have to purchase an additional display. But with that additional display, you can kinda see how your controller is charging your batteries, and you can also adjust some parameters with it. We do get a little bit of information though from this solar controller. We've got two lights down here that tell us the status of our solar panel and our battery. On the right we've got our battery LED and green-yellow little chart here that tells you what the status means. And solid means that our battery output's okay, everything's good on our battery's side there. I can see here if it was, the battery's flat or under voltage, you'd have different colors there. So you do get some feedback from this, but nothing that comes close to what the display would show you, in comparison. We can see our solar panels currently flashing slow, and that indicates that we are currently charging. So it looks like we're charging up our batteries right now. It's exactly what we wanna see. This controller is designed to work at either 12 or 24 volts. We've currently installed it for a 12 volt setup. This solar controller has a maximum of 10 amps, but REDARC does have some higher output models. I think they have a 20 and a 30 amp model available. So, if you need more than just 10, you're good to go. With a 10 amp controller. this is rated for up to about 120 Watts of solar panels. We've currently installed the 50 watt kits and we've got headroom to allow us to install another panel later on down the road to get more output from our solar, if we need it to be able to charge our batteries more. And this is what our solar controller display looks like when it's installed. We did just install an entire solar panel kit, but we added the display to it. It doesn't come included with the kit, but I wanted to put it on here so we can get some feedback on how well the system is operating. 'Cause without the display, it's still gonna charge your batteries and you will get an LED indicator on the charge controller to let you know whether or not it's charging or not, but you don't really get to see how much it's charging or anything like that, you'd have to almost put your own like inline multi-meter in there to measure the average or something like that, to be able to check it. And it's just a lot of extra work that you guys aren't gonna wanna do at home. So you can get a small device here that uses an ethernet cable that plugs into your solar controller to give us all of our system status here. So let's just take a look and see where we're at now. And now its morning here, the sun's coming up, so we do have a little bit of a partial blockage on the solar panel because the sun's kinda low in the sky right now. And here on our display, we can see the voltage in our battery is 12.1 volts. The volts coming out of our solar panel is 12.5 and we're currently charging the battery at about 0.1 amps. So it's kind of a trickle charge right now. We don't got a lot of sun. It's only a 50 watt panel, so it's not really a very large footprint on the roof. So it's really not collecting a whole lot in this low light right now. Let's go ahead and move on to the next display where we've got your time there and your date. This does need to be set. You'll have to set that yourself. This is a log of how much you've charged. We just put this on so these are gonna be empty right now. And here we can see kind of a status of what's going on. So it shows currently our battery's absorb or charging it. Status is normal, we've got no faults. So you can get good feedback here. This is our solar panel. It shows you how much volts we have at the panel and how much it's currently charging, about 1.5 Watts. So we're pretty far away from that 50, but I think this afternoon it should jump up some. We can get our current temperatures, which is nice to see. We don't wanna ever see like a really high temperature here on our regulator as that could potentially damage it if it gets way, way up there. We're at 4.8. So we're way far away from any potential damage, you know, from overheating components. Upwards of probably 60 to 80C is where you might wanna start to consider lowering down your loads or something to help cool that off, but we're way far away from that. And that's all of our stuff we see there for monitoring, but we do have another menu here we can open up. We've got some info there. We can control some parameters. Let's take a look here. So we can choose the type of battery that we're charging and we can even put the amp hours of the battery in there. So it's really cool. The more information you can provide the controller, the better it can do at charging your battery properly. So you got here, it shows your over volt would come on at about 16 1/2 volts and the charge that was about 16 volts. So you've got a lot of different settings here that you can go through to set up your particular charge strategy for the particular type of battery you have. Whether you got a lead-acid, an AGM or a calcium battery. Now, one of the things though that REDARC does not have functionality for is for lithium batteries. This charge controller does not support lithium batteries. If you wanted to do lithium, REDARC does have a BCDC charger that can be added into the circuit that does have the capability to be able to charge lithium batteries. So we've got a lot of different limiters and things that we can look at in there. And we've got our device information there. So you can see there's a lot of neat stuff that we can do here with our controller to give us full control over the way our batteries are charged. We're gonna begin our installation by figuring out where we're gonna mount all of the major components and how we're gonna get all the wires routed there. Our solar controller is the connection point between our solar panel on the roof and our batteries. And this is kind of where all the magic happens to regulate it and make sure it's charging our batteries properly, and that it's not draining the batteries at night, kind of taking care of all the stuff behind the scenes. So our batteries are located here at the front of our trailer, right here at the front of the A-frame. So, this is the cable that comes with it. This will connect to our battery end and the other end here with the Anderson connector will plug into our solar controller. So you can see, we don't have a whole lot of length of cable here. You get about five feet. So with this, you wanna put this nearby, so that way it'll reach from our controller to our batteries. So we're gonna mount that inside our compartment right here. There's a panel and we can drill through to run our wires out. You can see there's already some wires that run out there. So we're gonna run ours out, pretty close to where those wires run out. So we know we're gonna put this in this panel here. We know we're gonna need this wire to route out. So now that we know where we're gonna put our controller and how we're gonna wire it to our battery, the only thing we're really left to figure out is, where am I gonna put my solar panel And I did already climb up on a ladder and just took a peek on the roof, and we're gonna be able to put our solar panel, pretty much just straight up from where we're at, maybe back a little bit. So we're gonna be good there. We're clear there to put that up there. And then you also get, there's also a control box that doesn't come included with your kit, but we're gonna be installing today that will allow you to select the batteries and stuff. And that hooks up with a long ethernet cable. So that we're gonna mount inside. And we're also gonna be mounting it close to this to make routing easy. We're gonna put that right inside of the bedroom. So we've already planned out where we're gonna put all the parts. Now let's start getting 'em mounted up. We're gonna start with our controller here, and we're gonna be putting it on this panel here and then routing the wires over behind the panel. This panel here, it doesn't have any screws in it. We're gonna pull this out of the way, just to keep that from hitting our panel here. And then, looks like this panel's a bit loose, so we can just pull this out. There we go. And now we can get behind it to route our wires over. We can also go ahead and get this mounted up. So we're gonna put it probably just right next to our battery disconnect here. This will be a good mounting location for it right there. So, now that we've picked our location, we're just gonna run it in place. You will have to provide your own hardware. You don't get any in your kit. We're gonna be using just some self-tapping screws to run this into the paneling. We're just gonna get this lined up, slide it through there. We know we're gonna put our controller roughly at this location. And this is some pretty thin paneling, so I'm not screwing it down real hard, 'cause we don't wanna strip it out and cause our screws to be loose later. So, we're not running it in real tight, just tight enough to be snug. And then we're just gonna continue running this in. So we've got all four run in. There's locations for two on each side. And I do recommend you pull the panel out first. Just see you check behind it to make sure when you run your screws in here, you're not gonna run those into any wires or components. So we pulled it out first. It does make it a little bit flimsier but better than making an accidental mistake. So next, we're gonna be routing our wire from our panel here inside. So just open up your fuse cover here. We're gonna disconnect our cable from the fuse to make it smaller, so it's easier to pass through the holes that we're gonna need to draw out. Just gonna use an eight millimeter socket to remove the nut. Slide the wire off of there and then we're gonna reconnect to this after we get it routed outside. So our cable here needs to plug in here and then it's gonna pass through our panel here, go to the outside to connect to the battery. So we're gonna need to drill a hole in this panel to pass the wire through. So I'm just kinda holding it up here to get an idea of roughly where the hole is that I want to drill, 'cause the wire's gonna flex down here. So we're gonna drill our hole roughly here to give us enough room for our wire to be able to flex and still plug in. So, we've got roughly the location that we need it to be in here. Just kinda putting my finger there to kinda give me an idea of where I wanna drill. And then we're gonna take a half inch drill bit and we're gonna drill out this location. There we go. We've got that drilled out. And I'll take our cable. We're gonna feed it through the hole. Bring it back to us first. It's like half inch. There's really cutting it close. It does fit, but it's a tight fit. I'll go ahead and plug the end in to our solar controller, let that wire run through, and there we go. Next we're gonna drill out our hole in the outer paneling here to get this wire routed outside to our batteries there. We're gonna be placing our hole right here. You can see we've got some wires that already come out through here. And when we looked behind our panel, we we're able to see these wires, so we know it's clear. We wanna stay towards the top though, 'cause there is like a brace fitting that runs kinda down towards the bottom. So we're trying to stay towards the top of this here. We go straight in. All right. Now we're just gonna take our wires down. We're gonna pass 'em through the hole that we just drilled. It is pretty far down in here. And then we're just gonna pull some of the excess through. We only need enough to be able to connect to our batteries. So that's probably pretty good there. That way we can take some of this excess and connect it to our factory wiring there to keep it up off the road. So at this point I recommend that you hold off on hooking into your battery. This way, there's not gonna be any live wires. We don't have to worry about any accidental shorts when we're working. We'll come back to this before we make any connections further to our solar controller there. We're also gonna seal up all of our ends where we poke this through any holes. We're gonna need some silicon to seal that up but I'm gonna wait also until I get it connected, so I know roughly the length of wire that I wanna have at each location. Now we're in our camper here. We need to get our wire from our solar panels, being able to route down to our solar controller there. There's no rooftop connections on this trailer, so you got a couple of options. You could go through an existing vent on your roof. Some people use the refrigerator vent. You can go down and then route your wires up towards your controller there. That is possible. We're not gonna have enough length to be able to do that, so we'd have to buy an extension to do that. And I don't really personally like doing that way, 'cause when you go through the vent, it has the chance of wicking water and moisture, down through the wire you've run down the vent and potentially in your trailer. You can do some loops to it, to kinda help make sure that moisture doesn't go inside, but it's just a little bit riskier. If we do it this way, we're gonna be putting a connector on the roof that our solar panel's plugged into and we'll drop our wires down from that connector. And we'll seal that connector up to our roof. We're gonna be using a part from Go Power to do this. It's gonna have MC4 connectors on it, so the solar panel will plug directly into it, and then we can easily take the wires from our connector here and run those down to our solar controller. So here, inside, we're gonna take a half inch drill bit. We're gonna mount that connector on our roof, just above this location here. Since we're gonna be mounting at this location here, we're gonna take our drill bit from the inside, angled towards the back. So we're gonna be mounting our connector. We're gonna come in just a little bit from the outside, just so we don't have our connector too far to the outside edge. We'll probably put it about right here and then our wire, we can run over to the edge and run it down this inside seam, all the way down. I'm just gonna get our drill bit kinda lined up in here. So once you find your spot, we're just gonna drill straight on up through the roof. So here we are on the roof. This is the MC4 connector that we're gonna be mounting to the roof to connect our solar panel to. There's our hole that we had drilled through. So you can see our panel's gonna connect and our wires are gonna pass down through right here. Now, before we pass our wires through, we're gonna make sure we get this fully sealed up and mounted so no moisture can leak into our cabin. We're gonna be using a mounting kit here. We do have rooftop mounting kits available here at etrailer. They're just kind of a universal kit that comes with some butyl tape and some mounting hardware. We're gonna be putting the butyl tape all along the bottom to fully coat the inside. This way when we screw it down, it's gonna smash this up inside of there and give us a really good seal. So I'm just kinda holding it up to length, ripping off pieces of the butyl tape, and we're gonna cover the entire perimeter. So we're fully coated with our butyl tape all the way around. We'll set that out of our way. Take our wires and we're gonna feed those down through our opening that we drilled, just kinda smushing the butyl tape there to make sure it kinda stays in place so it doesn't fall off when I'm feeding the wires through. So now we just passed the wires through and pushed it down on top of the roof. We'll then use the mounting hardware that came in our little rooftop kit here to run this in place. And I will take some self leveling sealant and we're gonna fully coat the top edges of our connector here, making sure that we fully cover up any screw heads that we had run down in there. So we're just kinda doing this along the sides and also on top. Next, we'll need to mount the solar panel. This is the rough location of where we wanna put our panel. Our wires here are gonna be long enough to reach our connector there, to go down inside, to connect to our system. And this is gonna be far enough back from the front. REDARC doesn't have anything in their literature about mentioning not to mount it too close to the front. And that's likely due to these mounts that they come with. These are supposed to be more aerodynamic than your traditional solar panel mount. A lot of the competitors like Go Power here, when we go to install those, they wanna have a certain distance away from the front of the motor home so there's not too much wind drag on the solar panels. So I don't see that in the literature. So I'm suspecting that it's because of these mounts that you could mount it a little bit closer to the front with this particular one here. So we're gonna put it in roughly this location, next to our vent here. So we're not in an area where like, if we we're to put in here, if we wanted to expand later on, we've already got an item here or something like that. So we would expand in this direction. There's plenty of room back here so. This is a nice place. It's kinda out of the way and it's not really too awkward. Our mounts here don't have any holes drilled in them. So you are gonna have to drill your own holes. So I just kinda sat it here in this location to get a rough idea of where this is gonna go and see if it's gonna fit. And then we're gonna take our drill bit, and I'm using a five 30 seconds and we need to drill out all the holes for the mounts. So we're gonna put three per mount. We're gonna do one in the corner. And I'm not drilling all the way through it yet, I'm just putting a mark there. I'll drill through it. Just don't wanna drill into the top of the motor home for the trailer. We're gonna put one on the outer edge and then we're also gonna put one on this outer edge. And we're gonna be putting it at this location on all three mounts. So we can go ahead and take our mount here, drill this out. All right. We got those drilled out. We're gonna repeat that for the three remaining mounts there. But you'll also notice here, these are the holes for our screws to attach to our solar panel. These ones are marked for you, but they're also not drilled out. Now we're gonna be using self tapping screws to attach it. So the self tapping screw will drill through the plastic, but it's a little bit easier to get it to drill through the metal of the solar panel if you've already got these drilled out. So we're gonna drill out these as well. We're just gonna use the same size. And now we're just gonna repeat that for the remaining ones. And the spacing doesn't need to be exactly the same on each one. We're gonna be covering this with the self leveling sealant, just like we did when we mounted the other one. So these screw locations don't need to be all really that pretty. We're gonna be covering up all of it anyway. I just like it to be in a general relative location so if I ever had to take it off, for whatever reason, I know the screws are gonna be in roughly that location, you know So now that we've got all of these fully drilled out here, I like to attach it to the solar panel first and then we'll attach it to the top. Usually when I'm mounting solar panels like from Go Power, it's about roughly the same to, we usually attach it to one place and into the other. So that's how we're gonna do it with this one. So I'm just gonna put that back into place, kind of in a rough location I want everything to be in. And then we'll grab our self tapping screws. These do not come included with your kits so you are gonna have to provide these yourself. You can get these at your local hardware store. So now we're just gonna take our self tapping screws. We're gonna run it through our mounts and also through our paneling. And if you have a little gap there, you can loosen this back up. Push 'em together, nice and tight, and then tighten it back down. There we go. and that will hold it snug. So now we're just gonna repeat that for this one on the other side and the remaining ones to get all of our feet mounted up. And now we're gonna put some butyl tape on the bottom of each point here on our foot, so that way it's sealed up to our roof as well. So we're just gonna use some more butyl tape. I got a little bit thicker, a little bit wider tape here for this section, to make sure that we fully span across the width of this. You can get butyl tape here at etrailer, if you need some as well. And this is gonna be just like it was on the other one. We're gonna fully coat these. You really don't need to coat this section so much, 'cause we're not running any screws through here. I'm gonna go ahead and put some on there anyway though, just to ensure moisture can't somehow get from this direction and down our butyl tape. It shouldn't be able to, but we're gonna put a little there anyway. Now that we've got all of our butyl tape applied, you can set our solar panel into the position that we had chosen. The tape's pretty sticky so we're gonna try to be careful when sticking this on. Also make sure you pull your wires out. I like to just pull 'em off to the side where I'm gonna attach 'em, kinda pull the slack out and just fold it over the top so that way I don't accidentally pinch them between my mounts. And we're gonna put it in roughly this location, right here next to our vents. Put on down. That looks pretty well lined up front to back. Double check, make sure our wires are long enough, and they are so that looks good. So now at this point, we're just kind of pressing down on it just to make sure it's seated in place. So now we'll just run it into place. We're gonna be using some screws here and you can get these at your local hardware store. And we're using about 1 1/2 inch in length to ensure that it goes down through our mounts and into our roof there. And I'm just gonna repeat that, working our way around, screwing it down through each hole that we had drilled. All right. So now, all that we got left really up here is to plug in our cables here and then we're gonna use some of that self-leveling sealant to fully coat these as well. Just like we did with that one. I like to plug it in first just because the self leveling sealant, you can quickly make a mess, getting the stuff on yourself. So we're gonna get these two plugged in then we'll squirt that sealing on there to try to minimize the mess so we can stay away from it. These connectors here, you can't really do it wrong. You can see what they are opposite of one another, just like they're opposite of one another here. So just plug it into the only spot that it will plug into. All right. So we got our panel here fully mounted up here to the roof. We've got it all sealed up. We'll connect to our connector. At this point, we're gonna head back inside where we had drilled out our hole in that cabinet. We'll connect our wires and get those routed down to our solar controller from there. So here we are back inside again. Here's our wires that we had poked down through the roof. So we've got both of these here from our solar panel, so we can connect to those. This is the cable, the extension cable that comes in your kit well this is what we're gonna be using to go from here to our solar controller. You do also get a MC4 to Anderson connector. So this would plug into your solar panel. And then this way you can plug this into the Anderson connector and run it from up there down to your solar controller. But these Anderson connectors are huge. They don't connect to any type of rooftop connector. So I really don't recommend that. You can run it through the vent. So let me talk a little bit about running it through like a roof vent behind your fridge or something. That's a less recommended way to do it. It's best to have a rooftop mounted connector. So that way everything's nice and properly sealed and you can easily connect everything. There won't be wicking down or anything like that. So we're gonna be using just this one. We're gonna set that aside. We're not using that one. We're gonna finish drilling our holes so we can get the wire routed from here, down the inside all the way down into the compartment that's right below us, where we had mounted our controller. So I'm just gonna be drilling out kind of in the corners, give me a hole to be able to run these down through. So we got our hole drilled down through there, and now we're gonna go down through the floor to get into our compartment. All right. So now we got those holes drilled out, we're gonna cut off the end here. I'm gonna leave myself enough wire so I can make sure I can get this reconnected. So we're gonna cut it off about here. We'll then need to. But before we separate our wires, we'll feed it through, leaving it in the sheet, it will make it easier to pass through our holes. You can see that they are red and black. So they're labeled on the inside for us, which one's positive and negative. So we're gonna take these now. We're gonna go outside and we're gonna start feeding it from our compartment out there inside our motor, our trailer here. So now we're just gonna take the end that we cut back outside here. We're gonna poke it up through the opening that we had just made to get it inside. Sometimes you gotta kinda flex this, just a little bit to make it a little straighter to get it to pass through. There we go. And we just need to feed in enough to be able to grab on the other side and we'll take our excess here. We're gonna set it in the compartment. That can just help keep the weight of the cable from pulling itself back down. So we'll head back inside now and get it connected up top. And now we're just gonna continue feeding our wire up until we reach our cables here. I'm gonna pull through some excess here just to make it a little easier to work with. So now we'll take the two wires that are in here. We'll need to separate those out of there so we can access them. You can use a razor knife for this or the pair of snips you got usually work okay too. You can kinda run 'em down the side to cut it open, kinda like that there, and we're just gonna work our way down. So we really only need about an inch or so of exposed wire to work with. And that'll be good enough there. We'll just cut off our excess. And we'll then strip back these wires and then we'll attach it to our exposed wires here. We're gonna attach them color for color, red for positive, black for ground. So now we're just gonna take our butt connectors, we're gonna slide down our wires and crimp them together. If you need some butt connectors, you can get some here at etrailer. So now we're just gonna use some loom clamps just to keep our wire running down and hiding it back behind here. You can get loom clamps and self tapping screws here at etrailer if you need some to help hide your wiring. Now as an optional accessory, you can also add the controller for your solar control module, the one that's outside. There is a controller for your panel to make sure it works properly, but you're not gonna be able to select any of the parameters or make any adjustments or monitor its status without this part. It's sold separately. We're gonna go ahead and mount it up. The mounting bracket here has four screws inside and four threaded inserts to mount this panel to. This connects using an ethernet cable from this unit to the unit in our compartment that we've installed there. So we went ahead and took the gray ethernet cable that comes in this kit and we routed it right alongside the other wire that we did just run. So this one just went right along with it. We are gonna mount this right here. So we're gonna go ahead and drill out a hole here to be able to pass it through, to hide everything. If we look at our panel here, our mounting bracket, on the side of it, it's got a little notch there and that's to allow your wire to pass in behind it. So this way, it'll be nice and hidden behind our panel. You won't even really know that we've made this modification here. And you just wanna be careful when you're drilling this, make sure you don't cut your wires on the other side so, I can pull it back out of the way. So we know our cable, it's gonna line up with this match here. So we're just gonna line it up with that match. And then we're just gonna run it into place using the screws that comes provided with it. We're just gonna slide the screws into place and then just run 'em on in. And looks like you're probably gonna have to take a screwdriver to finish these off. Looks like our drill here is actually too large to fit in the openings for where the screws run in. We can kinda get 'em started, but you can see, we can't get them fully tightened down, so we'll have to finish 'em up with a hand screwdriver. So on our trailer here, turns out we're not gonna be able to use these screws. When we checked, they're longer than what the width of our wall is here. So I'm gonna go ahead and back these out. We're gonna get us some smaller screws and ones that are actually able to go into this paneling here without causing any damage to the trailer. All right. So we got pretty lucky here. These are the screws, some of the extra ones that came with that rooftop mounting kit we we're using. So these ones are gonna be the proper length. So that's definitely a worthwhile kit right there that seems to have kinda added all the missing components that we didn't have here in the REDARC to get this installed. That rooftop mounting kit's really coming in clutch here. So I would recommend grabbing that if you're planning on installing this, as it will, really comes with a lot of useful things to make this job happen. So now we're just gonna plug this in, pull us a little bit of excess through here if we can, just 'cause that'll be kinda useful for the future. And there's plenty of room back here for excess wire. That should be pretty good right there. We'll plug that in, slide our panel in, and then we're gonna use these smaller screws that come in your kit here. These come with the solar controller. This panel here, not the full kit. This comes with the little additional accessory component here. We'll then use these to attach it to the mounting bracket. You also get some little black covers or rubber bumpers. After you get all these screws in, you can stick those little rubber bumpers in here to cover up the screw holes and just give it a little bit more appealing look. Let's poke those in there. And it really makes it look nice there. So we can now hook up our controller to our battery and then we'll make our connections. One of the things I did notice, there's a rubber plug in the ethernet connection and it's quite difficult to remove. So you might wanna remove it before you mount that. I had to use a pick to get up in there to get this thing out of there to be able to plug the other controller into this one. But we wanna get our battery hooked up first. Before we hook our solar panels to the controller, we wanna make sure the battery's hooked to the controller. So we're back outside. We're gonna get ready to hook this to the battery. First, we're gonna hook our fuse backup that we had disconnected earlier. Tighten back down. All right. And now we're gonna kind of taking this a little assessment on this here. If we look at our fuse holder, it does have two spots to mount the fuse, but the end of the cable here that it has is very, very, very small. So if we we're to hook it to the battery there, you can see where our fuse would be. So we're just gonna zip tie it to our wiring there due to the short length that you get provided with this to make the connections. Also, the ring terminals on the ends here are too small to hook to the battery posts. The posts here are quite a bit larger, so that's never gonna slide on there. So we're gonna have to cut these off and replace the ends with something big enough to connect to our battery. So we've got replacement ring terminal ends down here. We do have a bunch here at etrailer so you can get the one that's appropriate for your battery. We'll then just cut off our old end, strip it back, take an appropriate size ring terminal, slide it into place and then crimp it down. We'll then do the same thing for the other wire because that one's not gonna work either because it's too small. Well now I'm just gonna remove the battery positive terminal post. Take the nut off the top there, slide our ring terminal on and then just tighten it back down. We'll then do the same thing with the negative. Now we'll come back here to our controller and we'll take those wires we routed in. We're gonna plug in our solar panel as well as our controller ethernet cable. We're gonna have a ton of extra wire here. If you put 'em in the same location as us, we're gonna be storing all of this down here in this compartment. So now we'll just take our wiring. We're gonna zip tie 'em up. We'll probably use some wire loom clamps to kinda hold them up by the way up in here or something, so that way it doesn't obstruct the use of their compartment too much. And that completes our installation of REDARC's 50 Watts solar panel kit..
Info for this part was:
At etrailer.com we provide the best information available about the products we sell. We take the quality of our information seriously so that you can get the right part the first time. Let us know if anything is missing or if you have any questions.


Thank you! Your comment has been submitted successfully. You should be able to view your question/comment here within a few days.
Error submitting comment. Please try again momentarily.