
OptiMate Roof Mount Solar Charging System with Controller - 80 Watt Solar Panel
(10 reviews)
Price: $274.95
OptiMate Roof Mount Solar Charging System with Controller - 80 Watt Solar Panel
Our Price: $274.95
In Stock


Need help with installation?
Locate installers near meCustomers prefer these similar products
24% prefer this

20% prefer this

17% prefer this

16% prefer this

11% prefer this


- All Info
- Reviews (10)
- Q & A (0)
- Videos (1)
- Photos
OptiMate RV Solar Panels
- Roof Mounted Solar Kit
- 80 Watts
- OptiMate
- AGM
- Flooded Lead Acid
- Gel
- 5.1 - 10 Amps
- Rigid Panels
- 1 Panel
- 30-3/8L x 27W Inch
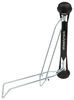
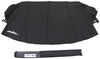
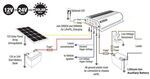
This 80-watt solar charging system lets you extend your off-grid campout if you have low energy demands. Installs on your roof (hardware sold separately) and wires directly to your battery with ring terminals or alligator clips.
Features:
- Permanent-mount solar system provides an off-grid charging solution for low-energy demands
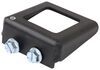
- Panel attaches to the roof of your RV (hardware not included)
- Polycrystalline solar panel charges your battery at 80 watts an hour in optimal daylight conditions
- Weatherproof materials stand up to the elements
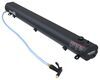
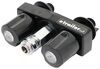
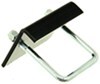
- 5-Amp PWM solar controller automatically adjusts solar panel output for a consistent charge
- Allows panel to stay connected safely for extended periods
- Displays charge progress and charge level with LED indicators
- Can save a dead battery from as low as 1V
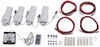
- Kit includes all major components (hardware not included)
- 1 Solar panel with built-in solar cable
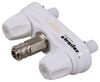
- 1 Solar controller with SAE connector
- 1 Battery clamp cable
- 1 Ring terminal cable
Specs:
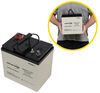
- Application: 12V batteries from 2 to 240 amp-hours
- Works with AGM, gel, and flooded lead acid batteries
- Solar panel rated power: 80 watts
- Controller charging amperage:
- Maximum average current: 6.67 amps
- Pulse current: 3 to 5 amps
- Cable lengths:
- Solar cable: 80"
- Controller cable: 40"
- Battery clamp lead: 20"
- Ring terminal lead: 20"
- Panel dimensions: 30-3/8" long x 27" wide x 1-1/4" deep
- Solar panel IP rating: IP54
- 3-year limited warranty
This permanently mounted Optimate solar system can help extend your off-grid campout if you have low energy demands. It provides an easy way to charge your RV batteries with clean, renewable power. Using the 80-watt solar panel, this system collects solar energy to create DC power that passes through a solar charge controller into your battery. The kit includes adapters to suit your charging application.
It's great if you only run lights or a fan on the single battery of your small travel trailer, or if you have a portable power station for keeping your phones and chargeable devices topped up. This is also a great choice for maintaining the battery in your motorcycle, ATV, golf cart, or other big toy in the offseason. Simply mount the panel to the roof or wall of your garage and run the cables inside.
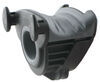
Polycrystalline Solar Panel

The charging process starts with the solar panel, which mounts permanently with screws or other mounting hardware (sold separately). When solar energy interacts with the silicon cells in the panel, it generates a flow of DC electrical current that charges your battery. And in optimal sunlight conditions, the panel produces 80 watts per hour.
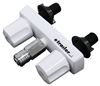
Smart Solar Controller Charges and Protects Battery
The solar controller prevents harmful overcharging by adjusting the power generated by the solar panel before it reaches your batteries. It uses pulse width modulation technology to regulate the output through pulses that provide a consistent charge. Typically, PWM controllers are a good fit for smaller systems with lower voltages compared to more expensive MPPT solar controllers.
Using a multistage charging system, the controller automatically switches voltages while the battery bank charges. This accelerates the charge, but also helps extend battery life by adjusting the voltage during the different modes. The controller is compatible with multiple battery types and includes preset charging profiles for sealed/gel, AGM, and flooded/wet cell lead acid batteries.
Charging Modes
- Save: When battery save mode is in progress, the solar charge controller is detecting a battery lower than 12V. It can save a battery discharged as low as 4V.
- Charge & Optimize: In this mode, the controller will be actively charging the battery. The battery is optimized by continuing charging for at least 10 more minutes.
- Maintain: The battery will be maintained in this mode as the charger delivers a holding voltage between 13.3V and 13.6V.

LED indicators provide information on the current solar panel output. The lights will tell you if the panel is providing a charge, if the battery is deeply discharged and in save mode, if the battery is moderately charged and in charge & optimize mode, and when the battery is fully charged and being maintained. It automatically detects battery type and chooses the appropriate charging profile.
Easy-to-Use Adapters for Battery Connection

This kit includes two cables for temporary or permanent attachment to your battery. The SAE plugs connect to the charge controller and attach to your battery using ring terminals or alligator clips. The ring terminals are good for creating a port on your motorcycle, ATV, golf cart, or RV so you can park it and quickly attach the solar panel with zero fuss. The alligator clips are a good option if your battery is easily accessible and you only occasionally plan to hook up the solar panel.
TM523-8 OptiMate Solar + 80W Solar Panel 6-Step 12V 6.67A Sealed Solar Battery Saving Charger and Maintainer
Item # MA46JR
Installation Details


Video of OptiMate Roof Mount Solar Charging System with Controller - 80 Watt Solar Panel


Videos are provided as a guide only. Refer to manufacturer installation instructions and specs for complete information.

Video Transcript for Review of OptiMate RV Solar Panels - Roof Mounted 80 Watt Solar Kit - MA46JR
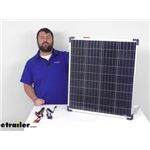
Hi there, I'm Michael with etrailer.com. Today, we're going to take a quick look at this OptiMate solar charging system with the solar controller. This is an 80-watts polycrystalline panel that is going to allow you to use the sunlight, to provide an off-grid charging solution for your lead-acid batteries. Now being in a polycrystalline construction, it is going to be a little bit less efficient than your monocrystalline solar panels out there. So it is going to be more of a economical option for you. If you're wanting the max efficiency, the monocrystalline is a definitely a little bit more effective, but you're probably not going to notice it very much unless you have the two side by side, and this is still going to do a good job for you.
This will permanently attach to the top of your RV or camper. We've got a couple holes on the corner brackets, and that will allow you to pass screws through to get it mounted in place. The hardware is not included with this panel. So you will have to provide that on your own. You will, once you have this mounted in place, you'll have to park your RV or camper in the general direction where it's going to get sunlight.
So unlike some of your more portable options where you can set the solar panel out in the sun, and you can park in the shade where it's a little bit cooler, this is going to be attached to the top of your RV, so you will have to be parking in the sunlight. This is made with weatherproof materials, so it is going to help stand up well in the elements, it does have an IP rating of 5 4, so it should stand up to most rain showers and that sort of thing. There are some other panels that have a little bit higher IP rating if you're more nervous about that, but it should do a decent job for you. This is going to connect to your 12-volt batteries that are from two to 240 amp hours. And that could be any of your lead-acid types, your flooded, AGM, or gel batteries.
So it's going to do a good job of helping to charge those batteries up when you're off the grid. As far as our dimensions go, this is right at 30 and three quarters of an inch tall by 27 inches wide, only about one and three quarters of an inch deep or thick. So the panel itself is going to have on the backside here, you can see the plug or the cable, the SAE fitting on the one end. This cable is about 80 inches long. So it will allow you to route that inside where you'll have your charge controller.
Now, this is going to become the brains of the operation. This is going to control how much power is coming from your panel, going to your battery. So this little guy here, give you that close-up look, this is going to make sure that you have a quick, consistent charge. It's automatically going to adjust to your battery's level so that you're not going to overcharge your battery. It's going to help extend your battery life that way. And it is also going to ensure that the battery is getting charged in any weather condition. So if you have a full sun, sunshiny day, this is going to provide continuous charge for you. If you have, if you're in a low light setting, that's going to provide a pulse charge of about three to five amps for you. If you can see that this does have the LED display here, that's going to allow you to monitor your battery process or fullness so that you can be aware of which stage it's in, how much it's putting into your battery. It's going to allow you to monitor your battery's charge throughout the night. And this can save a battery from as low as one volt. So it is going to do a good job of ensuring that the batteries are well charged, even if they are extremely discharged before. So like I said, that cable coming from your solar panel, that's going to plug in to this end is 80 inches long. This controller cable here is right at 40 inches long. And then you're going to have two different options to plug into this. Two different ways to connect to your battery. So you're going to have more of a temporary option with these clamps. So you'll attach your positive and negative side of your battery, plug in here, and that's going to allow that power to flow through. So this is more of a temporary option. If you're wanting to charge up a another battery that you don't typically charge up. something along those lines, you can use these, or you have this more permanent option with the ring terminals that you'll install on your battery posts. This is fuse-protected. And it's got this cap on here with the little slits for your zip ties. So you can zip tie this in place where it's going to be most convenient to plug in and then disconnect for you. So having those ring terminals, you won't ever have to work with the battery, just pop off that cap, plug in your controller, and you'll be ready to go. So both the battery clamps and the ring terminals are about 20 inches. So to kind of give you an idea of how far that's going to reach out for you. They do include instructions to help you get this installed, ensure everything is set up properly. But overall I'd say this is a decent panel for you. Now, keep in mind, it is 80 watts. So depending on the amount of power that you're going to need, that sort of thing, we do have other options available for you here at etrailer.com. Some help articles to help you determine how much power you are going to need, depending on how long you're going to be off the grid and that sort of thing. So definitely check out some of those other resources. If you are needing a larger panel or a portable panel, you'll want to set that up so that you don't have to have it installed on your roof. If you move it to where it's going to be convenient for you, we do have lots of other options available as well. So be sure to check those out. Hopefully this video has been helpful for you in determining if this is the right option for you or not. So that's going to complete our look for today. Again, I'm Michael with etrailer.com. Thanks for watching..
Customer Reviews
OptiMate Roof Mount Solar Charging System with Controller - 80 Watt Solar Panel - MA46JR
Average Customer Rating: 4.7 out of 5 stars (10 Customer Reviews)
This 80-watt solar charging system lets you extend your off-grid campout if you have low energy demands. Installs on your roof (hardware sold separately) and wires directly to your battery with ring terminals or alligator clips.by: John 05/17/2023
It's a great solar charger. The only downside is that it doesn't indicate the charging level. I have it hooked up to my four wheeler in a remote area to keep the battery charged. It would be a five rating if there was some way to tell if the battery was fully charged when using the charger.
by: Mark 06/21/2023
Great service, speedy delivery and fine products.
by: Mike02/23/2022
Product exactly what was advertised and easy to install.
by: Matthew 02/12/2024
by: George 01/30/2024
by: Lavern 03/16/2024
by: Joey04/27/2023
by: Robert 05/30/2023
by: Brad 12/08/2022
by: Randy 07/16/2022
10
10
See what our Experts say about this OptiMate RV Solar Panels
- Interior LED Light & Solar Panel For Cargo TrailerFor the interior LED light, you can use essentially any style that best suits your needs, such as the Opti-Brite LED Dome Light # ILL06COB. I have added a link below to our selection of interior LED lights as well. As for the solar panel, that really depends on your power needs, but if it's just for a battery controlling a light, something small will be fine, and I recommend the OptiMate Solar Charging System with Controller - 80 Watt Solar Panel # MA46JR. The # MA46JR is a single panel...
view full answer... - Can the OptiMate Roof Mounted Solar Charging System Be Used W/ Two Batteries?The OptiMate Roof Mount Solar Charging System with Controller # MA46JR you were looking at can only be used with one battery. For a better option, I recommend checking out the Redarc In-Vehicle BCDC Battery Charger # 331-BCDC1225D instead. This battery charger will draw power from your vehicle to provide power to an auxiliary battery on your trailer or RV. This also allows you to add a solar panel if you wanted to and you wouldn't need to add an additional controller.
view full answer...
Do you have a question about this RV Solar Panel?
Info for this part was:

Updated by:
Kathleen M

Updated by:
Cody B

Video by:
Dustin K

Video by:
John S

Edited by:
Daron K

Installed by:
David F

Installed by:
Michael B

Written by:
Alex H

Test Fit:
Aidan B
At etrailer.com we provide the best information available about the products we sell. We take the quality of our information seriously so that you can get the right part the first time. Let us know if anything is missing or if you have any questions.
Product Experts Available Now!
Call 1-800-940-8924
Thank you! Your comment has been submitted successfully. You should be able to view your question/comment here within a few days.
Error submitting comment. Please try again momentarily.