
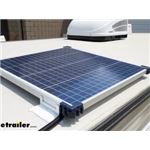
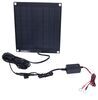
This 60-watt solar charging system lets you extend your off-grid campout if you have low energy demands. Installs on your roof (hardware sold separately) and wires directly to your battery with ring terminals or alligator clips.
Features:
Specs:
This permanently mounted Optimate solar system can help extend your off-grid campout if you have low energy demands. It provides an easy way to charge your RV batteries with clean, renewable power. Using the 60-watt solar panel, this system collects solar energy to create DC power that passes through a solar charge controller into your battery. The kit includes adapters to suit your charging application.
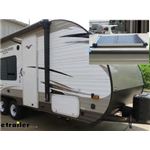
It's great if you only run lights or a fan on the single battery of your small travel trailer, or if you have a portable power station for keeping your phones and chargeable devices topped up. This is also a great choice for maintaining the battery in your motorcycle, ATV, golf cart, or other big toy in the offseason. Simply mount the panel to the roof or wall of your garage and run the cables inside.
The charging process starts with the solar panel, which mounts permanently with screws or other mounting hardware (sold separately). When solar energy interacts with the silicon cells in the panel, it generates a flow of DC electrical current that charges your battery. And in optimal sunlight conditions, the panel produces 60 watts per hour.
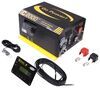
The solar controller prevents harmful overcharging by adjusting the power generated by the solar panel before it reaches your batteries. It uses pulse width modulation technology to regulate the output through pulses that provide a consistent charge. Typically, PWM controllers are a good fit for smaller systems with lower voltages compared to more expensive MPPT solar controllers.
Using a multistage charging system, the controller automatically switches voltages while the battery bank charges. This accelerates the charge, but also helps extend battery life by adjusting the voltage during the different modes. The controller is compatible with multiple battery types and includes preset charging profiles for sealed/gel, AGM, and flooded/wet cell lead acid batteries.
Charging Modes
LED indicators provide information on the current solar panel output. The lights will tell you if the panel is providing a charge, if the battery is deeply discharged and in save mode, if the battery is moderately charged and in charge & optimize mode, and when the battery is fully charged and being maintained. It automatically detects battery type and chooses the appropriate charging profile.
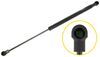
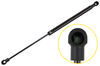
This kit includes two cables for temporary or permanent attachment to your battery. The SAE plugs connect to the charge controller and attach to your battery using ring terminals or alligator clips. The ring terminals are good for creating a port on your motorcycle, ATV, golf cart, or RV so you can park it and quickly attach the solar panel with zero fuss. The alligator clips are a good option if your battery is easily accessible and you only occasionally plan to hook up the solar panel.

Videos are provided as a guide only. Refer to manufacturer installation instructions and specs for complete information.
Hey guys, Kevin here with etrailer, and today I'll be showing you the OptiMate Solar Panel with Controller. So our OptiMate solar panel is actually made of a polycrystalline material, which makes this weatherproof in a variety of different elements. Our actual panel today is a 60 Watt panel. And the entire line of these is actually pretty low when it comes to wattage. If you are looking to just maintain your battery, maybe you put your travel trailer, maybe your boat, whatever you have, in storage for quite a while. Maybe a month or so.
And you come back and you notice that your battery's dead each time. This would be the ideal solar panel for you, 'cause this is not really meant for off-gridding. You're not gonna really get enough amperage back into your battery to really compete with what you would actually be pulling from it, unless you're really not using that much in your trailer. So like I said, overall, this is more for maintaining a battery, keeping it kind of, charged up during storage versus an actual off gridding, boondocking kind of solar system. So as you can see here in our charger it's in blinking mode right now, which is saying that it's charging our battery up.
There's three different spots here with three different LED indicators. Our first one's going to be our deep discharge mode. That means that we're under 12.3 Volts. So it's sending quite a bit of current just to get our battery back up to where it needs to be. Our yellow mode is going to be from, it's going to be more of a bulk charge.
So that's gonna be getting us from that 12.3 up to 14.4. And then our third one right here, the green side, is going to be our maintain mode. So when we're in that, that's gonna be just your normal maintenance 'cause your battery's gonna naturally discharge as it sits here. So that's more your storage mode kind of setup. So exactly what our neighbor needs today is just to not have the battery discharge when he has it just sitting in the storage lot.
It's gonna come with two different connector styles. We have your typical Rain terminal here which is also fused with a 15 amp fuse. And then we also have your jumper style cables. This is more if you just kind of have this panel sitting out and you just need a quick charge on your battery. Maybe you're using this on your car or maybe like a dump trailer or something like that. Whereas this would be more of your permanent install situation. So as far as installation difficulty goes, this panel isn't like your other typical solar panels. It's not really a hard setup because it's all kind of enclosed. It's not like you're trying to run wires through the inside of your camper and hook up to other elements. This is all a closed system that's gonna go directly from your solar panel up to your battery. Now there are a couple of things I do wanna talk about here with the installation. So when you're looking at your controller, the shorter side that does not have any cable, it's just the plug, is gonna need to plug into your solar panel. If you flip it the other way and try to extend it from this, you're gonna have power going the wrong way on your controller so it's not gonna work. So you have to flip that around to where going over towards your battery is the actual cable. Another thing with mounting, I used a different mounting bracket because this doesn't come with any because the only permanent install brackets they have are just these screw holes that you can see right here and here. But if you're putting this on a flat surface you're gonna end up crunching your cable. It's not gonna have enough room to sit under this frame in between that and this bracket. So I really didn't like that. You're gonna end up damaging the cable over time. Especially if your camper's hitting any bumpy roads. That's gonna just sit there and rub against your cable and eventually just wear through it. With these panels, they do come in different wattages. Obviously, the smaller the wattage, the smaller the panel's gonna be. The larger the wattage, the larger the panel's gonna be. So you're gonna wanna make sure that you pick the correct size and wattage for your needs. And then also there's gonna be a slight difference between the panels. If it is labeled with duo that means it's able to charge both a lithium or a lead acid battery. For our specific model today, it is not a duo. It is just the standard panel, which is going to only be compatible with lead acid batteries. Well, I think that about does it for the OptiMate Solar Panel with Controller..
Average Customer Rating: 4.7 out of 5 stars (10 Customer Reviews)
This 60-watt solar charging system lets you extend your off-grid campout if you have low energy demands. Installs on your roof (hardware sold separately) and wires directly to your battery with ring terminals or alligator clips.
It's a great solar charger. The only downside is that it doesn't indicate the charging level. I have it hooked up to my four wheeler in a remote area to keep the battery charged. It would be a five rating if there was some way to tell if the battery was fully charged when using the charger.
Great service, speedy delivery and fine products.
Product exactly what was advertised and easy to install.
Do you have a question about this RV Solar Panel?
Info for this part was:
At etrailer.com we provide the best information available about the products we sell. We take the quality of our information seriously so that you can get the right part the first time. Let us know if anything is missing or if you have any questions.


Thank you! Your comment has been submitted successfully. You should be able to view your question/comment here within a few days.
Error submitting comment. Please try again momentarily.