
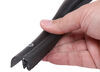
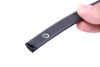
Replace your old and worn out C-channel mounted weather stripping before water damage creates a costly headache. Bulb seal slides onto existing track on the RV frame or can be used with Steele Rubber wiper seals with integrated track.
Features:
Videos are provided as a guide only. Refer to manufacturer installation instructions and specs for complete information.
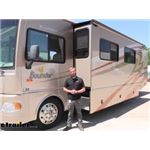
Hey guys, Kevin here at etrailer. And today, I'm be showing you how to replace the slide out seals on your 2007 Fleetwood Bounder Class A motorhome. So, your wiper seal is gonna be one of the most essential components of your slide out. What the wiper seal is gonna do is help provide a barrier between the outside and the inside of your camper. As your slide out goes in and out of your camper or your trailer or your motorhome, it's going to follow along the side of the slide out and wipe it down. And what that does is keep any bugs or debris that builds up on the sides, the top and even the bottom of your slide out box from getting inside.
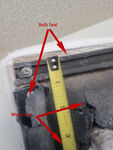
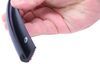
So, as you can see, on our seal, we already have installed. There's also this little like bulb shape that kinda comes out at the end of the wiper and that's gonna really help it drag against the box and help prevent anything from getting inside. So, without your seals, you'll actually be able to just stick your hand right through the slide out box and the wall of your motorhome or trailer, so that's why it's really important to have this. One of the things that you can kinda do to just check on it is kinda stick your hand in there and if you can kinda easily bend it around, then you know it's still kinda flexible. And you can kinda take a good look at it and see if it's getting dry rotted at all or if you see any kinda cracks starting to form on it, then you're gonna wanna take that off and replace it.
So, installation difficulty is going to definitely vary depending on what kind of trim, how much space you have, just kinda anything that's gonna be in the way of getting to that slide out wiper seal. With ours today, I had to remove a whole bunch of interior trim, just to kinda get the box in enough for me to get the wiper seal in there and get to the track that actually holds that and it's bulb. But typically, when you have like a fifth wheel, there's usually a quite a bit of a difference between the slide out box and the roof, so you can kinda get into it a little bit more. So, like I said, it is really just gonna vary. Overall, though, it really isn't that hard to install.
It's just a little bit time-consuming. So, what we're gonna have to do to start off our installation is open up our slide out just a bit, so that we have access to our bulb seal here and then get to our actual wiper seal. To do that, we're gonna have to remove this track right here that actually holds our bulb seal. I've already gone ahead and took out the screws, but this is still stuck on there. It's probably got a adhesive backing on it as well.
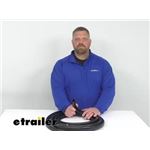
So, I'm gonna go ahead right now, we're gonna score this, keeping our blade off of the wall and more just trying to separate. You wanna make sure you're just taking this real easy. You don't wanna end up peeling this off at all. So, as you can see, on the track here, it's actually real flat on the backside of this. And your wiper seal is actually stuck on to this track itself, so that's why we have to take this off, just so that we can get to that. Because it's sitting here behind the actual wall, so you'd never be able to get to that from the outside. All right, I've got this popped off the rest of the way and we can kinda separate our trim from our seal. We're gonna pull that out of the way 'cause we're gonna be putting that right back on with our new wiper seal. So, down here, you can see that it's actually sticking out towards the outside of our trailer here. And I've already been out there and looked and there's actually two screws going through our seal, into the frame here, and that's kinda what's holding it in place out there. And then if we look up top, you can see that the track itself is holding the wiper seals in. That track is screwed through the top wiper seal and then pressed up against our side seals. So, we're gonna have to also take down our top track, and then we're gonna also take down the track that's on the opposite side over here. So, now I'm going ahead and I'm just kinda scoring this just like we did on the side. That way, it's a little bit easier to come off and we don't want it ripping the wallpaper up past where we can actually see it. So, now we're just gonna work our track out, and we got our wiper seal coming with it. I still have to take down that left side there, but we can just get this out of the way. Like I said, we're gonna hold onto our track. Our bulb seal is perfectly fine. More empathy. And putting this track back up in its place after we get our new wiper seal on it. All right, now we need to go outside and we need to take out those screws that are holding the bottom of our wiper seal on each corner. So, like I said, there's a screw here. And there's a screw on the other side of the frame, right over here, that's holding our seal. So, I'll go ahead and remove those now. Let's get down in here a bit more. So, you can see, it's fully out. Now, we're gonna go ahead and do the same thing on the other side. So, over on this side, I had to take our whole panel off, just so that I could gain access to this screw. And that's also gonna get us access to the bottom wiper seal here. So, now we can go ahead and take this screw off and then we can finally remove our side. Remove that put. And now, with that loose, I'm just gonna stick that back up in there, 'cause it's still kinda stuck to our track, we can just pull that from the inside. So, with our side panel here removed, I'm able to actually get into our bottom seal. I'm gonna pull that down now. And I can show you the side profile, so you can see how this one attaches. It kinda stuck on this. There we go. It had some caulk up in there, holding this in. But if you look at the side, it's got our press-on-style with a wiper seal here and a bulb already attached to it. So, now with both of our wiper seals off, you can see, we have our side here, which is quite a bit smaller than our top. So, we're gonna wanna make sure that we actually measure that and get the exact same size. Otherwise, if we get a slide out wiper that's gonna be too short, that's gonna sit too far away from the box, so it's not actually gonna wipe anything and then it would pretty much be doing nothing. Or if we get one that's too big, it might get caught and bound up a little bit too much. If you're just a little bit off from your current seal, it's not that big of a deal. But when you start getting about 1/2 inch or more, that's where you could start running into some issues. On our top, looking at it, we got a three-inch width there. So, we're gonna make sure that we grab the correct pieces. We don't wanna put this on, like I said, and then have it not actually do its job, how it's supposed to. So, I'm peeling back our adhesive backing right now. On the very edge of this, it's not actually sticky anymore, just from how the manufacturer have cut it. So, I'm gonna make sure that I overhang just a bit off of this. That way, I know for a fact that I'm gonna get a good seal. So, I'm just gonna take my time pressing this on, making sure that we're getting just the adhesive portion and then we're getting nice adhesion on here. And I'm also making sure I have it nice and tight. I don't want it kinda billowing up at all. So, as you can see, with the roll here, it's kind of warped a little bit. So, you really wanna make sure that the adhesive side is really staying straight along this. Your wiper part of it up top is gonna kinda be a little bit wavy just until it gets kinda bent back out. But I think that's just from it sitting in the rolled up. So, I'm gonna leave a little bit of overhang. We actually had overhang on our last one and it screwed in right here on our frame and then also right here. So, from the bottom, this is our floor right here, inside to our overhang spot, I'm gonna give it about six inches. So, we'll go back and we will trim that down an extra six inches after our track ends. So, I'm gonna score that up a little bit, and then we can start cutting through it. This rubber is pretty thick, especially with the adhesive, so you may have to score it a few times to really get it going. So, now we can kinda force this into place. I had to go and kinda push down that excess that we had sitting out in between our slide out and our opening here. It's gonna kinda fight you just a bit, trying to get it back in place, 'cause the seal's wanting to go this way, but we're trying to kinda force it out, just so we can get our track back in place. So, you will have to fight it, especially up in the corner. 'Cause we're not actually cutting it to meet that corner, we're just gonna have it kinda bend out and then our top seal is gonna come across that. And that's what's gonna give us a tighter seal, so that we don't have water coming through. Now, if you went ahead and you cut that to make it fit with the other seal, then that's how you could end up having a leak. So, now that we got this kinda in place, I'm gonna grab my screws and we'll screw our track back in place. So, now we're gonna go ahead and put those screws back in. Eyeball that, right about there. And get that back in our track. That's gonna kinda hold this down. And then also, that adhesive, gotta keep it in place. And we'll go ahead and hit the other side as well. I'm not gonna cut this, so I don't wanna take a chance of tearing across. I'm just gonna kinda bend it and then screw it over. Let's see where our hole is. Right about there. So, now we're gonna go ahead and do the same thing that we did on our sides for our top railing here. I'm gonna go ahead and place it so that just the adhesive is on our track, and we're just gonna work our way down. This one's gonna take a bit longer, just 'cause of the big length that we have to go, but we're just gonna take our time. All right, we're getting down to the last little bit of this. Typically, a little bit of overhang is gonna be good. But with ours, we already have the side pieces where it's gonna butt up over it, so I'm gonna go ahead and just cut this right off, because I don't want that coming out past what's going to be hidden by our trim. So, I'm gonna grab a pair of scissors, make sure I get this real straight. I'm not gonna use my razor blade just 'cause I wanna get real close and have a nice, straight close line. And we'll get that trimmed up and then we can start screwing our railing back into our wall. So, our OEM wiper seal used to be a press-on with a bulb and a wiper up on the top. It'll scrape against the bottom of our slide out. Now, since there isn't a exact match to this one anymore, what we're gonna do is I have a wiper seal, that's gonna be a stick-on, that we're gonna stick on here. And then we're just gonna add a couple extra screws just for some extra security, just to make sure that we don't have this falling off over the years. And then also, this is a track on it, which is gonna allow us to install a bulb seal, which will just slide on, if we get the track lined up, and we can slide it right down it. So, what we're gonna do first is get our seal on. And we're gonna have to do that by peeling back our adhesive backing. So, as you can see, there's this little lip right here. I'm gonna have that sit right on top of our railing. Actually, I'm gonna kinda wipe that out just a bit, so that we don't have anything kinda keeping our adhesive from sticking. And then I'm gonna just start pushing this in place. We need to fight the wiper seal a bit, just as it's going on, just 'cause this is a bit longer as it's out. But once this comes in, there's quite a bit of a gap. We're gonna run this down just to this point right here. This is like a foam material. And that's because we have some cables that are gonna come and they're gonna press up against this, so we're not gonna be able to run our seal, the entire length, we'll have to kinda cut it down a bit. Go ahead and just cut through it, and we can finish sticking that in place. And like I said, just 'cause we wanna be extra cautious, we're gonna go ahead, I'm just gonna take some self-tappers and punch those through. So, I'm gonna go ahead and I'm gonna slide my bulb seal on right now, too, before we move on to the other section. We'll just get one done at a time here. And since it is a little tight right now, it's hard to kinda get it started, but there we go. We'll just pull it right through. Some slack here. So, I've already run our other portion that's under the slide out here down just 'cause it's a little bit harder for us to really show you on camera, but I've got it all the way up to the end here. I'm gonna go ahead and trim this down 'cause we don't need that full length. And we can peel back our backing and push this up into place. And now that we got that in, we can go ahead and take our bulb and run the length for this as well. One little trick that I have for that, just to make it a little bit easier, especially with how long this is, is just rub some dish soap on both this track and then the track for the bulb. That's gonna help it easily slide down it, so you're not sitting there and struggling. So, now that we have our bulb in place, as you can see right here, and with our other little side piece here, that will complete our installation of our wiper seals. Well, I think that about does it for today's replacement of the slide out seals here on our 2007 Fleetwood Bounder Class A motorhome. My name's Kevin, thanks for watching..
Average Customer Rating: 4.7 out of 5 stars (81 Customer Reviews)
Replace your old and worn out C-channel mounted weather stripping before water damage creates a costly headache. Bulb seal slides onto existing track on the RV frame or can be used with Steele Rubber wiper seals with integrated track.I am very pleased with the help and the way my order were taken care of. When I placed the order I was helped to assure that I had all that I needed to take
care of my project on my RV. The product is great and very easy to work with it exceeded.my expectations. Would highly recommend this company and the people that you deal with when ordering product
From ordering ,shipping and installation everything went really smooth. My son and I put. On new wiper and bulb seal with no problems. Seal seem to be of better quality than original seals. Will use etrailer again Thanks for a trouble free experience

ETrailer has been great to buy from. Highly recommend to anyone looking for truck or trailer parts.
worked good on 2012 hartland trailer
Perfect fit
Stated dimensions were correct. Sliding onto the track require a little effort but was easily installed.
Have not yet used but looks good.
Seems to be a good product.
Shipping and delivery were great!
I am very satisfied and happy.
They look great when they ship to you but after 2 mths in the heat and cold, the slides stick to them like glue and pull them off the track channel. No amount of different lubes seem to help. WD40, nope, Axle grease (moly type), Nope, even a lard based oily lube would not stop them from sticking. The slide was cleaned with alcohol and thinners to get any debris off and them lubed as well and they still stuck. I spent more time trying to get them back in the track on a garbage can in the RV parks than they spent on the trailer driving down the highway. Would I get them again, probably cause that's all thats out there.
Seal don’t react to slide because of the rubber is too stiff. Slide won’t come in properly. I am out the cost of a 30’ roll.
Beware of steels rubber wiper seals
Overall, easy to install with the exception of the top piece, as I didn't want to undo the slide shade. Seal works well with no problems. Thanks!
So far, so good! Definitely much better than the original installed on the coach. It’s a bit tricky pushing it through the grooved track, especially if it’s a longer slide out. You have to push it then pull it from the other side. Some silicone sprayed in the track helps.
Your service was excellent and the how to video on your web site was extremely helpful
Do you have a question about this RV Slide Out Part?
Info for this part was:
At etrailer.com we provide the best information available about the products we sell. We take the quality of our information seriously so that you can get the right part the first time. Let us know if anything is missing or if you have any questions.


Thank you! Your comment has been submitted successfully. You should be able to view your question/comment here within a few days.
Error submitting comment. Please try again momentarily.