
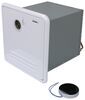
Replacement Gear Pack for Lippert RV Slide-outs -2"x3" or 3"x3" Arms - Standard
(10 reviews)
Price: $82.51
In Stock
Replacement Gear Pack for Lippert RV Slide-outs -2"x3" or 3"x3" Arms - Standard
Item # LC140409
Retail:$125.54
Our Price: $82.51
You Save: 34%
In Stock
Thank you! Your comment has been submitted successfully. You should be able to view your question/comment here within a few days.
Error submitting comment. Please try again momentarily.


- All Info
- Reviews (10)
- Q & A (0)
- Videos (2)
- Photos
Lippert RV Slide Out Parts - LC140409
- Gear Pack
- Gears
- Lippert Above-Floor Slide-Out Systems
- Lippert Through-Frame Slide-Out Systems
- Lippert
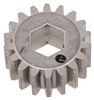
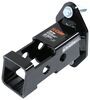
Replaces the gear pack of your Lippert above-frame slide-out with a 2" x 3" or 3" x 3" arm.
Features:
- Replaces the gear pack for your Lippert above-frame slide-out with a 2" x 3" or 3" x 3" arm
- 15 Teeth gear
- No assembly required
Fits:
- All Lippert above-frame slide-outs manufactured after October 2013 with a 2" x 3" or 3" x 3" arm
- For slide-outs manufactured before October 2013, you will need the 18-tooth gear (LC122739 - sold separately)
140409 Replacement Lippert Gear Pack for Slide-Out RV Awnings 2" x 3" - 3" x 3" - Above Frame Slide Out - Standard
Installation Details


Video of Replacement Gear Pack for Lippert RV Slide-outs -2"x3" or 3"x3" Arms - Standard


Videos are provided as a guide only. Refer to manufacturer installation instructions and specs for complete information.


Video Transcript for Lippert Slide-Out Gear Pack Installation - 2019 Grand Design Reflection Fifth Wheel
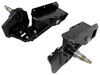
Kevin Hey guys, Kevin here with etrailer. And today I'm gonna be showing you how to replace your worn out gear pack for your slide out on your 2019 Grand Design Reflection Fifth Wheel Trailer. If you're having issues with your slide out not really wanting to come all the way out or come back in. Maybe one side's kind of starting to come out more than the other, might be a good time to get down there and look at your gear packs. Your gear pack has a crown gear in the center of it which has teeth in it and that's what actually kind of helps move your slide out in and out. Those gears get chewed up too much then you're not gonna be able to have your slide out actually move forward or back.
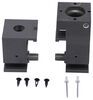
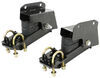
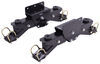
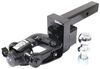
Here's what our gear pack is gonna look like once it's installed. We have our two rollers which are gonna ride along our arm here, and our crown gear which is actually gonna bite into the teeth on our arm and force our slide out to move in and out. As far as installation goes swapping at your gear pack can be super simple. The only thing you may run into some issues with is just a seized up bracket, just because sometimes over all the years, all that usage, that bracket can kind of get gunked up and really wanna stick to the mounting brackets on our frame. So you may have a little bit of issue trying to break that off, but shouldn't be too bad.
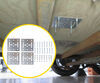
One of the things with this is in the instruction manual they tell you to place your slide out about halfway out. I feel like that's a little bit too much. I'd say anywhere from like a third to a half would probably be better, just so you don't have as much tension coming out because as this bar comes out, it's leaning all that weight more towards the outside which is pushing down on our gear pack here. If we have a little bit more in I wouldn't have had as much tension on here it would've been easier to swap out. Now that we've gone over some of the features of our gear pack, let me show you how I installed it.
The first thing you're gonna need to do before picking out your gear pack is to actually measure the arm. Once we measure our arm we'll have three choices of gear packs to choose from. We're gonna have a two by two, a two and a half by two and a half, or our two by three and three by three gear pack. To measure that, we're just going to take our tape measure up and looks like our arm is two inches by two inches so we know that we need the two by two gear pack. Just to give you a little bit of a reference I have our two by two and then our two and a half by two and a half.
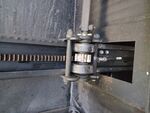
Now on our two by two, there are spaces for our roll pens but they do not come included. On our two and a half by two and a half and two by three and three by three gear pack we do come with these roll pens and these are important because that's how you can attach to your room bar, which will go between your gear pack on both sides of your slide out. I'm gonna start by disconnecting my room bar. I'm gonna set that aside because we're gonna put that back in once we replace our gear pack. Typically, your room bar can kind of collapse into itself. I just noticed cause I was having some issues getting it off. It's actually been welded. So our inner piece of our room bar and our outer piece are welded together. So this isn't gonna collapse at all. Which, not a problem. We can still get our gear pack out without having to collapse us in but it does help a little bit getting it off if that's not in your way. Now we can go ahead and we're just gonna break these bolts off here. Just get off my hand. All right, now we can start to pop our bolts out. We may need to use just a rubber mallet to get this out just cause this got a little bit of tension on it just from use over time and it's kind of gunked up a little bit so we'll grab our rubber mallet and get these out. Rubber mallet's not gonna fit back here I don't even have to use a steel hammer just wanna make sure that we're being careful we don't wanna damage anything. In our case, I am gonna need to also use a punch and just kind of hit the center of that bolt just to get it the rest of the way out cause it's just really sticking. Pull our bolts out. If you're having a lot of issues with the tension it is the room bar. Like I said, with ours being kinda welded in place really just have to sit there and fight the bolts out. You can take that room bar off and just easily slide it back go ahead and do that and make your life a whole lot easier. Get that bolt out the rest of the way. And then we can slide our gear pack out. If you look at your gear pack you can actually slide these brackets off and our rollers and then get to that crown gear. Our particular one here is a 15 tooth one but there are 18 teeth models. This is a replaceable part so if just your teeth are messed up and the rollers are fine, they're looking good no dents, no cuts in them you can go ahead and just replace that gear. Just match it up with what you already have or on some models you do need to kinda look because there are tech notes saying if it's within a certain year that you'll have to use the 18 tooth instead. All right, so now I'm gonna kinda line up my holes for my room bar. Get that slid in. When we look at our brackets here, it has a little bump out and that bump out's gonna sit inside of this well right here. I wanna make sure that we're sitting up against that and that this portion of our bracket is flat up against our mounting bracket up here. We're gonna do that for both sides. I'm just gonna try and slip the back bolt in first. Slips right in, and we can throw our front one in as well. Kinda lift up our whole assembly here. You need a little bit of persuasion to get this in. There we go. Just cause adding that room bar on there puts a little bit tension. Here we go. And now all we need to do is replace our nuts back on here and we'll just tighten those down. Okay, just double check they're even. Yep, all right. There isn't a torque setting for this so it's just getting it as tight as you can just with the wrench. And now we can go ahead. We actually slide my bar down just a little bit so I can get it matched up with our room bar here. All right. Now we can try getting our pull back through. It'll go up, and then you'll go just a tiny bit more. Like I said, typically you'll have one of those sheer pins in there on these and you won't have to really worry about it. Those sheer pins are designed to obviously just sheer away. That way if there is ever an issue you're not gonna destroy your whole assembly it'll just snap off of that room bar and not allow it to travel anymore. We can go ahead and take our wrench and tighten that down as well. Once you have all your bolts all nice and tight you can go ahead and run your slide out in and out just make sure it's working properly before you take off and go on that camping trip. Well, I think that about does it for today's replacement of our slide out gear pack here on our 2019 Grand Design Reflection Fifth Wheel Trailer. My name's Kevin, thanks for watching..
Customer Satisfaction Score:
93% were satisfied with this product
7% of customers were not satisfied
- Wrong item was ordered
Customer Reviews
Replacement Gear Pack for Lippert RV Slide-outs -2"x3" or 3"x3" Arms - Standard - LC140409
Average Customer Rating: 4.7 out of 5 stars (10 Customer Reviews)
Replaces the gear pack of your Lippert above-frame slide-out with a 2" x 3" or 3" x 3" arm.by: Edward 02/07/2024
Excellent price and part well made. Thinking of ordering another one to keep with us when we travel. Will need to upload the picture later on hold I replaced it on our 2016 Phaeton.
by: Jay 01/22/2023
Exact match for the Lippert Slide in our 2006 Mobile suite living room slide ordered the 18 tooth gear also as etrailer suggests and thats exactly what i needed
Great price on these parts !!!
by: Ronald 09/05/2023
Quick on getting order here
by: Walter N04/15/2020
This was an exact Lippert replacement for my slide. Everything lined up perfectly.
by: Peter 08/18/2021
OEM replacement at less than half the cost from the dealership. Delivered next day instead of several weeks. Good job eTrailer! Couldn’t be happier!
by: Arthur02/20/2022
VERY EASY TO ORDER AND SHIPMENT CAME TWO DAYS EARLY. THE CORRECT PART THE FIRST TIME. [ONLINE] COULDN'T GET THE CORRECT GEAR PACK IN TWO TRYS. NEW GEAR PACK INSTALLED AND REALIGNED THE SLIDE.THANKS
by: Mark Sides10/02/2017
Exactly what I expected. Delivery was prompt and the price unmatched.
by: David02/08/2021

David

2/9/2022
After replacing the first one shipped that broke, no problems
by: Albert 12/29/2023
by: Ralph 06/10/2021
10
10
See what our Experts say about this Lippert RV Slide Out Parts
- Replacement Gear Packs for Lippert Slide-OutsYou will want to use the same size gear pack to service your trailer's slide-out. We have kit # LC123356 from Lippert for a 2.5 x 2.5 size. For 2 x 2 installations we have part # LC281331 and for 2 x 3 and 3 x 3 we have part # LC140409.
view full answer... - Remove And Replace An Old Or Damaged Slide Out Gear Pack.Great question. When replacing a gear pack like Lippert 2 x 3 and 3x3 Standard Slide-Out Gearpack # LC140409. Follow these straight forward steps: 1. Run slide-out room half way out. 2. Place a jack under the inner arm of the slide-out. 3. Jack room up just enough to remove pressure off the gear pack. 4. Remove drive bolt from the cross shaft. 5. Remove bolts which hold the gear pack assembly in place on the outer rail. 6. Drop out the damaged or worn out gear pack. 7. Install the new...
view full answer...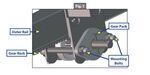
- How to Determine Correct Lippert Slide Out Gear PackThe correct replacement gear pack for your Lippert slide out will depend on the size of the arms attached to your slide out: - 2" x 3" Slide Arms: Lippert Standard Slide-Out Gear Pack # LC140409 - 2-1/2" x 2-1/2" Slide Arms: Lippert 2.5 x 2.5 Heavy Duty RV Slide-Out Gear Pack # LC123356
view full answer... - Is the Lippert Components 2 x 3 and 3x3 Standard Slide-Out Gearpack Heavy DutyWe have the standard gear pack for the 2 x 3 Lippert slide outs but we do not have a heavy duty option. Did you wear out your old gear pack quickly? Typically a heavier duty option than this isn't needed. The part # LC140409 is what you'd need. The word standard in the title of this does not refer to quality or durability and is more related to the standard application. This is a heavy duty option that would work well for you.
view full answer... - How To Determine The Correct Slide Out Gear Pack Replacement For Your RVManufacturers do not list the parts they use so we do not know what size gear pack is needed for your 2010 Tiffin Allegro Open Road 34TGA without first measuring the arm. For a 2 x 2 Arm you'll need part # LC281331. For a 2.5 x 2.5 Arm you'll need part # LC123356. For A 2 x 3 or 3 x 3 Arm you'll need part # LC140409.
view full answer...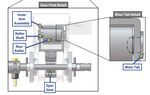
- Replacement Slide Out Gear Pack For A 2013 Forest River Flagstaff Classic Super Lite 5th WheelYou'll measure the arm (pictured below) to determine the correct size gear pack replacement for your 2013 Forest River Flagstaff Classic Super Lite 5th Wheel Trailer's slide outs. For 2" x 2" you'll need # LC281331. For 2.5" x 2.5" you'll need # LC123356. For 2" x 3" or 3" x 3" you'll need # LC140409. Based on your picture it looks like your current gear is the 2" x 2" which comes with a 15 tooth gear so you'll need part # LC122739 to swap the gear out with to have 18 teeth.
view full answer...

- Determining Which Slide Out Gear Pack Is Needed For A 2013 Forest River Rockwood SignatureIn order to determine the correct slide out gear, you will need to first identify the size of the arms attached to your slide out on your 2014 Forest River Rockwood Signature. -For 2" x 3" slide arms, you'll want to use # LC140409. -If you have 2" x 2" slide arms, you'll want to use # LC281331. -Finally, If you have 2-1/2" x 2-1/2" slide arms, you'll want to use # LC123356.
view full answer... - Will the Lippert Components Standard Slide-Out Gearpack work on my Coachmen Legacy 333BHTSCKThe Lippert Components 2 x 3 and 3x3 Standard Slide-Out Gearpack part # LC140409 is one of the most common replacement gearpack for modern campers. To ensure it will fit check the tubing slide arms on your slide out and ensure they are 2x3 or 3x3 if they are this will be a direct replacement. I tried to find information on line to confirm this but was unable to so taking a look at it to check is the only option.
view full answer... - What Does 2x3 and 3x3 Refer to In Description of RV Slide-Out Gear PackYou are exactly correct, that is referring to the tubing size that makes up the arm assembly. The Gear Pack bolts to the arm assembly, so the housing needs to be the correct width in order to fit.
view full answer... - Troubelshooting RV Slide Out CreepIf you've replaced the motor and your slide out is still creeping then it's most likely a worn crown gear in your slide out's gear pack. Over time the teeth can wear and allow the slide to creep outwards. We carry a few size options for replacing the gear pack so you'll want to measure the arm to figure out the correct size for your trailer. I've attached a video below where I'll walk you through this as well as the replacement process. 2"x 2" # LC281331 2.5"x 2.5" # LC123356 2"x 3" #...
view full answer... - How Many Teeth Are On Crown Gear In Lippert Components 2 x 3 and 3x3 Standard Slide-Out GearpackThe Lippert Components 2 x 3 and 3x3 Standard Slide-Out Gearpack, part # LC140409 has 15 teeth on the crown gear. This is used on slide systems that have 2 x 3 tubing slide arms.
view full answer... - Should Both Trailer Slide-Out Gearpacks Be Replaced on 2006 Cedar Creek SilverbackIf one of your trailer slide's gearpack needs replacement due to damaged/missing gear teeth I do recommended replacing both. There is a chance that the alignment issue from the missing teeth on the one gearpack could have damaged or at least stressed the other one. Since you're going to have it apart anyway I'd spare myself the potential need to go back into it and just replace both gearpacks at the same time. Kit # LC140409 is for slide systems utilizing 2 x 3 and 3 x 3 tubing slide...
view full answer... - Determining The Correct Replacement Slide Out Motor For A 2007 Fleetwood Pace Arrow Motorhome Manufacturers do not list the part numbers they use to the public so I would need to see the actual part numbers listed on the slide out motor to determine the correct replacement. I've attached a picture below of where the stickers are typically located on the motor as well as a video I made when replacing a similar motor to give you a better idea of how to get to it and check for the numbers. While you're down there I also recommend checking the teeth of your gear packs as these can...
view full answer...
- Replacement Gear Pack for Slide-Out on 2002 Monaco Dynasty TrailerWe do have a nice selection of replacement slide-out gear packs available from Lippert. I wasn't able to verify the type of slide-out you have on your 2002 Monaco Dynasty Trailer, so you will want to try and verify that it is in fact manufacturered by Lippert and then simply match up the gear pack to the tubing size the room slides on. For 2 x 2 inch tubing you will use # LC281331 for a replacement gear pack. There is also a 2-1/2 x 2-1/2 inch tubing option # LC123356 for the heavy duty...
view full answer... - What Do You Need To Measure To Find The Correct Replacement Slide Out Gear Pack You'll need to measure the arm (pictured below) to determine the correct size gear pack replacement for your trailer's slide outs. For 2" x 2" you'll need # LC281331 For 2.5" x 2.5" you'll need # LC123356 For 2" x 3" or 3" x 3" you'll need # LC140409 I've attached a short video below where I'll walk you through the replacement process. I do recommend using a floor jack and piece of wood to help lift the slide out box up slightly to take some tension off of the gear pack to make replacement...
view full answer... - Troubleshooting A Slide Out Box That Stops Before Fully Sealing Closed Most likely the gear pack on the right side is worn and skipped a bit throwing off the alignment of your slide out. You should first start by checking for any kind of obstructions that could prevent the slide out from fully retracting and then start looking at the gear pack for any damage to the teeth. I've attached a video below where I remove and replace the gear pack so you can see exactly how to do this. I recommend running the slide out about 3/4 of the way out and using a floor...
view full answer...
- Determining The Correct Replacement Slide Out Gear Packs For A 2010 Dutchmen Grand JunctionTo determine the correct gear pack(s) for your 2010 Dutchmen Grand Junction slide out you'll need to measure the arm (pictured below) to determine the correct size. For 2" x 2" you'll need # LC281331 For 2.5" x 2.5" you'll need # LC123356 For 2" x 3" or 3" x 3" you'll need # LC140409 I've attached a short video below where I'll walk you through the replacement process. I do recommend using a floor jack and piece of wood to help lift the slide out box up slightly to take some tension...
view full answer... - How do I Determine what Slide Out Gearpack I Need for my 2007 Monaco DiplomatIn order to get the correct replacement you will need to look at your existing Lippert Components Standard Slide-Out Gearpack part # LC140409 to see if they match up. There is not a fit guide available to show the correct replacement available through any of the manufacturers. We want to measure the slide rails. These will be above the gear pack and are steel rectangular tubing. Simply measure the height and width of the rails and that will tell you which gear pack you will need. This...
view full answer... - Replacement Gear Option For Lippert Slide OutWe have a couple of options for gear packs for LCI through-frame or above-floor slide-outs, depending on a couple factors. If you have a 2-1/2" x 2-1/2" through-frame slide manufactured before October 2013, there is a gear available, the Replacement 18-Tooth Gear for Lippert RV Slide Out # LC122739. For a 2-1/2" x 2-1/2" through-frame slide manufactured after October 2013, you would need a gear pack, the Lippert Components 2.5 x 2.5 Heavy Duty RV Slide-Out Gear Pack # LC123356. For 2"...
view full answer...
Do you have a question about this RV Slide Out Part?
Info for this part was:

Expert Research:
Mike L

Expert Research:
Jameson C

Expert Research:
Adam R

Expert Research:
Jeffrey L

Video Edited:
Jacob T

Written by:
Chelsea B

Updated by:
Wilson B

Updated by:
Mike S

Updated by:
Amanda K

Video by:
Jonathan Y

Installed by:
Michael B

Installed by:
Kevin C
At etrailer.com we provide the best information available about the products we sell. We take the quality of our information seriously so that you can get the right part the first time. Let us know if anything is missing or if you have any questions.
Product Experts Available Now!
Call 1-800-940-8924
Walter N.
5/5/2021
The replacement gear pack is doing just great after a year. Its one of two on a large front slideout.