
T-One Vehicle Wiring Harness with 4-Pole Flat Trailer Connector
(18 reviews)
Price: $77.24
T-One Vehicle Wiring Harness with 4-Pole Flat Trailer Connector
Retail:$102.72
Our Price: $77.24
You Save: 25%
Will this fit?
To see if this custom-fit item will work for you please tell us what vehicle you'll use it with.
Thank you! Your comment has been submitted successfully. You should be able to view your question/comment here within a few days.
Error submitting comment. Please try again momentarily.


- All Info
- Reviews (18)
- Q & A (0)
- Videos (3)
- Photos
Tekonsha Custom Fit Vehicle Wiring
- Custom Fit
- Trailer Hitch Wiring
- 4 Flat
- Powered Converter
- Tekonsha
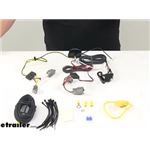
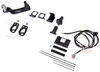
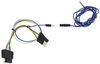
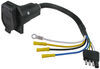
Quickly and easily install a 4-way trailer connector on your vehicle with this custom wiring harness. T-One connector plugs directly into existing wiring. Powered ModuLite reduces strain on wiring system.
Features:
- Provides a 4-way flat trailer connector at the back of your vehicle to power your trailer's signal lights
- Compatible with 5-pole, 6-pole and 7-pole adapters (sold separately)
- Connects quickly and easily
- Locate connection points behind tail lights
- Plug in T-connector
- Connect hot lead to battery
- Includes ModuLite power converter to ensure that your vehicle's wiring matches that of your trailer
- Powered module connects to battery to avoid overloading vehicle's electrical system
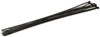
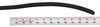
- Constructed of 16-gauge bonded wire
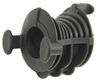
- Comes with dust cap for 4-way flat connector
Specs:
- Maximum amperage:
- Stop/turn lights: 5 amps per circuit
- Tail lights: 7.5 amps per circuit
- 1-Year limited warranty
Installation
This custom-fit T-One connector plugs into your vehicle's wiring harness, which is located in your rear cargo area, behind the driver's-side and passenger's-side tail lights. You will have to remove the rear floor section and some interior paneling to access this harness.
Once you've plugged in the T-connector, run the hot lead up to your car battery. Connect the lead to the included fuse holder, and then connect the fuse holder to the positive terminal on your battery and insert the provided fuse.
Once installation is complete, the 4-way flat connector will be stowed in your rear cargo area.
It is recommended that you use a small amount of grease on all electrical connections - the plugs on your automobile and the 4-pole connector itself - to help prevent corrosion.
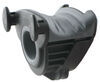
ModuLite Powered Tail Light Converter
A ModuLite power module is built into this T-One connector. Because your vehicle runs on a multiplex wiring system, the wiring needs to be converted to be compatible with the wiring system of your trailer. This power module functions as a tail light converter to combine the brake and turn signal functions of your automobile so that they run on one wire to properly activate your trailer's tail lights. Note: This will not affect how the tail lights on your vehicle operate.
With a ModuLite, your trailer's lights will be powered without overloading your vehicle's electrical system. Because the module draws power directly from your car's battery and bypasses the electrical routes that are used by a basic wiring harness, there is virtually no draw on your tail light circuits.
118792 Tekonsha T-1 T-Connector - 3 Wire - Modu-Lite Converter Included
Item # 118792
Installation Details

This Product Fits The Following Vehicles
- 2022 - 2023 Volvo C40 Recharge
- 2022 - 2023 Volvo C40 Recharge
- 2019 - 2023 Volvo XC40
- 2019 - 2023 Volvo XC40
- 2022 - 2023 Volvo XC40 Recharge
- 2022 - 2023 Volvo XC40 Recharge
California residents: click here


Video of T-One Vehicle Wiring Harness with 4-Pole Flat Trailer Connector


Videos are provided as a guide only. Refer to manufacturer installation instructions and specs for complete information.


Video Transcript for Tekonsha T-One Vehicle Wiring Harness Installation - 2022 Volvo XC40
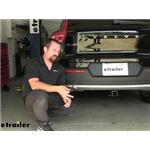
Hello neighbors, it's Brad here at etrailer and today we're taking a look and installing the Concha T1 trailer wiring harness on a 2022 Volvo XC40. You know in towing a trailer, you need to stay safe and legal and part of that's gonna have lighting function going from the vehicle to the lights on the trailer. That way when you have your headlights on or if you use your brakes or your turn signals you can indicate what you're doing to the people behind you and that's gonna be accomplished by using a four pole plug. In this instance. Now there is also a seven but generally this is going to be enough to give you your lighting functions without a brake controller. Now this wiring all feeds into one module and it's all gonna live inside kind of tucked behind this cargo area.
And the great part is, is the wiring. It's gonna live inside the vehicle. So when you're not using it you can just simply store it kind of in here or underneath this cargo compartment and it's outta sight. When you are ready to use it you simply just drape this over the weather stripping close the hatch down and it's ready to go. So not only does it keep it looking clean, the times that you aren't towing, it's also gonna keep it clean because this is gonna live inside.
It's not gonna get that road grime and buildup so that way when you are ready to use it it's gonna be ready to go and you're not gonna have any grime buildup. So another great thing is this module is going to be protected from any back feed. So if your trailer has a short it's not gonna go back and damage the electrical on your car, it's gonna protect itself. It also has an inline fuse it's also gonna protect it as well. And this is pretty easy to do as far as installation.
Its just kind of plugs into your factory taillights and you are gonna be running a power wire up to the battery but it uses OEM style clips on the taillights and it's very minimal as far as splicing it's just a few butt connectors here and there. And overall that's not terribly hard to do. As this is a requirement on towing a trailer, I'll make sure that you get yours installed so you can tow safely. So let's take a look at those steps and get yours installed. Before we begin our installation, a lot of times I like to just take our wiring harness and kind of lay this out to where it all kind of makes sense for you at home.
If you've never done this it can look a little bit overwhelming but really it's not too bad. So we'll start off with our module and this is where all the wires feed in and this is kind of where all the electrical connections kind of just start to take place. This also protects from any back feed. So once this is plugged in the vehicle even if you have a short in your trailer it's not gonna harm the wires that are on your vehicle. Now you have a green and red wire here. Now this is gonna be our right turn signal here and you can see we have plugs and these just plug in directly to where our taillight wiring is and it just kind of jumps in between it. So pretty easy there. There's an extra length of wire because our module's gonna live on this side and this green and red will run over to our right turn signal. Now pretty similar to that, we have a brown and yellow wire and this is just gonna plug into our left turn signal. Now going off of that we also have a white wire that's gonna be a ground. So we'll just tap this in to a factory ground if we can. If not, we'll be self tapping this in place. We then have our four pole and this is gonna live inside the vehicle and that way when we are ready to use it we can just droop this out close the hatch and then it'll be ready to go. And then finally this black wire here you can see it's been pre-stripped. We're gonna be attaching our wire loom that came in the kit and this is gonna run up to our battery to get that 12 volt power source. So as I mentioned earlier we are gonna be plugging into our taillight. So to begin our installation we're just gonna go ahead and get this opened up and then we're gonna start to gain access to our taillights. Now the wiring is actually gonna be tucked behind our cargo area here and in order to get to that we're gonna be pulling our cargo trays out. So there's actually quite a few of 'em here as you can tell. So we're gonna go ahead and just get all of this taken out and that way we can gain access to the bolts that are gonna be down here and that way this will draw out. So just have a nice place that you can set all this aside and you can just kind of fold this back to where really we need to gain access here to peel it back. So as much as you need to take out, go ahead and do that. Yeah, something else we'll need to do is get our scuff panel off and then you're gonna see that there's two eight millimeter screws that we're gonna be taking out. So we'll go ahead and get those taken out. Gonna be another screw, get this out. I'm just gonna use a plastic trim tool. There's gonna be some clips along here so just kind of take your time, just kind of prying these. Now if you don't have a plastic trim tool you can use a flathead. Just be careful. You don't wanna mar up your plastic. So maybe wrap it in some tape. But as we work along here we should be able to get this to kind of pop out. And then we can see we have another eight millimeter and we'll have the same on the other side. So those taken out we should be able to pop this outta place pretty easy. So just kind of pull up here, pull up here as well. And then as we peel back we can remove this and set it aside. Now we're also gonna have an eight millimeter here on this side plastic trim. Looking at where we've removed that eight millimeter we are gonna have to pull a little bit more off to give us a little more access. So in order to get this portion taken out, you're gonna push on this metal tab. There's also one on the other side and that's gonna bring this up. Now as far as getting this popped out, it's kind of tricky but I'll walk you through it. So we have the eight millimeter that we took off. There's gonna be also one that's kind of in this recess. We'll go ahead and take this off real quick. We also have one that's right here, so we need to loosen that up to give us a little bit more room to work with. Our passenger side, I went ahead and I took our toolkit and just kind of picked this up to give us a little bit more room and I've taken off those same eight millimeter screws but you can see this nub as well as this one here, those snap into place. So in order to kind of get this pryed out, I use a trim panel tool and just kind of work this one out first and then made my way to this one. And you can almost see it back tucked here. The hole for this nub is kind of back in there. So if you need to pry, you can pull this back just a little. This is gonna allow us to get this peeled back to really get our wires set up. Nice and easy and nice and clean. So go ahead and I'll show you how I pryed here. Just kind of putting my trim panel tool here. You can see just kind of be careful you don't wanna crack your plastic but just kind of push this out, putting a little bit of pressure, trying to get this nub to separate. And then also I'm gonna try to work on this back one too. Maybe that'll help kind of loosen it along here. And just like that kind of prying here that allows us to push this forward. And that way we have access to our panel. So you can see there's this hook here that'll just kind of lift through there if there's an opening, a little slit. So once you do that, this really opens it up and that's gonna gain us access to our taillight wiring. So let's go ahead, We'll grab our harness. You can follow the taillight here has like a spring loaded twist and to gain a little bit better view of it and also access to your plug, you can pull up this panel here and we're gonna just go ahead and unplug our taillight. There's a little tab on the bottom there. And with this peeled back, this allows us to feed our wires up and our, our modules also gonna live back here. So that's really why we pulled all this out. And it's gonna be pretty simple to plug this in because there's really only one way that this can go. So you'll find that we had, this is where we unplugged it. So this is the vehicle wiring harness. And then we have our plug that's on the taillight can only go one way here. So just plug in accordingly. Make sure you get that nice snap to know that it's connected. We'll do the same here. And we're pretty much just going to repeat that same process with our green and red but we are gonna want to undo our rubber band. And this is just gonna run along where our scuff panel was and that way the wires stay nice and hidden. So just take your wires here, I'm gonna uncoil my mess here and just run it along, tuck it back here. And then we'll just plug into the taillight on the passenger side. So as I run this over, I'm gonna leave all this like that because we'll have more than enough wiring. What I like to do is plug this in and then pull our wires back. That way when we tie all the rest of our wires up we'll have all the access from here. So just route this over and then also make sure to tuck this as clean as possible. So underneath the plastic. And then I'm also gonna go just obviously behind here and then I'll just run this up to our taillight and get that plugged in. Same thing if you just kind of reach by that spring clip you should be able to just find the tab that's facing down unplug that, take our plugs, plug them in accordingly. And now we officially have our taillights plugged in. So again, just kind of take this wire, pull this over and then we'll make the rest of our attachments on this side and to make our power wire connection a little bit easier rather than tucking this all back and then trying to make this connection, we'll just go ahead and get this connected now and we're gonna be feeding this through a grommet up to our battery. So we're just gonna connect it for now get everything tied up and then we can find out which grommet we're gonna run it through. So just strip back a small portion of it and then we'll go ahead and grab the butt connector from our kit and make this attachment. Now anytime we're making a connection with our butt connectors, I suggest giving it just a quick tug to make sure that it's secured. Otherwise you're gonna be chasing loose wires. So just a quick pull here to make sure that that's secured is gonna be good enough. So the next thing we need to do is find a spot to mount our ground wire and that's gonna kind of determine where we're gonna mount this up. Normally I like to look for a factory ground and I do see a stud that's down there that we could probably use. Another option too is we can use a self-tapping screw. So in order to use that stud we are gonna have to use some hardware that does not come in the kit just a nut to kind of tie that in. Or we can just use the self tapper so I can show you how to do that. That way you can get yours installed. As far as our ring terminal on our ground wire getting attached, our self tapper we're just gonna drill into right here's probably gonna be a good spot cuz I can see right behind there, there's nothing that we're gonna be drilling into to cause any damage. So it's also attached to the chassis, it's raw metal. So this'll be a good grounding point for us. So just take your time here. If you need to do a pilot hole, by all means that is an option to make this a little bit easier, but just take your time and drill it in. Now you don't have to get too tight here, you don't want to damage the ring terminal or strip out that self tapper. So just enough to wear that ring terminal doesn't spin around should be fine. And that should be good. So now the next thing we need to do is find a good spot to mount our module and it does come with a double sided tape so you can use that to stick it on this back end, which we will do. I'm also gonna run a zip tie through this hole here and find a nice secure point that way over time if this loses it, its adhesion, it's still, it's a zip tie and it's not gonna be jingling around in the back of your vehicle. So find a good spot and I'll show you where I mount mine up. It's gonna be kind of hard to see here. So once I have this mounted, I'll show you. So I'm going ahead and used double sided tape it's kind of sticking on the metal here. And then I just ran a zip tie through the holes here. So this will keep it nice and secure. And next you're gonna want to kind of just feed your four pole wiring clean, pretty clean nice and kind of underneath the plastic here. And then the rest of our wires minus our black power wire we're gonna kind of just zip tie up and make that nice and clean as well. That's gonna make sure that we have everything kind of tucked out of the way as far as running our power wire. Try to find a grommet that is going to easily get us to the front of the vehicle to our battery. And where I found underneath, I kind of poked one up. It's gonna be underneath these plugs here. And in order to get this loose it's just gonna be two 10 millimeter nuts. There's one here. Then there's one tucked back here that you can kind of get in between the carpet and this plastic. And once you have that lifted up, you'll go underneath and you'll see where you're gonna poke it through. And there should be a white grommet. So even if you don't go from underneath, lift this up you'll find this white grommet and I just poked a hole and fed my wire through it. That way it's gonna stay nice and sealed. And then from there I just fed our wire down and started pulling the excess. So you can see where I have this run through. So I'm just gonna go ahead, pull this slack out and then I'll go ahead and get my grommet put back in place. Then we can get our electrical box also put back in place. So we can see where we ran that through where the grommet was and I just simply routed it over this rear cross member. And kind of once I've fed that over that's gonna bring us to right in. Let's trace this back a little bit back to this area here. And so I just zip tied this along to some of the factory wiring and this keeps it away from our sway bar and our exhaust. And I just dropped this panel down using a series of 10 millimeters and that way we can just use the factory brackets here to make sure that it's nice and protected. And just once this is back in place it's not gonna have any issues over long term of you know just weather and road components hitting it. So from here to feed this up to the battery I've used an airline tube and that way you can kind of fish wire that down to pull it up. It is kind of tight to get this through. I think your best suggestion or the best suggestion I have for getting this in place is if you jack up this front section on the inside of the wheel well you can kind of start to see where you could feed that up and that's gonna be the easiest cuz otherwise feeding that through here is really tight. So using that fish wire technique, I'm gonna go back up pull our line up with my fish wire. I'm just kind of routing this up. And again, you're really gonna want to make sure that we are not making any contact with exhaust, suspension components, or axles or anything along that lines just to keep the wires from getting damaged long term. So just pulling up the extra slack here. I'm left with a decent amount so I'm gonna go ahead and I'll grab my fuse holder or fuse ring terminal on butt connector and we're gonna tie into our battery or I'm gonna just snip off some of the extra here and we're just gonna strip back this end and this is gonna make the connection to our fuse holder. Now it's important you don't want that fuse in place because we don't want power going through this until it's completely hooked up to our terminal. So we'll just go ahead and get this set up. You can see there's no fuse in here. We have a butt connector on one end and a ring terminal on the other. So pretty simple. We'll take our butt connector here and we're just gonna connect these. Quick tug, good to go there. Now with our ring terminal, you'll see this positive panel here that we're gonna peel back. I'm gonna be using this 10 millimeter. Now there is a square peg that kind of keeps this in place and you wanna make sure that this doesn't come off you don't want anything to reset on the vehicle. So just kinda make sure that terminal stays there and we'll go ahead and get this taken off and get our ring terminal in place. Now you can use really any of these here. I just figured this is the easiest to get to. Now that square peg can get a little bit tricky when putting it back in place. So if you need to what you can also do that makes it a little bit easier is take your ring terminal and you can just make a small cut here. And this is gonna allow us to slip this onto that without having to take that whole thing off. So this might be a better option too if you're looking to make this a little bit easier on yourself. Main thing is you want solid contact here. So what we'll want to do is just make sure that this is tightened down on here and it's not gonna become loose. Now if you need to make a little bit of room here for this to go through, I just made a small little snip here in the plastic and that way this can still close up. Now at this point we can go ahead and take our supplied fuse and put it in our fuse holder. So I'm just gonna go ahead and make sure that I have this all cleaned up with some zip ties. And also I'm gonna double check that my wiring going down is also clear of anything. So now we're gonna go ahead and test our wiring and I'm using a four pole tester. We have these available here at etrailer which is a really nice way to make sure that it's specific to the vehicle. The other way that you're gonna want to test is hooking up to your trailer, but just know that if your trailer has faulty wiring it could give you a false negative. So this four pole tester kind of just eliminates that variable, but we're just gonna kind of go through a light sequence to make sure that it's all working. So first we'll start with our running lights. Next we'll do our left turn signal then our right turn signal, and then finally our brakes. So with everything working properly and we know that it's electrically good to go really all that's left to do is getting all of our interior panels back in place just like we did in reverse order of taking them off. Now your four pole is going to live inside the vehicle so if you want to just coil that up and you can kind of just leave that in one of those cargo trays and that way when you are ready to use it you can just simply pop this out. It'll be good to go. So I'll go ahead, get of all of our interior panels into place and then all that's left to do hook up to our trailer and get to towing. And now was a look in installation of the Concha T1 trailer wiring harness on a 2022 Volvo XC40..
Customer Satisfaction Score:
96% were satisfied with this product
4% of customers were not satisfied
- Product did not meet expectations
- Defective
- Wrong item was ordered
Customer Reviews
T-One Vehicle Wiring Harness with 4-Pole Flat Trailer Connector - 118792
Average Customer Rating: 4.6 out of 5 stars (18 Customer Reviews)
Quickly and easily install a 4-way trailer connector on your vehicle with this custom wiring harness. T-One connector plugs directly into existing wiring. Powered ModuLite reduces strain on wiring system.by: Bill06/02/2022
2019 Volvo XC40
This was a relatively simple and straightforward installation on my 2019 Volvo XC40. The directions were clear, although the black and white pics can be a bit hard to follow. I would add the following points. First, the left plastic rail in the spare tire compartment needs to be removed, and it has an odd hook at the front that is a challenge. It will come with some wiggling. It's equally challenging to put back on. Second, I used the Volvo ground terminal to ground the T-One module. Third, I ran the wire from the module to the positive terminal down through a grommet in the spare tire compartment, then along the brake lines under the car to the battery. This was easy to do with the vehicle on a hoist, but will be more challenging if you don't have access to a hoist. I removed 2 of the protective panels under the car to route the wire. It was fairly straightforward. The product works as advertised and fits very well in the car.


by: Donald04/03/2023
Way too complicated to install!! I have my doubts if the wire I had to run (through the sheet metal in the hatch) all the way up to the battery will even survive before I get a chance to use it. etrailer is awesome. They are the only place I would ever get hitches (I have purchased 5 from them), but this item is total junk. Maybe it is Volvo's poor engineering that makes this so complicated, but there HAS to be a better way of doing this.
by: Mike T09/03/2022
2022 Volvo XC40 Recharge
Clean and simple installation. Once again, thank you e-Trailer.
by: Dennis04/07/2021
The wiring portion is OK but it's extremely difficult to run the required positive lead wire from the hitch all the way to the vehicle battery. Especially because its under the vehicle needs to be protected from damage & the elements
by: Peter 12/07/2022
I had this installed by a professional mechanic so I cant attest to the difficulty or simplicity of that but it has worked perfectly for over a year now and I have no regrets buying this
by: Pete 12/15/2022
Got it in 2 days
by: Cherry04/26/2021
very affordable!
by: Richard 10/11/2021
2021 Volvo XC40
FIT PERFECT! Great customer support as well.
by: Rich04/18/2022
by: Gary 08/25/2022
by: Christopher05/09/2022
by: Mike04/07/2022
by: William M04/07/2021
by: Thomas 07/15/2022
by: John 10/04/2021
by: Marianne 11/21/2021
by: Gary 04/07/2021
by: Robert 11/03/2022
2022 Volvo XC40
18
18
See what our Experts say about this Tekonsha Custom Fit Vehicle Wiring
- Tekonsha T-One Vehicle Wiring Harness For A 2023 Volvo XC40 Ultimate B4 AWDThe Tekonsha T-One Vehicle Wiring Harness # 118792 will indeed be a good fit for your 2023 Volvo XC40 Ultimate B4 AWD. That being said, we are only able to ship to the United States and Canada So I am afraid we cannot ship to you in Japan. You may be able to use a mail forwarding service, but this is not something we offer here at etrailer. You would need to provide both a shipping and billing address inside the USA or Canada.
view full answer... - Where to Connect 12V Power for Trailer Wring on 2022 Volvo XC40 RechargeIt looks like there is a positive terminal connection near the fuse box under the hood of your 2022 Volvo XC40 Recharge that you would use for a jump start situation. Since that should have sufficient 12V power when your vehicle is turned on that's where I recommend running the 12V power wire to when installing the T-One Vehicle Wiring Harness # 118792.
view full answer... - Recommended Trailer Hitch And Wiring For A 2023 Volvo XC40For your 2023 Volvo XC40 you'll need the Draw-Tite Max-Frame Trailer Hitch Receiver # 76245 in order to tow your trailer. To activate the lights on the trailer and properly display your traffic signals you'll also need the T-One Vehicle Wiring Harness with 4-Pole Flat Trailer Connector # 118792. I've attached a couple of videos below to help walk you through the installation process if you plan on completing it yourself.
view full answer... - Recommended Custom Fit Wiring Harness for a 2021 Volvo XC40To add a custom fit wiring harness to your 2021 Volvo XC40 you will want the T-One Vehicle Wiring Harness with 4-Pole Flat Trailer Connector item # 118792. This custom-fit T-One connector plugs into your Volvo's wiring harness, which is located in your rear cargo area, behind the tail lights.
view full answer...
Do you have a question about this Custom Fit Vehicle Wiring?
Info for this part was:

Edited by:
Lindsey S

Edited by:
Wilson B

Video Edited:
Joshua S

Video Edited:
Chris R

Installed by:
Cole B

Written by:
Alexander C

Test Fit:
David F

Test Fit:
Bradley B

Updated by:
Isabelle B

Video by:
Thomas T
At etrailer.com we provide the best information available about the products we sell. We take the quality of our information seriously so that you can get the right part the first time. Let us know if anything is missing or if you have any questions.
Product Experts Available Now!
Call 1-800-940-8924
Jenny N.
4/5/2023
I know that it can be a real pain to run the power wire to the battery. Many newer vehicles have an electrical system that are more sensitive and are not able to handle the amperage draw that trailer lights will have. The power converters that these harnesses use connect to the vehicles battery in order to protect the vehicles electrical systems. We do have a FAQ that can help with running that power wire.
Helpful Links
faq-Routing-a-Power-Wire.aspx