
To see if this custom-fit item will work for you please tell us what vehicle you'll use it with.
Thank you! Your comment has been submitted successfully. You should be able to view your question/comment here within a few days.
Error submitting comment. Please try again momentarily.
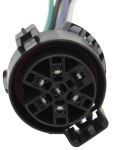
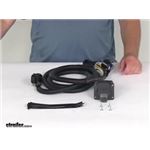
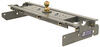
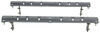
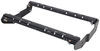
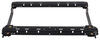
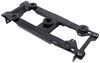
Mount this 7-way, RV-style connector in your truck bed to simplify hookup of your 5th-wheel or gooseneck trailer. Harness plugs into existing wiring and retains use of factory 7-pole at the bumper.
Features:
Specs:
California residents: click here
Videos are provided as a guide only. Refer to manufacturer installation instructions and specs for complete information.
Hi there Ford owners. Today in your 2015 Ford F-350 Super Duty, we're gonna be taking a look at and showing you how to install Mighty Cord's in bed wiring harness. By adding a second seven-way connector to the rear bed of your vehicle instead of just on the hitch, you can easily hook up gooseneck and fifth wheel trailers 'cause oftentimes those bigger trailers won't reach the back to be able to plug into your rear connection. By placing it in the bed here, you can easily make that connection here without having to extend the wiring and worry about wires hanging out the back of your truck. And it's just a quick and easy way to be able to get wiring installed here on our truck. It is a multi piece set up.
So the connector here is separate from the harness, but they both come in the kit. That does have its pros and its cons. The pros to it is depending on how you use your truck, like if you're just gonna use this for a fifth wheel, this may not be necessarily the best option 'cause you're probably never gonna damage your connector end here. But if you use your truck multipurpose, you're still gonna take your fifth wheel out, maybe use it to throw wood and other things back here in your truck, it's possible this connector could get damaged. So the fact that it is a easily replaceable connector that just plugs into the harness, that can be a great option for you if you think you're gonna damage the connector.
Now, if you don't think you're gonna damage the connector and be using it roughly and just be mainly using it for fifth wheel pulling, I'd probably recommend one from Bargman. They have a much more low profile one that just fits a little bit better in the cavities. You'll have more options and locations where you'll be able to put it if you wanted it closer up to the front or something like that, 'cause this connector, since it has a separate plug in the back to allow this to be replaceable, it does have a bigger footprint, so it sticks further into the paneling here behind our connector than the Bargman one would. But the Bargman is made onto the connector, so if you damage that connector end, you'd have to get creative or purchase a whole new harness in order to replace that one. So those are just the two things to look at when looking at these kits.
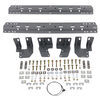
Do you have the space If you got a dually truck, this kit should probably work out just fine. But if you have a single wheel rear wheel truck, it gets a little tight in there and I'd probably recommend the Bargman for you guys out there. The Bargman does also come with a spacer plate, so if you do run into clearance issues even with the lower profile 90 degree end, you can put that plate on there to space it out further. We don't get any accommodations like that in this kit. But we do get all the hardware we need to mount it up, as well as some extra cable ties in the kit to secure everything.
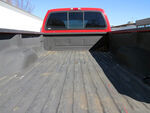
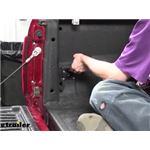
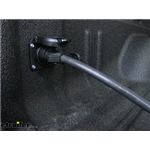
I would recommend adding a little bit of dielectric grease to your cart on checkout 'cause you'll wanna put that between your connectors to protect it. Now that we've covered some of the features of our wiring here though, let's take a minute and we'll show you how to get it installed. We'll begin our installation here at the back of the vehicle. We're gonna install ours on the driver's side, but you can choose wherever you want to put it. You do wanna make sure that you've got enough clearance between wherever you're gonna mount it here and the outside of your truck 'cause if you don't have the clearance, it's obviously not gonna fit. This one here by Mighty Cord, honestly I'd recommend the one from Bargman. Bargman has a low profile one, so it doesn't have a connector here at the back. It's pre-made wires that do a nice 90 degrees so it's a lot shorter than this one. And the Bargman one also comes with an adapter plate, so you can space it out if you do need that additional clearance. But the Mighty Cord here is basically the same thing. It's just not quite as a discrete package. We're gonna put ours right in this location, that way it sticks out, which we should hopefully have enough space in this area to be able to make it fit here. It does recommend using a two inch hole saw for the hole to cut this out, although I would recommend going up to the next size, like a 2 1/8 inch just because since this has the connector end on the back, the connector end's actually a little bit bigger and it's got that offset spot for it to click in and you'll have a real hard time getting that to fit in two inch. It is possible, but you just risk damaging the connector 'cause it's such a tight fit. If you just go up to that next size, it'll fit a whole lot easier, and you won't even be able to tell 'cause there's plenty of room here on the outside on each side of the area here. So it should work out fine. So we're gonna go ahead and cut our hole here. We're gonna center it in between the two edges here. You might wanna consider running it backwards real quick, just to cut through any spray in bed liner that you've got, and then you can switch it back, 'cause the bed liner just really grabs, and it's hard to hold it when you're cutting. All right, and now we're just gonna cut on through. Now as you're cutting on through, you gotta put some pressure on it, but we don't wanna put a lot of pressure on it 'cause there's really not a huge distance between this interior panel and the exterior one where your vehicle's painted and looks nice. We don't wanna bulge that out. So just keep some pressure on it, but make sure you stay in control so you can stop it right away. All right and once you've cut through there, make sure you pull back. And we're just checking. You can peel off any of that. It may be sharp there on the edges, so just be careful when you're doing this. You might take a file and clean that up a little bit just to knock off any rough edges. We're gonna grab a vacuum and clean this up and we're also gonna seal up the exposed metal with a little bit of spray paint. So now we're gonna go ahead and take our wiring and feed it into place. You've got two ends. You've got your single end and your dual end. This end is gonna be backed by your factory connector. This is the end that's gonna plug into the one that we're installing right here. So you can reach just right underneath this paneling here. So you're gonna see I'm gonna poke this out through the hole. I'm just gonna reach right underneath and pop it through there. But I recommend before plugging it in putting dielectric grease in between your connector ends. That'll seal it up, protect it against moisture and corrosion. You can get this here at etrailer if you need some. We wanna be pretty generous with it. Line up the connector ends there and plug it together. This should now go back, push into our hole. So now we're gonna take the self-tapping screws that come in our kit and a 1/4 inch socket and run them in place. So go ahead and set that there. Check on our outer wall here to make sure we're not putting any pressure on it or bulging. And everything looks okay there. We should be just barely, I think, fitting in there. So now we're just gonna run it in, roughly holding it to where I want it. And then I'll get a screw started. Just double check ourselves, making sure that looks pretty level. And then we'll run another screw in place. And just check yourself one more time. If everything looks pretty good and level, you can go your next one, 'cause you still got a little tiny bit of adjustment that you can do here, but just the two. So we'll just tweak it just a hair. And it looks pretty level. So then we're just gonna go in now, just run the next two fasteners in place. All right, that looks pretty good there. All right, so now we need to unplug the connector at the back of our seven and four here, our factory connector for our trailer. To unplug it though, it's kind of hard 'cause the hitch is right there. So we're gonna pull this bracket off of here. There's two fasteners on bottom. We're gonna use a 10 millimeter socket to zip those out of there. That'll free up our bracket some and just make it easier for us to work with it. So now we can press in on the release tab there and separate the two. Can knock out any dirt and stuff that's inside of there. This connector here is gonna now go on each side of our harness. One of our pieces from our harness is gonna plug into the factory connector and the other one's gonna plug into there. Now we do wanna route it in a way that makes sense, although it looks like it's all open right here. So this is just all open. So we'll end up just pushing it back in there just like that. And then we'll use a cable tie, you do get some in your kit, to just secure it all up here in the corner, keeping it outta the way of our spare tire. Now just like we did on top, before we plug in our new harness here, we're gonna fill this up with dielectric grease. The larger end is gonna plug into the vehicle side. And make sure it is all the way plugged in. It's not uncommon for it to just not quite be all the way and you can just pull it right apart. Since I can't pull it apart, I know it's clicked in. So we're good to go there. And now this end, we're gonna fill this with grease, plug it in, and then we can reinstall that bracket underneath. And again, check these two, make sure it is fully clicked in. Can't pull it out of there. That all looks good. Now we'll just grab our fasteners that we had removed and reinstall our panel here. All right, that's nice and secure. So the only thing that we really have left that we need to accomplish here is taking all the excess that's hanging down and secure it up there with cable ties. So now we just need to test it out. I've gone ahead and plugged in my test box here. You could also use your trailer, but I recommend a tester 'cause if you have any faults on your trailer, you can get some inconclusive results and think there's an issue with your wiring when it's actually your trailer. So this just helps you verify the vehicle side's working properly. Right away, you can see here at the top we've got our voltage, so our auxiliary power outlet for charging the battery and stuff and operating the battery in our trailer. That's working there. And our clearance lights are working. I'm gonna go ahead and switch the switch over. That changes this reading from the auxiliary power over to trailer breaks. And we'll be hitting our brake controller here in just a second. First, I'm gonna run through the turn signals though so you can see that both of those are also operating. We've got our left and our right there. Go ahead and turn those off and hit the brakes. And you can see they light up there as well. Go ahead and turn off our taillights. And then I'm gonna grab the manual slide for our brake controller. And I can hear the output on our tester, and you should also see it at the gauge in the top right. And that completes our installation of Mighty Cord's in bed wiring harness on our 2015 Ford F-350 Super Duty..
Average Customer Rating: 4.9 out of 5 stars (75 Customer Reviews)
Mount this 7-way, RV-style connector in your truck bed to simplify hookup of your 5th-wheel or gooseneck trailer. Harness plugs into existing wiring and retains use of factory 7-pole at the bumper.
Strange that you emailed me. We are actually in Isla morada with our fifth wheel and I was just telling my wife how nice it was to be able to plug the light cord in where it should be instead of draped under the tailgate
Perfect plug and play 5th wheel harness. Shipping is slow and expensive…
Excellent kit. Easy plug and play. Came with tie wraps and sheet metal screws. Only thing it didn’t come with is the dielectric grease so I suppose if it were necessary they would have included it.
Installed on the right side wall of 2018 Nissan Titan XD. Truck has puck system for gooseneck but Nissan didn’t install this in wall until the 2019 trucks which is rather dumb since 2016 with this model and ending with the diesel 2019.
Super easy installation!
Once the location of the hole was figured out it is plug and play very easy
Easy ordering and fast shipping, works great. UPS sucks, it too 4 days and 1000 miles to travel 135 miles. But Etrailer has already been excellent
This wiring harness fit my needs perfectly. Transaction with E-Trailer was excellent.
Great Product. Easy to install. Took about 30 minutes start to finish.
Had to drill 21/8” hole for plug because factory hole was too big
This was a great addition to the tow vehicle. I no longer have the pig tail hanging over the tailgate. I now plug it inside the bed of the truck easy to install and works wonderful
The torklift frame mount camper tied downs are awesome. The 5th wheel wiring harness was easy install. Glad to see you have products that make things possible. Thanks.
Easy to follow instructions, install was a breeze. All 5th wheelers should have this to prevent damage to umbilical or paint on tailgate.
The harness was delivered in great shape and the installation was straight forward. With all hardware within the kit, I didn't have to search in my garage for anything to complete the install. It is as advertised as a plug and play and works as advertised.
I ordered the 7 way wiring harness from etrailer.com and the product was just what I needed for my truck the factory end hook right into the socket in a short time I was all done with the wiring.
Very easy install. Worked perfectly. Very satisfied. 2008 superduty.
Great product! Good thick wiring covered in convoluted wiring wrap. Easy to install, took longer to brainstorm an area to mount and drill a hole in my new pickup than to actually install the product. Connectors are solid with a easy snap into place design identical to factory pigtails.
Good communication
Exactly as described, easy to install in the bed of my F350, my 5er can now plug in the bed instead of at the factory 7 pin at the bumper. Excellent product.
Was very easy to install and was well made. etrailer is the only place I will go when it comes to buying anything for my cabover camper
Etrailer.com has everything you need for trailer towing. Products are 1st class and perform. I will be buying all my trailer and towing products here in the future. Shipping is also very fast.
Great product, Roger is who I placed the order with and he was great, answered all my questions and was very knowledgeable.
Thanks Roger
Easy plug in and use as advertised
Just what is says . Plug and play simple and easy to in stall .. would buy again
Fit my 2012 Ram 2500 long bed perfectly. Plenty of zip ties supplied to tie everything up.
Allways great service, and product is exactly as described. Keep up the great video's to assist in installation.
Do you have a question about this Custom Fit Vehicle Wiring?
Info for this part was:
At etrailer.com we provide the best information available about the products we sell. We take the quality of our information seriously so that you can get the right part the first time. Let us know if anything is missing or if you have any questions.


Steve
1/4/2022
It works great. It took very little time to install and is a great addition to my truck. It is much easier to hook up and the cord is in the bed of the truck. I have unhitched the trailer without unplugging the cord with no damages. GREAT PURCHASE