
To see if this custom-fit item will work for you please tell us what vehicle you'll use it with.
Thank you! Your comment has been submitted successfully. You should be able to view your question/comment here within a few days.
Error submitting comment. Please try again momentarily.
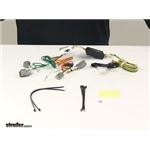
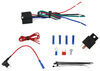
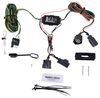
Quickly and easily install a 4-way trailer connector on your vehicle with this custom harness. T-connector plugs directly into existing wiring - no cutting, splicing or tapping required. Converter is made using SMT to ensure superior performance.
Features:
Specs:
Installation
This custom-fit T-connector plugs into your vehicle's wiring harness, which is located in your trunk, behind the driver's-side and passenger's-side tail lights. You will have to remove the rear scuff panel and pull back the felt trunk liner to access these connection points.
Once installation is complete, the 4-way connector will be stowed in an out-of-the-way location within your trunk.
It is recommended that you use a small amount of grease on all electrical connections - the plugs on your automobile and the 4-pole connector itself - to help prevent corrosion.
A tail light converter is built into this T-connector. Because most trailers run on a two-wire system - wherein the brake and turn signals are carried on one wire - the separate brake and turn signals from your vehicle's three-wire system need to be combined so they are compatible with the wiring system of the trailer. This converter combines the brake and turn signal functions of your automobile so that they run on one wire to properly activate your trailer's tail lights. Note: This will not affect how the tail lights on your vehicle operate.
Curt builds each tail light converter using surface-mount technology (SMT). This method of construction involves soldering electronic components directly to the surface of a printed circuit board. SMT eliminates the need for leads, which are used in older through-hole technology. The result is a circuit board that is smaller yet provides more routing area and that offers superior performance, reliability and durability.
Circuit boards constructed using SMT have been shown to perform better under rough conditions with excessive vibration than those made using the through-hole method. And where would vibration be more likely to occur than in towing applications? Curt converters also produce less heat, leading to increased durability and longer life. In addition, lower levels of resistance ensure better performance, especially for parts that operate at higher frequencies.
Each Curt circuit board is made using high-quality components that are pieced together in the most technologically savvy fashion, leading to greater predictability and reliability in functioning.

California residents: click here
Videos are provided as a guide only. Refer to manufacturer installation instructions and specs for complete information.
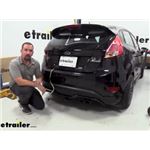
Hello neighbors. It's Brad here at E-trailer. And today we are installing the curt trailer wiring harness and this is gonna be a four pole on a 2018 Ford Fiesta St. Now this is gonna work on all your Fiesta models and this is a great easy way to plug in and have a trailer lights work. So not that you'll be towing a whole lot with the inch and a quarter hitch on here, but for your small trailers or even some of your accessories like your cargo carriers and even bike racks now have a light function that requires a four pole. So if you want those LED lights to work on that new bike rack or cargo carrier, or if you are pulling that small trailer, this is gonna be the ticket to be able to do that.
Now this trailer wiring harness is designed to live inside the vehicle. So you can see we have it draped out of our hatch which is perfectly safe to do when we need to use it. But if we don't need to use it, the great part is we can simply just kind of tuck this away and it's out of sight. Now, this is also module protected, meaning that any backfeed that might come from a trailer or accessory is not gonna harm detail lights or the wiring on the vehicle. And going along with that, this is simple plug and place.
So once you gain access to your tail light plugs, it's gonna match up to that OEM and just kind of jumper in there, and you're gonna run it to the other side and that's gonna be pretty much about it. So a very easy installation and you'll have trailer wiring set up in less than 15 minutes. Before we begin our installation, I'd like to lay out the wiring harness. So we kind of have a game plan of how we're gonna run this. And this is gonna be a pretty simple one in the fact that we don't have to run a power wire up to the battery.
So you'll see, we have a few wires coming off here. So first off, you're gonna have these plugs and these are gonna match to our taillight plugs. And this one is going to be on our driver's side. So you'll see we have our yellow, our red, our brown and our white. So if that'll live over here and also attached is gonna be a ring terminal on our white wire, and that's just gonna mount either to a factory ground, or we can self tap it into the chassis to get our grounding point.
The module's gonna live kind of tucked in there. And all we have left is really this green wire which is gonna be extra long to be able to run this under our scuff panel to the taillight on our passenger side. And then we just have our four pole which we can coil up and keep inside the vehicle. And then to just scrape out of the hatch whenever we need to use it. So let's go ahead and get this started by opening up our hatch. So now we're gonna go to our scuff panel here and there's gonna be a plastic cover right under here. So we'll just go ahead and just pop this off. You can use, honestly, your fingernail should be enough to kind of just pry that up. And if you need to get a little more leverage, you can use a plastic trim tool or a flathead screwdriver will work as well. So now we'll just take our T30 bit and we'll get this loosened up. You're gonna wanna find a nice place to store all your hardware throughout this. And there's gonna be one more on the other side. So we'll go ahead and get that removed before pulling off our scuff panel. To get your scuff panel off, you're just gonna wanna reach down and kind of grab the edge of the plastic and just pull up. Just take your time here. You don't wanna break those little tabs there but it should pop out and then you can set this aside. Now our wiring harness for our taillight's gonna be right here, and this is easy to kind of peel back, but to give us a little bit more room, I'm gonna take a Phillips head screwdriver and just remove this screw. And that's gonna allow us to kind of pull this panel, give us a little more access where the plug is. So you can see this'll just kind of pop a little bit and that's gonna be enough for us to kind of just peel this back. And you can see we have a plug right there and that looks to be pretty close to our wiring harness. So let's grab it and make sure it plugs in. So we'll separate this by pushing down this tab here and that plug should just separate like that. And you can see these are identical. So pretty easy here, we're just gonna take our factory one and plug it into our new trailer wiring harness. And then our other end is just gonna pop into our factory receiver end there. So that leaves us with a white wire here. So trying to find a nice grounding point, we have a lot of raw metal that we can self tap into. I'm gonna see if we have a factory ground that we can use, but worst case scenario, we got plenty of options here to be able to drill in and get that mounted up. I didn't find any factory grounds to tie off to but that's okay, we have a self-tapping screw that's included in the kit so we can mount this up kind of wherever's clean as long as it doesn't make any interference with the plastic but there's a recessed portion here. So I'm gonna probably mount it right up here. I've made sure that there's nothing behind there that it's gonna make contact with, but it's gonna be a solid metal connection. Now on your ring terminal, you'll see, it's got a flat side. You want that facing against the metal just to kind of give it the best contact. So I'll go ahead and get this drilled in. And if the self tapper gives you a little trouble, you can always put a little pilot hole by using a small drill bit and just pre-drilling a hole. As long as it's a smaller diameter, then the self tapping screw. As long as it's tight enough to where this ring terminal's not spinning around, that should be fine. You don't want to over tighten it as that can kind of strip out the hole that it's made. So just make sure that it's snug. So now we can route our green wire over to our passenger side and it's gonna kind of just run along our scuff panel. There's a few holes along here that I see that we can throw some zip ties to kinda keep that up and tight against it. Once the scuff panel's on, you're not gonna be able to see it. So same thing, we have a Phillips head screw here. So I'm just gonna pop this out. So you can see I've routed my green wire over here and just plug that in just as we did on the driver's side. So from there, I kind of pulled the slack and found a few spots along here. There's some large access holes that you can run a zip tie through with the smaller hole. And this is just gonna kind of keep this wire tight. And if you set it above here, when we put that kick plate or scuff panel back on, this is all gonna be tucked in. So as long as you have a few attachments to where it's not dragging down, you should be good. And just kind of pull that slack over. Then we can tighten all this wiring up and that should be just about it. Now, before we button up our driver's side, we're gonna wanna mount our module. And part of it is gonna be just kind of making sure we clean up our wires and kinda get this in a spot where over time it's not gonna become loose or fall down. And there is a double sided tape that comes with the kit. And we'll just go ahead and put this on the flat surface here. And I'm also gonna see that there's two holes up top here. So I'm gonna just take a zip tie and run it through our wires. And that's also gonna make sure that over time if this doesn't stay sticky, that we can have this zip tied up, it's not gonna go anywhere. And once we do that, I can tie up the rest of the wires and get this all put back together. Now, as far as mounting spots, this seems to be really good as it's flat underneath here. And like I said, I use the zip ties on these two holes to kinda cinch this up as well as our tape. So that's gonna live under here and then I've just tied up some of my wires that way they're kind of hidden back. Now, your four pole is going to live in the vehicle until you need it. And then when you do need it, you're gonna drape it out. So you can find a nice clean spot for this. The Fiesta does have a little cubby here, so I'm gonna try to route my wires, that way I have it accessible right here whenever I need it. So I'll go ahead and just kind of tuck this down. So this little cubby, you can actually pull this pocket out and there's gonna be a slit here. So I'm gonna run my four pole in through there. And that wire should still allow us to get our cubby back in place. And then with this tuck back there, it's gonna be hidden and out of sight just by coiling this up and having this slid in that cubby. Now with everything back in place, we're ready to test this out. So I'm gonna go ahead and take our four pole, feed this out of the vehicle, and it can sit really anywhere along here as long as you're not putting it by the latch because this weather stripping is gonna be just enough space for it to not get crunched down. Now, for our testing, I'm gonna be using a four pole tester and this is just gonna indicate when we go through our light signals that they're all working properly. And these are really nice because you don't have to hook up to a trailer. And if your trailer has some faulty wiring, sometimes you can get a false negative that the vehicle wiring's bad. So with this little tester, we should be able to see that it is working. So I'll hop in the car and we'll go through the light sequence. So starting off, we'll go to our running lights. Next, we'll do our left turn signal, our right turn signal, and then finally our brakes. With all of them working properly, I'm ready to either hook up to my trailer or tuck this in and start using it whenever I need it. And that was a look and installation of the curt four pole trailer wiring harness on a 2018 Ford Fiesta..
Average Customer Rating: 5.0 out of 5 stars (42 Customer Reviews)
Quickly and easily install a 4-way trailer connector on your vehicle with this custom harness. T-connector plugs directly into existing wiring - no cutting, splicing or tapping required. Converter is made using SMT to ensure superior performance.The light kit for my 2017 Fiesta was a breeze to install. First time a kit did ehat it said it would. Thanks. I would only suggest one mire item for the kit. A larger zip tie for the black small box to secure it more permanent
Very well engineered product and easy to follow instructions come with it.

Bws

5/29/2021
Excellent, works fine after 1 year.

Plug & Play. Lott's of wire length to use. best way to hook up trailers to NEW VEHICLES- No mistakes or damage to wire harness/ecu/electrical system because you do NOT have to "poke & hope"...
Perfect .
Every wire was perfect length .
Instructions perfect.
Order this and dont look around,
If you need to tow with your Fist,
Get this and be off sailing.
Was easy to wire up following the instructions and is working just as it is supposed to.
Very good easy to install doesn't even look like it's there and it works very well
I am very pleased with my 1.25 inch hitch from etrailer. It was very easy to install on my Ford fiesta. I’ll have used it many times in the past year and never a problem.
The directions were lacking. It's plug n' play up until the part where you need a drill for the grounding wire. It was here that I searched online and saw etrailer's install video. Well I don't own a drill. Perhaps Curt should include screw specifically for one of those holes in the body that they mention in the directions.

Sierra K.
9/14/2021
Sorry about the trouble. Sometimes you can drive to an auto parts store and borrow tools right there in the parking lot.
Quick delivery and good communication from etrailer. Always a pleasure to deal with this company.
I've installed trailer wire harnesses in 4 of my previous cars. All of them have been generic harnesses that required soldering. This was the first trailer wire harness install that was completely plug and play. Good instructions and easy to install. About an hour including testing the system and completing a clean install where the wires are hidden and protected.
Everything about dealing with this company is a five star experience! I called with a really desperate need for a trailer because my family was right in the middle of a move and we needed to tow a trailer. We were down to the final hours and my CSR Debbie jumped through hoops just to get my order shipped at the very last minute of their day. I had to have this trailer hitch so badly that I paid "Next Day Air" to get it. They came through for me!! I got the hitch, it was a big box filled with everything that I needed for my car. And then.......... The movers saw that nice box and packed it away without me noticing and it's now somewhere on its way to Phoenix. I'm towing the car instead!! I still can't believe it! When we finally unpack, I will install it and use it for a bicycle rack which I will buy from etrailer!!! Thanks to all of you at etrailer for really coming through for me!
The trailer wiring harness I purchased from etrailer was easy to install and worked as it was supposed to.
Easiest trailer wiring ever for me at least took 10mins! I've done many harnesses on lots of different vehicles including vehicles that supposedly had the tow package. This is literally plug and play and go on with your day!
worked exactly as expected and come with cable ties and double sided tape to make a clean install. Hides well in the spare tire well under the floor panel and when I use it I just close the hatch on the wiring in a spot where it wont get pinched by the latch.
The product was as described. The product was easy to install given the Youtube installation video. I like the fact it can be connected with out cutting wires. It is also nice that it hides when not in use.
Literally took 5 mins to install and worked perfectly
Clear, easy to follow instructions. The unit installs inside the vehicle out of the weather, so it should last and eliminate future wiring issues due to corrosion.
Super easy to install and it comes with everything you need to get the job done. works perfect! 10 min install start to finish.
Product worked well. Installation video was a GREAT help and made for an easy install. Would buy products once again from your company.
Great product. Fast shipping and the how to videos were outstanding. That's what convinced me to order from etrailer. Outstanding.
Very good instructions (for a change). Installation was simple. Time: Less than an hour for a Ford Fiesta.
Love the plug and play wire kits! Work great. Love etrailer!
Excellent service. I will use etrailer again !
Went right on easy install took about 35 minutes nice product perfect fit

David
4/3/2019
Works great easy install no problems of any kind
As advertised, easy install, no mistakes, no surprises!
Big-rob
4/3/2020
Still working great a year later. No problems, no issues, no surprises.
Great and easy to install

Allen B.
8/22/2018
great after one year and lots of use...

Do you have a question about this Custom Fit Vehicle Wiring?
Info for this part was:
At etrailer.com we provide the best information available about the products we sell. We take the quality of our information seriously so that you can get the right part the first time. Let us know if anything is missing or if you have any questions.


William J.
7/9/2023
Truly a good product for the cost Works well to this date.