
Summer Starts Here - Save up to 70%
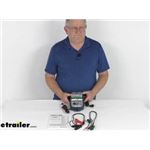
Compact smart charger draws power from a wall outlet to automatically charge, test, and maintain batteries on cars, motorcycles, racing vehicles, RVs, and boats. Saves batteries as low as 0.5V. Charges 12V lithium batteries.
Features:
Specs:

Videos are provided as a guide only. Refer to manufacturer installation instructions and specs for complete information.
Hi everyone. It's Evangeline here at etrailer. And today we'll be taking a look at our OptiMate Lithium Smart Battery Charger. So the one I have here is the 4S smart battery charger made specifically for your lithium iron batteries whether they are in a car or in a trailer like what we have here. OptiMate has this really good line of battery chargers. So they are designed to test, charge, and maintain your batteries.
So whether they're in a car, truck or RV, you wanna make sure that those batteries work well and are efficient. Now, this one is designed specifically for your lithium iron batteries. So if you have another style of battery, let's say you have a lead acid, you have a flooded battery, there's gonna be different chargers for that. But if you have the lithium ion battery, you wanna make sure you get the right equipment for it which is this. Comparing this charger with some other chargers that are out there.
One example is gonna be the NOCO Genius. That's an other brand that we carry and it can also charge your batteries. In fact, it has a charger that works for both lead acids, flooded cell, AGM batteries and lithium iron batteries. But there is some downsides to that too. So in comparison to that one, this is a bit more specialized.
It focuses on your lithium iron battery. Also the NOCO Genius requires having a BMS system. This one works on whether there is BMS or no BMS on your lithium iron battery. So if you wanna have a charger that you know works on no matter what kind of lithium iron battery you have, you can choose an opt battery charger. Now the pros for the NOCO Genius is gonna be it has a sleeker design.
This can be kind of tricky to understand with all the different lights, the different symbols but that's what this video is for. Hopefully I was able to guide you through that process so you understand what those lights do and how they work. This is gonna be a bit bigger than your NOCO Genius charger of the same amperage, but this is more focus and specialized for your lithium iron batteries. Now within the lithium battery charger series from OptiMate, there are some different options to, depending on your batteries or what you wanna do with them. For example, this is the 4S which has a 9.5 amp. That's gonna be your good middle of the road. It does what you need it to do very simply. you can go a little lower than that. You can get the 4S which delivers five amps. You can go really, really big if you have a 24 volt battery. You can go again head and get the 8S. If you wanna charge four batteries, there's gonna for bank version as well. And finally, there's gonna be the lithium select where whether you have a 12 volt or a 16 volt, you can pick and choose what works for you. So either way, whichever one you get they're gonna work pretty much the same way in going through the different steps so that your lithium iron battery is charged and maintained. So the main functions of this battery charger is that it tests, it charges and it maintains but it's not a linear process, you have multiple different steps in order to do those different things. So later on, I'm gonna show you how to use it and then explain which each step does. But first off, let's talk about test. So what it does is it in the beginning, it tests how much charge does your battery have. And then at the end, it's gonna test how much charge does your battery maintain. And then once it goes through that testing process, then you'll be able to find out whether you have like a low voltage battery or maybe you have permanent damage to your battery. Maybe your cells just aren't optimized, things like that. So then you'll see those things as you go through the charge process. It's a multiple step process and it does different things. That's what makes the OptiMate very smart it uses this special ampmatic, where it delivers different types of currents, depending on the state of your battery. Then the third big thing it does is that it maintains your battery. So it's not just like a jumpstarter where you jump it and then you're done. You can leave and leave this on your battery if you want to. So let's say it's time to winterize your camper or maybe it's cold outside, and you're tired of jump starting your trailer just to go the next day. That way, if you just plug this in or have your terminals on your battery, you can just keep this connected or ready to connect it's up to you. So we'll take a look at some of those different features. I currently have the included ring terminals is connected because this is gonna be your best long term solution. So you just have that connection with this SAE plug and then the plug has its own dust cover but it's not just a dust cover, it's also a sleeve. So let's say you have your batteries outside. This helps pro protect the outside and then when you're ready to plug in your connections, this covers your connection and make sure it's all protected. For your more short term or quick and easy applications, you have your included clamps. So this just goes and plugs into your terminals. And then you have that SAE plug to plug into your charger. So whichever situation you're in, however you wanna do this, you have those two options. So this is gonna be your main battery charger. And if you do wanna leave it on long term, you can actually Mount this in certain locations. So you have these holes here, which are gonna be great for cable ties to help you out with mounting it. And the dimensions for the charge itself is gonna be nine and a half in length and about five inches in width. So that's a general idea of how it works or why it works. So let's take a look at that whole process. While you can leave the charger on your battery even while it is connected, I also just disconnect the battery. when I first install our ring terminals if I want it to be a more permanent solution, or let's say if you have a very sulfated battery, you're gonna have to disconnect it and take it out. That way it's easier or two repair and maintain. So let's start by removing the terminals that are on our positive. We already have a bunch of terminals over here. What we can do is just add another terminal which is going to be for our charger. Pop the end. So there's this interesting prong on the inside of our ring terminal, and I actually haven't seen it before but when you do put it onto the post of your battery, this helps latch onto that post. I personally just pushed it up out of a way with a needle nose supplier. That way, when I tighten it down with the nut it'll push it back into place. That's just another option for if you are using this long term or not long term. For short term, this will help catch onto that post. If we we're using this on a car truck and I just needed to charge or maintain my battery real quick I would go ahead and use the clamps. But since this is gonna be in our RV or in our trailer and I think it's easier to maintain it, especially in the cold season with the ring terminals, we attach to the ring terminals. Now this is just gonna sit out and be easy to set up your charger when you need to. But that's just how you set up plugs. Now let's take a look at how this actually works. So this is an AC to DC charger which means you need to plug it in to use it. So you're gonna have two plugs. So one's gonna go into pretty much your regular outlet in your wall. I highly recommend finding an outlet in your garage that this will fit into because please don't use extension cords unless absolutely necessary. Now, this plug is going to be almost six feet long. Now it's on. And then your other plug, which goes into the SAE connector in your battery is gonna be about five feet long. So some of the other OptiMate chargers you get to select which type of voltage your battery is. When in our case this is gonna be the one specifically for lithium battery. So if your battery is not a lithium iron battery it's not LFP, it's not what I call life PO four then this is not the charger for you. But if that's your battery, which we have up right here then you can go ahead and connect it without selecting anything. So step one is when it connects to the battery, this is when your protections come in place let's say you have reverse polarity, you didn't set up your terminals correctly then that's when it will set off that error. Also, if you have something that requires manual activation maybe have a special system in your battery, you'll have to manually tell it to start charging. That's right here, BMS reset for those types of batteries. But most normal batteries will go straight past step one. If everything looks good, you go on to step two. So step two is preparing to charge. We're just gonna do your battery state of charge check just understanding the battery health. And right after that, it'll go straight into the temperature check. If everything checks through then it immediately goes to step four which is when it actually charges. Steps four, five and six will have this first indicator light. So it would be a red light, right Where that red crosses on that battery. So this will help save the battery. If it's at a very, very low voltage, or if it's less than 50% charged. That's a really cool feature because it goes through different stages. So if you have a very, very low voltage, it checks that it delivers a current and then if it can't charge or it can't be saved, you'll have an error indicator flashing light telling you that your battery has permanent damage. But if you can hold the charge once it goes up to very low charge, then it changes that amperage of the current and helps save that battery all the way up until you can get at least 50% charge. If your very low voltage battery does go through those steps and it goes all the way to steps six that's gonna be the testing stage. So it's gonna hold onto it for about two minutes and see if it can hold that charge. It checks to see if there's any cell damage in your battery. Once it verifies that there is no permanent cell damage then it goes right into step seven which is where we are right now. This is where it's really working to charge your battery. So from 50 up to 75%, this is the ampmatic charge program. So it automatically picks the best or more sufficient way to charge your battery up. So it can deliver a current from 2.5 amps all the way up to 9.5 amps depending on your temperatures or just your situations. So once it gets up to 75% in the most efficient way it can, it then goes on to the next step. Once you hit 75% charge, you now enter into step number eight. So that's gonna be the optimized step. So what it does is it delivers pulses of current order to equalize yourselves. So rather than just charging them, it optimizes your cells and then a hundred percent charge it then goes into step nine, which is the test mode. So in the very beginning when you first started charging, it tested how much charge does this battery have But now after you have charged it, your second testing is gonna be how much charge can my battery maintain So see that green check mark there that's gonna be step number nine telling you how that's going. And finally, step number 10 is maintenance. So you can actually leave this with your lithium battery for any extended period of time. What it's gonna do is it's just gonna maintain it. So it'll help charge it back up. It sees if everything's going okay and it's not going to overcharge it. So you have 30 minute intervals where you kind of have like this float charge thing going on. So for those who just leave this over winter time or if they're leaving this for a month, a week, a day, you can keep this plugged in, connected to your battery. It's all perfectly fine. Now that was a lot of information but that's just the brink of the iceberg. There is a lot more information OptiMate gives inside of your instructions when it comes to amperage, when it comes to different temperatures, it comes to different voltages, things like that. So definitely something worth learning about, but as a process from step one to 10, it's very easy. It's really just plug and play. You're ready to go. And just like that, you have your lithium iron battery back to business. So for those who are wondering why don't I just get a new battery Why would I get a battery charger Well, those batteries can get very expensive, very pricey. Plus, if it's worth saving, why not save it So this is where this battery charger comes in handy and not only helps charge your battery back up but it optimizes it and it maintains it so that way you can have adventures for time to come. And that was a look here at our OptiMate Lithium Smart Battery Charger here at etrailer. My name is Evangeline and I hope you enjoyed the journey..
Info for this part was:
At etrailer.com we provide the best information available about the products we sell. We take the quality of our information seriously so that you can get the right part the first time. Let us know if anything is missing or if you have any questions.


Thank you! Your comment has been submitted successfully. You should be able to view your question/comment here within a few days.
Error submitting comment. Please try again momentarily.