
Thank you! Your comment has been submitted successfully. You should be able to view your question/comment here within a few days.
Error submitting comment. Please try again momentarily.


In-stock alternatives that can ship today
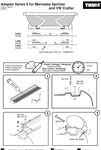
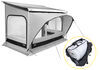
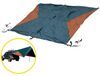
These adapters let you mount your Thule HideAway roll-out awning to your vehicle's aftermarket roof rack. Locking hoods secure the awning to your crossbars.
Features:
Specs:

Videos are provided as a guide only. Refer to manufacturer installation instructions and specs for complete information.
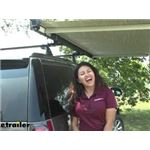
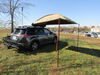
Hi, everyone. It's Evangeline here at etrailer. And today we'll be taking a look at the roof rack adaptor for your Thule hideaway awnings here at etrailer. When you do have a Thule awning, you're going to need a different mounting adaptor depending on your mounting system. So here we saw the roof rack mounting system, and I think it really works well, especially with how it gives you two choices for mounting it to your roof rack. Now, if you do have a thinner bar, this may not be the best fit, just cause those walls are a bit too long.
It will still work, but you won't be able to lock it. But I do like how it has everything included that you would need to make sure that you get an awning on your car. Now, this is designed to work with the Thule hideaway awning, but I did notice that this also works with the Thule outcast awning, very similar design, same mounting process. So if you need to use one for the other, that will work. So if you have some crossbars that you want to connect your hideaway awning to, this is the adapter you would use.
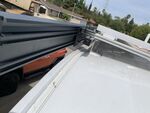
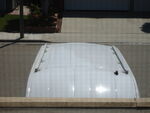
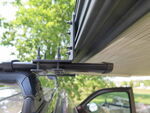
So as you can see, we have it attached to our Yakima core bars, but this will also fit around aftermarket crossbars, whether they be arrow or square bars. So we do have some options for clamping down. The T-track option is the easiest, but like what we have here, we don't have T-tracks in our crossbars. So we have clamps that go around. So this will involve 1, 2, 3, 4.
So about eight on each side of four bolts that you have to tighten down. To make things easier, I do recommend picking up a size 10 millimeter ratchet wrench, whether you have a long socket or this type of a wrench that just goes around, this is going to make it much faster to mount these to your crossbars. Depending on your vehicle, since the Thule hideaway is a larger awning, it works best on larger vehicles. I do recommend picking up either the Moki doorstep or a step stool or a ladder that's going to help you out as you tighten down your bolts here on your adapter. Now that we've taken a quick look at how our adapter works here in action, holding up our awning, let's take it back inside so I can show you how I did it.
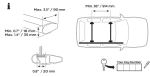
So I have the adapters right now. And the first step is just to get these square bolts and then fit them into the tracks of your hideaway. So just slide them through and you're going to want eight bolts slid through those tracks. So next you're going to install your plate. So notice how we have two sides to this. What we want is we're going to get the one with the rectangular part portion. That's going to fit over your four bolts. So we're going to put it up just like this. Also make sure you have it facing the correct direction. That way you can pull it out after you have it installed on your crossbars. Once you have those brackets on there, you're going to get four flat washers and then four nuts for each bracket. So flat washer first, and then put the nut on top to secure it only loosely tighten this down because you're still gonna need to move that plate around. So you do get this tool, which you can use to tighten down those nuts, but I use my own socket and a wrench. So this is a 10 millimeter socket, that just makes it faster to tighten those bolts down. So just make sure you get them about halfway through before you go onto the next step. So before setting up our crossbars, firstly you make sure you have enough minimum crossbar spread. So what we have right now with our aftermarket crossbars is that they are set 37 inches apart. So just as an easy way to get set up, I have these already moved 37 inches apart center to center, and that's just a good guesstimate before I put them on the crossbars. So now we're going to get this onto our crossbar. Since this is a bit of a taller vehicle, plus since this is a heavy awning, make sure you have you and your friend carrying each side of the awning. So we got Jack and Bobby right over here and we're just going to lift it onto the crossbars before we get mounted down. So what I did is I put the first two clamps on first, just because you do have to hold it up while you clamp them down. And if you don't do it quickly, it can get tiring for people helping you out as you do tighten down your clamps. But now you're going to put one, two on each bracket. So let's put them in there, get the clamp underneath your crossbar, push the bolts up. And then through the bracket, then you're going to get a flat washer and then a split washer. So put those on top of that bracket. That way you can tighten those bolts down. If you're not using a ratchet wrench and you're using a socket wrench instead, make sure it is kind of a deep well socket, just because that's a lot of bolt you need to get through. Once you have your clamps, or if you have a T channel crossbar and you have those tightened down, next you're going to make sure that your awning is centered or where you want it to be on your crossbars. Then you're going to tighten down the bolt on the bracket that's behind the awning. While I'm up here, I would highly recommend picking up the Moki doorstep. If you haven't already, I put this right into the hook where your door is, and this definitely gives you the height that you are going to need to tighten down all these brackets and all these bolts. I finally tightened all the bolts down. Now, there we're a lot of them, especially if you have crossbars that don't have T-track channels, it is going to take you a while putting everything down. Please make sure you have the proper tools that will make this easier for you. And if you're good with drills, maybe put a socket on that drill and it's going to be so much faster that way. But all in all, once you have everything tightened down, you can then move on to the next step. Of course, when you do have an awning and after you put all that work to tightening it down, you'll gonna want to make sure no one else can untighten it without your permission. So what you're going to do is you're going to secure them with these locks. So you're going to get two lock cores, and you're going to insert those lock cores into these covers and then put them over your brackets. So get your lock core with a key inserted and then just fit it through that hole in the bracket, line it up right there until it pushes through completely and then turn it and then remove the key. Once your lock cores are installed, then make sure that it's in the unlocked position and slide it over your bracket. So just like that, push that through. Now, I actually tightened down our bolts all the way where it made it just a little bit too tall to fit that cover over the first time. So I did need to loosen it just a little bit, but once I did, you're able to fit right in there. Now do the same thing on the other side, make sure you keep those keys. One key will access both covers. And then after that, that's about it for the install. And that was a look here at our roof rack adaptor mounting kit for your Thule hideaway awnings here at etrailer..
Average Customer Rating: 5.0 out of 5 stars (14 Customer Reviews)
These adapters let you mount your Thule HideAway roll-out awning to your vehicle's aftermarket roof rack. Locking hoods secure the awning to your crossbars.I'm really enjoying the Thule awning. It's well-made and seems to be of high quality materials. I installed it on a set of Yakima Racks on my E350 4x4 van. Looking forward to some good shade this summer; it's large and should do the trick nicely. I'll also use it in light rain. Like all awnings, I probably wouldn't keep this up in heavy rain or high winds.
.
Adapter does what it is supposed to do. As the video stated, it does take a while to tighten on the roof rack. I wish THULE came out with an easy to remove option like Yakima's Slimshady. This is my second time purchasing from etrailer and I 100% recommend purchasing from them. Their communication throughout the process was excellent.
Excellent service! Very helpful!
I mounted the roof rack adapters upside down to the side rails of my Prime Design Alurack. The awning works perfectly. It's a nice addition to my Nissan 2500 van build.

They do what they are suppose to do.
Great job..got it out quick
Extremely easy to order and very fast d elivery
On time, and as described!
Do you have a question about this Accessories and Part?
Info for this part was:
At etrailer.com we provide the best information available about the products we sell. We take the quality of our information seriously so that you can get the right part the first time. Let us know if anything is missing or if you have any questions.


Matthew
11/17/2022
Still fantastic, ZERO issues.