
Thank you! Your comment has been submitted successfully. You should be able to view your question/comment here within a few days.
Error submitting comment. Please try again momentarily.
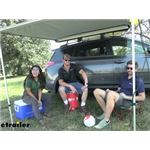
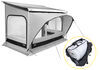
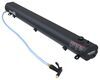
Awning mounts to your roof rack to provide coverage from the elements. Guide wires offer stability.
Features:
Specs:

California residents: click here
Videos are provided as a guide only. Refer to manufacturer installation instructions and specs for complete information.
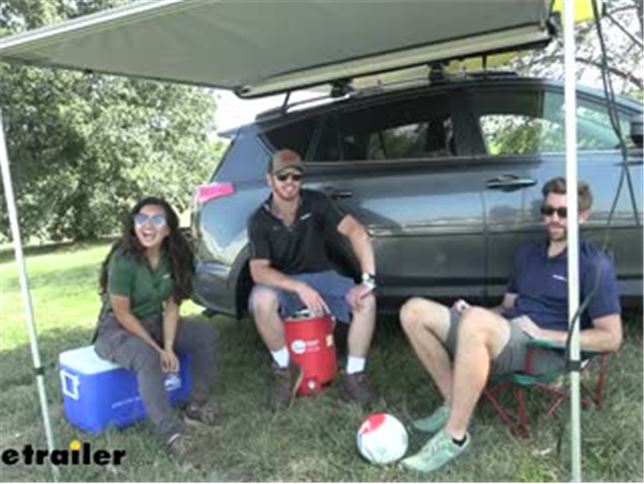
Hi, everyone. It's Evangeline here at etrailer. And today we'll be taking a look here at our Thule awning which works great with your Thule Tepui tent or your crossbars, whether they be Aero or factory crossbars here at etrailer. So, I'm here with my friends here at etrailer. We got Adam and we got Zack and we're just hanging out. It's really hot outside, but we don't have anything to worry about because we have this awning.
So, if you're at a campsite, if you're tailgating, if you just want to have a party with your friends out in the outdoors with the fresh air, but you don't want to get too much sun on you, this is a great set up that you might be interested in. Now there's a bunch of different awnings out there. There's some from Yakima, Rhino-Rack has one. What we have here is the awning from Thule. So, I did the install in the video for this Thule awning.
But Adam here did the video for the Yakima one. So we're going to take a look at a little bit of comparison between the two, what's different, pros and cons. So quick up, Adam, what do you think about this one versus the Slim Shady from YakimaWhen it comes to awnings, they're basically the same on many different points. So, when it comes to the structure of how these arms swing out, what they're made of, it's made of aluminum. One thing that I noticed right away is the top here.
This doesn't have a pattern on it. The one from Yakima has a cool little map. So if you're looking for style, Yakima is going to be the way to go. But when it comes to set up and stuff, these are basically all the same. You have telescoping little poles here.
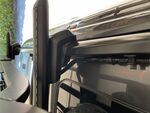
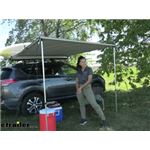
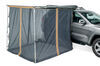
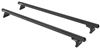
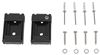
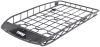
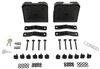
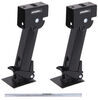
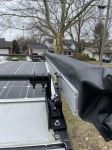
It's all gonna flip in right here. And it has a little zip up bag. The main difference is how it connects to your bars. So this one is mounted to the T-tracks on our Thule wing bars. How does the Slim Shady mountThe Slim Shady doesn't give you options. So with this one, you're going to get clamps or you can do T-track. Evangeline Yeah. But a lot of the times you don't really get T slots with some of your crossbars. If you have a Yakima CoreBar or even just factory bars, you're not going to be able to use this with the T slots. But with the Yakima, you basically, all you need is your hands to tighten down this little lever. And it's going to clamp like this around your bar. So it'll work with your factory bars, but also a lot of your Aero bars, as well. Evangeline So. So that is one thing that's a little different. Even the wider Aero bars, does that clamp fit around it, tooAbsolutely, yeah. So, it has plenty of room when it's completely open. Yeah. You have a, maybe a half inch on each side, so you can get it over and then clamp it down. So there really isn't any limitation when it comes. Yeah. To the Aero bars and the Yakima Slim Shady awning. This one jus has two different options, depending on the fit you like. Yeah. Okay. So they give you options. But if you already have a roof rack, you know if you had T slots, you know if you want to do T slot or wrap around. So with the Slim Shady, you don't really have to worry about having to choose. It just gives you one and they're going to work with all your bars. So, we we're able to compare the differences a little bit between the Yakima Slim Shady and our awning here from Thule. So all in all, it sounds like they mount almost the same way. They work the same way. The biggest difference was just that the Thule one has your options for either T track or, let's say, a factory bar with a clamp around system. So, if I didn't have a roof rack, maybe. Mm-hmm. I might want to get the. I would definitely go with the Thule. If you don't know what bars that you're going to have. Me, I have a factory rack, so I don't have T slots. So, I don't even want to grab one that gives me that option because I'm not going to use it. So I would use the Slim Shady, but that's just me. And I'm sure if you don't have any roof rails on your vehicle, you want to have that option so you can with the Thule. Yeah. So all in all, they're both really good awnings. It's just really up to you and what kind of system you already have in place. So, now that we've had our fun, let's get serious and take a look at our awning just to see how it works and what it's made of. So this is a square awning. It's six and a half by six and a half wide and long. So you can see how far this comes out with our vehicle, right over here. It's on the smaller size when it comes to awnings, but it does kind of make up for it with how portable it is. So it's been a really windy day today and I am impressed by how well this has held up. We've got our lines onto the side holding it down with tent stakes, and we also have stabilizing holes on the inside. So with how you can adjust those poles, as well as how you can tie it down, I do like how it sits here outside. So this has four aluminum height adjustable poles. So, I do like how lightweight they are. You want to make sure that this awning is as light as you can get it, because it is going to sit on your crossbars or on your Tepui tent. But even though it is lightweight, it is sturdy and holds up pretty well. So up here, you can see how our awning is made of a hazed gray material. While this is primarily used for shade, because you want that protection from the sun and the UV rays, this will hold up to the elements as well. So if you do have a little bit of rain, you don't have to worry about it. I do like how it feels. This feels like a really strong material. Not just like your tarp, but rather you can see there is some reinforcement, as well. It is double hemmed, so I'm not worried about it fraying. And you can see how even our seams are covered with material, just to keep that water out. Now, this comes with your arms just to hold them in place when they are inside your awning, but I do recommend wrapping these rubber blockers into the seam between one pole and the other. I've noticed that this really helps hold them in place and keeps out your other elements from getting into those grooves. With a coverage of 42 and a quarter square feet, you can see how we can fit a couple of chairs as well as some coolers underneath. If you have a large crowd, maybe not the best fit for you, but for a nice, small, intimate gathering here at the campsite, this is perfect. With how breezy it is right now, I'm not too worried about getting bitten by mosquitoes, but once that wind dies down, I'll throw up my mosquito net that attaches to this awning. And you can check that out here at etrailer. Now, one thing I personally recommend adding onto this is more tent stakes. So we have been here at each trailer, different shapes, different sizes because after a while, these can get bent up depending on how you have them hammered down. So you might want to pick up extras. If you're wondering about how much space this takes up on your crossbars, and if you have space for your other accessories, like we have our kayak over here, from the end of the bracket to right where the end of that track is on the inside, it's six inches. So that does not include the fact that we have it inside the overhang. It'll take up less space if you have it on the overhang, but that's a good measurement just to help you figure out if it's the right fit for you. When it comes to portability, you can see how it is currently rolled up into our 39 ounce PVC travel cover. So this is mounted to our crossbars. If you have it on a tent, it's mounted there. You can leave it there. Because of this cover, it's going to hold up to the elements and stay nice and dry for when you want to take it out. So this fits on different crossbars. Even if you don't have Thule bars, that's okay. So what we have here are Yakima CoreBars and they do not have T tracks. So notice how we just have it clamped around. You get two clamps. So one, two. And tighten it down with those bolts. We also have the Rhino-Rack bars. So notice how our T track bolts go right through them. The same for our Yakima HD bars. Okay, so we're gonna start with the install. What I do is I first have it upside down. So the zipper is closed around our awning, and then we have our track system right underneath. So we're going to set up that track system on the awning. So you're going to get these shoulder bolts and just fit them through the track. So, there's going to be eight bolts. So, four on each side. Just slide all eight through, and then we're going to put up our brackets. So, you want to line this up over your awning. Right where that rectangular cut out is, that should be on top of your track. The one with the bolts, that should be on the outside, right where that zipper is. So it's not going to be this way because then it'll mount onto crossbar differently, but it will be right over here. And just line that up with your bolts and fit that through. So then, to secure that bracket, you have a flat washer. So, just pop that onto those bolts and a nut. So, we're going to make sure that all of these are mounted. You can just have them loosely mounted for now. So this comes with its own wrench or tool to tighten down those nuts. But I recommend doing what I do, which is I use a socket with a 10 millimeter socket for my wrench, and that's just going to make it easier and faster to do. Now, this next step will depend on what kind of crossbars you have. If you have square bars, you will not be using the T track hardware. But if you have wing bars, kind of like what I have here, or other Aero bars that have a T track channel, then this is what you're going to do. So you're first going to take off the end cap or move it to this side and then just feed these through that channel. So two on each crossbar. Now, this ideally would work if you have a good amount of overhang on past your towers, just because of how this sits on your bars. But also if you don't have much overhang, but your car doesn't sit out as much, it should be fine. So what we're going to do is we're going to bring this over to the end of the crossbar, as much as we can get it, not where it sits too far off, where our awning still stays on the crossbar and is supported, but is also accessible. The next step is a two person job. So make sure you have your friend helping you out on the other end. We have Jonathan right over here. And I have this lined up to match the crossbar spread of our crossbars. So we're just going to bring this up and over and onto the bolts on our crossbars. Once you have them centered over the bolts on your crossbars, you can have your friend hold it down in the middle, just to stabilize it as you use a flat washer and then a nut to secure those bolts. Once you have the bolts on your brackets which are over or in your crossbars tightened down, you can then tighten down the bolts that are on your awning. So just double check that all six, if you're using a crossbar with a T track system, or all eight bolts, if you're using like a square bar or another style of a crossbar without a T-track system, just to make sure all of them are tightened down. And once you've confirmed that, you can then move on to the next step. After tightening down those bolts, you'll want to make sure that they're secured and that no one else can loosen them. So you have this lock core right here. So just fit that into this cover and then fit that cover over that bracket and then into that hole. And then you're going to secure it with the included key. And now that we have our awning fully mounted to our crossbars, what we're going to do now is that we're going to unzip it. So you see how we have our zippers underneath So just get both of them, one on each side, and once that's fully loose, we're going to then take this off of our awning. Now unbuckle those straps. Now, before we continue, let's take this outside so that we can see how the awning looks with it fully opened up. So with your awning unzipped and unbuckled, you can then unroll it. Now, since it is kind of a windy day, I have my friend here, Zack, who's just going to help me out so it doesn't blow away as we get it set up. So first you're going to want to bring these arms out to the side. Then you're going to get this hook and loop patch and just bring that around the arm and then tighten it down. And then keep unrolling it onto those arms, and whenever you find a hook and loop hatch, make sure it's secure. Now, once you have this fully extended out, you're going to secure it into the hole inside the awning. Now you're going to extend the legs and just bring them down to however tall or however high your vehicle is and how high you want your awning to be. So right over here looks good. Just to make sure to give it a little bit of a tilt so that when you do have some rain, it tilts downwards. Once you have your poles adjusted to the height you want them to be, just rotate them in order to lock them down. Now, it's very important just to make sure that your supporting arms are extended as far out as you can get them just so that you can make sure everything is nice and taut right over here, and that you don't have any excess awning just spilling over. To secure your awning, you also have these tie downs, which are going to be at the end of the awning. So you're going to get this rope, which is included with this kit, feed it through, and then we're going to put it through a tent stake. Now, if you go camping, you usually have something to drive down your tent stakes with. I don't have a mallet on me right now, but I do have this hammer. So we're just going to get that into the ground. Now, get your rope and then just put that into your tent stake and tighten it up. And then make sure everything is secured. You may need to hammer down your stake a little bit more or tighten stronger knots, but this is going to be how you secure your awning. Once you've checked that everything is secured, everything's tightened down, you're now ready to set up your campsite. And that's it for the install. So my final thoughts about this awning is if you're looking for a smaller awning that attaches straight to your roof rack, or if you already have a Thule Tepui tent and you want an awning that matches that, this is a really good option. If you want something larger, you might want to check out either our Thule Hideaway, or even our Yakima Slim Shady, which comes in larger sizes. It really is up to you and the situation. I do like how this has a mosquito net that you can add to this awning, creating kind of an enclosed room. I prefer that, especially when it's late at night and we're at the campsite and I don't want to get bit. But then again, depending on your vehicle and depending on how many are traveling with you, you can check out your options here at etrailer.com. And that was a look here at our Thule awning for your Thule Tepui tent or for your crossbars here at etrailer. My name is Evangeline, and I hope you enjoyed the journey..
Average Customer Rating: 5.0 out of 5 stars (4 Customer Reviews)
Awning mounts to your roof rack to provide coverage from the elements. Guide wires offer stability.
The Awning provided shade and with the net tent added protected me kitchen from bees and wasps while cooking. Easy to install. On my Tundra I needed to reverse the mounting bracket to allow the bottom of the tent to reach the ground. It worked out perfectly.
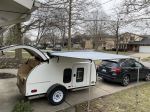
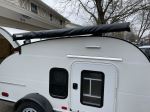
The Thule awning is a high quality awning that can easily be opened by an individual in 2 minutes. I installed it on my home built tear drop trailer in a couple hours using custom aluminum anodized mount brackets. It would be awesome if one could purchase just the awning for these types of custom applications. I'll save the key-lock Thule brackets in the event it gets placed on my Subaru.
Can't beat the quality of this Thule product! Looks great, works great! etrailer answered my question on mounting the awning via their blog. I'll be a repeat customer.

Gary

8/18/2023
Great! Had an issue with high winds. One pole came down bending the aluminum frame where the pole was ed. Im being more careful to secure the poles. I havent checked to see if the frame is replaceable.
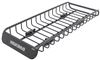
This is my second order from earlier, and will continue to stop here first for excellent pricing and fast shipping. Beyond satisfied with the items I have purchased. Added the Thule awning and Rhino basket... Love it!

Do you have a question about this Car Awning?
Info for this part was:
At etrailer.com we provide the best information available about the products we sell. We take the quality of our information seriously so that you can get the right part the first time. Let us know if anything is missing or if you have any questions.


Rebecca
2/1/2024
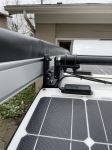
Have used the awning for a year, it has come in handy when I need sun or bug protection. I bought the net tent that attaches to the awning and both are easy to set up and take down. This is installed on my Tundra which also has a solar panel attached to the rack. The Yakima roof rack worked out really well with these items installed.