


Thank you! Your comment has been submitted successfully. You should be able to view your question/comment here within a few days.
Error submitting comment. Please try again momentarily.
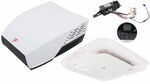
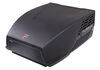
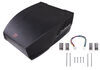
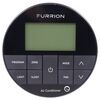
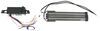
Replaces the single zone controller for your Furrion Chill AC setup (sold separately). Communicates with your thermostat to control the temperature inside your RV or camper. Short-cycle protection ensures your RV reaches its temperature set-point.
Features:
Specs:
Videos are provided as a guide only. Refer to manufacturer installation instructions and specs for complete information.
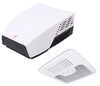
Hi, there Dynamax owners. Today of your 2015 Dynamax Force HD we're gonna be taking a look at and showing you how to install Furrion's control unit for rooftop air conditioning systems. These are available in both a single or dual zone. We're gonna be installing the single zone today. When you install your Furrion rooftop AC unit you'll need a control unit in order to properly control it. We do have some adapters available here at etrailer, so you can plug your AC system directly into an existing control box, if you have one from a manufacturer such as Coleman, Advent, or Dometic, But if you've got another brand that is just not gonna be compatible, such as the one we replaced recently here, which was an Atwood unit, which did not have a compatible control box, so we had to replace the whole thing.
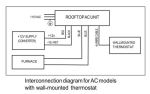
So we've got a new AC unit on top, our control box here. That's going to allow the AC unit to work and properly communicate with a thermostat. So this box here basically is where we wire up our power. You got your shore line coming in and this box will then supply that to the rooftop unit whenever it needs to kick on and cool things down. Your thermostat will send its information directly to the box here to let it know like, "Hey, it's time for you to turn on so we can bring that temperature down," on your thermostat you set all those controls there, and it sends that information up to this box.
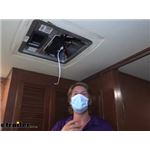
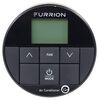
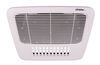
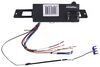
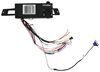
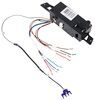
And then this box will turn on the unit so you can get the desired results that you've set on your thermostat. It is designed to work with a digital thermostat, but there are also circuits on here for an analog one if you so wanted to use one, you can see here, we've got a bunch of circuits that are all labeled for your furnace, your compressor, and all those things, so you can manually wire that up for an analog thermostat. Inside you'll have dip switches where you can change between digital and analog if you did want to use that kind. We'll also have on our box here a temperature sensor probe that comes out to get the inlet temperature, as well as a freeze sensor, which is located on the evaporator coil up there that's coming out of our box. And that way it can monitor the temperature of our evaporator coil to ensure that it doesn't freeze up and get too cold.
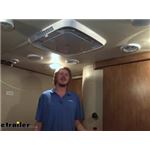
All those things are gonna allow your system to run as efficiently as possible, as well as maximize the cooling efficiency of the system. Lastly, we've got this ribbon cable that runs down here. And this will allow the system to operate the mood lighting on the air distribution box from Furrion if you do purchase that one. We are installing that one today so we'll be able to show off that mood lighting. It is really nice if you're just wanting a little bit of light, especially if you're gonna be installing a unit like this in your bedroom, like we are here.
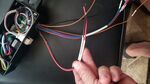
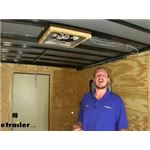
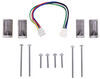
So you can set the mood for whatever you want, or maybe you just want a little nightlight to be able to move around and stuff without disturbing your partner. So now we're gonna move on to wiring up the unit. You will need a control box for your system, whether it's a single or dual zone. We're setting this one up as a single zone here in the back, so this is just a single zone controller. It is important you get the correct one so that it has the correct protocol inside to be able to communicate properly with multiple zones. So we're gonna take this unit now, we need to get our wires run in. So we're gonna loosen up the two screws here on top. This is the strain relief for the high voltage that's gonna be going to it. So we're just loosening that up so we can slide the wires down. We also want to take out the screw just below it. This is the cover that's directly below that spot. That's where the wires are that we're gonna be connecting our high voltage to. And there's our wires inside. The unit's gonna install upward like this, so our connector's gonna be facing towards the front. So now we're gonna drop our wires down through the strain relief, just like that. This unit's gonna end up sitting about right here. You can see there's these little holes that it's gonna line up with, so we're just kinda getting a relative idea of where it's gonna sit. About right there, and then what I like to do is I'm just gonna grab the wire and the unit here and just hold 'em 'cause I know this is the length I need it to be to reach that position. And we're just gonna angle it down now and we're gonna tighten down our strain relief. All right, now we've got the correct length of wire to reach where our rounding position is here. Looks like we're gonna line up okay there. So we can go ahead and get this in place now. Now you do not get hardware included with your controller. So you are gonna have to provide your own hardware. We're gonna be using one of the old screws from our old unit right here. It's gonna thread into the smaller hole there. Run our screw in, and then we'll just grab another one of those. We can now start connecting our wires. Our black wire off of our unit is our live wire. And the black wire that was routed inside is also our live wire. So we're gonna take these two and give 'em just a little start twist, and we'll connect these together using wire nuts. Now that we've got the live wires connected, we're gonna move on to the common. That's our, our neutral I'm sorry, our neutral wire, which is our white wire. That's going to hook to the white wire that we've already got pre-run up here. So same thing with these two, just wire nuts to go together. And lastly, we're gonna be hooking the green wire in here to the ground wire that's run inside, which is usually your bare wire, sometimes it is also green. We can now put our cover back into place. And now we'll move on to hooking up the rest of our wires. Now this is gonna look a little intimidating. You've got a lot of wires here, and a lot of these you may or may not even connect. It just depends on the type of system you're gonna be running. For example, these wires here, these are the ones we're not gonna be connecting. So we'll just go over those real quick. We've got our furnace wires here. There's no furnace back here on this unit. This is just gonna be air conditioning, so we're not gonna be hooking those up. So that's more, just more furnace wires. And the rest of these are really just for being for used for if it's connected into another system, you can, there's compressor, ground, there's a reversing valve here if it was a heat pump to be able to operate heat pumps. So there's some neat stuff coming from Furrion, so that way we'll have heat pumps is technology they're coming out with. But just again, a lot of this stuff you're really not gonna be using for a single-zone setup like this. The things we are gonna be using though are the thermostat wires, which are labeled here. You'll have four wires here. Two of those are power and ground. That's our red and our green that's power and ground. And then we have our two communication circuits that are gonna go over to our thermostat through the A and the B wire. If you purchased the unit, the distribution box that has the mood lighting, this is the connector that would plug into that. So when we go to put our distribution box up, we'll plug that in. And then we also have just our 12-volt power and ground right here, so we can go ahead and start there by getting those connected. Our power and ground was the black and white wire located here, our black was our hot, and our white was our ground. So we can go ahead and start wiring our components up now. We're gonna start with power and ground to the unit on our 12 volt here. So we're gonna start with the power wire. They have quite a bit stripped back there, so to me, it's a little bit too much, so we're gonna trim off some of the excess there that they've got and then just pull off what's left. That's a pretty good amount there to make a connection to. We'll then cut our power wire here, get that butt connector off of there. We'll strip this end back. And then we're just gonna use butt connectors to attach the two together. If you need some butt connectors, you can get those here at etrailer. So we're just gonna slide our butt connector onto the 12 volt wire, our positive there. We'll crimp it down. And then on the other side of our butt connector here, we're gonna take the 12-volt wire from our control box here and connect it together. Once we get this done, we're just gonna repeat this procedure for our ground wire. The ground the wire's the black one here labeled ground. And we know that this is our ground here, this white one. So we can just snip this and use the same type of butt connector to make that connection. So now we're gonna go ahead and put the temperature sensor on and plug in the rooftop unit to our control box. So you'll find your connector for your rooftop unit, it's actually just right up inside there, just pull that connector down. And that's just gonna plug right into the box. The temperature sensor is this guy right here, and this needs to be installed on to the evaporator located up there, these little round, kinda round openings, they're gonna slide over the cross tubes that's on there. So if you look up, you can kinda see the cross tubes, just slide it in between the slits and it should line up with those cross tubes and just push right into place. And it's important that we've got it all the way pressed into place. You don't want to be too hard with it, but we need that temperature sensor to be up against the evaporator to get proper readings. So we're pushing, make sure we're all the way on. And we're also taking the sensor probe and we're just pushing that to make sure it's got contact with the evaporator coil there. So now that we've got those in place, all that we really have left is our thermostat wires. All these wires here that we're not gonna be connecting, what I would recommend doing before we hook up our thermostat here, we're just gonna take the ends that are pre-stripped, we're gonna give those a little snip, and we're just gonna take a little piece of electrical tape, and we're gonna cover those up, just so that way there's no issues of any kind in the future from those. And we don't need a lot of electrical tape, just a little tiny flag like that will work just to seal that off. So now we're gonna hook up our thermostat wires. I went ahead and snipped off the connector end that was on there 'cause it's not gonna plug into our unit here, we need to butt connector them together. And I went ahead and stripped back some of the sheeting as well. So now that we've got these exposed, really these wire colors, we can choose what we want them to do. 'Cause we're gonna be hooking up this end here and the other end of the thermostat. We're gonna make our red wire our power wire, the black wire our ground wire, we'll make white our A circuit and yellow our B circuit. So now we're just gonna grab some strippers and butt connectors and start connecting those together. We're gonna start with our power circuit, strip it back. We'll then connect to this to the 12-volt circuit coming off of the ones labeled for the wall thermostat. So I'm just gonna slide our wire in there, crimp it down. These are some pretty small wires too, our thermostat wires. So after you crimp that just give it a nice check there. Make sure we're not gonna just slide right out of there. Looks like that was a good connection, so we'll just move on to the 12-volt wire from our unit here, slide that into place, and we'll crimp that one down. So now we're just gonna finish making our connections. Just like we said, black's gonna be ground, white we're gonna hook to A, and yellow we're gonna hook to B. So we've gone ahead and plugged it into shore power. Let's go ahead and power it up and see if everything's working properly. We're gonna go ahead and hold the power button down for a few seconds. That's gone ahead and turned our unit on. And afterwards, there it did kick on, it came on in fan mode so we can hear the fan running. Let's just check our speeds here. To check your fan speed you'll just press the fan button in the middle, that's gonna increase our speed. We're now at level three. We could hear the thermostat, or we can hear the unit up there kick it into a higher speed, so all that seems to be working properly. We're going back down to fan-speed one. It's gone down, so let's go ahead and switch into a cooling mode now and see if everything kicks on. There's dry mode, there's auto, and here's cool. And that's what we want to test now is cool mode. All right, we heard the unit kick on. It's currently 87 in here. Let's go ahead and put our set point. Ideal temperature for me is 72 degrees so that's where I'm gonna set it at. And we're gonna go and let the unit run now and verify that we've got nice, cool air coming out of it and that it can bring our temperature down. So now we've got cool set, let's see where we're at. And it does feel like we've got some nice, cool air coming out of both the front and the rear outlet vents here from our distribution box. So it all seems to be working good there. Next test, we're gonna close off both of these outlets because when we had installed this, there was openings for roof vents. Oh, and there we go, we've got cool air coming out of the roof vents as well. So it looks like all of our system is working properly here. We can go ahead and let it run for a while and verify that it does drop our temps down, see how well it's gonna work here. But we know that it will completely cool the whole unit through the roof-mounted duct work. And if we want to prioritize this room, we can open up these ducts here to maximize cooling in this room. And that completes our installation of Furrion's control unit for their rooftop AC units..
Average Customer Rating: 4.6 out of 5 stars (53 Customer Reviews)
Replaces the single zone controller for your Furrion Chill AC setup (sold separately). Communicates with your thermostat to control the temperature inside your RV or camper. Short-cycle protection ensures your RV reaches its temperature set-point.etrailer is the Chik-A-fila of customer service for online purchases. I cannot say enough about their service and friendliness.
The Furrion 15,500 BTU AC works like a dream!! Cools my 38' 5th wheel very well in 80° It is impressively quiet and with the 3 fan modes, you can sleep like a baby. I installed it myself converting it from an old Dometic Duo Therm. I had to replace the air distribution box and thermostat.
The only reason it got four stars is because the cover came busted. Cracked and held on by only 3 screws since the rest of the tabs were broken. It is made in China so I'm sure it's not etrailer's fault. The main issue I had was a junction box in the main roof unit that came loose from it's four screws and wedged itself against the fan blade. It kept the blade from spinning and the sound coming from the unit sounded like a giant refrigerator the size of a tractor trail parked right out side the RV. Extremely loud!! After climbing up there and removing the cover I noticed and fixed the issue. Looks like it was never screwed to being with. Fortunalty it didn't damage my unit.etrailer did send me a new cover at no cost as soon as they had it back in stock. All in all, I would def recommend, just watch out for loose or broken parts.

This entire system works really well as far as dropping the temperature. We have our system freezing often which makes me wonder why that would be. Maybe we have too much moisture in that room.
Overall this item is great, and does what is promised. My issue is with the overall rv AC ecosystem as a whole, and not this. I originally just got the ac adapter to fit with a original coleman ac unit, but ended up needing to purchase this due to wanting the led strip on the interior distribution recptical to light up using the furrion thermostat. After a year of ownership I have no regrets about purchasing this.
pis poor guys wrong unit for the thermo stat

Katrina D.
7/21/2023
It looks like you were actually needing part # FR86NR. However, this is currently out of stock. You can definitely speak to our customer service department for them to give you the best options.
Pretty much ‘plug n play’, final piece plus the t-stat and my new a/c unit was running. (2nd a/c for my 5th wheel).
thanks etrailer for the fast shipment with the furrion ac and the thermostat and the controller . plus the advice you guys gave me in the chat and over the 2 phone calls I had with you guys telling me about the a c . the new ac is far better then the 4 year old dometic penquin 2 that I replaced it with ( stop work in ac and heat pump ) as the inside and the outside sound level is a lot quieter with out the thump drone noise when the compressor started up . and yes like all the reviews said when it got here the shroud had 4 broken mounting screws ? I emailed etrailer and they sent out a new shroud the same day with the return info . after I installed the new shroud all is awesome !
thanks again dave
Very sensitive to freezing. Can't be left on all day while you're out doing things. It will be frozen up and blowing hot air when you return. Works ok if you are around to babysit it. I contacted Furrion and they told me the recommended placement of the freeze sensor and that's where I placed it.
Just what I ordered and fast shipping great people to deal with
Very knowledgeable and quick to answer my questions. Will definitely be doing more business. I thought I had my a/c controls figured out but I was wrong. They steered me in the right direction for less than I thought it was going to cost me. Fast delivery also
This is what did not come with Furrion roof air conditioner that is needed when you buy one . Was self explanatory on install.
Perfect! Quick delivery and works as it should.
Necessary for the air conditioner. It being digital only requires four wires between the thermostat and the unit
I'm a/c tech 35 years. Issue with thermistor in return. Because it reading temp in return air and not tstat. Reading at tstat came be off as much as 10 deg

Jenny N.
6/10/2022
I reached out to the manufacturer about the concerns with the zone controller. They advised that to ensure that the temperature is read correctly it is recommended to run the fan in the AC unit constantly so that the room air continually passes across the sensor.
Well, i would love to tell you, but my husband is having a difficult time getting our unit to work. We took out our coleman air roof unit and replaced with the Furrion. We did not get the thermostate because ours works. But my husband thinks he may have to get your thermostate for this unit to work. All i know is we are in Florida and one unit is not enough to cook our Redwood 38GK.
One year later... PERFECT! Exactly what I needed to get my furrion up and running. Etrailer does a great job of informing you BEFORE you buy, and asking me how it's going a year later, very unexpected. From now on, I will start with etrailer.
This replacement controller was very easy to install and it fixed the problem with my furrion AC!!
Olivia was a big help. She went out of her way to make sure I received my part for my AC unit for our travel trailer. She saved the week long camping trip with the family. I will be using etrailer for all my parts needs in the future. Thank You Olivia!
Great unit, well thought out and compact. Was very easy to install and was plug and play. Much better than my 5 year old Dometic 15,500 btu unit.
Works as it should! Best price I found is on this site, thank you etrailer
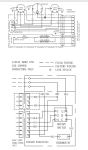
I haven't installed it yet because there is no information on wiring or a wiring diagram. My old system has 12 wires that are clearly marked. But the new wires are not clearly marked.
The tech people have not been much help. Maybe after I figure it out ill hang my review.

Sierra K.
8/4/2021
Thank you for your review. I have attached the wiring diagram and installation video:
Works great. Etrailer had part when i could not find it anywhere else. Thanks E trailer.
RECEIVED PRODUCTS I ORDERED YESTERDAY. COMMUNICATION WAS GREAT. I REALLY ENJOYED SEEING A FACE WITH EACH EMAIL. MUCH MORE PERSONAL THAN THE USUAL COMPUTER GENERATED RESPONSE. LIKE THE WAY THE PRODUCT LOOKS, BUT WILL NOT BE ABLE TO HAVE IT INSTALLED FOR A WEEK OR SO. HOPING IT WORKS GREAT & DOES WHAT WE NEED IT TO DO.
3 day shipping is what I paid for, got the package 5 days later

Brooke M.
10/25/2021
Thank you for letting us know. Our customer service team should be reaching out to you in the near future.
Been a year, works like
It should.
Do you have a question about this Accessories and Part?
Info for this part was:
At etrailer.com we provide the best information available about the products we sell. We take the quality of our information seriously so that you can get the right part the first time. Let us know if anything is missing or if you have any questions.


Giovanny G.
5/18/2023
Well, a year later, all is well, honestly. We gotta go in and manually clean the ac and take good care to keep it going strong. Its our coldest, best working AC. We clean it about 3 times a year.