
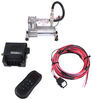
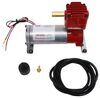
Firestone Heavy Duty Air Compressor - 145 psi
(7 reviews)
Price: $270.90
In Stock
Firestone Heavy Duty Air Compressor - 145 psi
Item # F9335
Retail:$436.63
Our Price: $270.90
You Save: $165.73
In Stock
Thank you! Your comment has been submitted successfully. You should be able to view your question/comment here within a few days.
Error submitting comment. Please try again momentarily.


- All Info
- Reviews (7)
- Q & A (0)
- Videos (1)
- Photos
Firestone Accessories and Parts - F9335
- Air Suspension Compressor Kit
- Vehicle Suspension
- Air Compressor
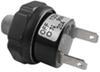
- Wired Control - No Display
- Firestone
- 145 psi
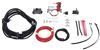
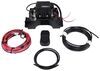
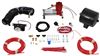
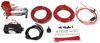
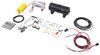
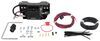
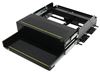
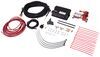
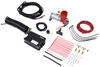
This heavy-duty air compressor is perfect for use with any air spring kit with a tank up to 3 gallons. Compressor operates at a maximum 145 psi.
Features:
- Replaces compressor in Firestone air command systems F2230 and F9003
- Supplies compressed air to air helper springs
Specs:
- Application: Firestone air command systems F2230 and F9003
- For use with tanks up to 3-gallon capacity
- PSI: 145
- Amperage: 17.5 amps
- Cu ft/min (at 60 PSI): 0.73
- Cu ft/min (at 100 PSI): 0.57
- 2-Year limited warranty
Note: The construction material of the fittings may vary.
WR17609335 Firestone Heavy Duty Air Compressor - 145 psi
9335


Video of Firestone Heavy Duty Air Compressor - 145 psi


Videos are provided as a guide only. Refer to manufacturer installation instructions and specs for complete information.

Video Transcript for Firestone Heavy Duty Air Compressor Review
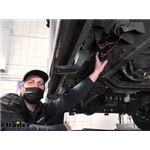
Hey everybody, Ryan here at etrailer. Today, we're gonna be checking out and showing you how to install the Firestone heavy duty air compressor. So right off the bat, this is just gonna be the compressor. It has got to come with a few fittings and a filter and things like that, but it's not gonna come with a tank or airbags or anything else. So there's a few uses that I can think to use this for. And one of them being a replacement part.
So for example, that's exactly what we did here today. Our customer's original compressor is just seen better days. It's several years old and they really put this truck, it's a work truck, they really put it through the ringer. And so things happen mechanically and this one just decided it's had enough. And so what we did was replace it with this one.
And this one is actually a slight upgrade or slight improvement over the original one he had in there. It's just a little more powerful. This one can go up to 145 PSI. So if it we're me, I'd rather have a little overkill. You just don't have to work the smaller or work this compressor as hard as you do the smaller ones.
And honestly, I think that's what kind of does a number on the compressors is just really working on at 100% and really leaning on them pretty heavy. So having one that's built a little bit better, definitely should improve the longevity of it. This thing can also work for those one-off type scenarios where you're trying to do something custom. Put airbags on, whatever machine you're trying to put them on or have onboard air or things of that nature. This is gonna do that too.
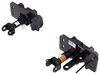
'Cause really in the grand scheme of things, you put 12 volt power to this and it's gonna turn off and on. Really doesn't care what it's airing up or what bags it's airing up or anything like that. So it opens up your opportunity on what you can actually use this thing for, which brings me to my next point. A lot of people are wondering how big is it How much space does it take up 'Cause that way obviously you can figure out where you can mount it. And in our case today, we actually use the same mounting spots that we did essentially for the old one. So it's a direct replacement almost. But in case you're wondering the length of it, and so from end to end, it's gonna be eight inches long. As far as how tall it is, it is 6-1/3 inch. And as far as the width, how wide it is, it's gonna come and right under four inches at an exact 3.9, four inches wide. So relatively compact, it's not huge by any means, but it's a relatively small unit and you should be able to fit this in a lot of different places. We do get a lot of people asking if these things are waterproof and the answer is yes and no. They're not waterproof by any means. If you go drive in through a lake or a river, you're probably gonna tear the compressor out. But with that said, they're meant to be outside and exposed to the elements. So just your average rain or anything like that. Probably isn't gonna give you any issues. Like I said, that's what they're built for. But with that said, the dryer you can keep it, the better. So if you can Mount it up high and somewhat protected, you're gonna be in better shape as opposed to just leaving it wide open and letting the water chew through it. With that said, as far as how much noise this is gonna make, honestly, it's not much louder or quieter than really of the anyone, any of the others that I've heard. I mean, they're all about the same for the most part. So especially for the size of it, I think it's does pretty good for being a larger type compressor. It's not screaming by any means, but you can hear it running. So something to keep in mind. And that depends too on where you mount this thing up. If you mount it further away from the cab of your truck. If you're putting it on a vehicle, chances are pretty good. You're barely gonna be able to hear it. In our case, it's right under the door. And even when you're in the cab, you can hear it, but really not enough to bother you. But other than that, a pretty nice compressor. Really not much to it. As far as getting this thing installed, it's really just gonna depend on your particular setup. Just to give you a general idea, you're gonna have the intake here. So where the compressor sucks air in. The output where it's gonna send that compressed air and a power and ground. So rather than mounting it up, that's really about it. Depending on what you're doing, you might have to pick up some different fittings and things of that nature. We do sell a lot of different ones here at etrailer. So check that out. But with that said, why don't we go ahead and jump right in and show you how I replaced ours. Since this is a replacement compressor, we're just gonna walk through on how to get it changed. With that said, keep in mind, every vehicle is gonna be set up a little bit different and things like that. So just use this as a guideline to get you going in the right direction. But with that said, we're gonna get the old one removed first. So in our case, it's over here on the driver's side, tucked up here and we're just gonna get everything disconnected. So first thing, we have our wiring that just unplugs and then we can take our air line out. So with these quick connects, you just push down on the air line, hold the fitting and that'll pop out. And then what we can do is actually, since we're gonna have a new power and a ground wire, I'm gonna cut the power wire off of the compressor here. Cut like that. And we'll go ahead and just unscrew the ground. So that one is located right there. So I'll go ahead and get my bit set up. So there's our ground that undone. Pull that out. Then in our case, we have an air line coming right here and this is actually the inlet for there's an air filter. So this is where the compressor draws air from. And instead of trying to fight it off the barb fitting, I'll just go ahead and cut that line. Make it a little bit easier. And now, really the only thing was holding it up is actual bolts themselves. So I get my socket switched out and get all those removed and then the compressor should drop down. I can manage to get my gun in here and get to the last bolt. With a longer bit, I'm able to get this up there and lower this down, and then we can bring it over to the bench and swap some things over if we need to. Or if we don't, we can just start to get our new compressor ready to put in. So here on the work bench, I did change a couple things from our old compressor to our new one, really just this brass fitting here. So the compressor actually comes with this new silver one and I just stole this one out of the old one and put it in there. When you're tightening these down, you don't have to crank down on them by any means. I like to get them snug and then go about another half a turn, something like that, Rather than be a little loose than over tight, 'cause if we ended up having a leak, not really a big deal. Just come down and tighten it down a little more. If you over-tighten it, sometimes it can crack. And then you're in for a headache there. But with that said, now what you can do is take the air filter and thread that in. So this is fine if you're in an enclosed area or something like that, but I really don't wanna do this under our trucks since it is exposed to the elements. I feel like if they do happen across a creek or they plow a lot of snow in this truck, I feel like they could potentially suck that up into the compressor. So the way it was set up is that air line that was going into here that actually ran up towards like the engine compartment and had the air filter on it. So it's nice, high and dry. So what I'm gonna do is not even bothered with this one. All right, I got a fitting here. That's gonna thread into this. And then that'll allow me to plug that existing air filter line into here and still utilize that. So I think that's the path I'm gonna take. I think it's a good call. We do have all kinds of different fittings here at etrailer. So if you're wanting to piece something together or make it your own, whatever you think is gonna work best, you can always grab some of those. But with that said, I'll go ahead and snug this one down as well. So the end of the wire, the end of the power wire here on our new compressor comes with the pre-attached spade terminal. However, I wanna get rid of that one and just hardwire it. That way it just make for a better connection in my opinion. So I'm gonna cut this off, strip back the insulation here. And what I'm gonna use is a heat shrink butt connector. And I recommend using these 'cause you can seal up the ends and it helps like prevent corrosion and things like that. So I'm gonna shorten up our wire a little bit. And the butt connectors covers it completely, we'll slide on in, we'll crimp it down. That way, it's ready for us to hook up once we get this bolted up and everything. So the compressor does come with these rubber feet, I guess you could call them. And you're gonna take these and slide them into the attachment points. What these are gonna do is just help absorb some of that sound and everything. That way it's not metal on metal and ran on a whole bunch wherever this thing is running. And so I put that one in there, got two more on the other side and this worked the same way. So I went ahead and reinstalled our assembly here and went up pretty much the same exact way as we removed it. Just plug your air lines into the quick connect fittings and bolt this on up now, pretty straightforward. I've just used some self tapping screws and some flat washers, plugged our electrical back in. And that was really it. I did, if you remember that butt connector here, I connected that to the power wire. And then the black wire coming off of our compressor, I just grounded that out to the chassis. And when you ground it out, make sure it's a good clean piece of metal. I scraped off some of this undercoating, uses a self-tapper to secure it. And that's really all there is to it. I'll probably come back with some zip ties and tape and button everything up a little bit. But before we do that, I'm gonna try it out, make sure that it is working. That way if you need to make any adjustments or fix something, it won't be all taped up. So we'll go ahead and give that a go now. So I went ahead keyed our truck on, came to our controller and I'll go ahead and hold the switch down and see if the compressor turns on and fills our airbags up. So I'm getting pressure and my bags is increasing and it looks like everything is working correctly. Now that we've verified it's working, I left some pressure in the system and I just wanna do a quick check for leaks here on the output. So I'll take some soapy water, spray around and all of our fittings and stuff. And what we're looking for is for bubbles to be rapidly forming. And if that happens, we have a small leak that we need to correct. You can also just stay quiet and listen for the leak as well. But if you have a leak around the fittings, just tighten them down a little bit more. It should correct it. If you have a leak here where your air line plugs in, what you're gonna do about the air line system, pull the line out, cut it clean again and plug it back in. And when you cut it, you don't wanna use like a regular pair of snips. You want is a tubing cutter or some type of razor edge, make it nice and clean. Plug it in and fill it up and check again. But for now, looks like we don't have any leaks and we're all good to go. And that'll finish up our look at of the Firestone heavy duty air compressor..
Customer Satisfaction Score:
98% were satisfied with this product
2% of customers were not satisfied
- Alternate product found
Customer Reviews
Firestone Heavy Duty Air Compressor - 145 psi - F9335
Average Customer Rating: 5.0 out of 5 stars (7 Customer Reviews)
This heavy-duty air compressor is perfect for use with any air spring kit with a tank up to 3 gallons. Compressor operates at a maximum 145 psi.by: Sterling01/29/2020
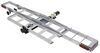
The pump works great but does run pretty hot so you have to be careful what kind of line material you use. It is installed on a 44' Stacker car hauler to air up the air ride suspension and definitely does the job.


Sterling R.

1/31/2021
Still doing the job! I would recommend it to anyone. Thanks!
by: Michael 10/26/2023
Good service and product.
by: Eric07/23/2023
I can usually find what I need on your site. Easy to purchase and delivery normally fits our projects timeline.
by: Mario 03/31/2023
Thanks for à good and excellent service
by: Glenn Reese07/06/2014
Received this product quickly. It was easy to install and works like it is suppose too.
by: Tom H11/05/2014
Very helpful and very fast service. Thank You all !
by: Denis 08/09/2022
7
7
See what our Experts say about this Firestone Accessories and Parts
- Is Firestone F9335 Heavy Duty Air Suspension Compressor WaterproofAccording to Firestone, the compressor is water resistant. It would typically install under the bed of the truck where is would be exposed to splashing from the road which doesn't present a problem. Firestone doesn't recommend submerging the compressor, however.
view full answer... - Dimensions of Firestone Heavy Duty Compressor F9335The Firestone Heavy Duty Air Compressor # F9335 is designed to work on a 12 volt system. It is in the process of being phased out though and replaced with the part # F9499 which has the dimensions of: L – 8.” W- 3.94” H- 6.3”
view full answer...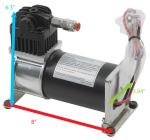
- Replacement Firestone Compressor 9335 for One that Won't Build Pressure Beyond 27 PSIFirestone does not offer a rebuild kit for the Heavy Duty Compressor part # F9335 so the best option would be to replace the compressor altogether.
view full answer... - What is the Duty Cycle of the Firestone Heavy Duty Air Compressor F9335?The Firestone Heavy Duty Air Compressor item # F9335 has a 30% duty cycle.
view full answer...
Do you have a question about this Accessories and Part?
Info for this part was:

Updated by:
Leah B

Updated by:
Mary K

Updated by:
Wilson B

Updated by:
Anna W

Updated by:
Hannah L

Updated by:
Alex H

Expert Research:
Mike L

Expert Research:
Jameson C

Written by:
Tyler C

Video by:
Joshua S

Video Edited:
Jacob T

Installed by:
Ryan G
At etrailer.com we provide the best information available about the products we sell. We take the quality of our information seriously so that you can get the right part the first time. Let us know if anything is missing or if you have any questions.
Product Experts Available Now!
Call 1-800-940-8924
Victoria B.
2/12/2020
Thanks for sharing photos of your set up! If you are continuously running the compressor while in use, this could be the reason it is running hot. Pairing the compressor with an air tank, such as part # F9229, can help ease the load on the compressor. I have also linked all of our Firestone 3 gallon air tanks for you.
Helpful Links
Accessories-and-Parts/Firestone/F9229.html
dept-pg-Accessories_and_Parts-pt-Air_Tank-hs-3_Gallon_Tank-pm-Firestone.aspx