
Thank you! Your comment has been submitted successfully. You should be able to view your question/comment here within a few days.
Error submitting comment. Please try again momentarily.


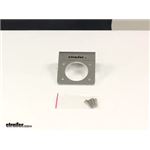
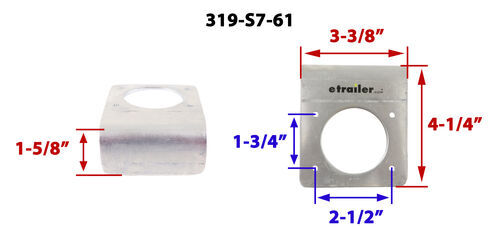
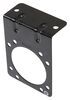
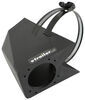
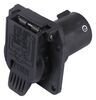
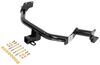
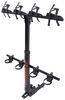
Mount your EZ Connector socket or standard 7-way vehicle-end connector with this mounting bracket. Heavy-duty aluminum is durable. Includes mounting screws.
Features:
Specs:
Videos are provided as a guide only. Refer to manufacturer installation instructions and specs for complete information.
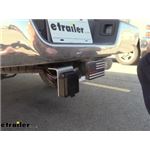
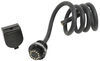
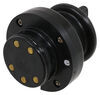
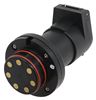
Hi there heavy haulers, Today we're gonna be taking a look at easy connectors mounting bracket. And this is what our bracket looks like when it's installed. It's specifically designed to mount up an easy connector seven or 14 pin self-closing connector just like the one that we have here. And we can see it gives you a really nice look here at the back. Even the mounting holes for the connector are hidden inside the connector here on the easy connector. The hardware does come included with the bracket for getting your easy connector mounted up.
And it threads directly into the bracket. There's no nuts or washers or anything like that required. The bolts just thread in. This gives you a really nice look. I really like the look of the aluminum here.
The connector fills it in very nicely. And with this aluminum kind of finish on in here you do have the option to paint it. And I highly recommend that you do paint it. Anyway we've got it just kinda showing off how it looks when you'll get it. We did put a clear coat on it.
But you could paint it to match the back of your vehicle, whether you want it to match your connectors and your hitch by painting it black or maybe you have a red bumper on the back of your truck, and you wanna maintain that look, you could have this match directly to the same color as your vehicle. And this bracket here is designed for custom installation. The mounting holes here at the top, if you're putting them in you will have to drill those holes for you. There's no pre drilled holes here in the top just for the ones for mounting your easy connector. And they've done that.
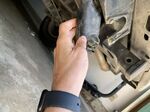
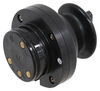
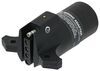
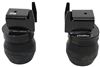
So that way you can have the cleanest look wherever you mount it. 'Cause you're drilling the holes only in the specific location that you want your hardware to be. And if you're going for a custom look, and you want it to really look nice, you don't wanna see any extra holes. So it's cool that they've done that. They've really given it a good solid option here. So if you follow along with us we'll show you how to get it installed. We'll begin our installation at the back of the vehicle and determine where we're gonna be putting our seven way bracket. 'Cause this is a kind of. You can choose wherever you wanna put it tight bracket and you will have to drill your own mounting holes and provide your own mounting hardware to get the bracket mounted up. You do get hardware included for mounting the easy connector to it. So that way you do get that hardware. One of the ways you can get it mounted up. And the way that we chose was to use a no-drill bracket. You can get these here at Etrailer and this makes it so we don't have to drill into the bumper or into our hitch and perform any modifications to the vehicle side whatsoever. But one of the things you can look out for is something like this it's already on your hitch. Some manufacturers do provide a tab like this which is designed for mounting six, seven four pole brackets and like that to 'em. So if you have one you can probably mount yours directly to it. If not, then you'll need some solution here. Or you could, again drill directly into something and go ahead and modify your vehicle. Now the bracket does need to be modified in order to work. You can see I drilled out two holes there. All I did was hold it up to my bracket here. And then I just made some marks with a marker and then I drilled out the holes. So that way we can get it attached. I used a quarter inch drill bit which is a little bit larger than you need 'cause most hardware is gonna be five 16th but that's gonna give you a little bit of leeway so you can ensure that it's straight and get it in the proper orientation. So now that we know where we're gonna put it, we can go ahead and use our hardware to attach it to it. This hardware came included with our no-drill bracket here. So if you decided to just run in into your bumper or something you'll wanna just use some self-tapping screws or something like that, to get those into there. If you get the long bracket and follow along with us you'll have hardware that does come included with that. After sliding the hardware down to the top of our bracket or no-drill bracket, we slid our seven way bracket on here our easy connector bracket. And then we're just gonna follow that up with the nut. The nuts they come included with our no-drill bracket. They have star washers that are made onto 'em. And I really like the hardware here 'cause if you look at this, you're probably wondering, "How are you gonna get a screwdriver up on top "to tighten those down" And with these, we don't really need to. If we just put a little bit of pressure up there and you can then just tighten it down. The nuts will grab and it will hold it on there very tightly. You can see we've got no play. We're gonna do the same thing with the other one. And now we've got that mounted up securely. Now, when it comes to mounting here you can see that our easy connector doesn't have any of the wire connections made. So you'll either wanna make sure that you pull your wire through the hole here, make your connections and then mount it up or just mount it up first, and then you can make your connections after it's mounted whichever works best for you. Now we've got our connector slid in here. We're gonna open it up. And this is harder to open than most of your seven way connectors. And that's due to the magnetism. You can feel that when you first open it. you've got a magnetism pulling on it. And we also have a spring loaded mechanism in there as well keeping it shut. And you can see the large seal here that keeps out any moisture. This is probably the best weatherproof connection that you can get for the back of your vehicle. So now we've got it open. I'm just gonna stick my finger in there to keep it from fully shedding. 'Cause that magnetism does hold it pretty tight. And we're just gonna open it. We're gonna take our included hardware and then we're just gonna thread it in. Now, one of the things I did notice about this bracket and this hardware was that the hardware here is stainless steel and our bracket is made of aluminum. So one of the things we can do to help prevent against corrosion here due to the dissimilar metals is we can take a clear coat and paint our bracket. That'll help give us a layer of protection. And then we can also be very generous with anti-seize on our bolts. So we are gonna do that here before we thread it in there to combat the issue of the dissimilar metals that we've got going on here. Make sure we put a very heavy mount of anti-seize on our stainless steel bolt that's gonna help prevent it from galling when we insert it. And it's also gonna help prevent against any galvanic corrosion that can occur between two dissimilar metals. So we're just gonna get this started. If you need some anti-seize, you can fix them up here at Etrailer with these connections I do recommend getting each one started and then going back and tighten them down. So we've got one started there you can see. We're gonna repeat the same process of putting NICs on starting the remaining bolts here. And if we take a look at the backside of our bracket here you can see that the holes here. We're not putting any nuts on the other side of these bolts. These holes are pre threaded. So our bolts just thread directly into 'em. As part of why we're going so heavy with the anti-seize before putting 'em in. And I do like that it does make things a little bit easier. We don't have to worry about fumbling with any nuts and washers and lock washers and all that hardware that you could potentially drop and lose. And just push your bolt in and thread it right in. It gives you a cleaner look in the end. So we've got 'em all started. We can go back and snug them down. You don't wanna go crazy tight as this is just a composite housing. We don't wanna cause any damage to it. So we're just runnin' 'em in till they're snug. And with our hardware tightened down that'll complete the installation of our connector into our bracket. Only thing that's left now is if you so need to finish up wiring the connector, you can go ahead and do so. You wanna follow your instructions that comes included with your connector. So we've got the trailer end of our easy connector here. Let's go ahead and flip up in the cover and test it out. And it clicks and locks right in. We've got a nice, solid mounting connection right there. So we have now upgraded from the factory seven way that we've got on our vehicle here to a much more secure, easy connect that is going to have a magnetic solution to keep our connections made. And that completes our look at easy connectors mounting bracket..
Average Customer Rating: 4.4 out of 5 stars (9 Customer Reviews)
Mount your EZ Connector socket or standard 7-way vehicle-end connector with this mounting bracket. Heavy-duty aluminum is durable. Includes mounting screws.I KNOW LORIA WAS VERY HELPFUL . SHE HELPED ME GET THE RIGHT BRAKE CONTROLLER THAT I NEEDED THANK YOU LORIA, BILLY

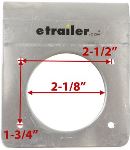
The 2 1/8" hole was cut out with a dull or improper blade. It was rough but my connector covered it. For what it cost I will make my own out of stock in the future.
Thank you very much for the quick response to my order
Great product. Definitely an upgrade from thin galvanized metal. I like that the mounting holes are not predrilled so you have the option of mounting wherever you like.
The product was fine but the holes did not align with my receptor so I had to drill new ones. IT will not rust and that is what I was look for in the item.
Better if it was painted or anodized black aluminum.
Do you have a question about this Accessories and Part?
Info for this part was:
At etrailer.com we provide the best information available about the products we sell. We take the quality of our information seriously so that you can get the right part the first time. Let us know if anything is missing or if you have any questions.


Jenny N.
11/3/2021
We do have a black metal bracket available part # C67UR.
Helpful Links
Accessories-and-PartsCurtC67UR.html