
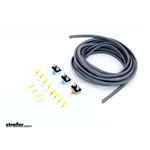
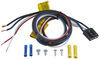
Wiring Kit for 2, 4, 6, and 8 Brake Electric Trailer Brake Controllers
(135 reviews)
Price: $50.10
In Stock
Wiring Kit for 2, 4, 6, and 8 Brake Electric Trailer Brake Controllers
Item # 5506
Retail:$52.88
Our Price: $50.10
You Save: 5%
In Stock
Thank you! Your comment has been submitted successfully. You should be able to view your question/comment here within a few days.
Error submitting comment. Please try again momentarily.


- All Info
- Reviews (135)
- Q & A (0)
- Videos (6)
- Photos
etrailer Accessories and Parts - 5506
- Trailer Brake Controller
- Installation Kits
- etrailer
Features:
- Works with electric brake controllers for trailers with 2, 4, 6, or 8 brake assemblies
- Includes:
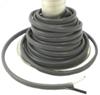
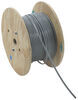
- 25 ft. 10-2 Duplex wire
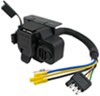
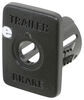
- 20 Amp circuit breaker
- 30 Amp circuit breaker
- 40 Amp circuit breaker
- Attaching terminals
5506 Wiring Kit for 2, 4, 6, and 8 Brake Electric Brake Controllers
Replaces 5505


Video of Wiring Kit for 2, 4, 6, and 8 Brake Electric Trailer Brake Controllers


Videos are provided as a guide only. Refer to manufacturer installation instructions and specs for complete information.


Video Transcript for Draw-Tite Electric Trailer Brake Controller Wiring Kit Review
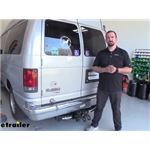
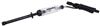
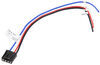
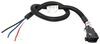
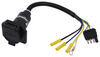
Today, we're going to review and install the wiring kit for the wiring kit for 2, 4, 6 and 8 brake electric brake controllers, part number 5506. This is a great wiring harness to use if you already have a pre-existing center seven pole or six pole connector on the back of your vehicle and you want to upgrade it to use it with a brake controller. We'll go ahead and start with our part number 5506 first, our wiring kit. We're going to work with this and then we'll work up to our brake controller. Let's go ahead and cover the parts that come with that. We got 25' of cable right here, which is ten-gauge material with two wires inside the sheath. We've got a variety of ring terminals here to connect up to your battery, and also ring terminals to connect up to the included circuit breakers.
The circuit breakers you have are going to be 20, 30, and 40 amp. Pretty much in every situation you're going to use this kit on, you're only going to use two or three. It depends on which amperage circuit breaker you need for you're particular break controller. It also includes four butt connectors to help hook up your wires. To give you an idea of what we're working with on our truck, our truck already has a seven pole connector wired up to it for just lights alone. We have our extra wires coming out from here, so we can hook up the rest of our wire harness too.
This one has a blue wire and a black wire. The blue wire is going to be used for the output from our brake controller and our black wire will be used for a 12 volt power supply going out to our trailer. On this style connector, it makes everything pretty easy to connect to and convenient. However, if you have a different style connector, it's the same principle applies. Still look for the blue for your trailer brake output and black for your 12 volt power supply. we'll go ahead and remove the sheath on our two wires here to get access to our wires.
One note, of course this is not going to be an exact color match, we're still going to ours black to black and then white to blue. Let's go ahead and strip back our wires and get them ready to install. Now let's get our other wires ready. Our butt connectors, the inside has been sitting out and corroded up a little bit; we're going to use some of the new butt connectors that come with the kit. Now I'm going to use some electrical tape to help protect our connections here. Now we'll go ahead and run our grey cable through our front of the vehicle.
Just make sure you stay away from anything moving, like suspension components, or anything hot, like the exhaust. What we did in this case is we ran our wire up along side the frame, over the hitch, and up and over our top of the frame. We'll zip tie it to keep it up and out of the way. We went over these components and lines and hoses . just went over the top of it, just ran it down along side the frame. There is space between the frame and the gas tank, we just kind of stuck it between there over the bracket for the gas tank. Again, followed the frame, zip tying where we could. There happened to be a little bit of an opening right here that we was able to run our cable through . that held it up for us. Then, we ran it up towards the engine compartment. There's a little heat shield right here that we'll be able to sneak or cable through and hide it up, and once we pull up from the top it'll take up all our slack and it'll be hidden on the inside. None of of our parts come with any zip ties like we're using here today, but you can use part number DW05726-25. For our Nissan here, it was pretty easy to push the wire up from the bottom and up into the opening right here so that we could easily reach it. If it was a little bit harder to get to you could use a pull wire. Basically, you would use any type of material, we use an old piece of airline tubing, but a coat hanger or any piece of material that you can manipulate . push down here and tie off and pull back up. We'll go ahead and pull up the slack. Make sure it's not interfering with anything on the engine. Then, we'll go ahead and use another zip tie to help hold it in place. We're just going to tie off to the vacuum line right here and cut off our excess. Next we'll go ahead and run our wire out to our power supply, which will be our battery. Let's go ahead and see how much length we need. We'll follow the existing wire harness. We'll go to the positive side of our battery. Next, we'll go ahead and find a location to install our circuit breakers. To help us with our installation, we're going to attach them using some self-tapping screws. We'll be using part number 101131802. When we install our circuit breakers, it's a good idea to be as close to our power supply as possible. In this case, we're going to use the sheet metal right here. We're always going to use a 40 amp circuit breaker for a 12 volt power supply for our trailer. In this case for our brake controller, we're going to use a 30 amp circuit breaker. To install the screws, we're using a 1/4" nut driver. We'll just overlap the tube mounting tabs and use one screw to hold everything together. With our circuit breakers mounted, now we've got a better idea of where we're going to run our wires to for through those and through our battery here. We'll go ahead and cut off our excess. Next, we'll go ahead and take a moment to split the wires apart . We'll go pretty far back on our wires and split them. Let's just go ahead and put our white wire off to the side, eventually that will go inside the vehicle. Let's go ahead and work up our black wire. Our 12 volt wire is going to go through our 40 amp circuit breaker, which is located right here. Pretty simple to install. We'll go ahead and cut the wire in half, strip them back, and we'll install a couple of the small ring terminals. Our circuit breakers are actually labelled. This copper one is labelled BAT, so it goes to the wire that goes to the battery. This sliver one is labelled AUX. We're going to our battery. We'll go ahead and take our black wire, put it into place and loosely install our hardware. Our wire going out to, eventually, our trailer will go on top. We can go ahead and snug those down using a 3/8" deep well socket. Now we'll take the other end of our wire and we'll go ahead and get it stripped back. We're going to attack one of the large ring terminals to it. This will eventually connect to the battery in this location right here. I like to leave the connection to the battery as one of the last things I do, so I'll just leave this off to the side. Next up is to go ahead and use our leftover length of wire and use that to run between our brake controller from the inside and out to our power supply once again. This will provide our ground and our power for the brake controller. However, of course, whatever we have left is way to short for the job, so we'll have to use some additional wire. This will happen in situations where your battery is located on the passenger side of the vehicle. The extra wire that we're going to be using is part number 10-2-1. This is Deka 2 wire, ten gauge brake wire. Now we've got our extra length of wire here, we're going to have maybe about maybe a ten foot chunk, and we're going to combine it with our white wire here that's separate. We're going to run that through a grommet to the inside of the vehicle. The grommet's going to be located in this corner right here. We'll make a slit into that using a utility knife, or actually a pocket knife works really good in this application, and just make a slit in there, just enough for it to run our wires through. Just make sure we stay away from the wires on the side. I'm going to bundle my three wires together temporarily with some electrical tape and we'll push on through. I'll go ahead and push it in, and chances are it's going to be hidden behind the insulation a little bit, on the inside of the vehicle. We'll go ahead and take our new cable here and follow the path of our original black cable. Now we'll go ahead and see how much wire we need going from the circuit breakers and to our battery. This time we'll also need to accommodate for going to the positive side of our battery and also our ground, or negative, side of the battery. We'll go ahead and cut off our excess one more time. Let's take a few moments to go ahead and separate our wires, give us some working room. We'll also separate a small section here to get access to our black wire. Let's go ahead and cut this black wire in half and we'll connect it up to our 30 amp circuit breaker just like we did with our other wires. We'll go ahead and take two more small ring terminals and add it to our wires. Our one wire that's going to our battery will go to the copper side and our brake controller will do to the silver side of the circuit breaker. We'll cut our black wire off short, we don't need all that length, and add our large ring terminal. We'll also do that to the white wire as well but we'll leave it at its original length. Once again, I'm going to leave my connection to my battery as the last thing I do, so let's tuck them out of the side for now. Now we'll go ahead and take a moment to zip tie our wires up, and bundle them up, and keep them safe and secure and out of the way from the engine. At this point we've got all our wires ran into the inside of the vehicle and it's ready for the brake controller of your choice. Remember that our single white wire will go back to the blue wire for the output on the brake controller, and then your black and white wires that are still in the sheath here will go black to black for power and white to white for ground. I'm going to go ahead and cut them off even and strip back the wires. Let's get our wires for our brake controller out, this is the wires that do come with the P3 brake controller. We'll go ahead and loosen them up and we'll use the supplied butt connectors that do come with the brake controller . Strip the wire back and add our butt connectors. Our brake controller comes with two smaller butt connectors, which isn't going to be enough for our white one, but our wiring kit does come with that extra butt connector that we can use for that purpose. Let's do our easy ones: black to black and white to white. Then our single white wire we'll connect up to our blue wire. We have our single wire remaining, which is our red wire; this will connect up to the cold side of brake switch. When you hit your brake pedal that turns on the brake lights and that's the circuit you want, so that'll turn on our brake controller when it's needed. To tap into our brakes that go on our truck, we're going to use a quick splice wire connector; we'll be using part number 564. On our Nissan, we're going to tap into the wire right behind one of our brake switches here. Follow our pedal up . we found out this yellow wire here is our brake signal, so when we pressed the brake pedal. it gets hot. To use the quick splice connector is pretty simple. Just connect it over the wire that you want to use and then the wire that you want to tap into or add to it we slide next to it. This is going to be pretty tight up in there, so give me a moment, I'll have this hooked up and you can see what we did. You can see here, with my quick splice in place and our red wire sitting next to my yellow wire here, and our quick splice doing the job. Now we'll go ahead and find a place for our brake controller. The rules are pretty simple, basically you just want to make sure you have it in an easily accessible area so you can manually activate it if you need it in an emergency situation. Make sure it's in a straight line with the vehicle and as little twist left to right as possible. You can install it up or down and get 360 degrees of rotation to install it. If you want to you can install it this way, vertical, and look down on it if it'll work out better for you. In this case, I think we're going to use this location right here so it's easily accessible. Our mounting bracket consists of two pieces. We have this piece right here that gets bolted to the truck, and then we had the secondary bracket that attaches to this one with some screws and it holds the brake controller in place. This also allows you to remove the brake controller easily if you want to transfer between different vehicles. If you want to permanent set up, you could also use this included metal bracket as well. Let's go ahead and put our small bracket in place, we'll need a phillips bit screw driver to run the screws in. Always double check to make sure there's nothing behind it before you run your screws in. Make sure it's straight where we want it. Then we'll install the second screw. We'll go ahead and use the machine screws that are also included with the brake controller as the rest of its hardware. To push it in, using a phillips screwdriver we'll install the machine screws. This will cut their own threads into the plastic bracket. By the way, you can also use the screws that we used for circuit breakers will work in the same place as well. This smaller, stubby screw driver works in a tight situation like this. Let's go ahead and take our wire harness, plug it into the back of the brake controller till it clicks. Then these corners right here will go into the corners of the bracket and will snap into place. Next we'll go ahead and take a few moments and zip tie our wires, and, once again, making sure we're safe and secure and don't interfere with working with the pedals. I'm going to use a small piece of loom material here to help hide the color of our wires. You could also use electric tape to accomplish the same thing. Back underneath the hood, we'll go ahead and hook up our wires. Let's start with the positive side first. Loosen up this nut using a 12mm socket. We'll put our two ring terminals on there and replace the nut. Then we'll go over to our negative side of our battery and we'll use our 10mm socket for that side. Let's go back to our brake controller, and we've got the screen lit up, so that shows us that we've got power. At this point, it's a good idea to go ahead and plug up a trailer and try it out. With our trailer hooked up, we can see the display changes and shows a small icon of a truck and trailer. That tells us we've got good connection to our trailer brakes, and all you've got to do now is take it on a couple of test drives and adjust the brake controller to your liking. That'll finish it for the wiring kit for 2, 4, 6, and 8 brake electric trailer brake controllers, part number 5506.
Customer Satisfaction Score:
96% were satisfied with this product
4% of customers were not satisfied
- Product did not meet expectations
- Wrong item was ordered
- Did not arrive in time
Customer Reviews
Wiring Kit for 2, 4, 6, and 8 Brake Electric Trailer Brake Controllers - 5506
Average Customer Rating: 4.7 out of 5 stars (135 Customer Reviews)


by: Getting wiring done!02/08/2017
The wiring was everything I needed to wire my 92 GMC 2500. This kit will have all you need to install wiring. Order a break controller and a rear 7 way and you will have a complete kit.
I would order this kit again, wire is of the correct gauge and the breakers work as designed. You will not be disappointed.
Than you etrailer for providing me with the parts I needed once again.


by: Jason 10/26/2023
Everything was tere which made it fast and easy. It would be nice it it came with self tapping screws.
by: David 11/08/2023
Easy installation and directions.
by: George 05/18/2024
Thank you!
by: Daniel Messick02/11/2015
Just what i need to instal my Prodigy P3 on a 1964 f100. A couple self tapping screws and about 4 ft of blue wire would of made life easier. But in the end i had enough wire i just had to make sure to remember colors. Would buy again.


by: Paul 05/24/2023
Another great product from e-trailer! The right products for installation makes all the difference....instructional videos are awesome 1
by: Hiroshi08/19/2023
Everythings there and it sure make it e asy
by: Ira 08/25/2023
Haven't installed it yet but, the order came quickly and just what I ordered.
by: Fredrick 08/27/2023
Came just as the picture showed. Haven't installed it yet but will take some pics for you when I do.
by: Jake O06/10/2017
I recommend some changes:
1) add an equivalent length of blue 10g wire.
2) If all three 30A breakers are used, I would suggest supplying two more #8 ring terminals (the smaller ones)

Jake O.

6/12/2018
So far very well, however 1/4 of crimp connections failed, requiring soldering.
by: Daniel02/17/2019
Product had everything needed to install my trailer brake in my 2008 Jeep Grand Cherokee Overland. Installation took about 30 minutes.

Daniel S.
2/17/2020
Everything is still working perfectly. No corrosion and no shorts.
by: kent05/19/2021
Moving up to the engine compartment, two circuit breakers from the ETBC7 kit were installed on the firewall. 40A for the hot wire back to the 7-Way connector, and 20A for power to the brake controller. The black conductor from the 10 gauge wire was connect to the silver (load side) of the 40A circuit breaker. This wire supplies power to the AUX post in the 7-Way connector. The white conductor from the 10 gauge wire is fed through the firewall and connected to the blue conductor from the brake controller. A separate black (10 gauge) wire is run from the silver post on the 20A circuit breaker, and this wire is connected to the black wire of the brake controller. The two wires leading through the firewall were achieved by making a small slit in the existing wiring grommet with a pocket knife. Finally, a separate black wire is jumpered between the two copper posts on the circuit breakers and run to the hot terminal of the vehicle battery. This is the final connection, after everything else is done.
by: Agustin09/24/2022
The original product shipped with a 20 20 and 20 amp circuit breaker. It should of been 20 30 and 40. I called in the following Monday explained the situation and they shipped out the correct circuit breaker. Thought when received it was sticking out of the envelope. It should of been in a little box to protect it better.
by: Ben05/05/2014
I used it to hook up my Mopar 7 pin trailer connection on a 2011 Jeep Wrangler unlimited. Worked great. No issues I could not have hooked it up without it.

Ben
5/5/2015
Works the same as when I installed it, perfect. Zero issues at all
by: Nicholas 06/09/2020
I used the 5506 to wire a brake controller for a 2016 Toyota Tacoma SR5 Crew Cab with a 6' bed (no towing package). By the way, if you're searching for the cold side of the brake switch on a third-gen Tacoma I found the blue wire to be the correct one.
The good: There is plenty of 10-2 duplex wire to make it from the hitch to the engine compartment and make the jumper wires from the breakers to the battery. There is also enough to run a positive wire to the brake controller and an output wire from the controller to the hitch.
The not so good: I would like to see a "complete kit" to install a brake controller. This would include the following; 6 self-tapping screws (4 to be used on the breakers and 2 to mount the controller (don't order self-tapping screws from e-trailer because you only get 1 for about $2.50), 10' of 16 gauge wire to run from the brake pedal switch to the controller, 1 quick splice connector to tap into the cold side of the brake switch, and 15' of 10 gauge wire to ground the controller. Also, make sure you have extra 10 gauge butt connectors on hand, the ones provided are cheap and don't grip well. I purchased more at my local auto parts store that are actually threaded to grip the insulation on the wires.
Overall, I would recommend this kit for non-towing package vehicles. The cost to buy 25' of 10-2 wire separately is $86.50 ($3.46/ft) then add the individual breakers and you well exceed the price of the kit.
by: FastFreddie11/11/2016
I have a 05 ram 1500 Thunder road edition the video was on a 08 ram 1500 not much different in body styles.I ran my wires from front to back and over the gas tank like the video but didn't run it down side the frame rail my wiring harness ran on my truck on top of the frame rail passed the gas tank going to the front of the truck I zipped tied and ran it up away from the exaust on the truck .The only complaint I have is not enough connectors if you screw up you have to buy them and zip ties the brake controller works great still have just a little fine tuning to do with it but I will get it very happy with the people of Etrailer they were a big help.
by: Jeff H.06/11/2015
I had my P2 Prodigy installed in my 2015 Town & Country yesterday. Found out that the T&C with the factory towing package and 7-pin connector was wired all the way to the front of the vehicle. All we needed from the 5506 kit was the 30 amp breaker and a number of the wire connectors. And of course the 20127 plug-in harness for the P2. Installation went smoothly and we are pleased with the result. Thank you for your assistance.
by: Marc-Andre07/13/2022
Not even 2 years after install all rusty. Electric brake pin broke due to rust.
Impossible To remove 4 bolt holding connector due To rust. I do not recommend
by: Richard09/28/2022
The process to wire power back to the hitch for the controller was straightforward, especially with the helpful video from etrailer.
by: Dennis P.08/22/2014
The quality of the wire, relays, and connectors was excellent making the installation very professional once finished. I would like to add however that since this is being installed in the engine compartment were it will be exposed to extreme heat and moisture; the crimp terminals and butt connectors should be covered with heat shrink rather than electrical tape and the terminals/butt connectors should be the type designed for moisture prone areas. It would have also been convenient if the kit included tie wraps to allow ease of a professional installation.
by: Dave H.06/30/2015
My third order from etrailer came in Saturday and I installed the prodigy2 brake controller using the wiring kit 5505. The videos and instructions were perfect for my 2009 Ford Escape. I plan on going camping with my Scamp trailer this weekend of the 4th of July and I will write another review when I come back .
Thank you Etrailer!
Dave Harris
by: Terry06/18/2014
The quality of the twin lead is excellent. The kit should include one or two dual in-line wire crimp terminals used to connect the white and brown stop/brake wire indigenous to the Jeep products to the blue brake input wire of the controller. In addition, the kit should include an insulating boot or jacket in which to protect the circuit breaker terminal bolts.
by: Nathan J04/07/2018
Installed on a 2014 150 crew cab, 5.5ft bed. Ran up the frame rail, into engine pay, where I split. One with through the firewall to brake controller, one across the bay to the battery. Perfect length for my application. I was happy with the quality of the kit.
Does not include mounting hardware for the circuit breakers. That would have made sense...
I will say I added the product to my cart, came back the next day to order and it went up three or so dollars. This is a bit aggravating, and etrailer lost my business on several other items that went up way more than that, but this was still the best price on 10g duplex brake wire. All in all a decent value, but the perceived pricing games are frustrating.
by: Brandon05/16/2018
Very happy with the product. Relatively easy to install following etrailer installation video. Bit disappointed did not also include the self tapping screws. would recommend for someone looking to add brake controller to vehicle
25
135
Show More Reviews
See what our Experts say about this etrailer Accessories and Parts
- Installing Trailer Brake Controller on a 2010 Jeep Liberty with a Factory 7-WayA plug-in brake controller wiring harness is not available for your 2010 Jeep Liberty but if your Liberty has a factory installed 7-Way you will only need isntallation kit # 5506. What you will do is use the wire included with # 5506 and attach one of the wires (there are 2 bonded wires) to the back of the 7-Way in the 7 oclock position. Then route the wiring under the vehicle, avoiding areas that may pinch or burn the wire, and into the cab. Connect the wire from the 7-Way you ran to...
view full answer... - Parts Needed to Install a Brake Controller on a 1997 Chevy C/K Series Pickup TruckThere is no brake controller port for a 1997 Chevy or GMC C/K series pickup truck. It is a hardwire installation only. This means the brake controller has to be spliced in. The red wire in this case would attach to the cold side of the brake switch. The brake switch is located above the brake pedal. Use a circuit tester such as # PTW2993 to test the brake switch wires. You need the one that only has power when you step on the brake pedal. If it has power at any other time, such as with...
view full answer... - Brake Controller Recommendation for 2018 Holiday Rambler Endevor 40GThe best electric brake controller in my opinion is the Tekonsha Prodigy P3 # 90195. This brake controller is a proportional brake controller allowing your trailer brakes to be applied in direct proportion of intensity and timing as you hit the brake pedal in your Freightliner. This controller has an LCD screen that allows you to take code deciphering out of the equation. It will allow your to see at a glance what is going on with your system. This controller is customizable and has 3 preset...
view full answer... - Recommended Trailer Brake Controller for a 2007 BMW X3 with Factory Trailer Hitch and WiringIf your 2007 BMW X3 has a factory 7-way trailer connector and you want to install a brake controller like the Prodigy P3 # 90195 you'll just need to hard wire the controller in. To do so the black wire from the P3 will be connected to the BMW's battery through a circuit breaker and the white wire needs to be grounded. You can use our # 5506 kit to make the connections. The blue wire from the controller is connected to the brake circuit that runs back to the 7-way which you can use #...
view full answer... - Installing Trailer Brake Controller on 2016 Jeep Wrangler UnlimitedI am happy to help with installation, however there is not a plug-in wiring adapter available for your 2016 Jeep Wrangler Unlimited, so you will need to hardwire the controller to the vehicle. It sounds like you already have the brake controller, so you will just want to add the Wiring Kit # 5506. The white wire from the trailer brake controller will connect the negative terminal on your Jeep's battery. The black wire from the controller will then connect to the positive terminal via...
view full answer... - Recommended Brake Controller and Wiring for 2003 Itasca Motorhome on Workhorse ChassisStarting with the brake controller itself, I highly recommend the Tekonsha Prodigy P2 # 90885. This is an excellent proportional controller that will activate your trailer's brakes at the same time and with the same intensity that you apply to them in your Itasca Motorhome. It features an easy-to-read digital display along with continuous diagnostics that will alert you to any potential issues. Then to install the brake controller, you will just need a couple of items. While there isn't...
view full answer... - Brake Controller Install Recommendation for 2017 Fort Transit T350There isn't a brake controller harness under the dash of your 2017 Ford Transit T350. However we can help you wire in a brake controller to the 7-way you have at the rear of your vehicle. First let's start with a brake controller. I would recommend the Prodigy P2 Brake Controller part # 90885. This is our best selling brake controller because of how well it works and how easy it is to set up. Next, for a wiring kit to install the brake controller to the 7-way you would want the Wiring...
view full answer... - Parts Needed for Brake Controller Installation on 2011 Nissan FrontierFrom what you describe, it sounds like you have most of the wiring squared away. You'll need to install a brake controller to actuate the trailer brakes and wire it to the vehicle. For a brake controller, I'd recommend using a proportional controller for the most effective, safe and predictable braking. The Tekonsha P3 you'd looked at, part # 90195 is extremely easy to use and provides excellent controls and an easy to read and understand display. You'll also need the # 5506 brake controller...
view full answer... - How To Install A Brake Controller On A 2015 Subaru OutbackIn order to install the Tekonsha Prodigy P2 Trailer Brake Controller part # 90885 on your 2015 Subaru Outback, you will want the following: If you do not have a 4 or 7-way trailer connector on your vehicle, you will want to install the T-One Vehicle Wiring Harness with 4-Pole Flat Trailer Connector part # 118467 and the Universal Installation Kit for Trailer Brake Controller part # ETBC7. If you already have a 4-way installed on your vehicle, you only want the Universal Installation...
view full answer... - Installing a Brake Controller on a 2005 Jeep Grand Cherokee with Factory Tow PackageChrysler did not put a factory brake controller in the 2005 Jeep Grand Cherokee so to activate electric trailer brakes the Jeep will need to have a 7-Way trailer connector and an aftermarket brake controller. You mentioned your Jeep has the factory tow package which means it would have a 7-Way connector. But even with the tow package and 7-Way the brake controller will need to be hardwired. You can use wiring kit # 5506 to install a brake controller. The kit includes duplex cable to...
view full answer... - Brake Controller Wiring Kit For Vehicle With 7 Way Already InstalledWe do offer the wiring kit # 5506 which will includes the wire, circuit breakers and connectors that come in the # ETBC7 kit. You can get a few feet of wire loom # 459075-1 and some zip ties. Since your vehicle already has the 7 way installed, that will be all you need.
view full answer... - Can Prodigy P3 Brake Controller Install in a 1997 Chevy TruckFor a Chevy truck made in 1997 there isn't an install harness available for installing the P3 part # 90195 under the dash but you can still install the controller. For a wiring kit to install the brake controller and the 7-way already have you would want the Wiring Kit for 2 and 4 Brake Electric Brake Controllers # 5506. This will provide the power source and ground for the wiring for the brake controller. You will need to test the wires from the brake pedal switch of your vehicle to find...
view full answer... - Troubleshooting Brake Controller Installation on 2012 Ford E350 VanThe Tekonsha Plug-In Wiring Adapter for Electric Brake Controllers - Ford # 3034-P is the correct fit for factory 7-way systems. It is odd to have the harness connection and not have it connected to the power, but that is what Ford did on their factory 4-flat models. They required the brake output wire and a 12V hot lead wire be run from the battery. I recommend testing the red brake wire for signal and then checking to see if the blue brake output wire is run to the 7-way or not. If...
view full answer... - Brake Controller Installation on 2004 Jeep Liberty with Factory Tow PackageIf your 2004 Jeep Liberty has a factory-installed 7-way trailer socket at the back bumper then brake controller installation will be simple. The controller I recommend is the easy-to-use and reliable Prodigy P2 # 90885. This proportional controller will slow your trailer right along with the Jeep, so you don't get so much of that tug-of-war feeling from the trailer. You will also need wiring kit # 5506 to provide you with the wire and connectors needed to install the controller with the...
view full answer... - Brake Controller Installation 2016 Toyota Tacoma Without Factory Trailer ConnectorIn addition to the brake controller you mentioned, the Curt # C24VV TriFlex and the Universal Wiring Pigtail, part # C51515, you'll also need our brake controller installation kit, part # 5506. The kit includes all the wire, circuit breakers and hardware you'll need to complete your installation. Start by locating the black and blue wires on your # PK11998 pigtail. The blue wire carries the output from the brake controller. The black wire carries 12-volts from the battery to any trailer...
view full answer... - Installing Brake Controller or 2008 Chevrolet Silverado with Integrated Brake ControllerYou can certainly install an aftermarket brake controller on your 2008 Chevrolet Silverado. I highly recommend the Tekonsha Prodigy P2 Trailer Brake Controller # 90885. This brake controller offers a digital display, 3 boost levels, battery protection, and continuous diagnostics. The P2 is a proportional brake controller that will activate immediately and tailor the trailer's braking to that of the tow vehicle. To start, you will want to find the bundle of 4 or 5 blunt-cut wires under...
view full answer...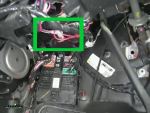

- Recommended 4-Way Trailer Wiring Harness to 7-Way Trailer Adapter and No Drill Mounting BracketThe Curt T-Connector Vehicle Wiring Harness with 4-Pole Flat Trailer Connector # C79KR for 2016 - 2019 Volkswagen Passat models will connect to a 7-way using an adapter like the Hopkins Adapter 4-Pole to 7-Pole and 4-Pole # 37185. You simply will connect the 4-way trailer connector and then ground the adapter to your vehicle using the white wire with ring terminal. If you want the other 7-way functions, you will need to use a kit like # 5506 to add the 12V power and brake controller....
view full answer... - Recommended Fastway e2 Weight Distribution System for Coleman Trailer and Brake ControllerThe Fastway e2 # FA94-00-0800 has a weight capacity of 800 lbs as you mentioned, but weight distribution systems are rated for total tongue weight and have a range. The total tongue weight is the loaded trailer tongue weight plus any cargo weight behind the rear axle of your tow vehicle. If your loaded Coleman trailer is 540 lbs, then this system will work really well as your total tongue weight will be in the middle of its 400-800 lbs capacity. If you want slightly better ground clearance...
view full answer... - Where is Brake Controller Adapter Plug Located In 2002 Dodge Ram PickupThe green connector in your truck is not the correct plug. It is normally a blue plug like what I have shown in the photo that plugs into the adapter part # C51332 if you are using a Curt brake controller like part # C51170. There will be a port to plug into if the truck came with a factory 7-way plug just to the right of the emergency brake. If the 7-way plug was installed after-market, you will need to see how far the wires from the plug are extended so you can complete the install...
view full answer...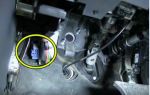
- Brake Controller Install on 2007 Jeep Commander with Factory Tow PackageAlthough your 2007 Jeep Commander is equipped with the Mopar tow package, it isn't fully wired with a plug-and-play connector under the dash. Jeep ran the brake controller output wire from the 7-way up into the passenger compartment, look for a coiled up blue or light green bare-ended wire near the top of the e-brake pedal. To complete wiring the controller, you'll need the # 5506 kit which includes the wire, hardware and circuit breakers necessary to complete the installation. You'll...
view full answer... - Recommended Brake Controller for a 2001 Toyota TundraThe best bang for your buck brake controller option we offer for a 2001 Toyota Tundra is going to be the Tekonsha BRAKE-EVN Trailer Brake Controller part # TK63VR. If you want you can cut off the plug and wire in directly or you can use the Brake Control Plug-In Harness part # 20127. If you already have a 7-way trailer connector then all you should need is some is some extra wiring and breakers like what comes with the Wiring Kit for 2, 4, 6, and 8 Brake Electric Trailer Brake Controllers...
view full answer... - Recommended Brake Controller Wiring for 2008 Country Coach Intrigue Class A MotorhomeThe 2008 Country Coach Intrigue Motorhome is not prewired for a brake controller based on my research. A wireless unit like the Tekonsha Prodigy RF Wireless Trailer Brake Controller # TK94FR can be used if you have the 12V power at your 7-way. My recommendation however is the Prodigy P3 # 90195 and hardwiring your system using the kit # ETBC7 if you don't already have a 7-way or kit # 5506 if you do have a 7-way. This will give you the wiring, circuit breakers, and connectors needed...
view full answer... - Installing Trailer Brake Controller on 2008 Jeep Grand Cherokee LimitedYour 2008 Jeep Grand Cherokee will not have the dash wiring kit. If you have a factory 7-way then you will need kit # 5506 to complete your wiring and add a brake controller like the Tekonsha Prodigy P3 # 90195. If you do not have the factory 7-way, then I recommend the kit # ETBC7 to give you the wiring for your brake controller and also give you the 7-way trailer connector. If you don't already have a 4-way trailer connection, then you will first need # 118425. This is an easy installation...
view full answer... - Location of Factory Trailer Brake Controller Harness on a 2007 Toyota Tacoma with Tow PackageThe factory harness to plug in a brake controller wiring harness on your 2007 Toyota Tacoma is located underneath and left of the steering column, taped to another harness near the emergency brake pedal. There will be a 5-pin connector that mates with the one on the adapter, # 3040-P. The harness does include an additional ground (white) wire that will need to be attached to a bare metal surface. The P2 is a proportional controller that applies the trailer brakes in proportion to how much...
view full answer...
Do you have a question about this Accessories and Part?
Info for this part was:

Installed by:
Joe V

Installed by:
Cole B

Expert Research:
Jackie C

Expert Research:
Mike L

Expert Research:
Robert G

Expert Research:
Michael H

Expert Research:
Jeff D

Expert Research:
Jameson C

Expert Research:
John H

Expert Research:
Adam R

Expert Research:
Rachael H

Expert Research:
Jeffrey L

Video by:
Joshua S

Video by:
Zach D

Test Fit:
Nicholas E

Test Fit:
Brent H

Test Fit:
Shane H

Test Fit:
Robert C

Test Fit:
Bradley B

Video Edited:
Jacob T

Video Edited:
Dustin K

Video Edited:
Chris R

Updated by:
Wilson B

Updated by:
Alexander C
At etrailer.com we provide the best information available about the products we sell. We take the quality of our information seriously so that you can get the right part the first time. Let us know if anything is missing or if you have any questions.
Product Experts Available Now!
Call 1-800-940-8924
Getting D.
2/8/2018
Product is still working with 0 issues