
Summer Starts Here - Save up to 70%
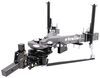
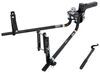
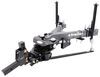
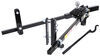
If your chains and cables do not extend 24" past the end of the hitch box on your ProPride hitch, this extension kit is for you. Allows you to hook up your ProPride 3P hitch without having to buy new safety chains and wiring cables.
Features:
Specs:
Videos are provided as a guide only. Refer to manufacturer installation instructions and specs for complete information.
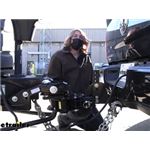
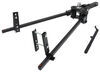
Hi there, ProPride owners. Today, we're gonna be taking a look at and showing you how to install ProPride's Safety Chain, Breakaway and Wiring Extension Kit. So here's our seven-way extender just to give you a closer look at it. It's pretty much what you would see at the back of most of your trucks. It's got a spring loaded mechanism on it. So when you're not using it, helps keep out dirt, debris and moisture.
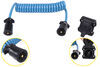
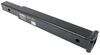
It accepts a standard seven-way. So your trailer connector here will plug into this. And then you can see it's, the other end's just the same as your trailer connector, just a seven way. That'll give you the extension you need here. And we got about 18 inches of extension with this cable here.
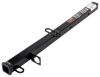
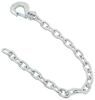
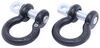
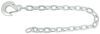
You'll receive 17 inches of chain. And the chain that comes with our kit here is rated up to 15,800 pounds. So that's gonna be enough for our trailer here. It's got a max weight of about 12500 thousand. So that'll be plenty.
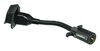
You get about 20 inches of extra breakaway switch cable. So we're right outside the van now. We got those, some safety cable extensions here. We just pulled it right out the bay cuz we we're kind of holding the door open so we didn't wanna freeze everybody out in the shop. It's pretty chilly out here.
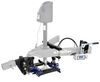
So, we just got it right out here and we're gonna extend these cables right out here. So our ends here if they don't extend about 24 inches past center of your coupler then you're not likely gonna be able to hook up. And you can see here our chain's not gonna hook up, but ProPride does make an extension kit and that's what we're gonna be using. And in this extension kit, you'll get extension chains. We got two of those. You also get an extension for your breakaway cable if you need that. We'll see if we end up needing that. And you'll also get an extension for your wiring. And we already know on this one we don't need it for our wiring. Our wiring's long enough but it's cool that it comes with it yet. Your end here for your trailer to plug into and then this will plug into your truck to give you an extension. If you did need it. And you could even make some kind of bracket to mount that further back or something if you wanted to. We don't need that piece so we're just gonna move that off to the side and then we're gonna grab our chains here and start getting these on. So the first thing we want to do is remove our hooks here off the end. It's got a little cotter pin in it that holds it in place. So we're just gonna straighten out the cotter pin and we're gonna just push it through. All right, we got it, twisted it back and forth for a while until it broke loose and we can pull it out of there. Our pin comes out the other side here and we're just gonna set these right over there. This is our new components. This is gonna connect our two chains together, so. Straighten out the cotter pins on the end there, take that out. And we're gonna hook this right on to our safety chains that are on here. Slide that down and then we'll twist the end of our cotter pin to make sure that that stays in place. Now we'll remove the pin on the other side here. So we're gonna straighten this out, pull that out the other side and I'll move it to our chain. One of the things I wanted to check though is to see, make sure our chains aren't gonna be too long when they're installed. So we're gonna have a hook on it. Probably sit up something like this and that actually looks like that's gonna be a pretty good length for us. So, we're good to go there. But if it was too long, you would probably want to either, you could shave off one of these. There's probably enough room in here too. If we slide this out you could probably take like, move a link down and then see if this fits in here. Probably will fit though. Yeah, so you can move a link down like this and then our piece will slide through. And that way you're taking one link out of it. You can move more than one link down. If you get too many links down, you don't want stuff hanging down here dragging on the road though that could grab. So, if you got more than one or two you might want to cut that excess off. You can use a rotary tool or like a reciprocating blade to cut these. I'd probably wanna put it in a vice if you're gonna use a reciprocating blade. Okay, so we got, we got these guys. We know we're gonna connect our chain to it. We know it's a good length. So we want the full chain for our setup here so we're going to that far length, sliding it through. I'm gonna slide it just the other direction, just for continuity to make our cotter pins come out the same side. And we'll slide this pin back in and we're gonna spread it open. There we go. So now we're just gonna reinsert our end here onto our link. So we're just gonna grab this, slide our pin back through and reinstall the cotter pin. We do have additional cotter pins here at etrailer that you can purchase. I would've liked to have seen ProPride give you a couple extra. These rusty cotter pins here. This one didn't break, it did come out of there, but I would just feel more comfortable with a fresh pin over a rusty old one. So you can also order those here at etrailer if you wanted to make sure. 'Cause I would probably give yours a quick inspection if you're gonna do this at home. If yours look worse than this, then I would definitely replace 'em. So that looks good. This is gonna work out. This one is able to clip on there. So I'm gonna repeat the same process now for my other chain so I can get it clipped on over here. So you also get some safety cable extension here and this is what it looks like. Now our safety cable is long enough that it's not gonna have any issues fitting to our hitch here. So there's no reason for us to add this on there. It is actually, works out perfectly in the length to match our chains. So that's great, but I'm gonna show you guys how to use it, just so you can see. So we're gonna, just gonna pull the carabiner off of here. So what you would normally do to extend this. This guy here, we're gonna unravel, it's got a little bit of tape around it, so we're gonna undo the tape. And if we look here there's these two little crimp beads. So one of these crimp beads is gonna allow you to make a loop. So we can slide that on there. You can bring this back, bring it down inside of here. looks like we have to twist this to make sure it stays twisted. There we go and that just drops down in there like that. And you get your loop. And you can choose the size of the loop you want and you can make it as big as the customer's here. You could have a smaller loop. I mean that's really up to you for how you want, how big you want your loop to be. But it goes through like that. We'll make the loop just a little bit bigger there. Something like that'll be fine. That'll definitely be able to, you know, go around the hitch and stuff. Give yourself some excess sticking out the back there. You don't need a bunch. Just make sure you got some sticking out. So you can see we've got sticking out of both side and now we're just gonna crimp this down. And we're actually just gonna use a pair of wire crimpers to do so. There we go. We got a nice solid loop on there. So all we would do now with the other end, you could normally just cut the loop off of this end. And then you just slide this on one end of your new cable. And then after you cut the loop off of your old cable you would simply slide your old cable on this other end and then crimp it. And then you would see you have that extended that far. Okay, we don't need to extend it on this guy. So, we're gonna let him hang on to the rest of this cable here. We've got it, the loop, preset up for him if he needs it for another trailer or a little later on down the road. So we'll just put this back in the bag in the box for him. And then we're gonna hook this up to our hitch. So that's a nice little kit from ProPride to kinda give you every thing that you would need here as far as extending your components to compensate for the ProPride hitch here. And that completes our look at ProPride's Safety Chain, Breakaway and Wiring Kit..
Average Customer Rating: 4.5 out of 5 stars (2 Customer Reviews)
If your chains and cables do not extend 24" past the end of the hitch box on your ProPride hitch, this extension kit is for you. Allows you to hook up your ProPride 3P hitch without having to buy new safety chains and wiring cables.
Major improvement in stability in all but the heaviest direct sidewinds.
Do you have a question about this Accessories and Part?
Info for this part was:
At etrailer.com we provide the best information available about the products we sell. We take the quality of our information seriously so that you can get the right part the first time. Let us know if anything is missing or if you have any questions.


Thank you! Your comment has been submitted successfully. You should be able to view your question/comment here within a few days.
Error submitting comment. Please try again momentarily.