
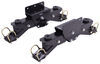
v2 Weight Distribution Jacks for ProPride 3P Hitches
(0 reviews)
Price: $582.00
v2 Weight Distribution Jacks for ProPride 3P Hitches
Item # PR79QR
Our Price: $582.00
In Stock


Need help with installation?
Locate installers near me- All Info
- Q & A (0)
- Videos (1)
- Photos
ProPride Accessories and Parts - PR79QR
- Weight Distribution Hitch
- Jacks
- ProPride
- 3P
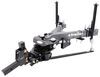
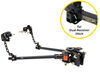
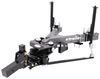
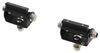
Replaces the weight distribution jacks for your ProPride 3P weight distribution hitch with sway control. These can also be used to retrofit your 3P hitch that came with the previous version of the jacks. Includes two jacks and necessary hardware.
Features:
- Replaces the weight distribution jacks for your ProPride 3P weight distribution hitch with sway control (PR37QR, PR47QR, PR57QR, PR67QR, or PR97QR)
- Can be used to retrofit your 3P hitch that came with the previous version of the jacks
- Includes two jacks and all necessary hardware
- Made in the USA
Fits:
- ProPride 3P weight distribution hitches: PR37QR, PR47QR, PR57QR, PR67QR, and PR97QR
v2WDJacks v2 Weight Distribution Jacks for Pro Pride 3P Weight Distribution Hitches


Video of v2 Weight Distribution Jacks for ProPride 3P Hitches


Videos are provided as a guide only. Refer to manufacturer installation instructions and specs for complete information.

Video Transcript for ProPride 3P Hitches v2 Weight Distribution Jacks Review
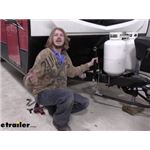
Hi there, ProPride owners. Today, we're gonna be taking a look and showing you how to replace your old V1-style jacks with the new V2 style. So we've got our customer here today. He's had the ProPride installed for quite a while on here. He's been using it. This is the old style that he's got here.
We just upgraded to the new style that we've got on there now. And this old one here, he had it bent on him. Now, ProPride did reach out and they said that if it bends like this, you can just bend it back straight, and it should still work fine. But that's much heavier duty than this here, so why go with something that has a potential to fail on you when this is working great So-Yeah, they told me, I was in, I pulled the thing 4,600 miles last September in one trip, all the way to Yellowstone. And we crossed the Continental Divide like 11 times.
And when I would get in a tight situation and have to make a sharp turn, I would notice a little bit of popping and creaking on the back. And at one time, I pulled over and this bar, which is just the sway bar support that goes from the jack down to the leveling bar, was pressed in against the frame and it was bent. And it concerned me, and I called ProPride. And immediately, I don't know if it was the owner or one of his top technicians or whoever, immediately called me on my phone and asked me what was going on. And I told him where I was at.
I was, you know, 2,000 miles from home and there was a bend in this. And he said, "Can you send me a picture with your cell phone" So I sent him and he goes, "Oh, you don't need to be concerned about that." He said, "Apparently, you've gotten in a tight turn "to where the trunnions couldn't get all the way around. "And it pushed up against your frame a little bit "and bent it." And I said, "Well, do I need to be concerned about that" He said no. He said, "That pulls straight down to your bar." He said, "When you get home, take it out, "put it on your vise, pound it back flat, and reinstall it. "And it'll be fine." I was still a little bit concerned about it, you know, being bent back and forth and bent back and forth that it might weaken or something.
Yeah. And when I heard that there was this upgrade available, that is just outstanding. I mean, there's nothing there that can go against the frame. It's got ball joints on it-Presenter Yeah. Customer to swivel back and forth. I doubt it if I'll hear any creaking whatsoever from it now. Presenter That's one of the biggest things I was expecting you we're gonna see an improvement with is noise. 'Cause with this one here, I mean, there's play that can occur in there. And these, you can see that this middle bar here that was in the jack has actually egged out a little bit from rubbing back and forth and having a lot of tension on it. It would get in binds on the hook that was on the original jack. And when it needed to seek center again, it would pop into place. That's why I have so much grease on it here, so that it would be able to swing in those bars a little bit easier. But this is. Presenter Yeah, that should be much quieter, should be-Customer That's unbelievable. much stronger. And I agree with you on this here. Once it's bent, you've now changed the properties of this metal. It's gone past its elasticity and, you know, you can try and straighten it back out, but its properties aren't just, but they're just not gonna be the same as they we're before. So I think you made the right decision here. And I do think you're gonna get some pretty substantial improvements in quieting. Now, I did drive it around the lot here. When you got a real sharp turn, you still get a little pop, but I believe it's less than what you had with these. As as far as this hitch goes, I wouldn't dare have a regular equalizer hitch on something like this if I was pulling on mountain passes or pulling on interstates with five or six lanes and you have a tractor trailer truck on both sides of you. Or pulling out across Kansas when you've got 40-mile-an-hour crosswinds, it's just, you don't know that this camper is even behind this truck. Presenter That's what I was about to ask. Unless you get on a steep incline, which would be with any camper and it slows your truck down, you never know that this camper's behind your truck whatsoever. The original sway hitch that I had on it, anytime a big vehicle would pass you, you could feel it suck your camper over and you could feel the rear end of your truck moving around. You know, with this thing, you never know this camper, it's like one long vehicle. Yeah. It's like it's all one piece, and it's just unbelievable. I actually, you have to be careful because you forget that you're pulling a camper when you've got this thing hooked up. So I wanted to ask you how it feels as far as when you're driving it, do you have to change the way you drive a little bit I heard that these feel a little bit more like a fifth wheel because of the way the mechanisms kinda rotates. Customer I don't notice anything about it. Presenter Just like normal. The only thing I noticed is sometimes, if traffic slows down real fast in front of you and you gotta hit your brakes hard, you'll get a little bump because the trunnion will swing forward either to the left or right and bump up against the stops. But other than that, if you've got your trailer brakes set up correctly and what I've read online is if you get, they call it a ProPride bump is what they call it, the guys that own these, that you need to set your trailer breaks up a little bit stiffer so that your camper slows down a little bit, so it doesn't come forward and bump the front of the level. And I've got mine set, so it'll, you know, it's more braking than my truck does anyway. So I don't ever have that problem anymore, but there's just things you need to get used to. A lot of guys say it's more difficult to hitch up than a regular ball hitch. And that was true about the first month that I had it because with a regular ball hitch, you can just back in at any angle. And as long as the ball is under your hitch, you can drop the ball down on the hitch. With these, you have to have that stinger lined up with the hitch, and you gotta be coming in at the correct angle, which is a really good idea to have a backup camera, whether it's magnetic, removable is what I use. I use an eyeball camera. I think if you guys even sell 'em. And it's just a magnetic camera that sits right on top of my hitch pointed down, and then it's got a wireless receiver that plugs into my 12 volt inside. And I can see if that stinger's going straight into the hitch or not. And when it's lined up straight, as long as you have the hitch set to the right height, it's gonna slide right in there. And you keep your stinger greased up nice and good, and it's a dream to hook up now. So you've taken this to a few camp sites. Hooking it up in your garage, you got a little bit more flat ground, it's probably easier. How is it hooking up at the campsite I'm sure you probably disconnect from time to time. You know, a lot of times, your truck's gonna be at an angle, and they'll have the pads pretty flat. But the drive up onto the pad might be a little bit different. Your truck might be lower or higher compared to the camper. As long as you loosen these bars up completely after you pull in to where you can swing this trunnion around, if it was unhooked, you'd be able to just swing it around. You loosen these up completely, you set your bar down to about the height that your truck normally would be if it wasn't hitched up. You really need to have some notes taken. You need to know how high your stinger is when your camper isn't hooked up to your truck. Because that is the no-pressure spot to slide your stinger into your camper. If you know what the height of your stinger is, when your truck's not hooked up to your camper, then you can use your jack here and set your camper so that the connector is at the exact same height it needs to be for your stinger to go right in there. And as long as you've got these loose, this sway will adjust itself to go right into the stinger. And that's also how you remove it. If you know what the height is of your truck when it's not hooked up to the camper, you can keep your jacks tight, jack up the truck and the trailer with this until you get the pressure off of these. And I don't even use a wrench on these anymore. Presenter Oh, reallyCustomer Once you get the pressure off of 'em with your center jack here, you just take a half-inch drill, a cordless drill with a socket that fits it, and it just drops, drops both 'em down. If you use your jack to lift your back end of your truck and your camper up, you can run this right up with a drill and you never have to use your socket wrench right up to where it goes in. And then, when you relieve your pressure off of here, you should never have to put a lot of pressure on your socket wrench to jack these. So would you say that these are easier to connect to your trailer and get this set back up to where you need toWay, way, way more. Presenter Than the other styles trying to push those on Yeah. Way more adjustable than the old sway hitch. You never knew how much pressure you had on the old sway bar hitches. You know, the ones you got over camPresenter Yeah. Customer You never knew how much pressure you had on those. And you certainly didn't have the same amount of pressure on both sides of 'em. You know, you had that, you just had chain links coming up. Who knew whether they we're the same length, you know Or how much bend you had in your bars. It was all a guessing game. So you might have a whole bunch more pressure on one side of your camper than you do on the other. With this one, you can tell, you know You can adjust each side independently for however your truck's pulling. So it's just, it's 10 times better than a regular sway bar hitch. Well, that's all very good information, especially with the bump and bumping up the brake controller. That's something that I didn't know about. So I know everybody at home's gonna like that as well. So yeah, thanks for taking some time here and giving us some information. If you ever wanna come back and let us know how the newer jacks are, we'd be glad to have you. Customer All righty. And this is what our newer jack looks like when it's installed. You can see it is very close to the previous jack that we've had. It's gonna be in roughly the same position, but we do get the better mechanism here versus that bar style that we had before. And you can see here that there's a bit of a larger gap here between our jack and our tanks. So this newer design does help. It just kinda fit on trailers better than the previous design. So here's our new jack. We can see it does have a different mechanism. It doesn't use the rod. The jack is offset towards the outside. Now, you can see it hangs over the edge. Before, the jack sat on top and had the hook. We can go out and just grab the other one. We'll set 'em side by side so you can see the differences between them. So we can see right away how this one kinda hangs off the side a little bit. That's actually a good thing. You can see here where as with it sitting on top of the frame, you actually usually have more issues with clearance between your tanks because we're closer. By pushing it out away from the frame, it pushes it away from our tanks a little bit. So we get a little bit better clearance with this style, makes it install easier on more trailers that way. This one's also easier to install just because there's less hardware that you kinda have to hold together. This one's gonna use two U bolts to clamp it in place. Whereas this one had the single U bolt with the set screw, and you had to try and hold those pieces in there while you're putting the set screw in. And see how loose this one is here. So this one's just a little bit more, a little bit more difficult to install with this older style. They've streamlined it and made it easier for you at home with this style. We don't have that spacer anymore. It is a smaller opening here. So it fits over the frame much better with less play than this one. And that just helps us eliminate the need for that spacer and set screw that this one required. We can also see all the pivot points that we've got here. So we've actually got like a ball and socket there that allows for movement at a couple of locations here versus before, we just had the beam that was on here. And it would just kinda pivot and rock on this. Sure, it had the movement that it needed, but it wasn't very controlled. There was kind of a slop allowed in there. And what happens when you have slop on very heavy, like pressurized pieces that's under a lot of stress like this, eventually, it's gonna start to wallow out and things are gonna wear out. Now, it's gonna take a very long time for that to happen. So you're gonna get plenty of life out of these jacks. But if you are in control, it's just gonna last that much longer. In addition to it lasting longer by being in control, we also minimize noise that occurs on the system. 'Cause if we got play in there, we're gonna hear clunks and pops and noises like that. Whereas with this here, we're able to keep our components tight and minimize any of those free play and movement that can be in the various pieces, reducing those clunks and pop noises that you get. So now, we've taken a quick look at these two here and how they're different. The attachment mechanism here where you adjust it has moved to the top versus on the side. So that just kinda depends. I actually kinda liked the side one myself just because it kinda sticks it away from your trailer, making it easy to get a drill on there. This one here, in most cases, you shouldn't have an issue with it because you're gonna be putting it at that 26-inch distance, which keeps it away from the trailer. But just some designs on your trailer could have this sticking out further that could potentially inhibit using a drill on here to adjust it. And I like the option of being able to use a drill 'cause it can really waste a lot of energy trying to adjust these by hand and crank 'em up every time you hook up. With this one, we have a lock pin on top that locks it in place to prevent any adjustment. This one here, it was just the friction and resistance inside the mechanism that held it in place. So this one's just a little bit better too in it's locking mechanism that ensures it stayed at the adjustment that we put it in. We'll begin our installation with our truck hooked up to our trailer with our ProPride installed. It's got the old parts on it. We're gonna be upgrading that to the new jacks, but we need it in this situation so we can verify our ride height. 'Cause once we put our new jacks on, we want it to give us the same weight distribution performance that we had before. So we've got it all hooked up, we're on level ground, and we're gonna see what our measurements are here. So here at the back, looks like we're at about 40 1/2 inches. We're also gonna check the front, and of course we're gonna check the other side as well. And up here at the front, we're just under 42, maybe about 41 3/4. And it's not a bad idea also just to measure from the ground to your bar here, just so you can get an idea of what that measurement to the ground is. 'Cause when we set this back up, it's gonna be pretty close to that with the new jack as well. All right, so we've got everything hooked up. I just wanted to point one thing out. It may look like my jack is down. I've just got it in position there, so if I needed to lower or raise the truck, I could, but, it's just the drop leg sitting on there. It's not actually, there's no weight on our tongue jack here. I can put my hand underneath of it. So it is fully suspended, hooked up to the truck. So we've got our measurements there, so now we know exactly how we need to set this back up. So that way, it's where it was before. Here's our old style jacks here. It's just got the straight rod. The newer ones we have, have better pivot points on 'em, so it's quieter. It'll be a quieter operating system, and it should last a little bit longer. This one here just won't pivot quite as nice. The other one's got a little bit more control on all of its movement points. So we're gonna go ahead and get this off here. We can just do one side at a time. I'm just gonna, run this down. Take the pressure off of it. There we go. We can kinda see that at that point there, we've got no pressure on it. It's nice and loose. So now, we can go ahead and start disconnecting it. On the bottom, you're gonna take out these bolts that hold our U bolts on. Now, we're gonna use our 15-millimeter socket to zip these off of here. And this whole piece here can slide right off of there, and then we can just set that aside. So this piece will just hang out there for now, and we can get our jack removed. Now, luckily for us, we still got marks on here from when the system was installed. So that's really nice. We know exactly where the 26-inch mark is from the front 'cause that's where our jacks need to be installed at the 26-inch mark. You do get a 1 1/2-inch leeway from that 26-inch mark, so that's what these dashes are here. There's 1 1/2 inches closer and also the 1 1/2 inches further away. That's where this jack's currently installed is at that 1 1/2 inches furthest from where our ideal mark is there. And the face of your jack right here is the point that you want to try to match up with that mark. So the only reason why we didn't go at 26 here, why this wasn't installed there to begin with is 'cause the propane tanks we're there. Rather than having to move the propane tanks closer, we we're in our tolerances to be able to move the jack further away. So we're gonna be putting this pretty much in the exact same position. Our new jack is slightly wider than our old jack, but only by about a little bit less than a half an inch, so it's really not much of a difference. So let's go ahead and get these nuts zipped off of here, so we can get that U bolt off and get this jack out of the way. We're gonna use a 9/16 socket to remove these nuts. And the U bolt may fall out of there, so I was keeping a little pressure on it. Just slide that down out of there. And our jack is still gonna be held on there. The old style jacks here have a set screw in the back that kinda clamps it into the frame. Our new style jacks don't utilize that. So we don't have to worry about that, but we're gonna get that off of there. So we're gonna swap over to a 3/4-inch socket, and zip out this nut here on the back side. Now, we'll use our 3/4-inch socket to take out this set screw here. We don't need to take it all the way out, just need to relieve it from the frame. And that should be enough. No, not quite. Looks like this one here is actually just a little stuck on the frame. So we might have to knock it loose just a little bit to get it off of there. All right, we did have to wiggle it around a bit. There's a spacer block here that goes in the backside. You see the hole in it that the set screw went through. Sometimes, that gets kinda wedged in there. It was a little tight, but we just rocked it back and forth. That spacer fell out of there, and then it just slipped right off. All right, so we're just taking our new jack. We've slid it over where our other one was. And you can really see here too, the marking outline of where the previous jack was located. We're still gonna utilize these measurements, but this is also a really good tool to help you. 'Cause you can see these marks on both sides as you're sliding this down. You can see, oh, I went too far. I can see some of that mark there. I need to scoot it back just a little bit. Now, I can't see it here, I can't see it on this side, which means I must have this pretty well exactly where our old jack was. And that puts us right at that same mark there where we we're at before. So that looks great right there. So now that we've got it in position, we'll take the U bolts that come on our kit. They are smaller than the previous one, so you wanna make sure you're using the ones in the kit. The previous ones used to go at a diagonal from hole to hole. These are gonna go straight across, and we have two of these versus the single one that you used to have. So we're just going on the bottom. Double-check on the inside and bottom of your frame if you've got any wiring are hoses there. Make sure you don't pinch it between the frame and your U bolt 'cause we don't want to damage any components on the trailer. After sliding it through, we'll place our washer on top. Follow that up with a lock washer. And finally, a nut. We're gonna do the same thing on the backside here. I'm just kinda running these down hand-tight for now. Do the other one. Slides up through the bottom. We get our washers and our nut. With them all ran in there, just double-check yourself one more time on each side. Make sure it didn't move, that you are covering up exactly where you want it in the center there. And that looks right where we want it right there. We'll grab our, this is gonna be a different size for this hardware, we're gonna use an 18-millimeter socket for the new U bolts. We can then go back and torque these to the specifications outlined in our instructions. All right, so now that we've got this guy into position, before we continue on up there, we're gonna get the bottom piece attached because these pieces here, once we start attaching stuff to 'em, you can't get to these bolts down here. This is gonna sit just right on top of our bar there. The bolts that we've got here, the hex head ones, they're gonna drop down through our attachment. And the nylon locking nuts that come in the kit will secure to these. And to tighten these down, you're likely gonna need a deep-well socket or two short-well sockets and an extension. They also change sizes on us for the nuts down here. They're not a 15 anymore. They've upped it to a 17-millimeter. So you're also gonna need a 17-millimeter for here. So you can see why a wrench doesn't fit in between here, so you need a deep-well or an extension for your socket to make sure you can get that in there. And then, we'll snug these down. You can remove your pin from the top of your jack now to make the installation easier. We're gonna loosen this to drop the jack down. You may need to hold the assembly down here while you're doing this too 'cause the whole piece you see here, if it spins, it doesn't actually lower it. It's just gonna spin inside of there. And that should be close enough 'cause this has got some plane in, eh, maybe a little more. Okay. Get those to where you can attach the two pieces together. We're just trying to bring it down, and then you wanna check these. 'Cause I already installed the other side over there, and one of the things that I noticed when I was putting this jack on is the bolt that was installed here for the top one, first off, it was loose. And it was installed the other direction with the nut on this side over here. These need to be installed where the head of the bolt is on the same side for both of these attachments and the nuts are on the same sides. The reason why, you see this piece here, this little piece that sticks out If you have the nut side facing in like that, it'll contact that piece, and you'll cause damage to your system there. So make sure that all the nuts are facing outward, so we don't contact anything here on the trailer, whether it be the frame or this piece sticking out, any of that. So they all need to be like this. If you get 'em in your kit and the they're not like that, you need to make sure you take 'em out, flip 'em around to have 'em all in the same direction. And I would double-check the tightness as well since the one on the other side we had was loose. We're gonna go ahead and remove the bolt here from the bottom. It does come with the hardware on pretty much exactly the order that you're gonna wanna have it in when you install it. So we're just gonna slide these off of there. Take your nut and your washer off. We'll set those aside, and then you'll see we've got our bolt here with two tapered washers. The tapered washers need to face just like you see here with the tapered edge towards the pivoting joint there. So we'll slide those out of there. Again, make sure your nuts are facing away from the trailer frame. And then, line these pieces up. We're gonna go bolt first. Then, the tapered washer with the taper facing towards our pivot point here. Go through the pivoting joint. Then, your other tapered washer with, again, the taper facing towards the pivot point. Then, you can go through there, come out the other side, and follow that up with that flat washer and nylon locking nut. And then, we're just gonna snug these down next. We're gonna use a 19-millimeter socket and wrench or a 3/4, either one will work fine. And we just wanna snug this up until we take out the play. You see how this kinda slides back and forth like that. We really wanna get rid of that. We wanna be in control or removing play. So we're just gonna snug it up just a little bit more. Still has just a smidge there, so we're just trying to get it to where it kisses those pieces there to kinda take that play out. And that's what we're looking at right there. Just tight enough to where we're keeping all of our movement in the points that we're designed to move. And you wanna check this one here. If it's got play in it, you'll wanna snug that up as well. But that all looks good. Maybe I'll give it just a hair more, but you don't want it to be overly tight, just enough to, again, remove that play. All right, so all we got left now is to just adjust this side back up. So we're just gonna put our 3/4-inch socket on top and zip this down. If you are using a drill with these jacks, make sure you're not using any type of hammer drill or impact because that impact can actually damage the mechanism. You need something that operates smoothly like a drill. All right. And let's see what our measurement here is. The measurement I took from the ground to here was just a little bit under 8 inches before. So we can go probably a little bit more. All right, that's pretty close to where it was before. So now, we're gonna head to the truck and we're gonna see if our measurements are relatively the same. We may have to make some minor adjustments here, up or down, to get our measurements where they we're before, but we should be pretty close. And so when we check it here, we're just a hair under 40 1/2, so maybe we need to bring it up just a little bit, but we're pretty darn close there. We'll check the front as well. And the front's right at about 41 1/2 as well. So the front's really close. We probably need to put just a couple of cranks on the top there to bring the back up just a hair more, but we're pretty close with our adjustment there. All right, we put a couple more turns on it there, and we're right at that 40 1/2 again. So everything's looking good. We're gonna repeat those same procedures on the other side to get that installed. After we make our adjustment, don't forget to put your pin in the top there. So we've got it where we want it. And then, put that in and lock that back down. So yeah, we're just gonna do the exact same procedures over on the other side to get that transitioned over. I prefer doing it this way where you're just doing it one side at a time. Having your trailer all hooked up and all of that, it makes things easier because you just have to match your measurements from your old to your new. Now, if you are replacing your old jack because something damaged on it, whether there's an accident that occurred, somebody hit it, bumped in it when they we're parking their car or something, and you're replacing it out and it doesn't work anymore, and you can't do it in this situation, you're gonna wanna make sure you have your ProPride manual that you had before to assist you with installing these. They don't come with instructions, and you will have to purchase instructions from ProPride if you don't have your previous instructions. It's not a bad idea to maybe even get the newer instruction set from ProPride, just because the hardware is slightly different here, slightly different sizes, and there could be subtle torque spec changes between the various pieces. So just keep that in mind. If you need that instruction set, you are gonna have to purchase that from ProPride. And that completes our look at the V2 ProPride hitch jacks..
0
0
See what our Experts say about this ProPride Accessories and Parts
Info for this part was:

Edited by:
Lindsey S

Video Edited:
Jacob T

Installed by:
David F

Written by:
Mike S
At etrailer.com we provide the best information available about the products we sell. We take the quality of our information seriously so that you can get the right part the first time. Let us know if anything is missing or if you have any questions.
Product Experts Available Now!
Call 1-800-940-8924
Thank you! Your comment has been submitted successfully. You should be able to view your question/comment here within a few days.
Error submitting comment. Please try again momentarily.