
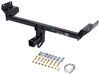
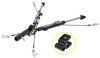
Curt T-Connector Vehicle Wiring Harness with 4-Pole Flat Trailer Connector
(12 reviews)
Price: $87.56
In Stock
Curt T-Connector Vehicle Wiring Harness with 4-Pole Flat Trailer Connector
Item # C66CR
Retail:$130.95
Our Price: $87.56
You Save: 33%
Will this fit?
To see if this custom-fit item will work for you please tell us what vehicle you'll use it with.
In Stock
Thank you! Your comment has been submitted successfully. You should be able to view your question/comment here within a few days.
Error submitting comment. Please try again momentarily.


- All Info
- Reviews (12)
- Q & A (0)
- Videos (2)
- Photos
CURT Custom Fit Vehicle Wiring - C66CR
- Trailer Hitch Wiring
- 4 Flat
- CURT
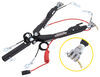
Quickly and easily install a 4-way trailer connector on your vehicle with this custom harness. T-connector plugs directly into existing wiring. Powered converter reduces strain on wiring system and is made using SMT to ensure superior performance.
Features:
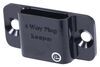
- Provides a 4-way flat trailer connector at the back of your vehicle to power your trailer's signal lights
- Compatible with 5-pole, 6-pole and 7-pole adapters (sold separately)
- Connects quickly and easily - no cutting or splicing of wires
- Locate connection points behind tail lights
- Plug in T-connector
- Run hot lead to car battery
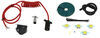
- Includes a tail light converter to ensure that your vehicle's wiring matches that of your trailer
- Powered module connects directly to battery to avoid overloading vehicle's electrical system
- Constructed using surface-mount technology (SMT) for consistent, reliable performance
- Maximizes trailer light yield and intensity while producing minimal heat
- Ensures superior operation in rough road conditions
- Comes with dust cap for 4-way flat connector
Specs:
- Maximum amperage:
- Stop/turn lights: 6 amps per circuit
- Tail lights: 3 amps per circuit
- Limited 1-year warranty
Installation
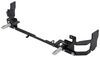
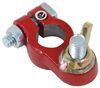
This custom-fit T-connector plugs into your vehicle's wiring harness, which is located behind the rear driver's-side and passenger's-side tail lights. You will have to remove the tail lights to access these connection points. Once you've plugged in the T-connector, run the hot lead up to your car battery. Connect the lead to the included fuse holder, and then connect the fuse holder to the positive terminal on your battery.
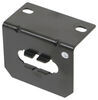
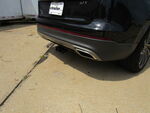
Once installation is complete, the 4-way connector will be stowed beneath your vehicle, near the trailer hitch. A mounting bracket (sold separately) is recommended to keep the connector secure.
It is recommended that you use a small amount of grease on all electrical connections - the plugs on your automobile and the 4-pole connector itself - to help prevent corrosion.
Powered Tail Light Converter with Surface-Mount Technology
A tail light converter is built into this T-connector. This converter is a circuit-protected, battery-powered unit that bypasses the electrical routes that are used by a basic wiring harness. As a result, there is virtually no draw on your tail light circuits.
Because most trailers run on a two-wire system - wherein the brake and turn signals are carried on one wire - the separate brake and turn signals from your vehicle's three-wire system need to be combined so they are compatible with the wiring system of the trailer. This converter combines the brake and turn signal functions of your automobile so that they run on one wire to properly activate your trailer's tail lights. Note: This will not affect how the tail lights on your vehicle operate.
Curt builds each tail light converter using surface-mount technology (SMT). This method of construction involves soldering electronic components directly to the surface of a printed circuit board. SMT eliminates the need for leads, which are used in older through-hole technology. The result is a circuit board that is smaller yet provides more routing area and that offers superior performance, reliability and durability.

Circuit boards constructed using SMT have been shown to perform better under rough conditions with excessive vibration than those made using the through-hole method. And where would vibration be more likely to occur than in towing applications? Curt converters also produce less heat, leading to increased durability and longer life. In addition, lower levels of resistance ensure better performance, especially for parts that operate at higher frequencies.
Each Curt circuit board is made using high-quality components that are pieced together in the most technologically savvy fashion, leading to greater predictability and reliability in functioning.
56446 Curt T-Connector - Surface Mount Technology - 4 Wire
Installation Details
This Product Fits The Following Vehicles
- 2019 - 2023 Lincoln Nautilus
- 2019 - 2023 Lincoln Nautilus


Video of Curt T-Connector Vehicle Wiring Harness with 4-Pole Flat Trailer Connector


Videos are provided as a guide only. Refer to manufacturer installation instructions and specs for complete information.


Video Transcript for Curt T-Connector Vehicle Wiring Harness Installation - 2021 Lincoln Nautilus
Hey, everybody. How is it going Today we're gonna be going over and showing you how to install the Curt T-Connector Trailer Wiring Harness here on a 2021 Lincoln Nautilus. Our trailer wiring harness is gonna simply transfer these signals from the vehicle to our trailer so we can let other motorists out in the road know what we're gonna be doing, allowing us to ride to our destination safe and sound. This is not only a security measure, it's also a legal requirement for towing in nearly every state. This kit here is gonna provide us with a 4-Way, also known as a 4-Pole Flat. That's the most common and standard type of trailer connector on the market, more than likely the one you're gonna need here for your Nautilus.
This is gonna transfer all of your basic lighting functions such as the stop and turn signal circuits for either side as well as the running light circuit. Now, there's another trailer connector out there known as a 7-Way, that is still common here in the U.S., but this is only gonna be for those larger trailers that have electric brakes. If you do have one of those, you'll still need this, you'll just also need an adapter, but more than likely, you guys are just gonna need that smaller 4-Pole. So this is gonna have everything you need. Trailer connector on this particular kit is stored outside the vehicle, which is nice because it allows for nice, easy, convenient access.
Now, with the kit, you're only gonna get away to secure it to the safety chain loop using the dust cap, which is perfectly fine. That's how we have ours secured here. But if you'd like to opt for a little bit more permanent installation, you can use a series of brackets which you can see over here, and we'll go over that a little bit more later in the video. Now, in regards to installation, this kit is gonna be plug and play. There's no splicing into the vehicle whatsoever, so you don't have to worry about damage in either factory wiring or voiding your warranty.
The bulk of the installation is gonna be routing a wire from the rear of the vehicle all the way up to the front where our battery is. But aside from that, it's definitely something a do-it-yourselfer or a weekend warrior can do by themselves at home in a few hours, just depending on your experience level. Just common hand tools required, you will need a set of wire cutters and crimpers, which most of those are two-in-one tools, pretty cost effective. But aside from that, as we said, pretty easy, definitely something you guys should be able to do. We'll go ahead and walk you through the entire process now.
So the first step of our installation, you need to open up the hatch on your tailgate here. Now, it doesn't matter what side you start on, but we do need to do this on both sides. We're gonna be removing our taillight. So you're gonna need a flathead screwdriver. Pry from the top there, remove that cover. And then inside there is a T20 Torx screw, go ahead and remove that. Kind of tricky to get out of there 'cause there's this little pocket. But then I'm actually just gonna pry out in a way just a little bit to loosen that up, and then I'm gonna come back from the backside there and I'm gonna be prying up. Now, some taillights are on there a little bit more than others. I like to do this to start. And you can see it's not really budging. So what I'm gonna do next is I'm gonna take a plastic trim panel tool, I'm gonna sneak it between the body and the taillight housing, and I'm gonna pry up to release that. Then we should just be able to push straight out here to release it like so. And now down here, sort of back behind the bumper, we're gonna have our electro connector you need to unplug. So there's gonna be a center tab there. You press that down and you pull out. So now once we get our taillight off, starting on the driver's side we're gonna take some sort of fish wire. A fish wire can represent a number of different things, such as a piece of airline tubing that we have here, a plumb bob or a wire coat hanger that you have unraveled. Basically what we're gonna do is we're gonna stick this back behind the bumper here in front of the body on the vehicle, and we're gonna fish this all the way down until we can find an open spot where it'll come out below. So here is where our piece of airline tubing came out sort of down here in this area. Where it's gonna come out is really gonna depend on where you routed it up inside the taillight. We kind of routed it towards the back corner there. But nonetheless, we have our piece of airline tubing here. Now, the instructions state to take your connectors, tie them to this piece of airline tubing and then take the other end and pull them back through the bumper. Unfortunately, this really just doesn't work the way they describe it. I've done these several times, and every single time there's just not enough clearance behind that bumper for both of these connectors to fit up there. I did it a couple times successfully but it took a long time. So what I'm gonna do is, to save us some headache, you guys don't have to do this, the process is gonna be pretty much the same. I'm actually just gonna go ahead and cut through these wires here just directly behind the connector. And then I'm going to reconnect them when we get up back behind the taillights here. So now I'm just gonna take these three wires, I'm gonna tape them to my airline tubing and then I'm gonna pull all the wires up into the taillight pocket there. So again, this isn't required here. If you guys don't wanna do that extra cutting, you will need to supply additional butt connectors for that that don't come in the kit. So keep that in mind as well. But if you don't wanna do that, just simply tape your connectors to this pull line here and fish them up there. But I will warn you, it is going to be much harder than just having the bare wire in. So, up to you guys what you wanna do, the method is pretty much the same regardless. So we've got our wires pulled up in the taillight pocket here, so I'm gonna go ahead and just remove them from our pull wire now, and then I'm gonna splice on our new connector there. But if you guys didn't cut yours off, you need to obviously just start plugging in your connections. But we'll show you that here in the next step. So you can see we got our three butt connectors here reattaching our connector. So now we're just gonna go ahead and start plugging everything in. We should only go in together one way so there's really not much room for air here. There's that one there, make sure you go ahead and press the red locking tab. I'm going to shove our wires back down there 'cause we don't have a ton to work with. And then I'm just gonna simply take our taillight here, reconnect this as well, and then I'll re-secure the taillight to the vehicle. So sometimes you do kind of have to shove this connector down through there because you're obviously adding some extra material and wires here. So it can be kind of difficult sometimes. So now we're gonna come underneath the vehicle here. Now, our converter box is gonna be sort of tucked up in this area here due to the length of wire they give us in their kit. So you got a couple options here. Number one, you can remove this panel that's held in place with two screws on the bottom. You'll use a 5.5 millimeter socket for those. And then two nuts on the top, here you'll use a 10 millimeter for those. And then we have a push pin fastener on the outside here. If you wanna take that out to get it out of your way, that's perfectly fine. I'm actually just gonna reach up here and secure the converter box to the bottom side of the metal panel here. So I'm gonna have to reach up in there pretty far with my arm there to get everything secured. You guys probably aren't gonna be able to see much, but once we get that secured, everything else we can show you pretty clearly. So I'm gonna go ahead and get that up there now. In your kit, you're gonna get some double-sided tape I'm gonna place on the back of that converter box. So stick it up there to hold it in place. And I'm gonna try to fit a self-tapping screw in there just as an extra measure of security. If we're gonna be taking the green wire that has your two connectors on it, we're gonna be routing this back behind the bumper here over the exhaust and then over there up into the passenger side taillight pocket, and then we'll secure these wires using the same method we showed you over here. So we went ahead and got that green wire routed over there to the passenger side, got everything hooked up. And again, it's exactly the same as everything we showed you over here. So now the next thing we're going to do is hook up our ground. So your ground already has a ring terminal pre-attached there. Unfortunately, this one is gonna be hard to see as well because it's gonna be located up on the back of the vehicle here. We'll jump over there to try to give you a little bit better shot, but basically we just took a self-tapping screw and we just secured that to the bottom side of the body. So in this area here behind our trailer hitch in front of our muffler, there's a bare part of the four pin inside the vehicle there. So we went ahead and just took the self-tapping screw and just ground it straight to the ground there. So the next thing we're gonna be doing is securing our trailer connector here. So we're gonna have to come up and over the tail pipe. I'm gonna zip tie it to the cross tube on our hitch here and then we're gonna be securing it to the safety chain loops on our trailer hitch. We've got my trailer connector wiring routed all the way over to the receiver tube. And as we said, we're gonna take the included dust cap here and simply secure it to the safety chain loops like so. Now, this is a great method of securing your trailer connector 'cause it's very cost effective, pretty easy to do, you don't have to buy any additional parts. But there is also another method that you can use that's a little bit more permanent. And that's gonna be a series of brackets that you can see here. So this is two different brackets that we sell; this one, and then the one you can't really see is a long no jaw bracket. Now we actually had to bend that up quite a bit, and it was pretty hard attaching it to the cross tube. So this method isn't for everyone, but if you're looking for something a little bit cleaner, a little bit more sturdier, then that's when you opt for the two bracket design. But this doesn't come with your kit, you'll have to purchase those separately and it's not required. So the choice is up to you. So now we have our power wire coming from the converter box. That's the last wire we need to deal with. I went ahead and crimped on a butt connector, which is the one you see here. Now we're just gonna take the other end of our power lead, we're gonna attach it to that butt connector just like so and now we need to run the other end of this wire up to the vehicle's engine bank compartment where the battery is. So we're gonna go ahead and do that now and then we'll show you the path that we took. It's gonna come straight off to convertor box, so it is sort of tucked up there. We actually just went behind this panel here, I sort of pulled back the fabric, I reached in there and grabbed that. And now I'm gonna run it up and over the subframe here, you can see I have a zip tie securing it to that ear on the subframe. It's gonna go up and over here, you gotta be careful 'cause we have our axle. So I went ahead and zip-tied it in a few places up here to some existing wiring. That way it's not gonna fall down, get tangled up on our axles. Now we're gonna come over here up and over the filler neck for the gas tank. All along here we have an existing wiring harness, I went ahead and zip-tied it to here. You can see now. Now we're gonna feed it pretty much above this panel, zip tie it to the brake lines following all the way to the front of the vehicle. Now I did remove these two nuts here with a 10 millimeter socket just so I could pull that down, did a couple more zip ties up there. Here's our wire coming out now. And then from this point here you're gonna sneak it up into the engine bay where our battery is. Now, in order to get the wire up there, you're not just gonna be able to reach up there, you're gonna have to use some sort of a pull wire like the technique we showed you earlier. Beside the brake fluid reservoir and your battery is where we fish the line down through and then we just pulled it up in the same area. And as soon as you get the wire up here, make sure you pull it tight and attach a zip tie, that way you don't have to worry about the wire falling back down there. And from this point here, you're gonna cut off the extra slack there on your power wire, crimp on one of your yellow butt connectors, and the other end of that is gonna go to the loop for your fuse holder, and then the other end of that is gonna go to a ring terminal. And you'll just simply loosen that nut on the positive battery terminal there with a 10 millimeter socket, insert your fuse and now we're ready to test. So now we're gonna be using a four pole tester. Just a little plug in one here to test everything out. If you guys don't have one of these, you can pick one up or you can just use your trailer. But keep in mind, if you do use your trailer, any issues on the trailer are gonna affect our testing on the vehicle. That being said, go ahead and run through our signals now. Go to our brake. Left turn. Right turn. And then finally our taillights. So now with everything tested and working correctly, that's gonna do it today for our look in installation of the Curt T-Connector Trailer Wiring Harness here on our 2021 Lincoln Nautilus..
Customer Satisfaction Score:
95% were satisfied with this product
5% of customers were not satisfied
- Wrong item was ordered
- etrailer mistake
- etrailer mistake
Customer Reviews
Curt T-Connector Vehicle Wiring Harness with 4-Pole Flat Trailer Connector - C66CR
Average Customer Rating: 4.9 out of 5 stars (12 Customer Reviews)
Quickly and easily install a 4-way trailer connector on your vehicle with this custom harness. T-connector plugs directly into existing wiring. Powered converter reduces strain on wiring system and is made using SMT to ensure superior performance.by: Roy 03/14/2024
It works. The instructions are easy to follow.
by: James A02/22/2024
Great service, speed, and free shipping. Love this site!
by: Brandon 08/15/2022
Great product
by: Todd 10/04/2023
2023 Lincoln Nautilus
great service
by: Jonathan07/06/2023
It was easy to install
by: Mark 09/13/2022
Great costumer service
by: Ehler09/26/2022
Great fit
by: David 02/03/2022
Very good quality.
by: Jim 11/30/2023
2019 Lincoln Nautilus
by: Raymond 12/07/2022
by: Michael 09/28/2022
by: Steven 05/11/2023
12
12
See what our Experts say about this CURT Custom Fit Vehicle Wiring
- Recommended Hitch for a 2023 Lincoln Nautilus Yes, it does! The EcoHitch Stealth Trailer Hitch item # EH86SR is confirmed to fit all models of the 2023 Lincoln Nautilus including the Reserve. This hitch is custom fit and bolts to your Lincoln with included hardware. This is a class III hitch with a 2" receiver. It has a 5,000 lbs towing capacity and a 500 lbs maximum tongue weight. I really like EcoHitch item # EH86SR for two reasons. The 2" receiver is completely removable and the crosstube mounts behind your rear bumper. This means...
view full answer... - Recommended Class III 2 Inch Hitch for a 2022 Lincoln NautilusYes, we do. To add a class III hitch to your 2022 Lincoln Nautilus, I recommend the Curt Trailer Hitch item # C78KR. This hitch is custom fit and bolts to your Lincoln with included hardware. I really like this hitch because the crosstube mounts behind the rear bumper. This leaves only the 2" receiver visible, which not only helps with ground clearance but looks better. I have attached a couple of pictures below along with an installation video so you can see what this hitch looks like. If...
view full answer...
- Curt vs etrailer Trailer Hitch For 2023 Lincoln NautilusJust a single difference exists between the Curt and etrailer trailer hitches for your 2023 Lincoln Nautilus, which is the finish. The etrailer hitch has a matte black finish, while the Curt hitch has a glossy black finish, so you can choose which you prefer. The hitches that fit your Nautilus are the following part numbers: - Curt Trailer Hitch Receiver # C78KR - etrailer Trailer Hitch Receiver # e36RR The matte black finish does hide those inevitable small scuffs a bit better than...
view full answer... - Complete Towing Setup for a 2020 Lincoln Nautilus I am happy to help you setup your 2020 Lincoln Nautilus for towing. You are going to need a receiver hitch, wiring harnesses with a 7-Way connector, brake controller, and a ball mount. I recommend the Curt Trailer Hitch Receiver Item # C78KR. This is a custom fit receiver that attaches to your vehicle through preexisting holes and requires no cutting or drilling into your frame. It has a maximum gross trailer weight of 4,500 lbs and a maximum tongue weight of 675 lbs. The Curt receiver...
view full answer...
Do you have a question about this Custom Fit Vehicle Wiring?
Info for this part was:

Edited by:
Lindsey S

Installed by:
Kathleen M

Video Edited:
Chris R

Updated by:
Wilson B

Test Fit:
Conner L

Written by:
Kristina F

Video by:
Thomas T
At etrailer.com we provide the best information available about the products we sell. We take the quality of our information seriously so that you can get the right part the first time. Let us know if anything is missing or if you have any questions.
Product Experts Available Now!
Call 1-800-940-8924
Brandon
8/16/2023
Nice kit