
Summer Starts Here - Save up to 70%
To see if this custom-fit item will work for you please tell us what vehicle you'll use it with.


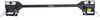
Custom designed to fit your vehicle so it can be safely towed behind your RV, this base plate has easily removable arms that offer a seamless look when you're not flat towing. Base plate bolts directly to your chassis, so no welding is required.
Features:
Specs:
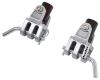
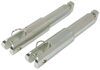
This base plate's hidden design creates a clean and seamless look. The bracket arms are easily removable, creating a slick appearance when you're not flat towing. Because the arms can be removed, you also won't have to worry about banging your leg into any protruding arms when you walk by.
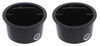
Attaching and removing the bracket arms is a breeze. To attach the arms to the base plate, simply insert them into the receivers and rotate them until they lock into place. Once you're finished towing and want to remove the arms, pull the pin to disengage the lock, rotate the arms, and remove them from the receivers. Finally, plug up the now empty receivers with the included receiver covers to help keep dirt and debris out of the base plate and provide a finished look.
Flat towing your vehicle is much more convenient than using a trailer or a tow dolly. These other options take up much more storage space, leaving you less room both at home and at the campsite. In addition, securing your vehicle to a trailer or tow dolly can be a hassle and more time consuming than hooking up with a tow bar.
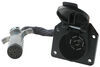
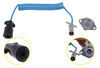
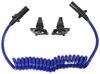
There are 5 basic components needed when flat towing a vehicle: a tow bar, a base plate kit, a safety cable set, tow bar wiring, and a supplemental braking system.
The tow bar links your towed car to your motorhome. It attaches to the custom-fit base plates that install on the frame of your towed car. Safety cables ensure that your towed car does not separate from your motorhome in the event that your tow bar becomes detached. Tow bar wiring allows your towed vehicle's signal lights to sync up with your motorhome's tail lights, which is required by law in most states. Finally, the supplemental braking system - also required in most states - brakes your towed car when the brakes in your motorhome are activated, preventing wear on the motorhome and decreasing braking distance for your entire setup.

Videos are provided as a guide only. Refer to manufacturer installation instructions and specs for complete information.
Today on this 2012 Hyundai Accent, we're going to show you part number BX2333. This is the Blue Ox Base Plate with removable arms. This is what the base plate looks like when it's installed on the vehicle. You'll notice there's a section cut out here to make room for safety chain cables to mount here, and also, here is an opening for our removable arm. There's one on each side. All I had to cut out was just one little bar going across. This is an optional breakaway switch that comes from supplemental braking system.
This does not come with the base plate, but the mount for it to attach to does. Then also, there are 2 rods here. There rods will allow you to install any type of connector, 6-pole, 7-pole, or a 4-pole fly even with the right bracket. Let's go ahead and show the removable arms. There's a slot inside that you line this bar up with and then push in and turn it. You can see how the pin comes out.
It's spring loaded. Twist it until it falls back into place here, and it's locked and can not fall out. When our base plate is not being used, you just go ahead and pull out the pin, rotate it to unlock it. When it's not in use, there's a couple caps that go in place. There's not much to see once it's on the vehicle, so let's go ahead and show how it installs. First, the bumper cover. There will be 1, 2, 3, 4 bolts that you have to remove using a 10mm socket.
We also need to disconnect the bumper cover from this component here. There's 2 fasteners, and all we've got to do is push down in the center and that releases the fastener, and you can just lift up on the component and pop it loose. A flat screwdriver may help too just to getting started and just remove the rivet. Next, we're going to go over to the wheel wells. We're looking at the driver side, and there's a bolt that we have to remove that goes vertical this way. We'll follow the seam all the way down to the edge and look straight, and there's our bolt.
We'll use a 10mm socket to remove that. We'll go over and do the same thing on the passenger side. Now, we're at the bottom of the bumper cover on the driver side. We've got 2 plastic fasteners. When you remove this with a Phillips screwdriver and very light pressure, just enough to spin the inside part and probably pull down on the plastic, and you can pop it loose. We also use a flat screwdriver or trim panel tool to pop out the rest of the rivets. We'll leave this driver side alone and do the same thing on our passenger side. Next, we've got to go ahead and remove these 3 bolts on the bottom. This is the center of the bumper cover on the bottom. Again, we'll use a 10mm socket. Now, we can go ahead and start to remove the bumper cover. It may be a good idea to get your fingers behind the interior mud panel and just pull out gently this way, and it pops out pretty easy. These guys, you got to kind of push down and then out that are underneath here. There is it. It kind of helps you to use a wide plastic trim panel tool to push down on it to help release a little bit, and then, pull back. Now, we'll go ahead and lose the bumper cover from the car. Our car does not have any fog lights and will not have to worry about disconnecting any wires. We'll set this in a safe spot. Now, we've got to remove the bumper structure here. There will be 2 bolts in the top and 2 in the bottom. We'll go ahead and do the bottom ones first. We'll use a 12mm socket to remove these. Here are the 2 bolts on top that we have to remove. This is the driver side, and we'll do the same thing on the passenger side. The last 2 bolts we'll go ahead and loosen up but not remove them. We'll just loosen up those 2 nuts, and then, we'll go ahead and remove this horn and disconnect the wires. There's a small tab on this side, if you press down you can disconnect the wires. Then with a 10mm socket, we'll remove this bracket from the bumper structure. Now, we'll go ahead and completely remove the nuts on top, and then, we'll take the bumper structure and set it aside for now. Next, we have to remove the tank for the washer fluid. We'll go ahead and disconnect the electrical. Just like the horn, we'll push in the tab, pull it apart to free the wires up, and push them out of the way for now. The lines, we need to go ahead and disconnect. This will drain out. We're just going to use an extra piece of rubber hose and just make a circle out of this so it doesn't drain everywhere. Unclip the lines, there's 2 on this side and 2 on the top. We'll get those out of the way. There's a hidden screw behind the fender liner here. This is really hard to get to, and we're actually going to remove a fastener behind the fender liner so we can move it out of our way. This plastic fastener we just have to unscrew and pull it out. Now, it gives a little more better working room. We'll use a 10mm socket on these 2 bolts on the inside edge. This one is still going to be awkward at best. We're using a swivel extension to help. You'll need a large Phillips screwdriver for this. We just need to loosen it up a little bit, maybe a few turns at best and lift straight up and then pull away to pull the bottle out. There's a little clip on the top here. Ours came apart really easy. Just keep an eye on that when you take it down from the top. Next, the air baffle has to be removed. We'll go ahead and take this line and pop it loose from here. These wires and this plastic fastener here, we'll go ahead and pry it out. You can probably work it loose with a flat screwdriver or a trim panel tool. With a 10mm socket, we'll remove this fastener and this fastener. Our last bolt is a little awkward to get to on our driver . We're looking from the bottom and on the other side of this panel here we can see the bolt. To remove the baffle, we'll go ahead and loosen up where it goes up into the intake up on top, just pull out and rock it back and forth. Then, we can pull down over here, and there's a disconnect right here as you can see. This little rubber stop kind of hangs up a little bit. Then, you just pull it out of the way. Then, let's go ahead and set this to the side. Next, we're going to go ahead and disconnect the wire from this point here because we'll have to trim this piece of metal. This flange right here has to be removed all the way down. We'll make 3 cuts and take it out in a couple of sections. From this edge to this edge is about 4-1/2". You can use a reciprocating saw or a cutting wheel and just go straight in and work from middle out. Actually, we found out we can just use a set of tin snips. The metal is thin enough. With some vice grips, we'll just get ahold of it and work it loose. It helps to move your vice grips up and down to help work the metal loose. Now, we'll go down to about to the edge of this metal right here and do the same thing once again. We're done with our driver side. Let's go ahead and do the same thing over on the passenger side. You can see how we have all our metal cut out. We did this on both sides. Now, we can actually put our bumper structure back into place. All this cutting will give us room for our base plate when we install it. We're going to go ahead and re-install our bumper structure using all of the original hardware. We'll do the small nuts first and then do the bolts. Now, I've got the hardware started on this side, we'll do the same thing on the other side. With all the hardware loosely installed, we'll go ahead and tighten it down for good. Next, we have to trim this piece of plastic out of the way from here on down. This will be completely removed. I'm just going to use some tin snips to cut as close as I can to the bumper, of course be careful by the radiator behind it and the A/C condenser. There it is. One last detail before we install the base plate is that this screw right here that was used for the washer bottle with the Phillips head, we do need to remove that. This will be one of our initial alignment holes for our base plate. We're almost ready to install our base plate. I want to point out that there's 2 different bolts that we use to initially install the base plate with. This longer one, 45mm, will go into this hole right here. Of course with the base plate in place, that will hold it up for us. This will be reused for the attachment for the air baffle on our driver side. We don't have to worry about really tightening this down, just to hold up the base plate for us. On the passenger side, the shorter bolt will go right here. This is where the phillips head bolt used to be. This bolt will be, again, reused to hold up the water take on this side. With an extra set of hands, we'll go ahead and lift our base plate up into position and install these bolts through it and into their proper places. You definitely want an extra set of hands when you do this. We'll go ahead and push it in place and then work our way up. When we put our base plate up, this will probably be in the way too. Let's go ahead and take this wire harness and remove it from the clip. Now, we can go ahead and put the base plate into place. We want it to line up with this hole, and then, we'll install our bolt. Let's go ahead and run it down to ensure it's steady and won't go anywhere. We'll do the same thing over on the driver side. With out base plate just sitting here loosely for now, we need to go ahead and create access for the rest of the hardware that will go inside the frame. We need to lengthen this round hole right here at the bottom of the frame. We're going to drill a 1/4" pilot hole and then follow it up with a hole saw. Now, I'm going to drill back at it with a 1" hole saw. Now, we're going to do the same thing right here, but we've got to go through 2 layers of material, and we'll also be moving up to a 1-1/4" hole size. There is a second layer in here. We just kind of knocked it back with the chisel. Then, we just took a pry bar and flattened it out. Actually, we got it to break loose too, and it worked out pretty good. The driver side is done. Repeat the same on your passenger side. We'll level it out, and we're going to use a clamp on the driver side to help hold it in place. We want to aim for the base plate to be level, and then, we'll go ahead and drill out first holes. We'll drill out this one first on each side. Now, I have a hole marked with my large bit, we'll go back at it with the smaller hole size bit, it don't matter which one or size. On our passenger side, first of all what will drill out will be this one here. We'll install the hardware, which will be 3/8" bolt with a flat washer and a lock washer. This is our nut plate. It will be installed from the bottom on the hole that we drilled in the bottom up here and thread through. We'll also use some LockTite on our threads as well. We're using part number LT37420. Now that we've got this one started, we'll go to the other side and go ahead and put the hardware in the hole that we just drilled. It will be the same hardware as before, flat washer, lock washer, and our bolt with some LockTite and our handle nut, but on this one, we're going to go from the front. We'll go ahead and move it up and down and make sure it's level. I snugged the 2 bolts down on each side. Now, we'll go ahead and drill out the rest of our holes and install our hardware just like we did on the first 2 bolts. When you install the handle nuts, you can bend them anyway you need to make sure you work them in the right spot. These 2 bolts will have the handle nut installed from the bottom, and our remaining one over here will be installed at an angle this way. This one is kind of tricky to get to. It goes over these 2 pieces of metal on the inside, and you can get an angle going down to it. I'm moving the handles around so hopefully you can see which direction we ran them in. On our driver side, we have it all loosely installed with all of our hardware, and I will do the same thing over on the passenger side. Now with all of our hardware loosely installed, let's go ahead and tighten them down, and we'll torque the bolts down as specified in the instructions. Okay. At this point, we can go ahead and shorten up all of our handles. I just like to take a pair of side cutters and try to cut it, but we just have to rock it back and forth a little bit, and it will break loose. Now, we can go ahead and start reassembling our vehicle. We'll start with the washer bottle here. This bolt will be used for the washer bottle. We'll go ahead and take it back out now, and then, we'll put our water bottle into place and then put that fastener back in. We're going to snug this down just a little bit with a 10mm socket. Then, we'll go ahead and re-install the rest of our original hardware. With all of our hardware loosely installed, we'll go ahead and tighten it down for good. We'll bring our electrical down, plug it back in, and reconnect our lines. Now, we'll go ahead and work on the air baffle on the driver side. The small bolt on the driver side we'll go ahead and remove. We need to do a modification to our air baffle before we can re-install it. This mount right here, we have to completely remove. I'm going to use a rotary tool to help cut it out of there. We'll go ahead and put our air baffle back into place and line it up with the other tubes. We'll go ahead and use our new bolt up here. On these small bolts, we'll also need to use a drop of LockTite as well. Let's go ahead and line up this tube while we're down here and put it back into place. We've got our bottom bolt tightened, we'll go ahead and tighten this one on top here. We'll go ahead and snap our cables back into place. We'll now go ahead and re-install the horn. Our base plate is in the way of its original position. What we have to do is drill out a hole in the bumper here and attach it on the end. This little tab here on the end, we'll have to bend or flatten out. Now that we've got it flattened out, we'll go ahead and find a location, probably about somewhere in these parts, and we'll go ahead and drill out 1/4" hole. We'll go ahead and just put it in place and mark our hole. I put it towards the back edge of our bumper. We'll go ahead and take the 1/4" bolt that comes with the kit and the flange nut and tighten it down with a 7/16" socket. Let's go ahead and plug the electrical back up, and we're done with the horn. Now, we need to go and install our safety cables for the base plate. We'll go ahead and wrap it around the frame and route it back down and around on the inside. Then, we'll attach it to this link right here using the quick link. Then, it might be a good idea to go ahead and use some zip ties to help keep the cables from rattling around. We have one for each to do. The driver side is going to be quite a bit harder to maneuver our cable around. Next, we're going to go ahead and install a bracket for the breakaway switch. There's a hole here and a hole here, personal preference on which side you're going to use. We're going to use the one on the right-hand side here, and we're going to drill through this with a 1/4" bolt, and we're going to go through a second layer. When you get to the top layer, you're just going to run the nut on the other side. We're going to take the long 1/4" bolt that comes with the kit, and we're going to run it through both layers of the bumper structure, and then, there will be a flange nut on the other side. Once we have it snugged down, we'll go ahead and tighten it down once again with a 7/16" socket. Now with the bracket installed, now it's a good idea to go ahead and install the breakaway switch from your supplemental braking system. In this case, our breakaway switch came from part number SM99251, the SMI Stay-IN-Play DUO supplemental braking system. We'll use the hardware that came with the breakaway switch, and again, it's just a 1/4". We'll go ahead and attach it. This also has a flat washer and a lock nut. It will tighten down with a 7/16" socket and wrench. I'm going to route my wires up and over to the top, and we'll just leave those guys alone for now. At this point, we can go ahead and start working with out bumper cover. We'll trim our what's needed, and we'll go ahead and do a couple test fits. We'll trim out as needed until we get it installed. What we're going to do is go ahead and take out this piece of material right here from this edge to this edge on both sides. Then, we'll go ahead and do a test fit and trim anymore if necessary. A small wire brush kind of helps get off the little remnants entailing from the initial cut. Let's go ahead and try it out. Once we're satisfied with the fit of the bumper cover, we'll go ahead and push it into place for good and basically re-install all of our fasteners in reverse order working our way from the bottom up to the top. Let's go ahead and put our fender well liner back into place, and we can go ahead and snap our fascia back on, our bumper cover. Let's not forget the fender well liner fastener that we had to remove earlier for the washer bottle. When you're putting your bumper cover in place, make sure you also have your hood release easy accessible, and then, we'll go on to the setting that went right here. We'll go ahead and put this plastic component back into place and our remaining screws. Then, we'll go ahead and put the last remaining fasteners on top. Once we have our last bolts re-installed, we can go ahead and try it out by inserting one of the arms. inaudible 00:26:07 arms to sit okay, we're good to go. That will finish it for our install of part number BX2333, the Blue Ox base plate kit with removable arms on our 2012 Hyundai Accent. .
Average Customer Rating: 4.8 out of 5 stars (3017 Customer Reviews)
Custom designed to fit your vehicle so it can be safely towed behind your RV, this base plate has easily removable arms that offer a seamless look when you're not flat towing. Base plate bolts directly to your chassis, so no welding is required.
The size of the box terrified me but I had to do this one myself.
This project is not for the faint of heart. When you think about what could go wrong you could wet yourself. I went with my gut and just opened the box. Hmmm, packaged very well with everything you need for the install. No going to the hardware store for this or that. Sat there with a cold sarsaparilla and read the very detailed instructions, went back to the etrailer web site and checked out some vids and pics. Hmm, it didn’t seem that daunting of a job. On my 04 Lexus GX470 most of the holes were drilled. Before I knew it 5 hours had past and I owned a toad! I took it to my local Rv service center for an inspection and it was deemed safe to use.
This thing is awesome, tracs straight as an arrow.
Now, I have to figure out this diode lighting kit. Camping is fun! Yah!!! :) Noah and etrailer made this a tolerable project. I urge everyone to take advantage of the resources that are on this sight. I always learn something when I’m there. See y’all on the trail….Rod
Well, I'm glad I'm good with tools, grinders, drills, and such. It was not just bolt-on dal. The car grill was able to be used any longer as it was too tight of a fit. Some of the lower fascia had to be trimmed and also removed OEM nuts from the front, the angle wouldn't allow the stock nuts to work. But in the end, I got to work out. So prepare to spend around 4-6 hours playing with it to get it to work. I am positive it's going to work as intended.
everything bolted up easy, i simply drilled hole’s into were needed and supplied my own bolts straight through for easy installation.
This kit fit well, had decent instructions, and performed perfectly every time once installed. If doing the install yourself, you'll need some metal fabrication tools to notch the D-ring plates behind the bumper but it's not complicated, just a little time consuming depending on the tools you're using. The look is also a little weird on the front of a new Bronco since you're losing the burly bumper D-rings, but it's a well engineered setup overall. I only used the tow bar setup a couple times before the vehicle was lost in a wildfire so I can't comment on the longevity, but I have no doubt it would still be working fine today.
I am really happy, not only with the product but the customer care I received. Very quick and helpful!!
I would make one suggestion. Take the headlights out when doing this on a Chevy Cobalt. It will make it much easier to get to the 3 bolt holding the fender to the fascia.
I will start with the people that work here at etrailer are great to deal with and very helpful! These baseplates for my 2023 bronco have been great. i bought and installed myself. install pretty straight forward. and these work great for flat towing my bronco behind my motorhome.
eTrailer was very helpful in choosing the correct hitch for our rv and car. They also provided a special brake application in the car that makes it super easy for toad braking.
I am 72, and I hook up this toad and pull it with confidence. The instructions to hook up the toad was presented with ease. They knew exactly what they were doing, and we didn't rush through the demonstration. I would recommend eTrailer to anyone.
Installed successfully on my 2024 Trax LT. However, with respect to the following installation steps, I made some changes:
All - Don't use a reciprocating saw! An oscillating tool and saw attachment works best, allowing more precise cuts.
Step #8 - After consultation with BlueOx Tech Support, I elected to re-install the plastic shroud. Wasn't difficult and I felt better about maintaining the integrity of the original equipment.
Step #28 - I moved the temperature sensor to a forward facing position in the grill section directly above the baseplate.
Baseplate installation went pretty smooth with no surprises. I chose to separate the lower grill piece while I had the bumper cover off. This allowed me to install the bumper cover over the baseplate and then accurately determine where to make my cuts in the grill for the baseplate protrusions. The Blue Ox base plate is well made and fit perfectly.
Etrailer offered competitive pricing for the base plate and the package was shipped promptly and arrived very quickly...much faster than I had anticipated.
The packaging was excellent and included all documentation. Installation was very straightforward and the unit was a perfect fit with minimal modifications to the car itself. Only a few small pieces of plastic had to be trimmed for a perfect fit.
We did have some trouble with 2 of the nuts-with-wires attached in that the bolts did NOT want to thread in to them. For some reason, they just did not want to 'start' easily and this made the blind installation of the nuts on the bolts extremely time-consuming. The nuts/bolts did not cross-thread and there were no other issues once we were able to use a tool to jam the blind nut and stop it from moving so that the bolt could be tightened and torqued. 4 of the 6 went in smoothly and with zero issues, so do I not believe that it was 'installer error' (!).
In the end, a perfect installation and the base plate is nearly invisible. I would definitely purchase from eTrailer again and can easily recommend their products based on this experience.
Pretty easy to do my self but the instructions could have been a bit larger with more pictures. I think the hardest part was drilling the holes to attach the two brackets as there was only one hole on each frame. Getting the square nuts with wire attached were difficult to get both aligned because the wire on the first one got in the way each time
My only negative comment is that this base plate sets the tow bar connections 23" above the ground making it somewhat of a pain to fine towbar and hitch connections. It mounts relatively easy.
Everything as advertised. Followed the videos and instructions for installing the base plates and tow bar and all were good. Did a test pull today and it towed great, straight as a dye. I only have 2 suggestions. There was no mention in the video of the space plate, which was included. Figured it out. Second suggestion, Install a 2" ball on your work bench and adjust the receiver to it. The instructions tell you what socket to adjust it with but that could have been done on the bench before shipping. Great product, so excited. We are off on a few hundred mile trip with the Fit behind the motorhome Wednesday. So excited. No more tow dolly.
It turned out fine but my opinion is that you should have some average or above mechanical skills to install this yourself. As you can see, the base plate protrusions are hardly noticeable at a distance with the tow pins removed. One thing worth mentioning is I had to mount it more rearward on the frame because the front valance would not mount back on correctly. Overall, good base plate.
Bought it at etrailer as I have with other trailer hitch related parts. Installed it myself, and it was a real job. I figure about 10 hours to get it right so I didn't have to worry if my 'toad' would pass my motorhome as I tooled down the road. Fit was perfect for my 2008 Honda CRV, but make sure you keep that oil cooler line up as high as possible or you will be redoing the fit to get the front cowling back on the car. Bought an angle grinder with cutoff wheels and that made the frame notching a lot easier. Note that if the removeable attachment pins are a tight fit into the base plate, they will loosen up with a good silicone lubricant and the wear of towing. I have towed with confidence for a year without a hitch (pun intended).
The Bx2692 is the better tow bar solution because it is higher up to hopefully keep your tow bar flat. I modified a Base bumper to install this because it is only available for the "Modular" and "Capable" bumpers. The base bumper option from bluox is for lower tow hook delete option. Took about 3hrs with the help of a grinder jigsaw and multi tool.
This baseplate fit perfectly and was a pretty easy instal after removing the bumper wrap on my wrx. Car pulls steady and straight!!
The item I received must have been a returned item. The box label was proof it was shipped to someone else before. Reason I'm not happy is because the bag of screws was open and most of it slipped out of the holes of the damaged box that was opened before and re-taped. The end of the crossbar was bent and not much packing inside. I needed this for our trip, so I didn't return it and had to fix and find screws to make it all work.
etrailers customer service is excellent. The item was back ordered, the customer service folks kept me informed on the projected delivery the entire time. And the Blue Ox part are really high quality. Only one minor issue, the bolts, nuts and washers bag was opened and the box had a large crack. Lost a few small pieces, not a big deal I have plenty of spares in the shop. Thanks etrailer
We had this base plate kit professionally installed on my wife's 2017 GMC Acadia and we've used it as our tow vehicle with no problems. It's easy to connect to the Blue Ox system we bought from etrailer and it's worked out great!
This Base plate was fairly simple to install in about 1/2 a day. I also installed brake kit and wiring so actually spent most of the day. This baseplate combined with the etrailer tow bar have been great. already pulled over 5000 miles with no issues at all. I love this setup and will never go back to tow dolly
It was an ordeal getting my base plate because of the car I drive but hats off to etrailer, you not only filled my request but did it in record time.
The images in the instructions are not of good quality, but installation is pretty straightforward. Be sure you know which bumper bolts to remove (the images are blurry), and do not forget to unplug AND unclip the wiring harness on the driver's side before removing the bumper so you are not pulling on wires while handling an awkward and heavy bumper.
The baseplate was slightly wider than my frame, so it had to go straight up, and I had to use a floorjack and block of wood to help push it into place. Ten holes are drilled into the frame, which requires some time and a very good drill and bit. Drilling vertically is relatively easy, and you can use, for example, a long-handled tool between the ground and drill to gain leverage (note: you need to reduce pressure when the sound of the drill changes, as that means you are almost through the frame; also, keep your arms locked straight so you do not lose control of the drill!). Drilling horizontally is a bit more challenging in terms of leverage, but again, use a very good drill bit (or have a second bit handy as the first bit gets dull). Keep in mind that there will be a lot of metal shavings coming down, and avoid getting those directly on your skin (they will be hot).
The nuts come with wires welded to them to help fish the nuts into place, but the access to the drilled holes isn't such that you really need wires on the nuts. Once the bolts are torqued to spec (torque setting depends on grade of bolts), you can either fold the wires into the frame, or clip the ends of the wires (which is what I did). I would not install without torquing the bolts to spec (don't really only on your impact, for example).
Reinstalling the bumper includes some effort to line it up in the original position, with even gaps with the body. You should be able to set the bumper on, loosely install one nut on either side to hold it, then get it close by sliding under the bumper and tightening the nuts in their original positions (based on marks from where the nuts had tightened originally. Having a buddy helps is a good idea, but I installed everything on my own.
I had the advantage of being a former auto tech, and long ago, a hitch installer, so there are some tricks to know. However, some basic skills and patience are all that are really necessary in this case.
The order was almost right but not the fault of Etraler. One of the nuts was fouled. I was very pleased with the way E trailer handled the problem. They quickly shipped out a replacement. Very nice folks that seem to care about their clientele. I will defiantly use them again.
My only complaint...the box failed during shipping, it arrived wet and open. The saving grace was that the baseplate and all hardware arrived undamaged.
Info for this part was:
At etrailer.com we provide the best information available about the products we sell. We take the quality of our information seriously so that you can get the right part the first time. Let us know if anything is missing or if you have any questions.


Thank you! Your comment has been submitted successfully. You should be able to view your question/comment here within a few days.
Error submitting comment. Please try again momentarily.