
Summer Starts Here - Save up to 70%
Thank you! Your comment has been submitted successfully. You should be able to view your question/comment here within a few days.
Error submitting comment. Please try again momentarily.
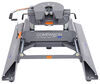
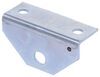
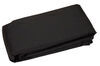
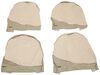
Build or repair your own personal dock for your summer getaway with this float. Sturdy outer shell protects the inner foam core, while also keeping it from contaminating the water. Mounting flange eases installation. Float supports up to 600 lbs.
Features:
Specs:
Note: This float should not be attached to other dock floats.
Videos are provided as a guide only. Refer to manufacturer installation instructions and specs for complete information.
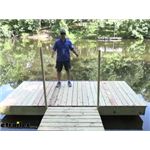
Hey everyone. Shane here with etrailor.com. Today I want to walk through how to install Taylor Made dock floats. When you think of a dock float, sometimes we think of the big barrels or we think of foam. The issue with the big barrels is they work great, but if they get a hole in them, then they fill up with water, then the end of your dock is tipping down in the water. You've got to take your whole dock out to replace them.The foam.
Foam, actually, you can't use any more because it contaminates the water. Well, Taylor Made has fixed that issue and come out with dock floats that have foam encased in a polyurethane box that is vented. The polyurethane is very durable so it's going to hold up and all weather conditions. You don't have to pull your dock out of the water in the winter time. With them being vented, it's going to allow the air to flow in and out of the box.The nice thing about them is they come in a variety of different sizes.
The ones we're installing on this dock are the bigger size. They're going to be 48 x 24 x 16 and they're going to have a 600 pound weight capacity. The smaller the box, the lower the weight capacity, or the weight capacity starts to go down. So just keep that in mind, depending on the dock size you have, and depending on what size boxes you're putting on your dock.As far as the installation process, pretty simple and straightforward. It's going to have eight mounting locations on each float, and it's going to require 3/8 lag bolts, your washers, and the nuts.
It is not going to come with the hardware to get them installed.Now, when I came out to install the floats on this dock, the dock was already basically built, the framing was. So we could only really install them a certain way. And how they're installed is they're running this way, length wise. We have one down in each corner running this way. What I would have done if I was going to do it myself is I probably would have extended this out and ran my floats this way in a line on each end to take a lot of the teetering effect out of it.
With them going this way, the dock kind of moves a little bit. It seems a little bit unstable.To start our installation, whatever boards we're going to be attaching our floats to, you want to make sure they're loose but they're in the area, or general area, of where you're going to be installing them. If you notice that this is a pretty wide dock, pretty long I should say, and it's not quite as wide. What we want to do is we want our floats to be as far over to the edge on the long side, and try to get it as far up towards your short side as you can, towards the corners. The reason you want to do that rather than having a middle is because if somebody stands on the edge, like they're going to jump off, go swimming or something, you don't want the other side to lift up and this side to dip.We have our support braces, and then we have our two by fours that we're going to be attaching our floats to. I'm going to start with this outside edge. Get it pulled over as far as I can. We're going to set our float in place and we're going to mark where we're going to be drilling our holes for a lag bolts.Now, when we're drilling for our lag bolts, we want to try to go through the center, if possible. We don't want to go to the edge because we don't want to take a chance of that lag bolt breaking off that piece and possibly this coming loose.So this is where we're going to be mounting it. Now we're only going to be putting four lag bolts in. It actually has eight, so if you want to put them on the end you can. I would suggest, if you have moving water, to put all of them in. We don't have moving water. We have a small lake, so we're only going to be putting four of them in to hold these in place.So if you see where I have this sitting, we're going to mark it right here in the center. We're going to do this on one side first. And I don't have this two by four screwed down yet, that's going to make it a lot easier when I'm hammering the lag bolt through that hole and then trying to lift up the whole dock and hold it up in the air.Now, depending on what size lag bolts you're using will depend on what size hole you want. I'm doing it a little bit smaller lag bolt, and we're using 3" lag bolts. They don't have to be quite that long, but that gives us plenty of room to work with.Now, while I have it down here, what I'm going to do is I'm going to pre-drill a couple holes for my screws to go in to these two by fours.I just pre-drilled through this two by four. I didn't go into the other one. So now let's take this off and then we can hammer our lag bolts in. Same thing here. We'll sit this back in place, get it lined up, and then we can put our four screws in.So now we're going to take our dock float, we're going to slide it all the way in. We're going to take our two by four on the other side, get it lined up, mark this edge just in case your board happens to move. We're going to mark these. We'll take our float off, then we're going to repeat that process for that board.Then we'll take our float, and it should line right up with our bolts. Now we can take our washers and nuts, put them on each of the bolts and secure them down. So what I'm doing is I'm putting two washers on. I would suggest, our customer doesn't have lock washers. So I would suggest if you're doing this, put lock washers on. I'm using two washers just so that the washer doesn't fold down inside of here. It makes it a little bit stiffer.Once you get all your hardware in place, go ahead and tighten it down and then repeat that process for any other float you're installing. Once you have all your floats installed, you're ready to go. That's going to do it for a look at, and installation, on the Taylor Made dock float.
Average Customer Rating: 4.8 out of 5 stars (11 Customer Reviews)
Build or repair your own personal dock for your summer getaway with this float. Sturdy outer shell protects the inner foam core, while also keeping it from contaminating the water. Mounting flange eases installation. Float supports up to 600 lbs.Very well made user friendly product
I can still use it but it came with a hole in the bottom of it.I used epoxy to repair it
These are available at any number of retailers, but I chose to buy through etrailer as I am a satisfied previous customer. The customer service and communication are top notch, not to mention they offered the best price out there.
God quality and construction, definitely worth the money spent!
High quality product. Fast delivery!
Working out great for our small business hear in Maine.
Worked great floated well/better then I expected.
Rapid delivery and exactly the quality that I expected! Thank you.
Great product and the best price around .!
Do you have a question about this Dock Accessory?
Info for this part was:
At etrailer.com we provide the best information available about the products we sell. We take the quality of our information seriously so that you can get the right part the first time. Let us know if anything is missing or if you have any questions.


Sierra K.
6/2/2022
Customer service will reach out to you.