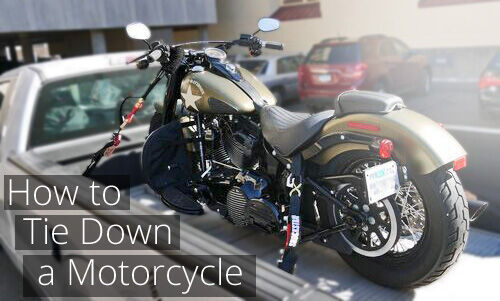
You’ve spent a whole lot of money on your motorcycle, so I’m sure you want to transport it in the safest, most secure way, am I right? However, if you don’t know where to start or what materials you need to get the job done, don’t sweat it. Today you’ll get the confidence to know exactly how to tie down your motorcycle on your truck or trailer as securely as possible, so you can have peace of mind and focus on other things while you’re hauling it… like the road.
Below, I'll dive a bit deeper into these 7 steps and give you some helpful tips, along with some essential products, that will help you out before you attempt to tie down your motorcycle.
Step 1. Gather the necessary equipment
There are a few things you will need before loading up your motorcycle. The main items you will need are: ratchet tie-down straps, soft loop straps, anchor points, and possibly a wheel chock. Some of these items you may already have, and some you may not, but they are crucial elements to making sure your motorcycle is as safe and secure as possible.
I know what you're thinking: "Why can't I just use the old bungee cords or chains I have laying around somewhere in my garage?" Well, I really hope you're not actually thinking that, and here's why. The recommended (a.k.a. safest) way to transport your motorcycle is to use tie down straps that have a combined safe working load limit (WLL) that is greater than the complete weight of your motorcycle.So unless you want to say "bye bye" to your motorcycle as you're hauling it, you'll want to invest in some quality tie-down straps that can handle your load.
By using soft loops, you’re giving the tie-down straps a much more secure connection to the motorcycle. Soft loops create a stable anchor point that’s not going to slide around or slip from the tie-down point while you’re transporting your motorcycle.These also will minimize the metal-on-metal contact so that your bike don't end up getting scratched or chipped from the tie-down straps.
If you don't have a secure point for your ratchet straps to attach, you will need to install an anchor point. There are several different types of anchor points, but the most common are D-ring and E-track anchors. An E-track system is great because it is very versatile and will allow you to use several different accessories as well, including hooks, grab handles, and nets. However, if you don't find yourself hauling many accessory items, a D-ring mount will do just fine for you.
Although wheel chocks are not always required to properly secure your motorcycle, we still recommend them. Wheel chocks will help keep your motorcycle stabilized not only while you're strapping it down initially, but also while you are hauling it, as it will provide an added hold on your motorcycle.
How much weight can a ratchet strap hold?
Different straps will have different weight capacities, so you will need to check each strap's capacity before choosing one. In order to make sure that your load is as secure as possible, the combined safe working load limit (WLL) of the tie-down straps you’re using must be greater than the complete weight of the secured cargo. So for example, if your bike weighs 500 lbs, and you’re using two straps to tie it down, each strap must have a WLL of at least 250 lbs.
We recommend getting straps that are rated above the capacity you actually need to guarantee the safest possible application. Also, try to use ratchet straps in pairs, mainly for the front straps, as this will help get a secure, snug fit on your bike and help keep it from coming loose.
Step 2. Load motorcycle onto trailer or truck
Finding a way to get your motorcycle onto your truck or trailer might be the most difficult step in this process. You may be able to manage loading up your motorcycle on your own (especially if you're Superman or Dwayne Johnson), but if you don't already have loading ramps, you may want to think about investing in some. Loading ramps will make it almost too easy to load the bike onto your trailer or truck, and will take all of the burden off of your knees and back.Since you'll obviously only need one ramp for a standard motorcycle, there is a single ramp option just for you.
Step 3. Rest motorcycle on kickstand or wheel chock
After you get your motorcycle loaded into your truck or trailer, you want it to be stabilized while you start to attach the straps. If the motorcycle has a kickstand, lower it to balance the bike while you get it strapped down. However, you need to make sure you put the kickstand up before you start traveling, so as to not damage it or the bike. If your bike doesn't have a kickstand, or if you would like a bit more stabilization, this is where the wheel chock comes in handy. You can easily bolt a wheel chock to your trailer or truck to help stabilize the motorcycle; this is an especially great option if you haul your motorcycle frequently.
Step 4. Pass soft loop straps securely around handlebars
Since you already know how helpful it is to have soft loop straps, now it's time to put them to good use. You're going to attach the soft loops to the most secure part of each handlebar. However, we recommend that you do not attach the straps directly to the handlebars if you can avoid it, as this can cause additional stress and possibly damage the handlebars. Instead, if your bike has a triple tree, we recommend to attach the straps there, as it is much safer for the bike.There are also ratchet straps that have built-in soft loops to save you a step and an extra purchase. The high quality ShockStrap tie-downs have both soft loops and built-in shock absorbers which will absorb any impact and ensure constant tension on your bike, even if it happens to shift a bit during travel.
Step 5. Attach tie-down hooks to soft loops
Once you have the soft loops secured around the handlebars or triple tree, you're going to secure the tie down hooks to the soft loops. This part is fairly simple, just make sure that the soft loops aren't going to slide around the handlebars, and that the tie-down hooks are fully hooked around the loops.
Step 6. Attach opposite tie down hooks to anchor points
After you hook one end of the ratchet strap to your soft loop, you're going to take the other end and secure the tie down hook to the anchor point that you either have just installed, or already have installed on your trailer or truck. You don't necessarily need a D-ring anchor point, but just make sure that whatever you are attaching your strap to is secure and can be easily grabbed by the hook.And don't just stop at securing down the handlebars, either. We definitely recommend using at least one more strap on the rear of the bike along with the one on each handlebar. You can attach a rear tie over the seat for a nice snug fit, or you can attach a tie through the rear wheel to help with better rear stabilization.
Step 7. Tighten the straps until all the slack is gone
Once everything is hooked up and in place, the only thing left to do is tighten that sucker down. Make sure that when you tighten the straps, you're adding tension evenly to each side, so that the bike is properly secured and not getting more tension on one side than the other. Even though it can seem a bit tedious, we recommend going back and forth to each side while tightening to make sure it's evenly secured.Also, make sure you do a final check before you take off, because even after you think you're done and good to go, you may have missed something. Make sure all the ratchets are closed, and all the excess straps are tied up so they don't risk becoming loosened as you travel.
Still have questions?Give our experts a call at 800-298-8924, or contact us online. We're happy to assist any way we can!
About the AuthorMy journey with etrailer started in Customer Service, where I went through months of product training to make sure that I had all of the knowledge I needed to help our neighbors find a solution to any situation. I helped them with technical questions, troubleshooting, product information, and anything else they needed. Since it has always been my passion to write and express myself through words, I made the transition over to the content side of the website so I could combine my product knowledge and passion for writing.In order to make sure that I am giving you the most accurate, current information, I am constantly doing research and talking with people who are doing what I am writing about every day. I am constantly striving to find out what questions you are asking, and to give you an answer to every one of those questions, plus answers to questions you haven't even asked yet - yes, I'm that good. Plus, I am constantly getting hands-on training with our vendors and asking them all of the hard questions, that way you can have all of the information you need before making a decision.
Once the bike is in place and strapped down,check the straps at each stop,getting gas ,lunch,just look for any thing loose or out of place.If the you are racing or doing track days,the tires will cool and change the tension on the straps.
There are so many variables involved here, including the size of the bikes, how you want them to sit in the trailer, the weight of the bikes and the geometry of the bike's frames that I couldn't begin to provide you with specifics,…
Bearing Buddies like #BB2441 fit very tight into a trailer hub. In order to get them out, you will need to use a rubber mallet and persuade them out. Once the Bearing Buddy starts to unseat from the hub you can grab it and wiggle it out.
Yes, the app will send a notification even when it is on in the background and not running on the screen to your phone if a sensor detects a fault on the Tire Linc TPMS for RVs and Trailers w/ Signal Booster #LC37VR. These notifications will…
The Tire Linc TPMS for RVs and Trailers w/ Signal Booster #LC37VR has to be used with the signal booster. The exact range isn't listed for without using the booster but it would diminished considerably.
The Kenda 4.80/4.00-8 Bias Trailer Tire with 8 inch White Steel Wheel you referred to, part #AM30000 features a wheel with a zero offset. This means that the wheel's mounting pad (the surface that contacts the hub face) is centered on the…
Is it possible that you have a 2.8 inch pilot diameter? If so we have some options that would work like the part #AM30060 that has a 5 on 4-1/2 inch bolt pattern and a 2.8 inch pilot diameter. If you have a 4 on 4 inch bolt pattern you would want the…
In order to realize their full weight carrying capacity, trailer tires should remain at their maximum pressure as stated on the tire's sidewall. When fully pressured up, your current tires have a capacity of 2170 lbs per axle. When you subtract…
The psi should be listed on the sidewall of the tire. It is recommended that tires always be inflated to the max psi. The max psi of the tire will depend on the tire's load range, not the weight of the trailer. For instance, we carry 5.30-12…
After looking at the picture you submitted of your trailer I would recommend you stick with the 5.30-12 trailer size since going to a larger tire would most likely interfere with your fender clearances. For a tire I would recommend the #AM10068. It…
If your motorcycle trailer has ST (special trailer) tires, then they are made to be run at the max psi. If they do not have this ST distinction, then you most likely can run them at a slightly lower tire pressure. I recommend confirming with the…
First, make sure that you have the correct size Bearing Buddy. It should be slightly larger than the hub bore though it is difficult to tell just by looking. If you can tell me the outer bearing number I can determine which is the correct model.…
The best way to remove a Bearing Buddy Bearing Protector like #BB2717 is pretty much what you've been doing. Because the fit inside the hub bore is pretty tight, you just have to take a rubber mallet (or wood block) and firmly tap it around the…
Bill
2/18/2023
Once the bike is in place and strapped down,check the straps at each stop,getting gas ,lunch,just look for any thing loose or out of place.If the you are racing or doing track days,the tires will cool and change the tension on the straps.