
Customers prefer these similar products
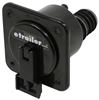
3" x 3" Square, heavy-duty work light with 4 LEDs produces a bright spot beam to illuminate a focused area. Powder coated black aluminum housing resists impact and corrosion. Pedestal-mount bracket and hardware included.
Features:
Specs:
Videos are provided as a guide only. Refer to manufacturer installation instructions and specs for complete information.
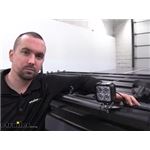
Hello neighbors, It's Brad here at etrailer. And today, we're taking a look and installing the TecNiq SteelHead LED work lamps. This is gonna be the four diode in black aluminum also available in white aluminum. Now, here we have our light powered up and you can see the 1100 lumens powering a pretty good area here roughly about six to seven foot of spread in that spot pattern. I'm about 15 foot away from the light and it's pretty concentrated in one spot. Now, if you are looking for a little bit more of a wider illumination of an area, to really illuminate a whole work space rather just than a concentrated area, we also have a flood option available.
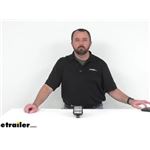
And that's gonna really spread that light out, rather than pointing that beam in a small area, like we see here. Now, the lights are actually sold individually but they work great as pairs or you can even pair up multiple lights creating a bunch of different concentrated work spaces. So with the two of them, you can actually focus a lot of power at one spot, or you can actually move them individually to create multiple work spots, or entertainment spots as well. The great part about the pedestal style base is you're easily able to adjust to really get that light dialed in exactly where you need it to be. So you can really get that light perfectly directed in multiple different areas, as we see with this pair.
So having a close or look at the light with it powered off, you can see the four diodes that create that light pattern in the spot. Now, this is going to have a nice aluminum outside fixture. It's gonna be in a black powder coat finish and in conjunction with the actual lens this is gonna be waterproof. So it's gonna hold up to the elements. So you can mount this on the outside of your camper or truck, and not have to worry about it breaking down, getting water in here and destroying the light.
Now, a few other things that make this nice and robust is gonna be the inside has a military spec circuit board. So it's gonna make sure that you don't have any loose connections inside of the light itself. Once you're going offroading, and you have some of those vibrations and rattling going along the light's not lose its connection. Also molded into the outer housing is gonna be this nice heat sink. So that's gonna disperse heat allowing these to be protected from thermal elements.
You'll also see the pedestal style bracket here is really easy to mount up as it just has one bolt with a carriage bolt style to really get this in place. So if you have your own bracket, you can use that. Or we have a bunch of different brackets available for your application, or you can actually just simply mount this on directly to whatever you need to, whether it be the rooftop or a headache rack or a front push bar, whatever it may be. And once you have it mounted up, adjusting this to whatever angle you may need it to be is gonna be awesome. So installation's gonna be quick and let's just take a look at that. So you can get your light set up. Now we're gonna be installing this six LED Floodlight, but if you pick up a different variety of LED lights, they're gonna have the same two wire installations. So following this is gonna be pretty much identical to what you'll be doing with your LED light. To begin your install, you're gonna want to find a place to tie into power and ground. Now this particular cable has a distribution panel that has a switch already into it. So we're gonna be using this, but if you don't have a distribution panel there's plenty switch is available here. And that's gonna allow you to turn that on and off, and cut that power whenever you don't want those lights to be on, but you are gonna need to tie into that power of your battery as well as the negative to get these to work. Now, we already have our switch installed but if you we're to wire up your own switch, here's an idea of kind of how it's gonna look. You're gonna have your two wires coming from your battery, your positive and negative. And those are simply gonna tie into the same spade connector as your wiring that's gonna go to the light itself. And really your switch is just to disconnect doing this is gonna allow that power to actually create a full circuit. When you close that off, it's gonna shut it off here. So pretty easy. So if you need to wire up your switch, here's a nice diagram on how to do that. Then from your switch, you're gonna want to run a positive and negative duplex wire to wherever your mounting location be. So on our camper, we're actually putting it on the back here on our Rhino rack. If you have a truck maybe you're putting it on your headache bar or your front push bar, whatever it may be. So make sure that you have enough wire to be able to run there. And if you need to pick some up we actually have some here at etrailer. Now, the next thing that you're gonna wanna do is determine how you want to mount your light. And here we actually have a heavy duty bracket specifically for the Rhino rack that goes in the track here, which is really nice. Now you may not have this identical rack which there's plenty of other options available for a mounting bracket. And really all you need to do is make sure that this is actually run through and clamped on. You can see, I've actually added a washer here just for a little bit of extra bite. So if you we're mounted it on to a solid surface maybe the roof here, you could actually just drill down, run that through and make sure that that tightens up. This is a carriage bolt style, up top on the bolt. So that's nice. It's gonna hold it in place as we tighten it down. So on the back side you're gonna see we have two wires coming off here. So we're just gonna match our corresponding wires. Black is gonna be our positive, white is gonna be our ground. Now we're gonna be using spade connectors just because we're gonna be test fitting quite a few light here. It's gonna make for a quick and easy disconnect to put the next light on. But if you're routing this and it's gonna live outside the vehicle or any of the wiring's gonna be outside the vehicle, I highly suggest picking up some heat shrink butt connectors. And these are really nice because once you actually crimp these down, you take a heat gun. These are gonna cinch around creating a water tight seal. So that way your connections aren't gonna get corroded or get brittle over time. These are gonna hold these in place really nicely. And then your next step is gonna be running some wire loom or something to keep these wires protected just for an added clean look. It's kinda up to you, if you can tuck these wires into something to hide it, that's gonna be great but you're gonna wanna make sure that they are tucked away. So things don't catch them and they stay protected. And once you have your wires connected, really all you need to do is turn the power onto the actual camper or the vehicle hit your switch. And then all so adjust where you want this to be. Now it's gonna be pretty simple here. You can see that it's gonna be able to pivot 360 degrees as well as rotate a bunch of different angles. So really getting it dialed into where you're gonna be using it. So, you know, if you're hanging outside your camper and you want this to kind of flood out where you're gonna be hanging out, that's no problem. You just simply aim your light beams and then just tighten these up and then you'll have it fixed exactly where you want it. And that was a look and install of the TecNiq SteelHead LED work lambs in black aluminum as well as white aluminum..
Average Customer Rating: 5.0 out of 5 stars (4 Customer Reviews)
3" x 3" Square, heavy-duty work light with 4 LEDs produces a bright spot beam to illuminate a focused area. Powder coated black aluminum housing resists impact and corrosion. Pedestal-mount bracket and hardware included.Have not installed yet, but I think it will as a flag light.
Fast service great product
Info for this part was:
At etrailer.com we provide the best information available about the products we sell. We take the quality of our information seriously so that you can get the right part the first time. Let us know if anything is missing or if you have any questions.


Thank you! Your comment has been submitted successfully. You should be able to view your question/comment here within a few days.
Error submitting comment. Please try again momentarily.