
Thank you! Your comment has been submitted successfully. You should be able to view your question/comment here within a few days.
Error submitting comment. Please try again momentarily.
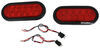
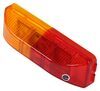
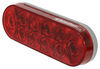
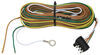
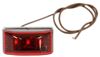
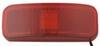
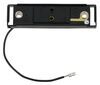
3-3/4" x 7/8" Oblong. Waterproof LED marker light can be installed on your trailer fender. Amber light faces front, and red light faces rear. Surface mount to trailer with bracket. 2-Wire pigtail. P2 rated.
Features:
Specs:
A P2-rated light produces a 45-degree angle of light to either side of its centerline for a total of 90 degrees of coverage. This beam pattern can be seen straight on, but it cannot be seen clearly from the side. So this type of light can be used as either a side marker light or a clearance light, but it cannot function as both. If you need both functions, then you must install 2 separate lights on your trailer - one as a front or rear clearance light and one as a side marker light.
Videos are provided as a guide only. Refer to manufacturer installation instructions and specs for complete information.
Hey everyone. Shane here with etrailer.com. Today, we're going to be taking a look at the Optronics LED side marker lights. These are in an Amber and Red combined. These are going to be LED. So they're going to have two diodes, one on each end.
Red is always going to be in the back. Orange is always going to face towards or Amber is always going to face towards the front. As I mentioned LED, they're going to last about 50 times longer than an incandescent bulb. This is going to be a sealed unit. So it's waterproof, basically, you don't have to worry about not only not changing bulbs, we don't have to worry about water getting inside and damaging it.
It's going to be a two wire system. You have your power and then you have your ground. It is going to come with a mounting flange. So how you see it here is how it's going to come. Each side here is going to have a hole in it that allows you to mount it.
This is a surface mount unit. It is not going to come with a self tapping screws depending on where you want to mount it. The lens itself is going to be a thermal polycarbonate lens. So it was going to hold up really well. Also, it's going to work with 12 volt systems.
So pretty much any trailer that you're pulling that has 12 volt power going to it, you're going to be able to use these lights. You'll notice that we have them mounted on the side of the fender here. So it's the most outer part of our trailer. Being LED is going to make it very bright and very noticeable at night. So people can see where our outer edge of our trailer is. Now as far as installing these, pretty simple, straight forward. You find your running lights signal inside the trailer. You can pretty much ground it on any metal surface depending on where you're going to mount the light, will depend on whether you need to add wire to extend. Self-tappers do not come but I highly recommend getting self-tappers, wire loom and loom clamps, depending on how you're going to run it. It's going to help keep your wire up, tight up against the trailer. Whether you're running outside, inside, along the bottom whatever it may be, protect your wire. So they don't get damaged by outside contaminants. Even with the lights on inside the shop here, it is during the day and our garage doors are open. You can see the LEDs are very bright. You have your Amber one again facing forward but that LED light is here on the end. So it gives us plenty of, of noticeability from oncoming cars and the Red ones are going to give us anything that's coming up behind us. Maybe we're in, on a three lane highway or something like that and somebody wants to pass us, they'll to be able to see the outside of our fender edge here. Start our installation, you need to determine where you're going to mount your light. Typically or originally, they had lights back here in the corners and they got damaged and they decided they didn't want to put them there again. They wanted to go with LED lights and they want to put them in a different location. So what we're going to do is we're going to put them right here, centered on the wheel-well. Red is going to face to the back, Orange gotta be towards the front. We're going to put them right here to the outside. What I'm gonna do, is I'm gonna drill a small hole. I might have to go just a little bit bigger. Yup, we'll go up one size in our drill bit. Get our wires put in the hole, take some self-tappers. We'll go ahead and secure it down to the fender. Somewhere in here, when I drill a hole all the way to the inside, extend my wires and run them in or at least my black one, my power wire. This is going to be our power wire for our running light signal for the light. If you don't have any wire, you can find some here at etrailer, you can use 12, 14 gauge wire. We're going to add on a heat shrink butt connector since this is going to be outside. We'll add that on to our black wire coming off our light. Then we needed a piece of white wire that we can extend and get it right over to this edge. I just cut a regular piece. And we'll go ahead and do the same thing, we'll add our heat shrink butt connector on. We'll take our heat source and we'll shrink both of those up. I've gone ahead and added some wire loom. It's really up to you. This is just to protect the wires. Since it's underneath the fender here. Also, I added a loom clamp and what I'm gonna do is I'm gonna take a self tapper, and we'll put it in right there. That'll hold it up as tight as we can get it up to the top there. And then my ground wire, I'll just run it and ground it right inside of this notch or right inside of this gap here, that'll kind of protect that in case the tire kicks, anything up. I'll strip back the ground wire, add a ring terminal. Once we get her outside done, we'll move to the inside and get our wire ran up to the ceiling and connected to our running light signal. Now, as I mentioned, we have wires that run up in this channel up here on both sides. Over on our passenger side, we just have Brown and Red. The Red wire is going to be an accessory wire. Brown wire is going to be our running light signal. We're going to go ahead and test our Brown wire just to make sure we have it hooked up to an alternate power source. The Red wire is always going to have power because it's coming from a 12 volt power source from our plug. So we know for sure that is correct. Now I'll go ahead and shut my running light signal off and come back and test that wire to make sure that that signal is gone. All I'm going to use up here to connect my wires is a quick splice connector. We get our wires fit in go ahead and make sure that it's compressed in. Then we can go ahead and get this wire secured to the front side of this post. What I'm going to do is I'm going to do is I'm gonna cover with wire loom first. Then I'm gonna take some loom clamps, three of them. I'll put one down at the bottom, one in the middle, and one right up here at the top. That way it'll hold tight. And when they put cattle in here or whatever they put in here then I don't have to worry about the wire getting damaged. Now we've got it installed, we'll go ahead and test it out. Now that we know it's working correctly, we're going to repeat the process on the other side. Once you've tested both sides out, you're ready to go. It's going to do it for a look at the Optronics Amber and Red LED side marker lights..
Average Customer Rating: 4.7 out of 5 stars (41 Customer Reviews)
3-3/4" x 7/8" Oblong. Waterproof LED marker light can be installed on your trailer fender. Amber light faces front, and red light faces rear. Surface mount to trailer with bracket. 2-Wire pigtail. P2 rated.I am happy with how fast it was delivered. But the packing worried me. The small plastic lights were just tossed into the box along with the very heavy trailer hitch. The edge of the box was torn. The heavy metal hitch could have very easily crushed the plastic items. Maybe those could have been placed inside a rolled up paper bag.
But lucking out there was no breakage.
I will review after I install. But I like it. The led light wires are big enough to splice onto other wires.
Consider me happy

These replacement lights were exactly what was on my trailer!! Easy installation and website was easy to navigate!! Thank you!!
Delivery was fast and exactly as pictur ed
Easy to order. Good product at a good price. Quick ship and arrived in good condition as described. Very Pleased and would recommend.
Prompt service, item as described and shown. Love the sleek look of these lights.
Solid product easy install
easy to install, nice and bright/visible. no issues.
great product
Thank you it’s exactly the same
etrailer sent me an identical replacement - which was what I needed.It was also sent in a timely manner and works great. I was surprised at the amazing follow up a year later to make sure all was working well.
Bright and easy to install.
They look great. I haven't installed them at this time
Wish they came with at least 2 diodes for each Color
quality product

Joe

11/15/2023
Its great we were having trouble finding aby lights like it
Very valued supplier with quality parts and excellent customer service!
Small lights but nice and bright
Looks good
Do you have a question about this Trailer Light?
Info for this part was:
At etrailer.com we provide the best information available about the products we sell. We take the quality of our information seriously so that you can get the right part the first time. Let us know if anything is missing or if you have any questions.


Melissa
2/7/2024
These lights have held up great! They are on heavily used commercial type trailers with no problems.