
To see if this custom-fit item will work for you please tell us what vehicle you'll use it with.
Thank you! Your comment has been submitted successfully. You should be able to view your question/comment here within a few days.
Error submitting comment. Please try again momentarily.


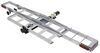
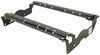
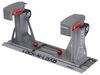
This fully welded trailer hitch receiver bolts onto your vehicle's frame with no welding required. Matte black, powder coated steel is durable and corrosion resistant and creates a rugged look.
Features:
Specs:
The sturdy steel construction is protected with a matte black finish for added durability. This unique powder coating gives etrailer hitches a carbide-like appearance and a rugged look that sets them apart from traditional glossy hitches. In addition to being rust and corrosion resistant, the tough matte coating hides dirt, scuffs, and dings better than a glossy finish.
At etrailer we're committed to the products we sell, and to our customers. Our experienced and knowledgeable staff are available via both phone and email to address your questions and concerns for the lifetime of your hitch. The technicians at etrailer perform hitch installations on a daily basis, making them a valuable resource for do-it-yourselfers. The one-on-one, personal service you'll receive comes straight from an expert in the towing and automotive field. We've installed it, we've wired it and we've towed with it, so whatever your question, we can answer it.

Videos are provided as a guide only. Refer to manufacturer installation instructions and specs for complete information.
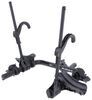
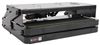
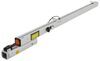
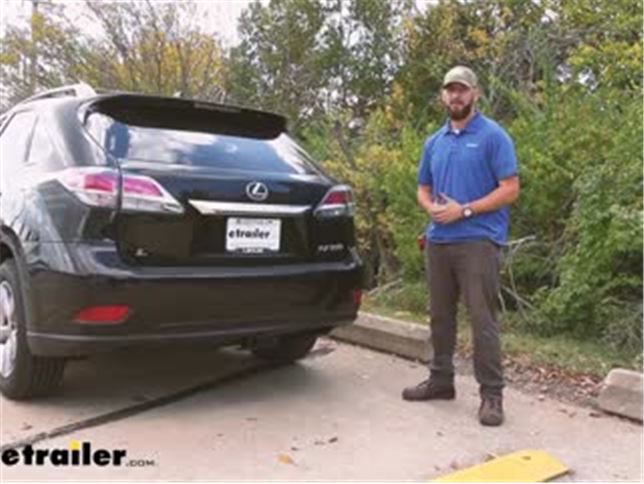
Welcome to etrailer.com. Today, we're taking a look at and showing you how to install the etrailer Class III trailer hitch receiver here on a 2014 Lexus RX 350. Our trailer hitch receiver today is gonna be an industry standard two inch by two inch receiver opening, which is gonna give you the widest range of accessories to choose from, be it cargo carriers, bike racks, or ball mounts for towing a trailer. The hitch receiver's gonna have an industry standard 5/8 inch hitch pin hole. Now, it does not come with a hitch pin but we have plenty of options here at etrailer.com including some locking ones that I highly recommend checking out if you want to make sure that whatever you put in here stays in here. Our weight capacities for this trailer hitch are gonna be a 4,000 pound gross trailer weight rating which is the weight of your trailer you're towing, and all the accessories or cargo loaded onto it.
With a tongue weight rating, which is the downward force on the inside of the receiver tube of 600 pounds, which is gonna allow you to pretty much max out any of the cargo carriers or bike racks we have here at etrailer.com. This trailer hitch is also gonna be compatible with a weight distribution system, which will open up your gross trailer weight rating to an increased 5,000 pound gross trailer weight. But the tongue weight rating is gonna stay the same at 600 pounds. One thing to keep in mind with those weight capacities is, you want to check your owner's manual for your Lexus to make sure you're not exceeding what the vehicle is capable of compared to what the hitch is capable of. Comparing those two numbers, take the lower of the two and that's gonna be the safest bet.
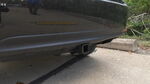
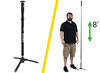
If you've been shopping for a trailer hitch for your Lexus here at etrailer.com, you're gonna notice of the different options, the etrailer hitch is the only one with a matte black powder coated finish. It's gonna match very nicely to the underbody panel here on our Lexus. Looking at the safety chain loops, they're a nice rolled style loop, which is gonna allow us to attach our larger beefier clevis style hooks and our standard smaller S-type hooks just fine. One thing to keep in mind with trailer hitches is a couple measurements. The first of which being from the center of the hitch pin hole to the outside of the fascia that's gonna be around 4 1/2 inches, which is a measurement to keep in mind for those accessories with tilting features where they fold up towards the body of the vehicle.
Another measurement is going to be from the top inside edge of your receiver tube to the ground. Here today, we're looking at 16 inches and that's something that you're gonna use to look for ball mounts with rise and drop. The process of installing this trailer hitch on the Lexus isn't that bad. You're gonna have three bolts on either side. You have to remove your underbody panel and make a small trim on it, but we'll walk you through that entire process step by step to show you how it's done.
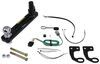
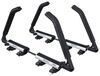
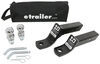
One thing that you might not have that you need for this is gonna be a torque wrench, but you can rent those at most local auto parts stores. All right, first step on this installation, we're gonna remove this lower fascia panel. You're gonna use a 10 millimeter socket, a large Phillips head screwdriver, and a trim panel tool. Let's go ahead and take 'em down. You're gonna wanna be sure to have a nice spot set aside for these, so that way you know exactly where they are when you need to put all this back up. Over here, by the exhaust from the passenger side of the vehicle, you're gonna have two Phillips head plastic screws holding this up. Since they are plastic, you might have to apply downward pressure to get it to loosen. They might just spin freely for a little bit. On the driver's side, we're gonna have a push pin over here and then another one right down here. A trim panel tool or a flathead screwdriver is gonna do the trick to pop the center section up and allow you to pry underneath and pull them out. And the last push pin fastener is gonna be back up here behind the wheel well liner. Not sure if you can really see it on the camera, but it's right here where I'm pointing the tool. With the last of our fasteners removed, we'll be able to pop out this panel and set it aside. For ease of installation and access to the frame rail on the passenger side, we're gonna be lowering our exhaust down today and I'm gonna use in a cam buckle strap to support this. If you're doing this on the ground or on jack stands in your driveway, you can use a block of wood to support it. Depending on the age of the vehicle, these rubber isolators can be a very snug on there. So, with some heavy duty silicone spray, you can soak that up and make it a little easier to pry it off. Using a pry bar, we're gonna push on the isolator to get it off the hangar bracket and make the exhaust hang freely. To get access to the weld nuts in the frame is gonna be these covers. This one's rubber, so you can use a flathead screwdriver to pry it off. And then there's this plastic one right here which will untread. We'll be repeating the same process over on the other side. Now, both sides on the frame rails, you're gonna have these tow hook attachments. We'll be removing those to install our hitch and we will not be reinstalling these. To get our hardware ready for the hitching going up, we're gonna have our conical tooth washers. You're gonna want to have those facing up to where the teeth are biting into the metal and we're gonna have our 19 millimeter hex head bolts. The washers will simply go on there and then we'll raise our hitch in the place. We'll run these up through the holes and secure them into the weld nuts in the frame. All right, our next step is to raise the hitch up into position. It really helps to have an extra set of hands around for this. We're gonna start by getting this side up over the exhaust and around the frame rail. And once you're up in position, you're gonna take your hardware and secure it to at least one weld nut on both sides. That way the hitch is able to support itself while we secure the other hardware. With a 19 millimeter socket, we can zip our hardware up into the frame rail. After securing the hitch, we'll come back with the torque wrench and using the manufacturer's specified foot-pounds in the instructions, torque 'em all to spec. With all the hardware torque to spec, now we can put our exhaust back on the rubber isolator. The instructions give you a diagram on how to measure out the trimming for your lower fascia panel. This protrusion right here lines up with the hitch's shank, so we're gonna measure across and then back, mark it out with Pannus tape and then come back and trim it. With our trim marked out, we'll come back with an oscillating tool. You can use a pair of snits or a razor knife, whatever cutting tool you have to get this out. With our panel piece trimmed out, and peel off our tape and then come back with a file or a razor knife and clear off these edges. With trimming done, the hitch in place, all this stuff to do is, put your lower panel back up with those 13 fasteners in the reverse order that we remove them and you're ready to start using your hitch. With everything back in place, that'll do it for our look at and installation of the etrailer Class III trailer hitch here on our 2014 Lexus RX 350..
Average Customer Rating: 4.9 out of 5 stars (23 Customer Reviews)
This fully welded trailer hitch receiver bolts onto your vehicle's frame with no welding required. Matte black, powder coated steel is durable and corrosion resistant and creates a rugged look.QUALITY PRODUCTS and Quality Company that recognizes Military Veterans with a generous discount!
Two of the screws rubbed out during installation. I had to use the Lexus-manufactured screws removed with the tow hook attachments. The Screw threads are not the best quality.
Easy to install everything fit perfectly ,no problems!
Super easy to install, more mods needed on the plastic cover that my Lexus has! Not shown in the video.

Prefect fit!
Great service, prompt delivery
Fits great. Install was easy enough.
Very easy install and great fit for my 2014 Lexus RX. I’ve had it a little over a year.
No issues with the install. The hitch fit perfectly.
Great product. Great instructions for install. I was able to do it myself with no help. I am a 60 yo woman. I used car ramps. I installed in on a RX450h 2013. It took me 2 hours because I had to set up and gather items. I hadnt done this before. I used stuff I had around me(a pail and some wood pieces) to prop it up so I could get the screws started. I borrowed a torque wrench. And reinstalled the fascia. It looks great.
Quick to order, quick to ship,quick to me!And the best price to boot! I don't know how they make money at these prices!(I install hitches for a living)
fit as stated.
The instructions were excellent. Customer service amazing.
Used this product before (it’s on another one of my vehicles). Works great. Light weight and great price
Very easy to install.
service was great, the hitch was installed with any problems
Nice hitch well tucked underneath
The Curt Trailer hitch when combined with our 2014 Lexus RX350 provided the easiest and complete DIY install you can get! The vehicle is set up from the factory for a hitch install which set the stage for an awesome result when coupled with the Curt receiver. It could not have been a better situation!
The item arrived on time, was a perfect fit for my car, installed easily (by a professional), and has been great.
Do you have a question about this Trailer Hitch?
Info for this part was:
At etrailer.com we provide the best information available about the products we sell. We take the quality of our information seriously so that you can get the right part the first time. Let us know if anything is missing or if you have any questions.


Cedro
8/14/2023
1 year in the hitch still works great.