
Summer Starts Here - Save up to 70%
To see if this custom-fit item will work for you please tell us what vehicle you'll use it with.


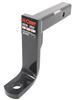
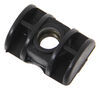
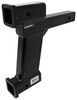
Fully welded vehicle trailer hitch is strong and durable. Draw-Tite's Tested Tough guarantee ensures that this hitch exceeds industry standards. The combination of an e-coat base and a powder coat finish provides excellent rust protection.
Features:
Specs:
Draw-Tite's Tested Tough program provides testing standards far superior to those outlined by the Society of Automotive Engineers (SAE), the go-to source for engineering professionals.
Each Draw-Tite trailer hitch receiver undergoes extensive fatigue testing and static testing with the ball mount that is either supplied or recommended for use with that particular hitch, thus ensuring results that are applicable to real life use. Fatigue testing is also conducted on hitches rated for use with weight-distribution systems.
In addition, Draw-Tite performs static testing on a simulated automobile, as opposed to the rigid fixture used for SAE testing, resulting in a more true-to-life scenario.
At etrailer.com we're committed to the products we sell, and to our customers. Our experienced and knowledgeable staff are available via both phone and email to address your questions and concerns for the lifetime of your hitch. The technicians at etrailer perform hitch installations on a daily basis, making them a valuable resource for do-it-yourselfers. The one-on-one, personal service you'll receive comes straight from an expert in the towing and automotive field. We've installed it, we've wired it and we've towed with it, so whatever your question, we can answer it.

Videos are provided as a guide only. Refer to manufacturer installation instructions and specs for complete information.
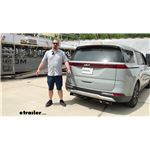
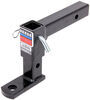
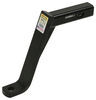
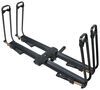
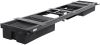
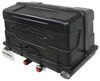
Hey everybody, how's it going Today, we're gonna be going over, and showing you how to install, the Draw-Tite Trailer Hitch Receiver here on a 2022 Kia Carnival. So, this is what our trailer hitch looks like installed on our Carnival. As you can see here, we have a visible cross tube, but everything has a nice black powder coated finish, which is gonna help protect the hitch from rust and corrosion over time, being that it is on the underside of the vehicle. It also helps it blend in a little bit better with the underbody paneling. So, adding a trailer hitch to your Carnival, it's gonna be an excellent idea, because it's gonna make your vehicle that much more versatile. Now, we can obviously use the trailer hitch for towing, but if we wanted to hit the trails, or free up some space inside the vehicle for those long road trips with the family, we could easily attach either a hitch-mounted bike rack or hitch-mounted cargo carrier/box.
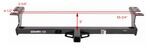
So, in regards to towing, our trailer hitch here is gonna provide us with a 4,000 pound gross trailer weight rating. That's the amount we can pull outward on our fully loaded trailer. Then it also has a 600 pound tongue weight rating, which is the downward force on the receiver tube. We could also use this trailer hitch with a weight distribution, if we have the need to do so. The capacities, however, are going to remain the same.
Now keep in mind, these capacities are for the hitch only, which is tested separately of the vehicle. Therefore, we need to verify the vehicle's towing capacity, and abide by the lower of the two, whether that's the hitch or the vehicle. So, the receiver tube here has the industry standard two inch by two inch opening, which is gonna provide us with a great selection of those hitch-mounted accessories to choose from. And then on the side of the receiver tube, we have our industry standard 5/8 inch diameter hitch pin hole. It's gonna work great with our 5/8 inch diameter hitch pin and clip.
Now keep in mind, the hitch pin and clip is actually sold separately. It doesn't come with the trailer hitch. And the reason for that is a lot of your hitch-mounted accessories are actually gonna come with their own hitch pin and clip. But if they don't, we have plenty of options here at etrailer. And then welded to the bottom of the receiver tube and the cross tube, we have our safety chain loops.
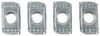
Those are gonna work great with both the S-type, as well as the larger Clevis style. So, we got a couple of measurements for you guys here. The first one is the distance from the ground to the top inside edge of the receiver tube. It's gonna be right at 11 1/4 inch, and that's gonna be useful when you're selecting a ball mount. That way, you can make sure you get the correct rise and drop to tow your trailer level. And then finally, we have the distance from the center of the hitch pin hole to the outside edge of the bumper. And this one's gonna be right at four inches. And that'll be useful when you're selecting your folding accessories, such as a bike rack or cargo carrier. That way you can make sure that while they're in the stowed position, that they don't hit the bumper. So in regards to installation, this one's pretty simple and straightforward. There's really no modifications to the vehicle needed, nor do we have to do any drilling or cutting. It's simply going to bolt right on using some common hand tools you can find in your home. There is one you may not have. That's a torque wrench. You can actually rent these for free from most local auto parts stores. So, let's go ahead and jump into the installation now, so we can show you how it's done. So to start our installation today, we're gonna come on the driver's side of the vehicle. Underneath the vehicle we're gonna have a trim panel we need to remove. In order to remove that, we're gonna have several pushpin fasteners on the outside here. So, we're gonna take a flathead screwdriver. You're gonna sneak that into the plastic push pin fastener, and once we pry that middle section out, the rest of it should follow. And again, we have several of these on the outside of the panel. We need to remove all those in order to take the panel off completely. So, I will say there is one that's kind of hidden in the back here. So, just make sure you don't forget that one. But, once we get them all out, we can take the panel off and set it aside. So the next part of our installation, we need to go ahead and lower our exhaust here. In order to do that, we're gonna take some sort of support straps, since we're working in the air. If you guys are at home working on the ground, you could just use a couple of blocks of woods, or a set of jack stands. So, we're just gonna find two points on the frame here, for our strap, and we're gonna pull it tight to provide some support once we remove the hangers. So, now in order to actually lower the exhaust, we have two hangers. One of them is gonna be closer to the tailpipe here at the end. So, there's gonna be a rubber isolator, and then a metal hanger going through that isolator attached to our exhaust. That's the one we're gonna break free. So, I'm gonna go ahead and spray it down with a spray lubricant to aid with that removal. So we got the one near the tailpipe removed. We'll show you how to remove the one here, closer to the muffler. It's pretty simple. You can just take a pry bar like we have here and just simply pry the rubber off of the metal hanger. So, on the inside of our vehicle here, directly below our frame rails on either side, we have the trunk pan here, and on the outside of the trunk pan you're gonna see some excess caulking here on the sides. That could potentially get in the way with our hitch. So, the best way to get this excess caulking off is to take a putty knife, or if you have a razor knife, which is what we see here. Again, if you're using a razor knife, just make sure you're extra careful. So, here's what it looks like when we have the caulking removed. As you can see, we don't have to remove all of that. There's actually a metal flange sorta tucked back behind that caulking. And we just need to remove all of that until we're flushed with the metal flange here. So keep in mind, we're on the other side of the vehicle now, so we do need to do this on both sides. In our particular case, the passenger's side had a little bit more caulking to remove. So now with an extra set of hands, we can raise the hitch into position on the vehicle. And on the bottom of the frame, we're gonna have three weld nuts there that are gonna line up with these three holes in our hitch. We'll simply secure it, using the hardware provided in your kit. So now luckily, it's a pretty tight fit around the trunk pan, so once you get it loosely into position, it should actually hold in place. And then we can line up our hole here and insert our bolt. Make sure the teeth on the conical tooth washer are facing up towards the hitch. We're gonna get one in place on this side. We'll jump over to the other side, get one in over there. You may need to maneuver the hitch around the exhaust a little bit over on the passenger's side. So now that we have a bolt holding it on the other side here, all that's left to do now is to insert our remaining fasteners. We have two more on each side. So now once we have all of our hardware in position here, we're gonna take a 19 millimeter socket. We're going to snug down all of our fasteners, and then we can torque them to the amount specified our instructions. So if you remember our trim panel from early, over on the driver's side, we actually won't be reinstalling that with the hitch into position, but now all that's left to do is to raise the exhaust back up into position, and that's gonna be it. And that's gonna do it today for our look and installation of the Draw-Tite Trailer Hitch Receiver, here on our 2022 Kia Carnival..
Average Customer Rating: 4.7 out of 5 stars (11 Customer Reviews)
Fully welded vehicle trailer hitch is strong and durable. Draw-Tite's Tested Tough guarantee ensures that this hitch exceeds industry standards. The combination of an e-coat base and a powder coat finish provides excellent rust protection.Came packaged in a cardboard box and arrived ahead of schedule. Installation was fairly easy but did take a little effort to remove exhaust rubber holder and get to bolts for fastening trailer hitch. Was able to reattach factory cover after cutting out a slot for hitch. Would recommend this product.,
Easy to install. Quick delivery. Great videos on the website showing how to install it.
Ordered on Tuesday, received on Friday. But hitch was delevered with deep scratches in a couple of spots. I installed it bc I didn't have choose. Also very hard to insert it into the designated spot. I used a jack from both sides. Otherwise it's relatively easy to install. Hardware supplied, will be good to include a small bag with thread lock.
Haven't unpacked the hitch yet but it arrived 3 days earlier than first posted :) etrailer is my "go to place" for all things auto / RV related.
Happy New Year to all.


Do you have a question about this Trailer Hitch?
Info for this part was:
At etrailer.com we provide the best information available about the products we sell. We take the quality of our information seriously so that you can get the right part the first time. Let us know if anything is missing or if you have any questions.


Thank you! Your comment has been submitted successfully. You should be able to view your question/comment here within a few days.
Error submitting comment. Please try again momentarily.