
THIS ITEM IS NOT A FIT FOR
2000 Dodge Van
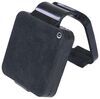
Draw-Tite Trailer Hitch Receiver - Custom Fit - Class II - 1-1/4"
Our Price: $215.13
2000 Dodge Van
Will this fit?
To see if this custom-fit item will work for you please tell us what vehicle you'll use it with.
Thank you! Your comment has been submitted successfully. You should be able to view your question/comment here within a few days.
Error submitting comment. Please try again momentarily.


- All Info
- Reviews (1)
- Q & A (0)
- Videos (2)
- Photos
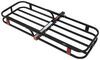
Draw-Tite Trailer Hitch
- Class II
- 1-1/4 Inch Hitch
- 3500 lbs GTW
- Concealed Cross Tube
- Draw-Tite
- 300 lbs TW
- Custom Fit Hitch
This fully welded, corrosion-resistant vehicle trailer hitch receiver is perfect for your light-duty towing needs. Draw-Tite's Tested Tough guarantee ensures that this hitch exceeds industry standards. Drawbar sold separately.
Features:
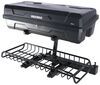
- Custom-fit trailer hitch lets you tow a trailer or carry a bike rack or cargo carrier with your vehicle
- Computer-aided, fully welded steel construction ensures strength and durability
- Tested Tough - safety and reliability criteria exceed industry standards
- Easy, bolt-on installation - no welding required
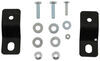
- Complete hardware kit - with carbon canister relocation brackets - and installation instructions included
- Lifetime technical support from the experts at etrailer.com
- Black powder coat finish covers a-coat base for superior rust protection
- Stylish, round-tube design
- Drawbar, pin, and clip sold separately
Specs:
- Receiver opening: 1-1/4" x 1-1/4"
- Rating: Class II
- Maximum gross trailer weight: 3,500 lbs
- Maximum tongue weight: 300 lbs
- Limited lifetime warranty

Draw-Tite Tested Tough
Draw-Tite's Tested Tough program provides testing standards far superior to those outlined by the Society of Automotive Engineers (SAE), the go-to source for engineering professionals.
Each Draw-Tite trailer hitch receiver undergoes extensive fatigue testing and static testing with the ball mount that is either supplied or recommended for use with that particular hitch, thus ensuring results that are applicable to real life use. Fatigue testing is also conducted on hitches rated for use with weight-distribution systems.
In addition, Draw-Tite performs static testing on a simulated automobile, as opposed to the rigid fixture used for SAE testing, resulting in a more true-to-life scenario.
etrailer.com Technical Support
At etrailer.com we're committed to the products we sell, and to our customers. Our experienced and knowledgeable staff are available via both phone and email to address your questions and concerns for the lifetime of your hitch. The technicians at etrailer perform hitch installations on a daily basis, making them a valuable resource for do-it-yourselfers. The one-on-one, personal service you'll receive comes straight from an expert in the towing and automotive field. We've installed it, we've wired it and we've towed with it, so whatever your question, we can answer it.
36798 Draw-Tite Class 2 Trailer Hitch Receiver
76046SK Emissions Canister Mounting Bracket Kit for Draw-Tite Trailer Hitch Receiver
Item # 36798-SK
Installation Details

This Product Fits The Following Vehicles
- 2017 - 2024 Chrysler Pacifica Hybrid
California residents: click here


Video of Draw-Tite Trailer Hitch Receiver - Custom Fit - Class II - 1-1/4"


Videos are provided as a guide only. Refer to manufacturer installation instructions and specs for complete information.


Video Transcript for Draw-Tite Class II Trailer Hitch Installation - 2021 Chrysler Pacifica
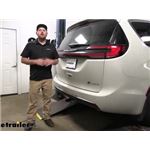
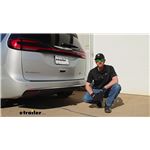
Hey everybody, Ryan here at etrailer. Today, on our 2021 Chrysler Pacifica, we're gonna be showing you how to install the Draw-Tite Class II trailer hitch receiver. But before we do that, why don't we check it out and make sure that this is something that's gonna work for you. So, with this hitch having the smaller inch and a quarter by inch and a quarter receiver tube opening, this will be a good choice for those of you that already have those inch and a quarter accessories who really only plan on using those, not doing anything too crazy. With that said, you know, the hitch is gonna look all right. It's gonna be completely hidden for the most part.
Really, the only thing you're gonna be able to see is the receiver tube opening. And it's gonna give us some good ground clearance as well. It's nice and tight against the bottom of our bumper. And that's important. You know, these vans don't ride super high off the ground.
So, as much space as we can get, we'll take. One of the big questions that we get asked all the time is if the hitch is going to interfere with your hands-free liftgate assist, and the answer is, no. You are just gonna have to kick your foot to either side of the hitch, and it'll open up like it did before. At the end of the receiver tube opening, there is gonna be a reinforced collar for a little bit of extra strength. And the hitch is gonna utilize that standard half-inch pin and clip.
Now, keep in mind, a pin and clip does not come included. But if you need one, you can grab it here at etrailer. We're going to have loop-style safety chain openings, which provide us with plenty of space to use just about any size hook that we might have. As far as hitch's weight capacities goes, it's gonna have a 300-pound maximum gross tongue weight rating. And that's gonna be the amount of weight that's pushing down on the hitch.
So, it's good for those one to three, maybe even four bike racks, just to kinda give you an example. As far as the maximum gross trailer weight rating goes, that's gonna be 3,500 pounds. And that's gonna be the amount of weight that's pulling on the hitch. So, there's the weight of the trailer, plus anything that you might have on it. Now, I do always like to suggest, never a bad idea just to grab your owner's manual. That way, you can make sure your Pacifica can pull as much weight safely. Now, I'm gonna give you a couple more measurements. And you can use these to help figure out which hitch-mounted accessories are gonna work out best. From the ground to the top inside edge of the receiver tube opening, that's gonna be about 12 1/2 inches. So, if you do plan on doing some towing, chances are pretty good. You're gonna need to get a ball mount with a rise. From the center of the hitch pinhole to the edge of the rear bumper, that's gonna be about an inch and a half. And you can use that measurement to figure out exactly, if any of those folding accessories that you might have can be stored in that upright position without contacting the bumper. When it comes down to it, you know, if you plan on, really just using those inch and a quarter accessories, be a great solution for you. However, if you do plan on, maybe kinda growing in due to some larger accessories, or, you know, maybe pulling some trailers around, things like that, it may be worth looking into a Class III hitch. Which, generally speaking, it's just a little more versatile. You know, a little more heavy duty and you can use it for a few more things. Other than that, as far as getting the hitch installed, I'm not gonna lie, it's a little tedious. I won't say that it's difficult, but more time consuming than anything else. But as long as you stay focus, it really shouldn't give you a whole lot of issues. Speaking of which, let's go ahead and put it on together now. To begin our installation, we're gonna be underneath the back of our van. And the first thing we need to do is remove this underbody panel. So, this thing's gonna be held in place with a bunch of different types of fasteners. So, we're just gonna kinda run through them here. The first ones that we're gonna start with will look like this. There's gonna be several of them. And we're gonna pull all of those off using a 10-millimeter socket. So, these are just gonna be kinda scattered throughout here. So, we'll just kinda work our way around. It's like there'll be two up there, but this is in the way, so we'll pull those off as well. And as of right now, that looks like we got all of those types of fasteners. Now, we can work on these types of fasteners. They're gonna have an eight-millimeter head. It's like they're gonna be kinda just along the edges. But again, like the last ones, we'll kinda just work our way around and get them pulled out. So, you'll see something that kinda look the same in these areas, but they're not actually holding the underbody panel on. So, what you can do is kinda push up on the panel and that'll help, you know, give you a better idea which ones you need to pull out. And then we're gonna have a couple more of those on this side edge here that we're gonna need to take out as well. So, if you look right here, we're gonna have two more of those fasteners. I'm gonna sneak in back there and get those removed. It's a little bit tight, but it is doable. Also, it looks like we're gonna have one more right there, kinda attaching the mudflap to the underbody panel. So, we'll go ahead and pull that out as well. And then, it looks like we're gonna have a couple of these types of fasteners. So, with these, you can take a big screwdriver and just turn them to the left. Sometimes, they drop right off, like this one did. Other times, you might have to kinda pull down on the panel while you're turning this to get it to release. Looks like the other one's gonna be you right here. And when you're removing these, this looks like the only thing holding the panel in position, so I'm gonna keep a hand on it while you're doing this. We should be able to grab the underbody panel, and work it out from under our vehicle. Now, we need to lower our exhaust a little bit. That way, it'll give us some more room to work. Before you do that, you just wanna take a strap and run it from side to side. Tighten it up a little bit. That way, this will help kinda support the exhaust and we can control how fast and how far we let it come down. To get the exhaust lowered, we're gonna have two rubber isolator hangers, which just like this one here. We're gonna spray these down with some soapy water or some penetrating oil to help make it a little easier. And you just take a pry bar and we're gonna work one side of the hanger off of our exhaust. If you follow our exhaust towards the front, we're gonna have another one right here. Loosen up the strap a little bit. That'll let us pull our exhaust down and make it easier to work. Now, we can remove our heat shield. So, we're gonna have two fasteners holding it in place. One's gonna be right there. We'll take a 10-millimeter socket. Get that one removed. And if you look right here, we're gonna have another one of those fasteners. We'll pull that one off, and then we should be able to kinda work the heat shield down, and out from under our vehicle for the time being. Over here on the driver's side of our vehicle, we're gonna have a ground wire that's attached to the bottom of the frame. And that's gonna interfere with the hitch if you leave it there, so we're gonna relocate it. I'm gonna remove this nut using a 10-millimeter. Pull that wire off. And there's actually a preexisting hole right here in the frame that we can use as a new ground. What you wanna make sure to do though, since this is painted, you wanna knock some of that paint off. That way, we have bare metal and we get a good ground connection. So, I'm just gonna take a little sandpaper. I'm just gonna work that area clean. That way, we'll have proper contact. So, we have the paint removed in that area. Now, we're gonna take the ground wire, and take the included bolt and a flat washer. You can move it into place. It looks like we're gonna have a tab right there. With this tab right here, to make everything fit nice and flush, I'm just gonna take a pair of pliers and just kinda bend that straight. With that done, we'll take our bolt and our washer. And then after there we're gonna take the nylon lock nut. Get that on the other side of the bolt. And we'll come back with a 7/16 socket and wrench and tighten this down. At this point, we can lower our carbon canister, which is this piece here on the driver's side. So, we're gonna have two fasteners. A 10-millimeter bolt on each side of it. We're gonna grab our socket and pull this one out first. The other one's gonna be the exact same, right here. So, we'll lower this down and kinda just let it hang for the time being. So, if you have any of these nut inserts left inside of the frame rail after you lower down the carbon canister, you just need to pull those out of the way. That way, they don't interfere with the hitch. So, we're not gonna reuse those. And then, what we can do is set up our relocation bracket. So, you want to take the side that has the round hole or that smaller hole. And you want this to sit on top of the carbon canister itself. You want the angle to go up. And what you're gonna do is take the bolt and a washer. You drop that down. And you're gonna follow that up with another washer and a nut. We'll just keep these on loose for now. So, it'll sit just like that. And I went ahead and just do the same exact thing over here on this side of the canister. Put that bracket on there and just loosely secure it using the same hardware combination. Now, let's go ahead and go over our attachment points that we're gonna use to secure the hitch. And they're gonna be the same on both sides of our vehicle. And we're gonna have a total of three. So, we're gonna have this hole here, this hole, as well as this one back here. So, with that said, now, what we can do is get our hardware ready and we can fish wire into the correct attachment points. Now, we can go ahead and get our hardware in the frame rail. And we're gonna have three attachment points. We're gonna be using this hole, this one, and this one. And I wanna mention, they're gonna be the same on both sides of our vehicle. Attachment points, as well as the hardware that we're gonna be using. With that said, to get the hardware in place, we're gonna be using a fish wire. And what I like to do, we're gonna be feeding our hardware up through this larger hole here. What I like to do is just kinda put a bend in that fish fire. And that'll help kinda make it a little bit easier to get in. We're gonna take the coiled end starting with this hole here at the back. We're gonna push that forward towards this larger hole here. And sometimes, you get lucky and the coiled end comes right out. Other times, you may have to kinda reach in there and help guide it out a little bit. But once that coiled end has dropped out, you're going to take one of these smaller spacer blocks. Put that over it, and the carriage bolt. The carriage bolt is going to thread onto the coiled end of the fish wire. And you can simply just feed that hardware inside of the frame. I'm gonna pull down on it until we get it to drop down, like so. For this opening, we're gonna do pretty much the same thing. We're gonna feed that through, get it to come down. Again, we're gonna take small spacer block and a carriage bolt and get that going. Feed it up in the frame, until it drops down. And then, for this attachment point, we're gonna do something a little bit different. Let's take the coiled end, and you're gonna put on one of the bigger spacer blocks. So, just slide that over and thread on the carriage bolt. And you can simply just push the bolt in the frame. As well as that spacer block, and drop it back down, like so. Now, with an extra set of hands, we can get our hitch into position. We wanna start over there on the passenger side. Make sure you feed the pull wires through the corresponding holes in the hitch. And so, once you have that done, you can kinda start to lift up. Once you get to that point, you wanna do the same thing over here on the driver's side. And on the driver's side, it's gonna be a little tight 'cause we have to kinda work around our canister box here. Make sure your fish wires aren't kinda tangled up. And once our hardware drops through, you wanna come to this one here closest to the back. Remove that fish wire. If you take a conical tooth washer, make sure the teeth on the washer are gonna face up towards the hitch. Place that over the bolt. And you're gonna take a hex nut. And you wanna get at least one started on each side, hand tight. That way, the hitch will support itself. So, it looks the hitch is supporting itself. Over here on the driver's side, we need to address our carbon canister. So, what you're gonna do is take the two pull wires. Feed them through the brackets that we installed earlier. We're gonna lift this canister up into the place, so we get the hardware to drop through it. Once you have it like that, you can remove the pull wires. And again, just take a conical tooth washer. A hex nut. And then get it started. With all of our hardware in place and hand tight, we can snug it all down using a 19-millimeter socket. Once everything is tight, we need to make sure to come back with a torque wrench and tighten it down to the amount specified in the instructions. If you don't have a torque wrench, you can always pick one up here at etrailer. Or a lot of times, you can go to your local auto parts store and rent one from them. Now, we can tighten up our brackets for our carbon canister. You're gonna need to take a 13-millimeter wrench, put it on the head of the bolt. A 13-millimeter socket. And that'll allow us to tighten everything down. Now, we can grab our heat shield. We got to get this trimmed out. That way, we can put it back in place. There is a diagram and instructions to give you some measurements. And I went ahead and drew that out here. What I'm gonna use to cut this is just a regular pair of tin snips. You can use a Dremel tool or something else like that as well. But, with that said, I'm go ahead and get this part trimmed off. With the heat shield trimmed out, we can go ahead and put it back in place. And for the time being, we're just going to reinstall this nut right there. Because the other one that's gonna hold it up over here is actually also going to help hold up our under body panel, so we'll leave that one exposed for now. Now, we can go ahead and rehang our exhaust. So, you just lubricate them again. And then, this time, you can kinda just get everything lined up by hand. Slide them back on. And with it supporting itself, go ahead and remove our strap. Now, what we can do is trim out our underbody panel here. There is a diagram and instructions. However, I feel like the diagram is gonna have us cut out a lot more of our underbody panel than we actually need to. So, what I've done is kinda held this up there against the bottom of our car and marked out a spot, which I drew here. And my thought is, you know, why cut out more than you absolutely need to. So, I'm gonna cut this opening out, and if it fits, great. If not, not really a huge deal. We can always come back and trim out a little bit more. My thought is we can always remove more material, but you can't put it back. So, we'll start with this area and go from there. So, this is almost like a cardboard type material. And I'm just gonna use a regular pair of scissors to get it cut out. So, I went ahead and put our panel back up. And everything cleared just fine. However, this side, a little more material was removed, so it just look a little off. So, I did cut off a few more inches over on this side just to help kinda even things out and make it look a little bit better. But, with that side, the panel's loosely installed and we're just gonna resecure it the opposite way that we removed it. And that'll finish up our look at and our installation of the Draw-Tite Class II trailer hitch receiver on our 2021 Chrysler Pacifica..
Customer Satisfaction Score:
94% were satisfied with this product
6% of customers were not satisfied
- Alternate product found
Customer Reviews
Draw-Tite Trailer Hitch Receiver - Custom Fit - Class II - 1-1/4" - 36798-SK
Average Customer Rating: 5.0 out of 5 stars (1 Customer Reviews)
This fully welded, corrosion-resistant vehicle trailer hitch receiver is perfect for your light-duty towing needs. Draw-Tite's Tested Tough guarantee ensures that this hitch exceeds industry standards. Drawbar sold separately.by: Mark01/31/2022
Chrysler Pacifica
I purchased this hitch because of etrailer's very helpful installation video specific to the Pacifica Hybrid. I spent hours online looking for a solution and glad that I found it here. Thank you for thinking about us hybrid van owners looking to carry some bikes!
- Now for the installation - you can do it, but be very patient. Else, hire a pro.
- I did the install without jacking up the van, and I’m 6’1” and 250 lbs. I used the etrailer box as a “work mat” : )
- I ended up not cutting much if the heatshield and not trimming much of the underbody cover
- Yes - you will need to unhook the exhaust just like in etrailer’s video. I tried not too at first but couldn’t get Around it.
- at the end - great way to carry bikes on the outside of the van and maximize your van’s investment and your fun time capabilities. This hitch on a hybrid is NOT for towing! That will void warranty
- For an added touch, I found a “Mopar” 1/4” hitch plug and threw it on. Now it looks like a dealer installed option! ;-)
Well, take a look at the pics. Thanks again ill be sticking with etrailer from now on.


1
1
See what our Experts say about this Draw-Tite Trailer Hitch
- Three Bike Carrying Option for 2020 Chrysler Pacifica HybridBecause the vehicle can be damaged due to the weight of 3 bikes it's not recommended that a 3 bike trunk mount rack be used on this vehicle. Your best bet would be to install a hitch and use a hitch mounted bike rack if you need to carry three bikes. For a hitch, I'd recommend the Draw-Tite class II hitch, part # 36798-SK. This hitch is a no-drill application that most folks could install on their own if they're fairly handy. I've linked to the installation instructions. If you were...
view full answer...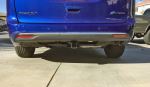
- Does Draw Tite Hitch for 2017 Chrysler Pacifica Interfere with Hands Free LiftgateThat Draw Tite hitch part # 36798-SK that fits the 2017 Chrysler Pacifica Hybrid (non-hybrid models use # 36798) does not interfere with the hands free liftgate you mentioned. At worst you'd just need to kick to either side of the hitch opening and you'd be set.
view full answer... - Concealed Cross Tube Hitch For 2020 Chrysler Pacifica Hybrid The Draw-Tite Trailer Hitch Receiver Class II 1-1/4" part # 36798-SK is the only option for a concealed cross tube on the 2020 Chrysler Pacifica Hybrid. The Draw-Tite hitch will give you a 1-1/4" receiver on the back of the Pacifica so as long as your bike rack is compatible with a 1-1/4" like you mention you will not have any issues.
view full answer...
Do you have a question about this Trailer Hitch?
Info for this part was:

Edited by:
Lindsey S

Expert Research:
Jameson C

Video Edited:
Joshua S

Video Edited:
Jacob T

Updated by:
Wilson B

Updated by:
Isabelle B

Written by:
Alexander C

Test Fit:
Ryan G
At etrailer.com we provide the best information available about the products we sell. We take the quality of our information seriously so that you can get the right part the first time. Let us know if anything is missing or if you have any questions.
Product Experts Available Now!
Call 1-800-940-8924
Mark
2/2/2023
Still like new. No problems at all.