
THIS ITEM IS NOT A FIT FOR
2002 Ford F-250 and F-350 Super Duty
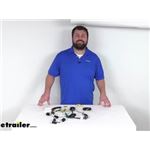
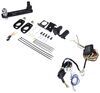
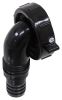
T-One Vehicle Wiring Harness with 4-Pole Flat Trailer Connector
Retail:$104.73
Our Price: $62.14
You Save: 41%
2002 Ford F-250 and F-350 Super Duty
Will this fit?
To see if this custom-fit item will work for you please tell us what vehicle you'll use it with.
Thank you! Your comment has been submitted successfully. You should be able to view your question/comment here within a few days.
Error submitting comment. Please try again momentarily.


- All Info
- Reviews (27)
- Q & A (0)
- Photos
Tekonsha Custom Fit Vehicle Wiring
- Custom Fit
- Trailer Hitch Wiring
- 4 Flat
- Powered Converter
- Tekonsha
Quickly and easily install a 4-way trailer connector on your vehicle with this custom wiring harness. T-One connector plugs directly into existing wiring - no cutting, splicing or tapping required. Powered ModuLite reduces strain on wiring system.
Features:
- Provides a 4-way flat trailer connector at the back of your vehicle to power your trailer's signal lights
- Compatible with 5-pole, 6-pole and 7-pole adapters (sold separately)
- Connects quickly and easily
- Locate connection points behind tail lights
- Plug in T-connector
- Run hot lead to car battery
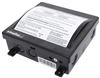
- Includes ModuLite power module that connects directly to battery to avoid overloading vehicle's electrical system
- Constructed of 16-gauge bonded wire
- Comes with dust cap for 4-way flat connector
Specs:
- Maximum amperage:
- Stop/turn lights: 5 amps per circuit
- Tail lights: 7.5 amps per circuit
- 1-Year limited warranty
Installation
This custom-fit T-One connector plugs into your vehicle's wiring harness, which is located behind the driver's-side and passenger's-side tail lights. You will have to remove the floor covering, interior paneling, and tail light assemblies to access this harness.

Once you've plugged in the T-connector, run the hot lead up to your car battery. Connect the lead to the included fuse holder, and then connect the fuse holder to the positive terminal on your battery and insert the provided fuse.
Once installation is complete, the 4-way connector will be stowed beneath your vehicle, near the trailer hitch. A mounting bracket (sold separately) is recommended to keep the connector secure.
It is recommended that you use a small amount of grease on all electrical connections - the plugs on your automobile and the 4-pole connector itself - to help prevent corrosion.
ModuLite Powered Tail Light Converter
A ModuLite power module is built into this T-One connector. With a ModuLite, your trailer's lights will be powered without overloading your vehicle's electrical system. Because the module draws power directly from your car's battery and bypasses the electrical routes that are used by a basic wiring harness, there is virtually no draw on your tail light circuits.
118785 Tekonsha T-1 T-Connector - 4 Wire - Modu-Lite Converter Included
Replaces Tekonsha 118748
Item # 118785
Installation Details

This Product Fits The Following Vehicles
- 2017 - 2024 Jaguar F-Pace
- 2017 - 2021 Jaguar F-Pace
California residents: click here


Customer Satisfaction Score:
97% were satisfied with this product
3% of customers were not satisfied
- Wrong item was ordered
- Product did not meet expectations
- etrailer mistake
Customer Reviews
T-One Vehicle Wiring Harness with 4-Pole Flat Trailer Connector - 118785
Average Customer Rating: 4.5 out of 5 stars (27 Customer Reviews)
Quickly and easily install a 4-way trailer connector on your vehicle with this custom wiring harness. T-One connector plugs directly into existing wiring - no cutting, splicing or tapping required. Powered ModuLite reduces strain on wiring system.by: Nic 05/09/2024
Mike helped take care of the few questions. Quick, efficient and to the point! Will absolutely be using e trailer more in the future!
by: Gustavo04/30/2022
It does not work/fit on a Range Rover Velar as claimed. The connectors clip-on, however the wires are too short to fit. The T-connectors are made to be housed behind the tail light housing. That seems to work in the Jaguar F, as per the installation video, but the tail lights of the Velar fit with tight precision. There's nowhere to put the T-Connectors.

Gustavo

5/5/2023
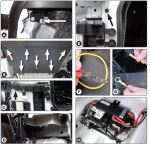
I found a good fix. After a couple of tries I devised a solution that makes this Tekonsha connector work perfectly. In short, I extended the wires of the T connectors by 12 inches. This allows the clamp that connects to taillight housing to fit as designed and for the clamp that connects to the car wiring to fit outside the taillight cavity where there is no room in an empty space between the fascia and body. I had an electrician solder 12 inch wire extensions on both t-connectors for $80, probably ripped off, but I wanted it done right. With this fix, making the connections and running the wires is really simple. I didn’t even have to remove the bumper fascia. I’ve included a few pictures which I hope help. Before doing this, I spoke with Tekonsha technician to see if they would provide me with extended t-connectors, but they never got back to me. For the company, the solution is simple: 12-16 inch wires forming the t-connectors. That would result in 5 star compatibility with the Range Rover Velar. As originally designed, it doesn’t fit.
by: Tina K05/01/2022
DOES NOT FIT A 2021 VELAR! If you have a Velar do not buy this. The tail lights are a different style than the Jaguar that this kit is made for. It damaged my tail light plug and tore out the wires. There is not enough room behind Velar taillights for this kit as the wires on the plug extension are too short. It is deceptive because all the plugs will plug in fine but then when you go to push the tail light in the resistance you encounter is the plug harness tearing the wires out of your tail light. I was gentle and I tried to put the harness in the cubby but there is no room and very little force destroyed my very expensive range rover tail light plug. Unfortunately I didn't take any pictures of the damage as I figured there wouldn't be much of a response to it given the underwhelming response when the hitch arrived sticking out of the box. But basically the issue is that your plug adapter is too short between the harness and tail light. On a Jaguar there is a large pocket behind the tail lights. On the Velar there is no pocket, there is an indent on the rear of the tail light itself and then just a small channel for the wire harness to run down into the bumper. I made the mistake of not realizing that this wouldn't fit and when sliding the tail light into its bracket the harness was too short and tore the plug out of the tail light. Unfortunately, the tail light is LED and the wires to the plug are like 24/26 gauge which caused them to tear right out of the EPC plug with very little pressure. I ended up soldering extension wires into the damaged headlight and re-pinned the plug. On the other side that I didn't damage I just cut all the wires on the plug jumper and extended it 6 inches. The first photo shows the stock harness and plug, the red circle is where the plugs sit in a groove in the rear of the tail light, there is no pocket to fit anything. The 2nd photo shows how I modified your harness to work, since the repairs on the other side aren't really applicable, which is not much. It just needs 7 inches of wire added to the plug adapter. The red outline shows how long your plug was when I received it, the blue is how much wire I added to make the plug work. I left the resistor or whatever on the harness side of the plug and only extended the plug that would connect to the headlight. Lastly. By extending the wires it allows you to slide everything down into the bumper gap as outlined with the yellow arrow. So the entire harness and resistor and original plug gets put in there and then just the extended plug side for the tail light goes up into the tail light pocket and the wires run down through the gap as normal. So basically all you'd have to do is extend all the wires by 6-8 inches between the two plugs with the resistor left shortened on the harness plug side as you can see in the photo.

Sierra K.
5/5/2022
I reached out to the manufacturer and they are going to look into this and hope to modify the kit with longer wiring.
by: Kenny 03/14/2023
Installation was simple. Works great.
by: Priscilla Banh04/22/2022
2017 Jaguar F-Pace
etrailer was such a great reference for me when looking for a trailer hitch and wiring. Although I ordered my hitch elsewhere, I definitely got the reference from etrailer. I did however order my Tekonsha wiring kit from etrailer. The price was reasonable and the delivery time was as expected. Actually a little earlier. Great service.
by: Casey02/22/2020
Make sure you install while your installing the hitch on the F-Pace. For me, I had to take the bumper off twice, thinking it was installed in the trunk only... wrong! The harness is completely outside the SUV. I zipped tied to the existing wire harness, ran it to the battery thru a grommet. Wish it came with heat shrinks and better instructions (black / white).
by: David 12/19/2021
Your prices are great and free prompt shipping was much appreciated...highly recommend this company

David
12/23/2022
GREAT PRODUCT....GREAT PRICE
by: Stephen10/08/2022
Very nicely made and fits perfectly. Followed the etrailer video for installation on the f-pace and installation went very smoothly. 5stars.
by: Mike S10/09/2017
2017 Jaguar F-Pace
I bought this with the trailer hitch from the same company. I highly recommend if your installing the hitch get this at the same time as you need to take off the bumper anyway. Just get the entire set and get it over with. The install was super easy, my only suggestion is to make the same video instructions as the hitch, they make life so much easier.
by: Pal06/22/2023
Quick delivery and an exact fit.
by: Mick 08/23/2020
The trailer provided me with a wiring harness that no one could find for more than two months there was excellent communication easy to order and you every step of the way when it was shipped and when it would arrive couldn’t of been more perfect
by: Rich11/18/2018
2018 Jaguar F-Pace
Great fit and easy to install once you have the bumper cover off ro install the hitch. Watch out how the wire harness tucks in the taillight housing as it is tight.
by: Joe12/07/2021
Fit my Range Rover Velar, saved me tons of money not having to go to dealer…
by: Peiqi02/01/2019
2019 Jaguar F-Pace
Great product, works perfect, arrive on time.
And good price also.
by: Charles 09/26/2021
Melissa was great. Already have it installed. Thank you for the fast shipping.
by: Hans 03/03/2021
2018 0 Velar
great service and fast
Thanks
by: John 03/18/2024
by: Jacob 06/13/2021
Quick and easy. Ty
by: Alexander 09/04/2022
by: Peter 06/22/2021
by: Vernon 02/21/2021
2021 0 Velar
by: Frank06/03/2023
by: Timothy 03/27/2023
by: Clark 09/15/2021
by: Mark 08/31/2022
2017 Jaguar F-Pace
25
27
Show More Reviews
See what our Experts say about this Tekonsha Custom Fit Vehicle Wiring
- How to Install a 5-Way Adapter on 2018 Range Rover VelarIn order to connect your additional wire from your adapter you will want to use a circuit tester like the # PTW2993. Using the circuit tester, find the reverse light circuit on your 2018 Range Rover Velar. Once you find this wire, you will splice in the reverse lockout wire from your adapter. I have attached a helpful article on wiring 5-way connections for your reference which also discusses the use of an adapter. We do not have an installation video for your particular vehicle, but I...
view full answer... - Will Trailer Hitch for 2019 Jaguar F-Pace Void WarrantyWhen you install an aftermarket part on your vehicle like a trailer hitch in this case, you are protected by the Magnuson–Moss Warranty Act. This act states, in part, that unless the installation and the part caused a problem then the warranty cannot be voided. I recommend looking it up online. For your 2019 Jaguar F-Pace we have the Draw Tite hitch part # 76026 as a confirmed fit that I recommend. I recommend this over the Curt hitch that also fits your vehicle as it does not require...
view full answer... - Brake Controller Recommendation/Installation on 2017 Jaguar F-PaceMy research indicates that the 2017 Jaguar F-Pace doesn't have a plug-and-play brake controller connector under the dash. Typically in this instance we'd simply recommend that the brake controller be hardwired using an installation kit like the # ETBC7. However, I've seen a few reports where folks have tried to do this and it hasn't worked correctly and it would appear that a solution has been found. I believe that your best option would be to use a wireless option like the Curt Echo,...
view full answer... - Draw-Tite Trailer Hitch 76026 Requires Permanent Removal of Impact Beam on 2017 Jaguar F-PaceWe do mention upfront that the Draw-Tite hitch # 76026 "requires permanent removal of the impact structure; hitch replaces the impact structure for support and safety." This is an installation note that appears below the features on the hitch results page if you go through the fit guide, see picture. I can see how someone might miss it though. If you do not trust the Draw-Tite hitch to meet or exceed the specs of the impact beam on your 2017 Jaguar F-Pace then like you said the Curt hitch...
view full answer...
- Trailer Wiring for 2017 Jaguar F-PaceThere is absolutely no difference between the two wiring harnesses. The T-One Vehicle Wiring Harness # 118785 is just an updated part number for Harness 118748. They are each plug-in harnesses that will provide your 2017 Jaguar F-Pace with a 4-flat connector so you can power your trailer's lights when using Curt hitch # C13291 to tow. Should you also need a ball mount I recommend checking out Ball Mount Kit # 989900, which is for 2” hitches and may fulfill your towing needs in one tidy...
view full answer... - Recommended Trailer Wiring Harness for 2018 Land Rover Velar I have great news! I checked with Tekonsha and was able to verify that the T-One Trailer Wiring Harness # 118785 referenced in your question is confirmed to fit your 2018 Land Rover Velar and will work perfectly. This custom harness installs by simply plugging into factory ports behind the driver and passenger tail lights and then running the hot lead up to the battery. It will provide you with a 4-Way connector to connect with and power a trailer's basic signal lights.
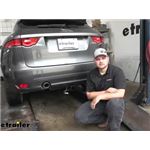
view full answer... - Will Curt Hitch Work With 2019 Jaguar F-Pace With Dual Exhaust On One SideThe Curt Hitch Receiver part # C13291 is designed to fit all models of the 2019 Jaguar F-Pace so you will not have a problem installing it on your Jaguar with dual exhaust on one side. I have attached a photo from the installation that shows that the hitch location does not interfere with the exhaust location at all. I have also attached the installation video for your reference. If you need wiring, I recommend the Tekonsha T-One Vehicle Wiring Harness with 4-Pole Flat Connector part #...
view full answer...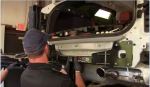
- Does Curt C13291 Class III Hitch Interfere With Backup Sensors on 2018 Jaguar F-PaceAccording to my contact at Curt, their # C13291 Class III hitch will not interfere with the back up sensors on your 2018 Jaguar F-Pace. The backup sensors are installed into the rear bumper cover, and the hitch is actually installed behind the sensors, sandwiched in between the factory bumper beam and the vehicle, so there's no way for the hitch to interfere with the sensors. You can see this in the installation video I've linked for you. If you'll be towing with the hitch, you'll need...
view full answer... - Trailer Hitch Recommendation 2019 Jaguar F-PaceFor a complete towing setup for your 2019 Jaguar F-Pace that will give you the best and most high quality towing components I would recommend the Stealth Hitch part # SH44FRT which gives you a hitch that has a removable lower section so that it can be completely invisible when not needed and also comes with a ball mount platform and trailer wiring so you'd have everything needed with just one part number. If instead you were wanting to spend less the Curt Hitch part # C13291 is a great...
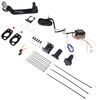
view full answer... - Draw-Tite Trailer Hitch Receiver and 4-Way Flat Wiring Harness For a 2020 Jaguar F-Pace SVRThe Draw-Tite Max-Frame Trailer Hitch Receiver # 76026 will work with all trim levels of your 2020 Jaguar F-Pace which includes your SVR. This receiver replaces the factory bumper beam on your Jaguar which gives it a hidden appearance. You will need to trim a slot in your lower appearance panel. I recommend also installing the Tekonsha T-One Vehicle Wiring Harness # 118785 when you install the receiver. This will make it much easier to run the wiring while the bumper cover is removed....
view full answer... - Is Bumper Fascia Removal Required to Install Tekonsha # 118785 on 2018 Jaguar F-Pace The Tekonsha T-One Vehicle Wiring harness # 118785 referenced in your question will install on your 2018 Jaguar F-Pace by plugging into the factory harness behind the driver and passenger side tail lights. During the install process you will indeed need to remove the bumper fascia for the included module. In addition to the bumper fascia you will also need to remove the floor coverings in the cargo area and the tail light assemblies themselves. I have attached a couple images from the...
view full answer...
- Why Does Bumper Beam Get Removed to Install Draw-Tite Trailer Hitch on a 2017 Jaguar F-PaceOn your 2017 Jaguar F-Pace the bumper beam is removed for installation of the Draw-Tite hitch # 76026 because the cross tube spans the space between where it mounts to the vehicle. The bumper beam is curved but doesn't stick out far enough on the ends for the design of the hitch. The bumper beam is therefore removed and the hitch basically takes its place. On the Curt hitch # C13291 the cross tube is not as long so the curved bumper beam can fit around it and you won't have to leave it...
view full answer... - Does Tekonsha Wiring Harness Fit 2020 Jaguar F-Pace SVRYes it is! I confirmed with the manufacturer, Tekonsha, that their wiring harness is indeed a fit for your 2020 Jaguar F-Pace SVR, with the correct part number being the following: - T-One Vehicle Wiring Harness with 4-Pole Flat Trailer Connector # 118785 This is a really good choice for your Jaguar as Tekonsha is known for making the most reliable wiring harnesses in the industry. Along with this harness you can complete your towing set up with a trailer hitch receiver, and there are...
view full answer... - Why Does Bumper Beam Get Removed To Install Draw-Tite Trailer Hitch On 2019 Jaguar F-PaceThe bumper beam is removed and not re-installed when installing the Draw-Tite trailer hitch part # 76026 on the 2019 Jaguar F-Pace because the hitch cross tube is longer so it does not allow the bumper beam to fit back onto the vehicle. The hitch replaces the bumper beam on the vehicle. I recommend the Curt Trailer Hitch Receiver part # C13291 for the Jaguar because it is a rounder and shorter design that allows the bumper beam to fit around the hitch. I have attached an installation...
view full answer...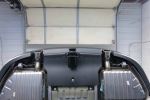
Do you have a question about this Custom Fit Vehicle Wiring?
Info for this part was:

Edited by:
Lindsey S

Video Edited:
Joshua S

Video by:
Chris R

Updated by:
Wilson B

Updated by:
Alexander C

Updated by:
Isabelle B

Updated by:
Noah M

Written by:
Ronnie R

Installed by:
Michael B

Test Fit:
Clayton O
At etrailer.com we provide the best information available about the products we sell. We take the quality of our information seriously so that you can get the right part the first time. Let us know if anything is missing or if you have any questions.
Product Experts Available Now!
Call 1-800-940-8924
Gustavo
5/1/2023
I found a good fix. After a couple of tries, I devised a solution that makes this Tekonsha connector work perfectly. In short, I extended the wires of the T connectors by 12 inches. This allows the clamp that connects to the taillight housing to fit as designed and for the clamp that connects to the car wiring to fit outside the taillight cavity where there is no room in an empty space between the fascia and body. I had an electrician solder 12-inch wire extensions on both t-connectors for $80, probably ripped off, but I wanted it done right. This fix makes the connections and running of the wires very simple. I didn’t even have to remove the bumper fascia. I’ve included a few pictures, which I hope help. Before doing this, I spoke with Tekonsha technician to see if they would provide me with extended t-connectors, but they never got back to me. For the company, the solution is simple: 12-16 inch wires forming the t-connectors. That would result in 5-star compatibility with the Range Rover Velar. As originally designed, it doesn’t fit.