
Summer Starts Here - Save up to 70%
To see if this custom-fit item will work for you please tell us what vehicle you'll use it with.
Thank you! Your comment has been submitted successfully. You should be able to view your question/comment here within a few days.
Error submitting comment. Please try again momentarily.
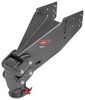
Quickly and easily install a 4-way trailer connector on your vehicle with this custom wiring harness. T-One connector plugs directly into existing wiring. Powered ModuLite reduces strain on wiring system.
Features:
Specs:
Installation
This custom-fit T-One connector plugs into your vehicle's wiring harness, which is located in your rear cargo area. You will have to remove some interior paneling to access this harness.
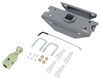
Once you've plugged in the T-connector, run the hot lead up to your car battery. Connect the lead to the included fuse holder, and then connect the fuse holder to the positive terminal on your battery and insert the provided fuse.
Once installation is complete, the 4-way connector will be stowed within your cargo area.
It is recommended that you use a small amount of grease on all electrical connections - the plugs on your automobile and the 4-pole connector itself - to help prevent corrosion.
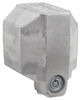
A ModuLite power module is built into this T-One connector. Because most trailers run on a two-wire system - wherein the brake and turn signals are carried on one wire - the separate brake and turn signals from your vehicle's three-wire system need to be combined so they are compatible with the wiring system of your trailer. This power module functions as a tail light converter to combine the brake and turn signal functions of your automobile so that they run on one wire to properly activate your trailer's tail lights. Note: This will not affect how the tail lights on your vehicle operate.
With a ModuLite, your trailer's lights will be powered without overloading your vehicle's electrical system. Because the module draws power directly from your car's battery and bypasses the electrical routes that are used by a basic wiring harness, there is virtually no draw on your tail light circuits.

California residents: click here
Videos are provided as a guide only. Refer to manufacturer installation instructions and specs for complete information.
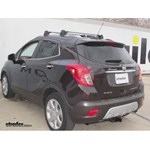
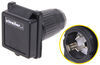
Today on our 2015 Buick Encore we're going to be taking a look at and installing the T1 vehicle wiring harness with four pull flat trailer connector. Part number 118588. Right now our four way trailer plug is stored away from the elements. When we're ready to use it we'll lift up our cover. We can set our wire out through whatever length you're going to need, then we'll lay it across the sill plate, across this rubber weather seal. Just make sure you stay away from the latch area and you can simply close your hatch, remove your cover, plug in your trailer, and you're ready to go.
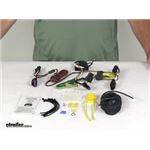
When you're all done put your protective cover back on, open up your hatch, lift up your wiring, and we'll just store it away for future use. Completely hidden and out of the way. This is what your kit's going to consist of. Your four flat wiring with protective cover, the modulator, and our T1 connections that are going to go in between your tail light and your factory wiring. You have the hardware kit, that's going to have all the parts needed to install. What this is going to do is stop your vehicle's electrical system from being overloaded by hooking your trailer into it.
It's going to simply plug in so you're not going to have to cut any factory wiring. We'll have one wire that's going to go up to the battery to supply power to the module. This way if your vehicle has separate turn signals and running lamps and stop lamps, this will convert them to a trailer which is going to have combined stop and turn signals. Now we can go ahead and get started on our install. We'll begin by removing the cargo cover, setting it aside. Then we're going to need to remove the sill plate.
There's two 10mm bolts on your package hooks. We'll take those out. Now we'll just lift up this sill plate. It's got a couple of snaps underneath it. Just pull up firmly.
Now we're going to need to gain access to the back of our tail lights. We're going to pop off this trim cover, slip it out of the way. You can see we have access to the back of our tail light wiring. It will be necessary to slide back this gray clip. Once you have the lock slid back you can press in, slide off your connector. Now we can route our passenger side wiring down first. That's going to be the one with the green and the red. We'll go down to the bottom and we can reach under and grab our wiring. We'll go ahead and pull this out. We're going to have to run that to the passenger side of the vehicle. We're also going to need to get our four flat wire down there. We'll do the same procedure; we'll just push it down and pull this wire through. Before we stick the rest of our module back in there, we're going to take our supplied wire that's going to run to the front to the battery for power, we'll strip it back. We'll do the same thing with the black wire in the modulator. We'll take one of the supplied yellow butt connectors and we will attach those two wires together. Crimp it firmly. Same thing on the other side with our wire. We'll wrap some electrical tape around it. We'll take our black wire and run it down to the bottom as well. We'll need to route that to the front of the car to attach to the battery. Now it's going to be necessary to attach a ground wire. We have a bolt here that's going right to the body. We're just going to loosen that up and we're going to attach our ring loop connector from our ground wire underneath that. We'll re-secure it. Now we'll take our t-connector and attach it to the wire that we unplugged from the back of the light. Snap it in and we'll push in the lock. That locks the wire from coming out. We'll take the other end and we'll slide that on to the back of our light. That's going to be the same thing, just push it on, listen for the snap, give it a tug. Now we can bundle up our wires. You want to make sure you have the one for the other side all the way out. We'll bundle up the excess. Zip tie it up. Cut off our excess and we can zip tie the modulator to the wiring harness. It does come with some two sided tape, but in this instance we can't get anything that's a flat surface to attach it to so we're going to zip tie it out of the way. We'll trim off the excess. Now we can pop our trim panel back in. We can go to the passenger side, remove our access door. We'll have the same kind of panel on this side. Pop it out of the way and there's our gray lock again. Slide the lock back, press it in the center, slide it back. Now we're going to follow the factory wiring harness inside this body panel. Take a piece of tubing as a fish wire. We'll run it through, it'll just make it a little easier on us. Place a little tape around the end of the plug. We can gently pull it through. We can just zip tie it to our factory harness. We'll trim off the excess, clean up our look. To make things easier on this side we'll just go ahead and put our piece of fish wire tubing down inside. We can attach it to the end of the plug, pull it up into position. Once we have our wire up, take it and we'll snap one end into the factory connector. Listen for the snap. Snap our lock back in and we'll set this back into the plug on the back of our tail light. Listen for the snap. We want to give it a little tug just to make sure it's on there. We'll tie up our excess wiring with a zip tie. Trim it off, set it inside. We can reinstall our cover. Now we can put our door back on, snap it shut. Our black power wire, I simply tucked it behind this package tray here. It went in behind our seats, it went towards the front of the car. Now we can reinstall the sill plate on the back of the car. Just going to tuck this back behind. Once you have that down we can put our hold down clips back on with our 10mm socket. This wire, we're going to leave way back here. It'll sit inside the package tray when it's not in use. We ran our wire after we got from the back, we ran the wire behind the seat, followed around our sill plates, tucked it up underneath, and we followed it all the way to the front. Underneath the sill plate, up under the dash, we tucked it underneath, came up behind the back, you can see the wire coming out right here. Followed their factory wiring harness, we poked it through the grommet there and came out on the other side by the battery. Now we can zip tie it under the harness. Now we need to get access to our battery. Once we've got our wire run out here, we're going to need to install the supplied fuse holder. We'll just cut it in the middle and we can strip it back on both ends about 1/4 of an inch. On one end we're going to put a ring connector, crimp that on. On the other end we'll put our yellow butt connector that's supplied. We're going to need to figure out where we're going to cut our wire. We're going to route it around so we have access to our fuse box should we ever have the reason to change a fuse. Cut off our excess and we can strip this one back about 1/4 of an inch. Install that into the other end. Crimp that, give it a tug. Now we'll put a little bit of electrical tape on it to keep any moisture or corrosion out of there. We're going to go ahead and take off this 12mm nut, place it on our connector. We'll reinstall the nut and tighten it back down. Once you grab that nice and snug, just going to tuck it inside. Put our cover back on and we can install our fuse, put on our protective cover. Then we'll just tie up the rest of our wires here and we're ready to test it. Let's go ahead and try our tail lights, our left turn, right turn, and our brake. It's going to be a solid signal for these two. Perfect. Now we're ready to hit the road. That's going to do it for our look at and install of the T1 vehicle wiring harness with four pull flat trailer connector. Part number 118588. On our 2015 Buick Encore.
Average Customer Rating: 4.8 out of 5 stars (25 Customer Reviews)
Quickly and easily install a 4-way trailer connector on your vehicle with this custom wiring harness. T-One connector plugs directly into existing wiring. Powered ModuLite reduces strain on wiring system.
This wiring kit was easy to install by following the simple, straight forward instructions included. The installation looks clean and nearly professionally done. I took the time to use flexible split wiring loom in order to avoid any unnecessary abrasion of the wiring.
This is a great product to ensure that original digital equiped light system is not overloaded.
5 Stars for the product. 4 Stars for the service and video.
I ordered my kit on a Saturday. Because I ordered the least expensive shipping charges, apparently that applies to the people who work at etrailer as well. It didn't go out until sometime Tuesday which means I didn't have it by the following weekend. 10 days to receive something snail mail or not isn't the best service. If it had gone out Monday (2 days after I ordered it) I would have considered that 5 star service.
The video: as with all etrailer videos, they are not produced for DIYers. Most people don't have a lift at home. Most people don't have all of the tools in the world.
Example: The explanation on how to get the wire through the fire wall is simply glazed over. There is no way to get the wire through the "grommet". If there is, show it! Solution: about 18" of coat hanger, taped on to about 3 feet of good twine. Make a loop on the other end of the twine, strip back 4-6" of insulation on the wire and loop it through the twine loop and fold it back on itself. Tape it up and use the coat hanger to punch it through the fire wall. Push the coat hanger through then from the engine bay pull the coat hanger then the twine then the wire through. THAT is an example of how a DIYer might do it!
Also, the biggest issue is the weakness of the tabs on the car parts that have to be removed. No one's fault but Buick's. But I highly doubt the tech in the video didn't break at least one tab pulling off the cover panels. It's no biggy but for DIYers it should be mentioned. Solution: have a tube of superglue at the ready.
The kit itself is perfect. No issues at all. Because the tech in the video doesn't mention it you'll need a 10mm wrench, a 12mm wrench, some wirestrippers (with built in crimpers and a role of black tape. Oh, and something from every DIYers tool kit: a butter knife.
Overall good, but it would be nice if it came with a fuse tap for models with rear fuse boxes.
In my 2014 Buick Encore, there's a fuse box in the driver's side taillight access panel, and it's wired a for 15A trailer hookup. It would be great if this kit came with a fuse tap to make use of the existing wiring, rather than running a wire all the way up to the battery. I bought a 15A Micro Fuse Tap, and used the existing panel slot for the trailer lights, and it works great. There's also a ground lug in that area, so you don't need to drill a hole for one.
I could not be happier! The Installation video was superb. I was able to follow the step-by-step installation instructions and a clean, professional installation resulted. Then I went back and restudied the installation booklet that came with the Wiring Harness. Those manufacturer instructions were nearly impossible to follow. I had extensively searched the Internet and there were other sources for nearly the same Wiring Harness at essentially the same price. However, none of them linked to an installation video. I highly recommend etrailer.com. I would be happy to provide pictures of my finished installation, but everything is so well tucked away and tied down that there is very little visible evidence that the harness is in place.
the hitch was a pleasure to hook up. the wire harness was sooooooooooo simple. one can only appreciate the harness if you have in the past used one you would have to measure and cut wire. Great products!
The wiring harness fit perfectly and worked as well too! Nice quality.
Great company to work with. My third hitch from you and never a problem. Your installation videos are always spot on.
Great instruction on how to install wire kit! also how to install hitch.
thanks!
Wire harness here in 3days.1hr.later trailer lights ready to go.Great job thank you all.
Everything went well, your on line video was a big help and thats why I bought everything from you folks,,,Thanks
This is my 2 order from e trailer and I've always been satisfied with your product, ill be a returning customer, thanks for a great product and a killer price
It is not as easy to install as the video makes it out to be.
Product comes with easy to follow instructions.
Great product; easy to install.
great, easy to install .fast ,great service. thank you
Excellent products and very quick service. I am impressed!
Awesome product. Exactly what I needed and very good quality.
Product is just what I expected, thanks.
This product I bought is awesome and easy to install thank you
Very prompt shipping. Product was top quality. Thanks.
Good service and info
It was simple to install.
Do you have a question about this Custom Fit Vehicle Wiring?
Info for this part was:
At etrailer.com we provide the best information available about the products we sell. We take the quality of our information seriously so that you can get the right part the first time. Let us know if anything is missing or if you have any questions.


Mark
5/6/2024
I have used my trailer with the T-One Vehicle Wiring Harness with 4-Pole Flat Trailer Connector, Item 118588, for a year now. I have had only good experience with this setup. I would recommend it for anyone who wants to install a trailer wiring harness in their Buick Encore.