
Hopkins Plug-In Simple Vehicle Wiring Harness with 4-Pole Flat Trailer Connector
(12 reviews)
Price: $68.31
In Stock
Hopkins Plug-In Simple Vehicle Wiring Harness with 4-Pole Flat Trailer Connector
Item # HM11143674
Retail:$102.09
Our Price: $68.31
You Save: 33%
Will this fit?
To see if this custom-fit item will work for you please tell us what vehicle you'll use it with.
In Stock
Thank you! Your comment has been submitted successfully. You should be able to view your question/comment here within a few days.
Error submitting comment. Please try again momentarily.


Need help with installation?
Locate installers near me- All Info
- Reviews (12)
- Q & A (0)
- Videos (1)
- Photos
Hopkins Custom Fit Vehicle Wiring - HM11143674
- Custom Fit
- 4 Flat
- Trailer Hitch Wiring
- Hopkins
- Powered Converter
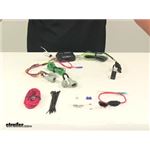
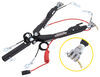
Quickly and easily install a 4-way trailer connector on your vehicle with this custom harness. T-connector plugs directly into existing wiring. Powered converter reduces strain on wiring system.
Features:
- Provides a 4-way flat trailer connector at the back of your vehicle to power your trailer's signal lights
- Compatible with 5-pole, 6-pole and 7-pole adapters (sold separately)
- Connects quickly and easily
- Locate connection points behind tail lights
- Plug in connector
- Run hot lead to car battery
- Includes a tail light converter to ensure that your vehicle's wiring matches that of your trailer
- Powered module connects directly to battery to avoid overloading vehicle's electrical system
- Protective connection terminals resist corrosion
- Comes with dust cap for 4-way flat connector and terminal grease packet for electrical connections
- 90-Day limited warranty
Installation
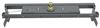
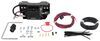
This custom-fit T-connector plugs into your vehicle's wiring harness, which is located behind the driver's-side and passenger's-side tail lights. You will have to remove the tail light assemblies to access this harness. Once you've plugged in the connector, run the red hot lead up to your car battery. Connect the included fuse holder, and then connect the fuse holder to the positive terminal on your battery.

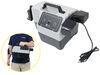
Once installation is complete, the 4-way connector will be stowed beneath your vehicle, near the trailer hitch. A mounting bracket (sold separately) is recommended to keep the connector secure.
It is recommended that you use a small amount of grease on all electrical connections - the plugs on your automobile and the 4-pole connector itself - to help prevent corrosion.
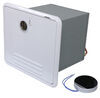
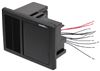
Powered Tail Light Converter
A tail light converter is built into this T-connector. This converter is a battery-powered unit that bypasses the electrical routes that are used by a basic wiring harness. As a result, there is virtually no draw on your tail light circuits.
Because most trailers run on a two-wire system - wherein the brake and turn signals are carried on one wire - the separate brake and turn signals from your vehicle's three-wire system need to be combined so they are compatible with the wiring system of the trailer. This converter combines the brake and turn signal functions of your automobile so that they run on one wire to properly activate your trailer's tail lights. Note: This will not affect how the tail lights on your vehicle operate.
11143674 Plug-in Simple Hopkins T-Connector with 4-Pole Trailer Connector
Replaces Hopkins 43674
Installation Details
This Product Fits The Following Vehicles
- 2011 - 2017 Nissan Quest


Video of Hopkins Plug-In Simple Vehicle Wiring Harness with 4-Pole Flat Trailer Connector


Videos are provided as a guide only. Refer to manufacturer installation instructions and specs for complete information.

Video Transcript for Hopkins Custom Fit Vehicle Wiring - Trailer Hitch Wiring - HM11143674 Review
Today we're going to be taking a look at the Hopkins plug in simple vehicle wiring harness with a four pole flat trailer connector. This product fits certain years of the Nissan Quest. To ensure or double check that this is a fit for your vehicle, you can always check out the vehicle fit guide located at etrailer.com. Now this unit provides a four way flat connector at the back of your vehicle to power your trailer's signal lights. It is compatible with five pole, six pole, and seven pole adapters. Adapters are sold separately and it comes with a dust cap for the four way flat connector.
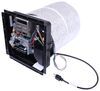
That way you can cover up the connection points whenever your plug's not being used. Now the black box on the unit is the included taillight converter. This ensures that your vehicle's wiring matches that of your trailers'. The powered module connects directly to the vehicle battery through the wiring. That's going to avoid overloading your vehicle's electrical system. Now this unit is designed to connect quickly and easily.
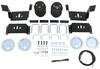
All you have to do is locate the connection points behind the taillights. You will have to remove the taillight assemblies to access the connection points and then plug in your connectors. One's going to go to the passenger side of the vehicle. The other goes to the driver side. These are custom fit for your vehicle.
These plugs are going to match up perfectly with the ports on the vehicle and they're going to snap lock together for a nice tight secure fit. Once you have those plugged in, take the white wire with the ring terminal attached to it. This is your ground wire. You need to make a ground connection. You can get this grounded to a suitable grounding location with the included grounding screw. Then you'll need to mount the converter box to a safe, out of the way location.
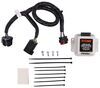
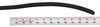
You can do that using the provided cable ties. Next you'll need to run the hot lead to the vehicle battery. The hot lead is the short red wire coming out of the box, has a butt connector attached to it. This gets connected to one end of the bundle. Other end of the bundle runs to the vehicle battery, gets attached to the fuse holder right here, the side with the butt connector. Other end of the fuse holder has a ring terminal attached to it and that gets connected to the positive post of the vehicle battery. Also comes with your 15 amp fuse, goes directly in here and it's got the cap that goes over it to keep that safe and protected. Once you have that done, you can secure any excess or slack in your wiring with the included cable ties. Then once your installs complete, the four way connector's going to be stowed beneath the vehicle near the trailer hitch. We do recommend using a mounting bracket to keep the connector secure and easily accessible. Mounting brackets are sold separately and available at etrailer.com. It's also recommended that you use a small amount of the included terminal grease on all your electrical connections like the plugs on the vehicle and the four pole connector itself. That's going to help prevent corrosion. That's going to do it for today's look at the Hopkins plug in simple vehicle wiring harness with a four pole flat trailer connector.
Customer Satisfaction Score:
98% were satisfied with this product
2% of customers were not satisfied
- Did not arrive in time
Customer Reviews
Hopkins Plug-In Simple Vehicle Wiring Harness with 4-Pole Flat Trailer Connector - HM11143674
Average Customer Rating: 4.3 out of 5 stars (12 Customer Reviews)
Quickly and easily install a 4-way trailer connector on your vehicle with this custom harness. T-connector plugs directly into existing wiring. Powered converter reduces strain on wiring system.by: James07/23/2019
Well to be honest the harness/kit ended up burning and smoking inside my left light rail light compartment and the hole car started smoking and I thought the car was going to catch fire,however I opened the compartment quickly and I ripped the harness out completely and it was fried but luckily there was no damage other than replacing the fuse and the car smelled horribly like electrical burning for a couple of months !! The harness worked great for a few months but we did not use it that much !! It's funny I got this e-mail from e-trailer for this review because I was going to file a complaint but never got around to it and I ended up throwing away all the wire and harness that came in the kit completely and just left it alone unroll I got this e-mail update review from e-trailer !! Anyways that's my review as I give this product a (1) one star review because it failed my application and almost caught my van on fire !! Maybe this was just a fluke and doesn't happen that often however they wanted a review and they got one !! Thanks.
by: Siegfried02/18/2023
2011 Ford Explorer
I orderd a hitch for a 2011 Nissan Quest, but you sent a Hitch who fits Ford Explorer / Licoln Aviator. No way this hitch fit on the Nissan Quest.


by: Luis S.10/11/2019
Great product for the super price and the installation so easy,
Can’t go wrong
Definitely Would buy another one if a need it.
by: Matthew09/07/2018
awesome .....
by: Rick 09/16/2023
2013 Nissan Quest
by: Ted 02/24/2023
by: Robert 08/28/2021
by: David 01/28/2023
by: Penny 07/02/2021
by: Eric 05/23/2021
by: Ray 01/13/2022
12
12
See what our Experts say about this Hopkins Custom Fit Vehicle Wiring
- Parts Needed To Tow Travel Trailer With 2015 Nissan QuestCongratulations on the new trailer! I looked up your new 2021 Jayco 154BH travel trailer, and it has a Gross Vehicle Weight Rating (GVWR) of 3450lbs. Your 2015 Nissan Quest has a maximum towing capacity of 3500lbs, which matches the Curt Trailer Hitch Receiver # C13078 you have and means you will be able to tow the trailer but you will need a few things first. When looking in the owners manual for your Nissan Quest it does mentioned that Nissan requires trailer brakes for any trailer...
view full answer... - Towing Package For A 2016 Nissan QuestThe etrailer Trailer Hitch Receiver - Custom Fit # e98KR has the heaviest rating of the hitches that are confirmed to fit your 2016 Nissan Quest. The trailer hitch has a bolt-on installation with no welding required. It has a matte black powder coat finish which is over a protective base coat that offers a superior rust resistance. The trailer hitch has a maximum gross trailer weight up to 3,500 pounds and has a maximum tongue weight up to 300 pounds. I would recommend checking the...
view full answer... - Recommended Towing Components Needed for 2014 Nissan QuestIn addition to the Curt # C13078 and the Hopkins Plug In-Simple 4 way Wiring Harness # HM11143674, you'll need a ball mount, hitch ball, hitch pin and clip. You can use something like the etrailer Ball Mount Kit # 989900 which has 2 ball mounts with varying rise/drops, a 1-7/8" and 2" hitch ball, hitch pin, clip and storage bag; this is the ideal solution for someone who tows a few different trailers that may require different ball mounts to tow each one level, and doesn't exactly know...
view full answer... - More Reliable Trailer Wiring Harness for 2016 Nissan QuestSounds like the harness is getting overdrawn by your trailer wiring which is shorting it out and causing it to fail and then also causing the lights on the vehicle to stay on. Does the trailer have a lot of lights on it? We don't have the best luck with Curt trailer wiring kits so I would recommend the Hopkins kit # HM11143674 instead for your 2016 Nissan Quest.
view full answer... - Trailer Hitch Receiver to Fit a 2017 Nissan QuestThe Draw-Tite hitch you were looking at, part # 75278, fits GM vans of the late 1990's and early 2000's. Trailer hitch receivers are custom designed for specific vehicles so that they install in the best possible location. The correct hitch for your 2017 Nissan Quest is the Curt part # C13078. It bolts onto existing mouting locations on your van so there's no drilling. I've linked an install video on a 2016 Quest which is the same generation so the process is the same. If you're going...
view full answer...
Do you have a question about this Custom Fit Vehicle Wiring?
Info for this part was:

Edited by:
Lindsey S

Installed by:
Cole B

Written by:
Alexander C

Updated by:
Michael B
At etrailer.com we provide the best information available about the products we sell. We take the quality of our information seriously so that you can get the right part the first time. Let us know if anything is missing or if you have any questions.
Mike L.
7/25/2019
The vast majority of the time, damage to the taillight converter is caused by a short circuit somewhere in the trailer wiring. The converter is internally circuit protected so that itll shut down in the event of a short circuit, but if the amperage is high enough the converter can emit some smoke in rare circumstances. Before installing a new converter, youll want to closely examine the trailer wiring circuits, beginning at the trailer connector and working your way back to each lamp. Look for loose connections and pinched wires. Check for worn or cracked wire insulation that would allow the copper wire inside to short out on the trailer frame. Once the short is located and repaired, you should be good to go. For more information, take a look at the trailer wiring troubleshooting help guide Ive linked.
Helpful Links
faq-4-5-way-troubleshooting.aspx