
Hopkins Plug-In Simple Vehicle Wiring Harness with 4-Pole Flat Trailer Connector
(21 reviews)
Price: $78.36
In Stock
Hopkins Plug-In Simple Vehicle Wiring Harness with 4-Pole Flat Trailer Connector
Item # HM11143114
Retail:$108.77
Our Price: $78.36
You Save: 28%
Will this fit?
To see if this custom-fit item will work for you please tell us what vehicle you'll use it with.
In Stock
Thank you! Your comment has been submitted successfully. You should be able to view your question/comment here within a few days.
Error submitting comment. Please try again momentarily.


- All Info
- Reviews (21)
- Q & A (0)
- Videos (2)
- Photos
Hopkins Custom Fit Vehicle Wiring - HM11143114
- Custom Fit
- Trailer Hitch Wiring
- 4 Flat
- Powered Converter
- Hopkins
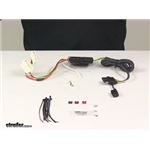
Quickly and easily install a 4-way trailer connector on your vehicle with this custom harness. T-connector plugs directly into existing wiring. Powered converter reduces strain on wiring system.
Features:
- Provides a 4-way flat trailer connector at the back of your vehicle to power your trailer's signal lights
- Compatible with 5-pole, 6-pole and 7-pole adapters (sold separately)
- Connects quickly and easily
- Locate connection point in rear cargo area
- Plug in connector
- Includes a tail light converter to ensure that your vehicle's wiring matches that of your trailer
- Powered module pulls power directly from battery to avoid overloading vehicle's electrical system
- Protective connection terminals resist corrosion
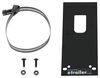
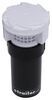
- Comes with dust cap for 4-way flat connector, cable ties, and terminal grease packet for electrical connections
Specs:
- Maximum amperage:
- Stop/turn lights: 3 amps per circuit
- Tail lights: 6 amps per circuit
- 90-Day limited warranty
Installation
This custom-fit T-connector plugs into your vehicle's wiring harness, which is located in your rear cargo area on the driver's side. You will have to remove some interior paneling to access this harness. Once you've plugged in the connector, open your fuse panel and locate the fuse positions indicated in the instructions. Then insert the included fuses.
Once installation is complete, the 4-way connector will be stowed in your spare tire area.
It is recommended that you use a small amount of grease on all electrical connections - the plugs on your automobile and the 4-pole connector itself - to help prevent corrosion.
Powered Tail Light Converter
A tail light converter is built into this T-connector. This converter is a battery-powered unit that bypasses the electrical routes that are used by a basic wiring harness. As a result, there is virtually no draw on your tail light circuits.
Because most trailers run on a two-wire system - wherein the brake and turn signals are carried on one wire - the separate brake and turn signals from your vehicle's three-wire system need to be combined so they are compatible with the wiring system of the trailer. This converter combines the brake and turn signal functions of your automobile so that they run on one wire to properly activate your trailer's tail lights. Note: This will not affect how the tail lights on your vehicle operate.
11143114 Plug-in Simple Hopkins T-Connector with 4-Pole Trailer Connector
Installation Details
This Product Fits The Following Vehicles
- 2011 - 2017 Honda Odyssey
California residents: click here


Video of Hopkins Plug-In Simple Vehicle Wiring Harness with 4-Pole Flat Trailer Connector


Videos are provided as a guide only. Refer to manufacturer installation instructions and specs for complete information.


Video Transcript for Hopkins 4-Pole Flat Plug-In Simple Vehicle Wiring Installation - 2013 Honda Odyssey
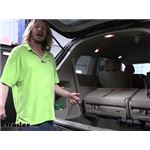
Hi there, Honda owners. Today on your 2013 Honda Odyssey we're gonna be taking a look at and showing you how to install Hopkins 4 Pole Flat Trailer Connector Vehicle Wiring Harness. It is designed to stay inside the vehicle when not in use, just down here in your compartment area. But when you are ready to use it, it will drape down over the back here, just make sure that you're avoiding the striker here at the middle, and when you shut your liftgate, it'll pinch it between the leather stripping, which won't cause any damage to it 'cause it'll hold it in place and allow you to be able to plug in your wiring. This is kind of the best case scenarios, keeping it inside the vehicle because it'll protect it from rust and corrosion when not in use. A lot of harnesses are routed to the outside and when they hang down here onto the bottom, even though they have a dust cap or something to protect 'em from rust and corrosion, it does still occur.
So if you can keep it in the vehicle it's gonna last significantly longer. Now, if you wanted the option to route it outside, you could do that yourself. You'd have to locate the grommet that's in the back here, or drill your own hole and you could route it out. And you could also buy brackets here at etrailer for mounting up a four pole. But again, I would recommend leaving this inside so that way you protect it and get the most use outta your connector before having to service it.
This is gonna provide all of our necessary lighting functions which includes our left turn signal, right turn signal, tail lamps and brake lamps, keeping us DOT compliant in all states. So the main purpose of this is so we got our trailer hooked up, all the lighting functions work back there, so when we use our lights here on our vehicle if our trailer has to be obstructing the lights here on the vehicle, the lights on the trailer are gonna mimic all these functionalities so that way people behind us will know our intentions when going down the road, keeping us nice and safe. This is a custom fit harness. So it simply just plugs into our vehicle, comes with all components you're gonna need to get it installed, which is self-tapping screw for the ground as well as the fuses necessary to make everything work the way it needs to. And this is a quick and easy installation.
This is something you can probably do in about 20 minutes to a half an hour, right in your garage. So if you wanna follow on with us, we'll show you how to get it done. We'll begin our installation here at the back of the vehicle with our liftgate open. We're gonna remove the threshold here at the back and we're gonna pop this panel out just a little bit. Our module's gonna install in the fuse compartment here but we do need to route some wiring behind this to be able to complete all this.
So the first thing we want to do is the cargo hooks here in the back, we wanna remove the one on the driver's side and both of the ones that are on each side of the interior panel. They both removed the same way. Just simply unscrew 'em. Got one down here we're gonna unscrew. And there's one here on the other side, on this lower panel we're gonna unscrew as well. Once we get these unscrewed we can remove this threshold panel. All right, all those are removed. So our threshold panel here we're gonna pull up and out a little bit. We gotta pull outward a little bit to clear the screws where we had removed the cargo hooks and then just up to pop it out of there. We'll then just take this panel and set it aside. This panel now should be able to be pulled outward. So we're just gonna grab it here at the bottom, get our fingers behind it, and just pop it out a little bit there. Kind of work our way down along the top edge here a little bit just to make it come out a little bit further and that's probably good enough. We just gotta have access to it and we should be able to access it there. You'll know you can access it if you can push that panel out from the inside just like we did there. So you can remove that fuse cover. This is our module. And this connector here will plug into the fuse panel. Now you may already have a connector that's plugged into the fuse panel. If you do, you'll want to disconnect that connector first and plug it into this connector that has just the single wire going to it so that way this one can go into the panel. We don't have one there. This is the slot right here where we're gonna plug it in but we gotta feed it behind this paneling. So we're just gonna pull it out a little bit, slide our wiring towards the fuse box. And there we go. Once you get your wires pulled in there you can go ahead and plug it in. And again, it plugs in right there. So we're just taking the connector end and just popping it right in there. It only fits one way so you can't install it incorrectly. And then the other connector, if you don't have anything to plug it into, we can just kind of hide it. We're just gonna stick it down kind of underneath the fuse panel right there. Now we also have a ground wire here that we need to hook up and you can just kind of run that in with a self tap issue into the metal. But if we have an option to use an existing bolt, I prefer to do so. And it kind of looks like there's a ground that we can attach to right here on the fuse box. So I think we're gonna try, potentially, attaching it there. It looks like the bolt's gonna probably be a little bit too big to do that. So probably not gonna be able to put it there. But if you see any kind of ground that you can use those are usually your best way to go so just pick one of those. So all the bolts there are just a little bit too big to fit through our ring terminal. So we're just gonna run it into the metal panel. We'll take the self-tapping screw that comes included with our kit and eight millimeter socket here. We're gonna bring it up to the metal that's located right over here. Try to find a decent spot for our gun to fit in there. Maybe we'll go a little bit lower 'cause the gun fits a little more easily and just run it into the paneling. Just make sure it's tight enough to where the ring terminal doesn't rotate on there. That all looks good. So now we're just gonna route the module and wiring back towards the center here and we'll use some of the cable ties, that comes included in your kit here, to secure the module behind the panel to keep it from rattling around. So you can go ahead and push your paneling back in, our wiring's gonna come out of the corner just right here at the bottom. It's designed to live inside the vehicle on this one here to protect it from rust and corrosion. So we can now reinstall our rear threshold here, snap that back into place, reinstall the cargo anchors that we had removed. And then we need to head back to our fuse box. You get some fuses included with your kit here. So let's just pull those out of there. You'll have a total of three fuses, you'll have two 7 1/2 amp and one 10 amp. And they're actually labeled here on the back of the cover to let you know where each one's gonna go. So we're gonna go ahead and insert 'em. If we look at our paneling, the 10 amp fuse is for the B+ trailer and it goes in that location up there, right there. So we're gonna grab our 10 amp fuse here and slide it up in the location where it indicated it goes. We also need to install the trailer back and trailer hazard 7.5 amp fuses in spots 10 and 11 there like it shows. All right. Now that we've got those installed, can simply reinstall the cover for your compartment. So now that we've got everything installed, we plugged in our tester here. You can plug into your trailer and test it out but I highly recommend using the tester like this because if you have any faults in your trailer, it could give you bad readings and you might think that your wiring's not working properly but it's actually a fault on the trailer. So this helps us guarantee the vehicle's side's working properly. We wanna make sure we have our left turn signal, right turn signal, tail lamps and brake lamps. With all of our signals working properly on our tester, we know our vehicle's ready to roll. So at this point we can just hook up our trailer and hit the road. And that completes our installation of Hopkins 4 Pole Flat Trailer Connector Vehicle Wiring Harness on our 2013 Honda Odyssey..
Customer Satisfaction Score:
98% were satisfied with this product
2% of customers were not satisfied
- Product did not meet expectations
- Wrong item was ordered
Customer Reviews
Hopkins Plug-In Simple Vehicle Wiring Harness with 4-Pole Flat Trailer Connector - HM11143114
Average Customer Rating: 4.3 out of 5 stars (21 Customer Reviews)
Quickly and easily install a 4-way trailer connector on your vehicle with this custom harness. T-connector plugs directly into existing wiring. Powered converter reduces strain on wiring system.by: Joe Morris, Provo, UT.02/02/2024
The trailer kit I purchased worked exactly as advertised. It was a quick install and easy to follow directions. I thought it would include a dust/weather cap on the electrical plug that connects to the trailer connector but it did not have one. Not a big deal. I am very satisfied with the kit and it was priced very affordably. Will be purchasing again from Etrailer.com


by: Stephen06/14/2022
2015 Honda Odyssey
Install video on the website for a wiring harness (not this one) was really helpful here. And I ordered that one. But by the time my order processed, that specific harness became out of stock. I didn't want to wait six or eight weeks for a restock, since the summer would be almost over by then!
I called and substituted a cheaper alternative harness for my vehicle. My complete order shipped the next day - great customer service! This alternate (in-stock) Hopkins wiring harness should do the trick. It is a bit shorter than I expected.
I do have two complaints. What I did notice is that the supplied fuse bodies were too large to completely seat in the fusebox. I could see an obvious difference in the supplied fuse bodies and the fuses already in the fusebox. The original Honda fuses are slightly smaller and can fully insert. I haven't tested it yet, but I expect that it will still work.
The second complaint is that my product arrived without the 4-pole connector dust cap. The product review video shows it, but it was not present in the package I received. Since the trailer wiring cable is stored within the vehicle until being used, I consider this to be a non-issue.

Stephen

6/22/2023
When I first tried to tow a trailer, I found that the lights would not work. I bought the correctly sized fuses and substituted them into my vehicle fusebox, and now everything is working great!
by: Walt06/05/2022
2014 Honda Odyssey
Kit is missing the grounding screw and the dielectric grease show in the etrailer video. Also having difficulty finding the installation video to re watch.

Jenny N.
6/8/2022
I will have our customer service department reach out so that we can send the missing pieces out to you. We do have a video installation on 2013 Honda Odyssey from a similar harness. Please see the link below.
Helpful Links
by: Pat M.07/30/2018
2015 Honda Odyssey
I ordered this one hoping it would be essentially plug and play. However, fuses included were not correct (needed low profile and didn't have the 10Amp fuse included) and for my vehicle (2015 Honda Odyssey) the ground wire from the Hopkins wasn't long enough to get to the existing ground, so I added wire so it would reach. Have had a good experience before ordering custom wiring for a brake controller, so I will be back, and maybe I should have picked something other than the cheapest wiring harness. Works fine now that it is in.
by: Nil P08/28/2020
Really worked well with my 2014 Honda Odyssey. Was able to add wiring for trailer lights to the factory installed hitch. Directions were straightforward. Mounting it and finding a screw for the ground were only issues but nothing major.
by: Mark 10/27/2022
2012 Honda Odyssey
The price was right. The harness came The day it was supposed to arrive. Directions were easy to follow and spot on. It took me about 20 minutes to put in. Works like charm. Time to get my Jetski back on the water.
by: Paul M.06/05/2017
I was very disappointed in the Hopkins harness. Directions were ok, but several parts were not included. There was no dust jacket for covering the plug (it is stored inside the vehicle, so less of a problem), it did not come with a screw for the ground wire (and how are you going to get a drill into that confined area to drill a hole with a 3.32 bit anyway), and the fuses supplied do not fit my car (they supplied mini fuses, and my car requires low-profile mini).
The etrailer video mentioned that the wire from the Hopkins was short, but I was also really disappointed in how short it was. It clears the door with about 6 inches to spare. I already have a jumper wire from another car, so it will work, but you would think they could put a usable wire length on the thing.
I won't be buying Hopkins again.
by: Lawrence04/13/2022
2016 Honda Odyssey
product arrived without flat trailer connector cover supplied fuses were not compatible with the fuse box product description was excellent
installation video was very helpful
by: JB05/21/2022
Very easy & simple install! Nothing much to say it simply just works!
Wiring to connector is plenty long enough so you do not have to worry about pulling loose from the trailer.
by: Wes Columbia04/10/2017
2015 Honda Odyssey
Super fast shipping. Web tutorials were extremely helpful! Will totally buy from etrailer.com again. Thanks!
by: Ryan04/09/2022
Easy install in 2014 Honda Odyssey. Works great.
by: Jon P09/20/2022
This was an easy install and quality pr oduct.
by: Eric 07/05/2022
Works perfect and was really easy to in stall.
by: Rob07/12/2019
2015 Honda Odyssey
Produce was great easily installed
by: Dan04/02/2022
Installed easily. Super fast shipping.
by: Walter 02/18/2023
by: Jim 06/21/2023
by: David10/27/2021
by: Luis 06/11/2021
very fast delivery
by: Tom V10/14/2022
2016 Honda Odyssey
by: Jay10/12/2022
21
21
See what our Experts say about this Hopkins Custom Fit Vehicle Wiring
- Troubleshooting Wiring Harness Issues On A 2012 Honda OdysseyWith both indicators flashing weakly it sounds that there could be a ground wire problem. You will want to locate the ground wire and make sure that it is secured tightly to a paint and debris free surface, on both your trailer and vehicle. You can also remove it completely and clear the area that is is connected to with sandpaper or steel wool to make sure there is not anything built up on the surface of the trailer frame where the wire is grounded. If that doesn't work I would use...
view full answer... - What Wiring Harness and Brake Controller do You Recommend for My 2014 Honda Odyssey?For wiring to add a brake controller to your tear trailer when towing with your 2014 Honda Odyssey, the vehicle must first have a 4-way wiring harness. If you need a 4-way, I recommend the T-One Vehicle Wiring Harness with 4-Pole Flat Trailer Connector # 118521. This harness comes with a better converter box than the Curt # C56378 or the Hopkins # HM11143114. Once the 4-way is installed, you are ready for the 7-way. For that harness, I recommend the Universal Installation Kit for Trailer...
view full answer... - Is A 1.25 or 2 Inch Trailer Hitch Receiver Best For My Honda OdysseyWhen choosing a trailer hitch for your 2011 Honda Odyssey, picking a hitch that is 2" will allow you to utilize the maximum towing capacity allowed by your Odyssey. A Class III hitch like Draw-Tite Max-Frame Trailer Hitch Receiver # 75270 is more studier than a Class II hitch # C12031. When it comes to choosing products to carry, such as a cargo, bike rack or trailer accessories there are more products to choose from that fit a Class III trailer hitch with a 2" receiver rather than a Class...
view full answer... - Trailer Lights Turn Off When Headlights on 2016 Honda Odyssey Are Turned OnYes. Because the Hopkins Plug-In Simple # HM11143114 is a plug and play wiring harness which required no hard wiring, a bad or insufficient ground wire on the trailer is the most likely cause of the trailer lights not working when the head lights on the vehicle are turned on. You'll want to locate the ground wire and make sure that it is secured tightly to a paint and debris free surface; you may want to remove it completely and clear the area it is connected to off with some sandpaper...
view full answer... - Recommended Trailer Hitch Receiver for 2016 Honda Odyssey Pulling Small Enclosed TrailerFor your 2016 Honda Odyssey I recommended the etrailer Trailer Hitch Receiver # e98862 for using either a cargo basket or for pulling an enclosed trailer. This is a Class III 2" receiver. The receiver is capable of 350lbs of tongue weight and 3,500lbs towing. With a weight distribution hitch the receiver is capable 500lbs of tongue weight and 5,000lbs towing. Be sure not to exceed the manufactures rating for towing on your Odyssey. You should not need a brake controller if your trailer...
view full answer...
Do you have a question about this Custom Fit Vehicle Wiring?
Info for this part was:

Edited by:
Lindsey S

Video Edited:
Dustin K

Video Edited:
Chris R

Installed by:
Cole B

Written by:
Alexander C

Test Fit:
David F

Test Fit:
John A

Video by:
Schuyler H

Video by:
Ethan H
At etrailer.com we provide the best information available about the products we sell. We take the quality of our information seriously so that you can get the right part the first time. Let us know if anything is missing or if you have any questions.
Sierra K.
6/20/2022
I will have customer service reach out to you.