
Summer Starts Here - Save up to 70%
To see if this custom-fit item will work for you please tell us what vehicle you'll use it with.
Thank you! Your comment has been submitted successfully. You should be able to view your question/comment here within a few days.
Error submitting comment. Please try again momentarily.
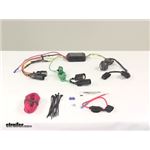
Quickly and easily install a 4-way trailer connector on your vehicle with this custom harness. T-connector plugs directly into existing wiring. Powered converter reduces strain on wiring system.
Features:
Specs:
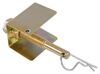
This custom-fit T-connector plugs into your vehicle's wiring harness, which is located behind the driver's-side and passenger's-side tail lights. You will have to remove the tail light assemblies to access this harness. Once you've plugged in the connector, run the red hot lead up to your car battery. Connect the included fuse holder, and then connect the fuse holder to the positive terminal on your battery.
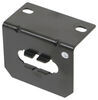
Once installation is complete, the 4-way connector will be stowed beneath your vehicle, near the trailer hitch. A mounting bracket (sold separately) is recommended to keep the connector secure.
It is recommended that you use a small amount of grease on all electrical connections - the plugs on your automobile and the 4-pole connector itself - to help prevent corrosion.
A tail light converter is built into this T-connector. This converter is a battery-powered unit that bypasses the electrical routes that are used by a basic wiring harness. As a result, there is virtually no draw on your tail light circuits.
Because most trailers run on a two-wire system - wherein the brake and turn signals are carried on one wire - the separate brake and turn signals from your vehicle's three-wire system need to be combined so they are compatible with the wiring system of the trailer. This converter combines the brake and turn signal functions of your automobile so that they run on one wire to properly activate your trailer's tail lights. Note: This will not affect how the tail lights on your vehicle operate.

California residents: click here
Videos are provided as a guide only. Refer to manufacturer installation instructions and specs for complete information.
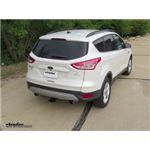
Speaker 1: Today on our 2015 Ford Escape we're gonna be taking a look at, and showing you how to install, the Hopkins Plug-In Simple Vehicle Wiring Harness with 4-Pole Flat Trailer Connector, part number HM11140514.So here's what our wiring looks like when it's fully installed. It is gonna stay on the outside of the vehicle at all times, and whenever we are ready to use it we can take of the dust cover from our hitch here, and that's gonna provide us with a 4-pole flat trailer connector, it's gonna give us all the required lights to get down the road safely, such as our headlights, taillights, and turn signals. One thing I do like about this wiring kit, is that right here on the of the 4-pole it does have a protective coating, and since it is on the outside that's a nice ting to have.Now that we've seen the end result, let's show you how we get it installed. To begin our installation we're gonna need to open up our rear hatch, so we can get access to our taillights so we can pull them out. Now on each side we're gonna have two plastic covers covering the bolts that are holding our taillight in. So I'm gonna take a flat blade screwdriver, and I'm actually just gonna come underneath these covers and pop them out.
And we'll go ahead and remove the other side as well. Now behind those covers we're gonna have two bolts holding them in place, and we're gonna be using an 8 mm socket to take them out. And we're gonna do that for the other side too.To remove our taillight, I'm gonna come to the edge here, I'm gonna kinda pry up a little bit so I have something to grab onto, and you're gonna wanna pull straight back, giving it a gentle wiggle back and forth to loosen the taillight. And once we have the taillight removed we're gonna come to the connectors here; we're gonna have a small tab right here, and we can go ahead and push in on that tab inaudible 00:02:08 release the connector, and we can put our taillight aside so it doesn't get damaged. Now we're gonna wanna do that for both of our taillights.Right below where our taillight was we're gonna have a black push pin fastener right here, we're gonna need to remove that because we are gonna have to run our wires up through the body, in between our bumper here and the body of the vehicle, so we want as much room as we can to get it up there.
So I'm gonna take a trim panel tool and pop this plastic fastener out. And with this one removed we're gonna go ahead and remove the other one too. If we move just to the inside of where that push pin fastener, we're gonna have two bolts that we're gonna need to remove as well, and we're gonna be using an 8 mm socket to take them out. And you're gonna wanna take out the other two on the other side.Now with our vehicle ready to put our harness in, we're gonna need to do a few things before we get it in place. Now, on our converter box here we're gonna have a red wire coming off, with a butt connector on it.
We're gonna wanna take the length of red wire they provide us in our kit and we're gonna crimp that together, since the converter box is gonna be in kind of a hard spot, and it's gonna be extremely hard to crimp it in later, so we'll go ahead and do that now. Now, you don't have to do this, but I'm actually gonna wrap the butt connector in some electrical tape to help give it a little bit more protection against any moisture getting inside and causing corrosion buildup.Now, I mentioned that we are gonna have to run our wire down through between our fascia and the body, and to help me get the wire up I'm actually gonna take a piece of airline tube that I had lying around, and you can use whatever you have available, even if it's just a coat hanger, just want something that's gonna keep its shape. So I'm gonna route this down, and I'm gonna go all the way down to the bumper until I can reach it and it comes through. Right here is where when we pulled those fasteners out, it's gonna help us get everything through, kind of just a little bit more room. So here's my airline tube coming from underneath the vehicle, and we're gonna wanna grab the yellow, brown, and red wire connector ends here, and I'm actually gonna tape my connector to my airline tube, and we won't have to worry about losing it when I start pulling it up.
And you're gonna wanna start pulling your airline tube up, and you may need to help guide the connector up because it is a pretty tight fit.Now that we have the connector up here we can take the tape off and remove the airline tube. So if we look we're gonna notice that our T-connector coming off of our harness is gonna match up with the factory plug going into our taillight; so we're gonna plug the male into the female end, and then the female end coming off of our harness will eventually go into our taillight. Before we make our connection I'm gonna take some of the dielectric grease that they supply in our kit, just gonna put a little bit inside the connector, and that's just gonna help, again, with the moisture and corrosion buildup. So we can just put a little bit in there, then we can put our connector in, make sure it locks into place.Now we'll go on the passenger side, I'm gonna run my airline tube down, just like we did on the driver's side. We're gonna need to route our green wire over to the passenger's side, so that we can connect it to that airline tube we just ran down. But you just wanna be careful, you wanna watch out for the exhaust or any other heat sources, or any moving parts back here. So I'm gonna route mine over my exhaust, over the bumper support right here, just gonna run it across right above my hitch, over this bumper support, and over the exhaust, and pull all the excess over to this side, and we'll secure everything later on. So we can again tape our connector to our airline tube, or whatever you're using, and then we can move up top and start pulling it through. Just gonna apply a little bit of the terminal grease into the passenger side, and we can grab our connector and we can plug it in.Now the white wire that's coming off our converter box with the ring terminal on it, it's gonna be for our ground, so we're gonna need to find a nice flat surface that we can take the provided self-tapping screw and screw it into. Now, I'm gonna be going right here into the frame, just behind my hitch. Now, they do provide us with that self-tapping screw, and I'm gonna be using a 1/4" nut driver to put it in place.Now the wires coming down, if we remember, our convertor box is gonna be about in this general location right here. Now, unfortunately there's not too much to use any zip ties to tie it to on the inside, so what I'm gonna do is I'm gonna take some double-sided foam tape that I had, and you can go pick some of this up, or you have the option of just gluing it, or using some silicon, to adhere it to the outside of the bumper. But I just wanna suggest you do wanna mount it some way, you don't want that converter box just bouncing around inside the bumper.So we can go and route our 4-pole towards the center of our hitch, and I'm just gonna take the same path that I did with my green wire. And for now I'm just gonna wrap it around the hitch, and I'm gonna leave all my excess wire still loose and out, that way I know at the end that everything is connected, and then I can tie it up. So now we're gonna take this red wire and we're gonna have to run it up to the battery. Now, everybody's gonna have a little bit of a different route they're gonna take and different ways they're gonna do it, but again I wanna mention, stay away from any moving parts or any heat sources that may potentially burn the wire. So I'll go ahead and run this, and I'll show you how I routed it.So I ran my red wire over the rear axle here, and over the brace. I actually cut over to underneath this cover, zip tying it along the way, securing it as needed. Then I cut the wire over to the center, right here, and I actually took my pull wire again and I put it in this channel here, and I ran all the way down until it came out the bottom of the frame here, and then I pulled my wire through. Now, we're gonna need to get this wire up to the battery, and I'll show you how we're gonna do that.So I'm gonna take my pull wire again, this time coming from the top side of the engine, and I'm gonna route it down so I can meet up with that red wire. Now again, you just wanna watch out for any moving parts, or any excessive heat sources. So here's where my pull wire came out, just on the outside edge, right behind the control arm on the front. Now, I'm gonna take my red wire, a small bit of electrical tape, and tape it to my pull wire. Now we can go back up top and start pulling it through. Now once you've got your wire up here, it's never a bad idea to peek underneath the vehicle and make sure it didn't get snagged or there's a big loop hanging out underneath.Now our battery is gonna be underneath this cover right next to the brake reservoir, so we can go ahead and lift up and pull it out of the way, and we're gonna need to remove that nut and attach our red wire to the positive post on the battery. But before we do that we're gonna have to put our fuse holder in place. So they give us plenty of wire here, so I'm gonna estimate about how much I need. Also, so that I have a little bit of room to work with, I'm gonna cut it a little bit long, and I'm gonna strip back the end of my red wire. Now, they already have the butt connector connected on the fuse holder, so all we're gonna have to do is crimp on one side.With everything connected I put a little bit of electrical tape around the connector to help with that moisture buildup and corrosion inside our connection. We're gonna be using a 10 mm socket to remove that nut so we can put our ring terminal in place. So we can remove that nut, slide our ring terminal over, and then replace the nut. We can take our 15 amp fuse, put it in the fuse holder, and I'm actually gonna take all my excess wire here, I'm actually gonna bundle it up and tie it to the power wire right here, in the battery box, and then just tuck the fuse holder inside. And we can replace our battery box cover, and now that all of our connections are made we go ahead back to the back, start cleaning up all the wires, and put our taillights back in place.Now, before we plug our taillights in, we'll take the little bit of grease that's left and put it in those connectors. We can grab our taillights, we can plug them in. On the back of our taillight we're gonna have this little hook section, that needs to line up with this tab on the outside, and then we're gonna have these pins that are gonna need to line up inside the housing area here. You just wanna line everything up, make sure the pins are in place, and then push it back in. Now these little tabs do have little ears on the sides, and if we look in the hole, those are gonna be directly to the left and right, so when you put these back just make sure you have them lined up so you don't break those off. And we'll go ahead and do that for the other side as well.Now, if you haven't already tied up your wires underneath the vehicle, now would be a good time. You just wanna leave just enough for your 4-pole hanging out so that you can connect it up. And I just tied the excess wire from my 4-pole to the hitch itself on the crossbeam, and then all my other wires I tied actually up above where the bumper support is, back here. So we can take our dust cover, slide it over the 4-pole connector, and when we're not towing anything and we're not using our lights you can actually use the dust cover to hook our connector to the safety chain loop here, so we don't have to worry about it hanging down or getting caught on anything.Now the last thing we're gonna need to do is to test our wiring, to make sure that everything's working properly. Now I'm gonna plug in my 4-pole tester here, and if you need one of these you can pick one up on our website using part number I26. I'm gonna grab an extra set of hands so they can run the lights and I can verify that they're working down here. Can I get the headlights please Looks good. Left turn signal; good. Right turn signal; good. Now the brakes; good. Now the brakes and both turn signals please. With everything looking good, we're ready to hit the road.And that will finish up our look at the Hopkins Plug-In Simple Vehicle Wiring Harness with 4-Pole Flat Trailer Connector, part number HM11140514, on our 2015 Ford Escape.
Average Customer Rating: 4.4 out of 5 stars (23 Customer Reviews)
Quickly and easily install a 4-way trailer connector on your vehicle with this custom harness. T-connector plugs directly into existing wiring. Powered converter reduces strain on wiring system.The product worked as advertised. The installation would have been much simpler, though, if the power lead on the harness were 12”-18” longer. When installing on a Ford Escape, the end of this wire ends up far enough up the fender wall that attaching the power wire (from battery) is very difficult.

Well, I just went to Hook my trailer up the other Day, "I hadn't used it since last fall" cause I had to go pick up a new lawn mower. Well, when I went to check the lights on the trailer they didn't work. I thought Huh, so I did a little messing around and still Huh. So, I checked the inline fuse, blown, alright change it out and I am good to go again. Well, changed the fuse and huh, no lights. Did it again another fuse and Huh, still no lights. So I crawled down under the vehicle and the black box "relay box" has a melted wire in the epoxied end and the wire is melted. So, sometime over the winter water had got inside that box and shorted it out. This is the second wiring harness I have gotten for this vehicle from E trailer that has not worked. The first one was about one hundred dollars but I thought it didn't work do to something I did only to order another one to find out differently.

Mike L.
6/9/2018
Typically when multiple failures of a trailer wiring harness/taillight converter occur, it is caused by a short circuit somewhere in the trailers wiring system. The fact that this has happened on two occasions with harness/converters from different manufacturers would tend to confirm this. Before replacing the wiring harness/converter box, youll want to carefully examine the trailer wiring and locate and repair the short or youll continue to short out converter boxes. Youll want to begin at the trailer connector and trace each circuit rearward until it meets the taillights. Look for pinched wires, loose connections or any wire with cracked or worn wire insulation. At some point, theres some bare copper wire shorting out to the trailer frame. A corroded lamp socket can sometimes cause a short as well. Ill link you to a help article that will provide some troubleshooting assistance.
Helpful Links
This kit was very easy for my 2014 Ford Escape. The plugs made the electrical work simple (no cutting and splicing of wires). The biggest challenge was running the power cord up to the battery, but the unit works just fine.
Easy installation, but product had a partial
malfunction after 7 months. Found out that it only has a 90 day warranty
Mike L.
10/23/2018
The majority of the time a taillight converter fails, it is caused by a short circuit in the trailer wiring. Closely examine the wiring on the trailer, beginning at the trailer connector. Look for pinched wires, loose connections or cracked or worn insulation that would allow the copper wire to short out to ground on the trailer frame. The converter failing actually protected the much more expensive to repair wiring system on your vehicle, which is what they are designed to do.
This worked great once I got the install figured out. This install took way longer than expected. The wires from the drivers taillight to the box need to be much longer. This leave the box hanging in the bumper area and is super hard to reach. The video tells you after the fact to put some two side tape on there. It needs to be longer wires so that it sits down and can be zip tied to the frame or some other mounting point that is easier to get to.
After a year still no issues, excellent product and service.
Everything works well. The only problem is that the driver side T connection is too short. The control box has to be way up inside the bumper where it can't be secured. Make sure you connect your power wire before you fish the T connector. Otherwise you won't be able to get your crimping tool up inside the bumper.
Great service, good prices, excellent help from staff. Everything arrived promptly, in good condition and fit my vehicle perfectly.
Assume experience, I highly recommend etrailer.com to everyone.
Nathan
Easy to install. No adjustments to make. Took 1 1/2 Hours to install. Floor jack helped with the lifting. 4 day delivery. Fantastic.
Again, the install video was an invaluable source of info. So easy to install! Great customer service and delivery times!

Kyle F.

4/8/2022
I havent had any issues with this product. Has been working great.
Exactly as described and working without issue.
works fine and had no problems,
Perfect for what I needed and worked like a charm
Super!
Great way to finish my hitch set-up
Do you have a question about this Custom Fit Vehicle Wiring?
Info for this part was:
At etrailer.com we provide the best information available about the products we sell. We take the quality of our information seriously so that you can get the right part the first time. Let us know if anything is missing or if you have any questions.


Mike
8/20/2023
Still works as advertised.