
Summer Starts Here - Save up to 70%
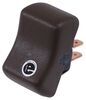
Double on/off switch for controlling lights and other applications powered by your battery. SPST, 16 amps at 125 - 250V AC, 3/4 hp at 125 - 250V AC, 10 amps at 14V (T), 3 amps at 125V (L). Fits cutouts measuring 1-5/8" tall x 2-7/16" wide.
Features:
California residents: click here
Videos are provided as a guide only. Refer to manufacturer installation instructions and specs for complete information.
Hey guys, it's Jake here with etrailer. Today we're gonna be taking a look at, and I'm gonna show you how to install the JR Products Double Light Switch. This light switch is going to be able to handle two circuits. It's gonna be a great add-on, or a replacement, if you have light switches in your camper or RV that have brown light switches. If you don't have any, and you're wanting to use all brown light switches, or the interior of your travel trailer has other brown accessories and you're wanting to add a switch, this one's gonna be a great option. Now, in addition to lights, you can use this for pretty much any 12-volt accessory that you want to have a temporary on and off switch for.
A lot of people use these for sound systems in their RVs, accessory lighting underneath. There's some RVs that have garbage disposals that run off a 12-volt, you can run the garbage disposal on one of these switches. I like these switches, these are the same ones that come in a lot of campers, and it's the same switches that are in my camper. I like 'em because it's not your traditional light switch where you have to flip it on and off, this one is you can turn it on and off with a brushing motion. So when you go to turn 'em both on, you can flip 'em both on, or flip 'em both off.
And what we use this for is, we installed it in an enclosed trailer to wire up six LED lights. We put one side of the trailer on one of the switches, and the other side on the other switch. The owner of this vehicle is using these lights to be able to strap down his rigs, and before, he just had one singular light switch and three lights running up the center of his trailer. Well, that poses a problem when you're going to strap things down, if the unit's in here that you're strapping down, and the lights are running down the center, that means you have nothing but shadows along the sides, where you have to strap the the units down. So adding these six lights using this light switch is gonna give him a lot more options to be able to have lights everywhere in his trailer, rather than just on the side.
With that being said, let's go ahead and show you how we got it installed. Now, to get our rocker switch installed what we wanted to do is, you want to take a, I like to take a piece of blue tape, put it on the backside of the area we're gonna have to cut out, in order for a switch to mount flush in the wall. And then we'll take that piece of tape, tape to our wall, and now we can get that cut out. (tool whirs) We're just using a multi-tool with a saw blade on it in order to do that. (tool whirs) So we've got our opening cut out.
Our trailer is like any other enclosed trailer when you get it from the manufacturer, most of them will have this Lauan on the walls. But this trim up top, you can usually pull it out a little bit, and there's a gap behind the wall. What we're gonna do is run our wires for our switch down through that gap in the wall. We may have to pull out a little bit. But we'll run it back there. And we essentially want 'em to come out by the switch panel. And I've got two wires, you can see, running down here. One is our wires going to all our lights, which we have tied in together. And then the other one is gonna go from the switch back up and over to the battery. So we're gonna put a spade terminal on each one of these. And essentially what we're gonna do is, on the backside of the switch panel, you're gonna have four prongs that you're gonna have to have spade terminals for, what we're gonna do is we're gonna run the white 2-1 switch, and we're gonna run a white power wire to that switch. I know it's probably confusing, because we're using white and black wires, but we're using power for both of them. And then all we're gonna have to do is go up and make sure that our battery is grounded to our frame, and then all of our lights should be just fine. So we need to put a spade terminal on each one of these wire ends. It'll make it real easy to connect up, all the colors will match, but they will all be power wires. Now we can make our connections to our switch. We have the white wire, which is the driver's side of our trailer, and the black wire, which is the wire that goes to the lights on the passenger side of our trailer. So the bottom two plugs, you're gonna want to be the load, and then the top two connectors you're going to want to go to your battery. Now we've got our two power wires, we tied 'em into the same fuse connector. We have the fuse out right now, we're going to connect it to the positive post of our battery. to the positive post of our battery. And we did figure out our trailer battery is grounded to the frame of the trailer because of the lights and accessories that he had on it before, so we don't have to worry about doing that. If you're putting a new battery in, you'll want to ground it to the frame, and you can do that with a self-tapping screw, or with a bolt, if you have a factor ground somewhere. This one just so happens to be grounded right here on this accessory post, so they've got it grounded to the frame and then grounded to the battery. Now we can take our fuse, and pop it in our fuse connector, and test out our lights. Now we can test out our lights. I wired up the closer switch to the door for the one right over the door, and all the way down the passenger side of the trailer, and the other one for the driver's side of the trailer. We'll flip those on. You see they're working great. Nice even light. And test out the other one. Those are working too. Now that everything's working properly, we took the decorative cover off our switch, and it will reveal our mounting holes, which we can use to get our switch mounted safely on the wall. We'll mount it up like this. You want to use some pretty small head screws for this, because the cover can, it may not go on all the way if you're using too thick a head of screw. (tool whirs) Well guys, hopefully this video helped you decide whether or not the JR Products Double Rocker Switch is right for you and your application.
Average Customer Rating: 4.0 out of 5 stars (2 Customer Reviews)
Double on/off switch for controlling lights and other applications powered by your battery. SPST, 16 amps at 125 - 250V AC, 3/4 hp at 125 - 250V AC, 10 amps at 14V (T), 3 amps at 125V (L). Fits cutouts measuring 1-5/8" tall x 2-7/16" wide.
Info for this part was:
At etrailer.com we provide the best information available about the products we sell. We take the quality of our information seriously so that you can get the right part the first time. Let us know if anything is missing or if you have any questions.


Thank you! Your comment has been submitted successfully. You should be able to view your question/comment here within a few days.
Error submitting comment. Please try again momentarily.