
Summer Starts Here - Save up to 70%
Thank you! Your comment has been submitted successfully. You should be able to view your question/comment here within a few days.
Error submitting comment. Please try again momentarily.
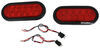
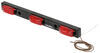
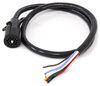
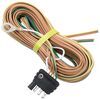
4-Way trailer harness connects to your tow vehicle to control trailer light functions. Wishbone-style harness comes with 2 tail light wires split for simple wiring.
Features:
Specs:
California residents: click here
Videos are provided as a guide only. Refer to manufacturer installation instructions and specs for complete information.
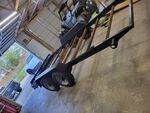
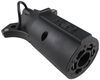
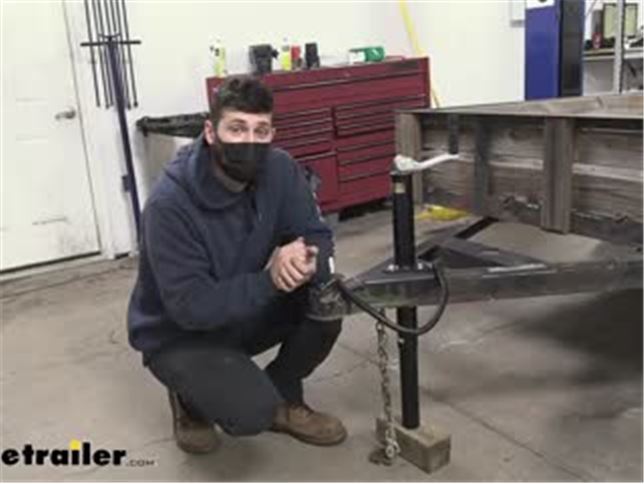
Hey everybody, how's it going Today, we're gonna be going over and showing you how to install the Wishbone 4-way 25 foot trailer wiring harness. So this trailer wiring harness here is gonna be the perfect option for any trailer up to 25 foot. Now, if your trailer isn't that long, it's perfectly fine. We would just go ahead and trim off the extra which is actually what we had to do for this particular application. But so long as it's not over 25 foot, this is gonna be a great kit for you. So this particular kit provides a standard 4-way flat, also referred to as a 4-pole trailer connector.
This is the most common type of trailer connector and the one you're gonna be using if you don't have electric brakes on your trailer. If you do have electric brakes, you're actually gonna be using a 7-way so you wouldn't use this. But for every trailer without a 7-way, it's gonna have this standard 4-way. This is the most commonly and widely used one. So a 4-way trailer connector is gonna transmit the running light circuit.
That's gonna transmit the stop and turn signal circuit for both the driver and passenger side. And there's also gonna be a pin on there for ground. So those are your four total of circuits there. This particular one is a Wishbone configuration. So what a Wishbone configuration is, it basically means there's gonna be two running lights one for each side.
Some 4-ways don't use that Wishbone and they just have a running light wire coming from the front to the rear. Just one wire and then they splice into the two running light circuits at the rear. So it really doesn't matter which you have. We can either run a running light wire for each side or just one and then tie it together at the rear. This one here, there's a wire for each side.
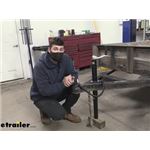
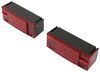
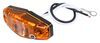
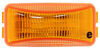
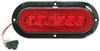
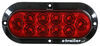
I kinda prefer this. It makes it a little bit easier. But again, you can use it no matter what your trailer has. So this kit has many different uses. Some people, their taillights are getting older. They're cracking, they get sun damaged and they're gonna replace the taillights. They figure that might as well replace the entire trailer wiring harness, which is what we did here. Or if you're building a trailer, it's gonna be an excellent option for that. Now over time, the jacket on those wires can get hard and crumbly exposing the bare wires underneath causing shorts. So that's a good time to upgrade as well. Really, it just really gonna be by age or if you're replacing other components. This is great kit here just to add to your complete set up there so you can make sure everything's working properly and you don't have any lighting issues down the road. So keep in mind, this wiring harness is compatible with both standard and LED taillights. We actually upgraded the LED taillights on this trailer. So it's gonna work great with both. The wire size is gonna be adequate for both of those types of bulbs. So now that we've gone over the wiring harness a little bit, let's go ahead and show you the installation. So first step of your installation, you're gonna go ahead and remove your old wiring harness here. You can see, we have a nice bundle here. It's quite messy. Now you can be as neat or as messy as you want when you're removing this. I end up just cutting a lot of this off 'cause I knew we weren't gonna be reusing it. So it was much faster just to cut everything off and then pull it all out. But now that we've got all the old wires out, we'll go ahead and start running the new ones. So next we're gonna take our wiring harness here and just untangle it as best as we can. So this is actually known as a Wishbone wiring harness. Now what a Wishbone wiring harness means is there's gonna be a running light circuit on each side of the trailer. So normally, they'll tie the running lights in at the back of the trailer, then they'll just run one wire up to the trailer connector. Here you actually have two brown wires for the running lights that go to the back of the trailer connector. So doesn't really matter which one your trailer uses. You can install this either if it had a Wishbone before or just had the standard one. So our two white wires here, these are for the ground. These run back to each taillight assembly. Our two brown wires, that's what we talked about. The Wishbone design. One goes to the driver taillight assembly. One goes to the passenger. And we have our yellow wire here, this will go to the driver's side. And then the green wire will go to the passenger side on the right. So what we're gonna do is we're gonna take our wiring harness here. Now I like to make things look a little bit cleaner. So I'm gonna take some wire loom and I'm gonna install it on the first couple feet of our wiring harness here. Just again, to make it look a little bit nicer. You guys don't have to do this, but if you have some laying around, it's worth the extra time to make it a little nicer. But once I get this on, I'm going to leave a couple feet at the tongue here 'cause you need to keep in mind that you need to have clearance to make turns and you want have enough to reach so you can reach your truck depending on your configuration. So give yourselves a little bit of extra wire here at the front. And the way you can do this to make sure that you don't short yourself, just kinda take it here and just wrap it around the tongue jack here or the trailer coupler. Just make yourself sure that you give plenty of extra. So now what we're gonna do is we're gonna route all of our wires from the front to rear here. So again, our wiring harness does kinda split in two. These three wires here with the green wire that's gonna go to the passenger side. And these three wires here with the yellow wire, that's gonna go to the driver's side. So just keep that in mind when you're routing them. But we're gonna go ahead now and get that done. And then we can show you how we did it. It's really gonna vary depending on how everything looks underneath. So the step by step really isn't gonna do you guys too much good because again, your trailer can be different, but the overall basis of it should be pretty similar. So we'll go ahead and show you that once we have it all done. So we've got our wires are routed now. Now right here just directly behind the jack tube, I used the little ring clamp here along with the self-tapping screw. That's just gonna secure our harness here so it's not falling down. But once I come from there, I'm gonna go directly down and then we're gonna be pretty much tying these to the bottom of the frame. So you're gonna see these little metal clips here. So I recommend picking these up with your wiring harness because there's really not a lot of ways to secure the wires to the bottom of the trailer. Granted that's gonna depend on your trailer, but most of the time, you're gonna have a flat lip on a frame rail. And the way these work is there's teeth on them. So you hammer them onto the bottom of the frame and there's a smooth side that you guide your wires through. So basically they just make a nice convenient way to hold your wires there without them dangling down, without requiring any modifications. Just a simple tap to the hammer and they're nice and secure. The teeth bite on there so they don't move. And then you can just use your wire to guide them through. But we're gonna use more of these here and just work our way down the frame rail. You can see our wire here. We have another one of those metal clips. And then from about this point on, we're gonna have to jump under the trailer. So we're underneath the trailer now and you can see we have our wire just tucked nice inside the frame rail here using those little clips that we showed you. And then for our particular trailer, we have these cross beams here. There's already holes drilled in there. We just enlarged them that way I could sneak the wires through that beam. If you don't have those, you don't have to worry about it. You can go around them. Again, a lot of this is gonna be specific to your trailer. Not everyone is gonna look the same underneath, but again, most of them are gonna have this frame right here so you can use those little ties. But we're just gonna keep working our way back to the frame. So we're gonna route our wire to about this point here. And then we're gonna come back outside the trailer because we actually have the clearance light that's gonna be installed here. Now, chances are you have several of these on your trailer. Some are gonna have more than others but the locations that you do have the clearance lights, here's what we're gonna be installing. It's just gonna mount up like so, so you need to make sure that you stop and give yourself some extra wire here whether you make your connections now or you make them at the end. What we did is we went ahead and cut our wires and we attached the two ends to one of these butt connectors. And then these two ends of the butt connectors, we're gonna attach to our light here. So we're gonna do that a little bit later. We're not gonna do it right now. If you wanna wait, you can just coil up, give yourself some extra wire to work with and then continue running your wire to the rear. But again, we need to do this each time that we have a clearance or side marker light on the trailer. You could have several so just be aware of that when you're routing your wire. So we don't have any more clearance or side marker lights. We just have the one on each side. So we can just now route this wire to the end here. Now this is a single axle trailer. So we're just gonna keep following our wire here. We have another cross beam that we went ahead. There's a pre-drilled hold there. We just drilled through it. So this area here around the suspension, the axle, you wanna be careful that you secure the wire. You don't want the wire getting tangled up in the leaf springs or anything like that. So directly over the axle, I have another one of those wire clips. Now you can use as many of these as you want or few as you want, but you do need to make sure your wire's not gonna be dragging on the ground. But from here, we're gonna go up and over the axle, we have another cross beam back there. And then directly after that cross beam, that's where our taillights are gonna be. So we'll jump outside the trailer. We'll show you where that wire comes out. So we've got our wiring harness. The end run back to where we have our taillight here. Now we're working on the passenger side. So again, we need to have that green wire. So what we're gonna do is we're just gonna simply connect our three wires here to the three wires coming from the back of the taillight. Now your taillight may be a little bit different in regards to wire colors, number of wires, because that's gonna come down to which specific taillight you have. But the three wire design of this one is pretty standard. This is gonna be most commonly used. So this is probably what you guys are gonna have as well. So we went ahead and just used something to secure our wire here, a little ring clamp, just so it's not dangling on the ground. So I'm kinda nut about this stuff. I always like to make sure that we have tons of security points along the way to secure our wire. That way it doesn't drag down, get tangled up in anything. I just like to go a little bit overboard even sometimes on securing the wire. But what we're gonna do now is we're just gonna attach our three wires here to our three wires here. We are, however, gonna make a ground jumper which will show you in the second. But in order to do all this, we are gonna need some miscellaneous butt connectors such as you see here as well as some electoral tape, some ring terminals. And if you guys have this at home, great. If you do a lot of wiring, chances are you do have these. They're pretty common. You could even pick these up individually in town. But we actually sell a kit here. That's gonna have all these miscellaneous connectors. All the ones you need and some of the ones you might not need. And it's also gonna have a crimping tool. So it's pretty cost effective. I would recommend picking it up along with your trailer wiring harness here. Just so you have everything right here when you need it. But with that being said, we'll go ahead and start making our connections now. We're just gonna strip some jacket off of each of these wires to start and then we'll begin making our connections. So our green, this is for the stop and turn signal circuit and then our brown, which is for the running light circuit. We can just connect those straight to one another using one of these butt connectors. You wanna use the blue ones here. I always like to twist those strands there. That way, they don't kinda fray and go to the side when you're sticking them in. So there's that one ane we'll have these running light wire. And get that crimped on there. And every time I crimp a wire, I always like to just give it a little tug. Hold on the butt connector and give it a little tug. Make sure it doesn't pull out. But we've got those two wires taken care of. Now we have our white wire which is just for the ground. So what I'm gonna do is I'm actually going to attach these together and then connect them to a ring terminal, which is this here. And then I'm going to screw that ring terminal into the frame of the trailer there to act as our ground. So you will need a self-tapping screw in order to do that. Well I think I'm actually just gonna attach it right up there. That seems like it's gonna be a good location for us. So there we go. That looks pretty good. What I'm gonna do now is I'm gonna take some of our electrical tape here. I'm just gonna clean up all these wires. You wanna make sure that you cover those butt connectors. You don't want any water getting in there. Basically, just making it look a little bit nicer. When we've got this side done, we're gonna do the exact same thing on the other side. Everything is pretty much the exact same except for the other side of the trailer has a yellow wire in our loom there. So now, as we said earlier, we needed to make some tie off points here for our running lights. So that's what we're gonna do now since we've wired everything up to the taillights. We're just gonna install our little clearance lights here. So this could vary depending on your particular setup, but usually there's gonna be a hole for your wires and then two holes for the mounting tabs there. So we're just gonna fish our wires down through there. Try to fish them out to the bottom as best we can. So now we're gonna go ahead and just secure our light using self-tapping screws. Again, this could vary depending on which actual clearance light you have, but most of them are fairly standard in regards to this two-hole design. And then once you have your light mounted and your wires ran down through here, you'll just crimp them and then secure them with electrical tape like you would normally. So now we're gonna go ahead and test everything out to make sure everything was done correctly. Now we have a tester box specifically for this but you guys are just gonna hook up to your vehicle there. Nice and simple. Gonna go ahead and turn on the taillights. We should see both the marker lights illuminated as well as the taillights at the rear. So we'll check both sides, make sure that's good. And then we will turn on our left turn signal. Perfect. Now we're gonna switch over to our brake lights. So the brake lights should illuminate the taillights on either side there. And then finally, we'll have our right turn signal. Make sure the right turn signal was illuminating there on that side as well. So looks like everything's working correctly for us. If you guys don't have any luck, just make sure to check all your connections with your butt connectors. That's usually the number one fail point and also check your grounds as well. So overall it's pretty easy. So you guys really shouldn't have any issues but just a few pointers there if your lights aren't working. So with all of our wires working correctly, that's gonna do it today for our look and installation of the Wishbone 4-way 25 foot trailer wiring harness..
Average Customer Rating: 4.8 out of 5 stars (221 Customer Reviews)
4-Way trailer harness connects to your tow vehicle to control trailer light functions. Wishbone-style harness comes with 2 tail light wires split for simple wiring.The full-length ground down each side of the trailer to the taillight and side lights is the best result on any trailer rewire.

As I was researching trailer wiring for my new led lights for my boat trailer I came across etrailer.com. That’s when I finally found exactly what I needed. Thanks etrailer. Com

Guy

4/5/2024
Still working great no issues at all.
Nice harness; see my 2023.07.23 Curtis Cargo Carrier review for more pics.
Worked well.
Like having ground wire to each light, ensures they will be grounded and will work properly. Reduces wire splices which can be a source of trouble with any trailer wiring.
Very useful item for wiring a set of removable trailer lights for our layout duck boat. Working perfectly and the lights now never go into the water.
Professional trailer supplies. One of the few dealers with proper grounded wiring harnesses. Cheap and hassle free
Excellent product rewiring my boat trailer the wishbone style makes it very easy
Wire harness has been in use for one year and no problems. When installing wire cutting and stripping the wire on the ends for lights was no problem. Had to be very careful slicing into wire in the middle of the run for side lights on the trailer. Wire did not want to separate. Used razor and had to be very careful not to damage other wires.
Restoring a 1991 2 horse trailer. etrailer had all the exact lights made by Peterson, 35 years later.
The wiring harness was easy to run and easy to hook up still working great.

Mickey W.
10/23/2023
The wiring harness is still working great no problems

I am so excited to find a harness that provides the ground all the way to the light!
Product promptly dispatched and received, as described. Thanks, etrailer!
perfect replacement
This was the ONLY wishbone wiring harness I could find with dual full length grounds. I have never had any long term luck with using the trailer frame as a ground.
I can now ground my lights to a hard wired ground, which should last just short of forever!
Thank you eTrailer.com for offering the perfect long term solution for trailer light grounding.

Jim
6/20/2023
It has worked out flawlessly! I connected the junctions inside plastic weatherproof boxes, and used silicone where the wire goes through the cord grips. WE have used it multiple times, even in drenching rains. Dry as a bone, and always works! I am going to do the same thing on my 6x12 utility trailer this fall!
Best way I’ve ever wire a boat trailer. No more concern about corroded ring terminals not making good contact with the frame of the trailer. All boat trailers should be wired this way. I’ve owned many
Hard to find item; Etrailer made it eas y!
Greg
10/15/2023
Can’t believe it’s been a year already. The harness is functioning great. Zero degradation with wiring and plug fitting.
Haven't use yet but I think they will work well.
5 stars is pretty much a given here considering this is the only properly made trailer harness on the market. Doesn't hurt that it's well made also, glad I found it.
No problems with wiring after one year putting boat trailer in/out of salt water
Work as expected and as I should
Fast shipping thanks
Great price fast shipping
Used this to install lights on a curt folding cargo carrier, was good to have 2 ground wires(white) and 2 parking light wires(brown), to avoid extra connectors that would cause corrosion problems
Much better quality than what you get at Walmart or on eBay.
The hot trick to keep from having to tap thru galvanizing on trailer for a ground at every light!!
Do you have a question about this Trailer Wiring?
Info for this part was:
At etrailer.com we provide the best information available about the products we sell. We take the quality of our information seriously so that you can get the right part the first time. Let us know if anything is missing or if you have any questions.


Rick S.
5/9/2024
no glitches