bing tracking image
  1. Electrical Tools
  2. Performance Tool
  3. Wiring Tools
  4. Wire Cutter
  5. 8 Inch Long
  6. Red
Wire Cutters with In-Handle Crimper and Bolt Cutter - 8" Long

Wire Cutters with In-Handle Crimper and Bolt Cutter - 8" Long

Item # PT43ZR
Retail:$27.27
Our Price: $9.31
You Save: 66%
Electrical Tools
Shipping Weight: 0.51 lbs
Add to cart
In Stock
zoom in icon
slider vertical icon
zoom out icon
Comment field cannot be left empty.
Name field cannot be left empty.

Thank you! Your comment has been submitted successfully. You should be able to view your question/comment here within a few days.

Error submitting comment. Please try again momentarily.

Product Images

Need help with installation?
Locate installers near me
1-800-940-8924 to order Performance Tool electrical tools part number PT43ZR or order online at etrailer.com. Free expert support on all Performance Tool products. Great prices and Fastest Shipping for Wire Cutters with In-Handle Crimper and Bolt Cutter - 8" Long. Electrical Tools reviews from real customers.
  • All Info
  • Reviews (5)
  • Q & A (0)
  • Videos (1)
  • Photos

Performance Tool Electrical Tools - PT43ZR

  • Wiring Tools
  • Wire Cutter
  • Performance Tool
  • 8 Inch Long
  • Red


  • Wire cutter with precision machined cutting edges
  • Strips and cuts 12-24 AWG stranded and 10-22 AWG solid wire
  • Bolt cutter cuts bolts sizes 4-40 to 10-24 AWG
  • In-handle crimper for insulated and non-insulated terminals and coaxial cable
  • Long-nose pliers for gripping, bending, shaping, and pulling wire
  • Ergonomic, non-slip molded grips for excellent comfort and control

W86503 Performance Tool Wire Strippers - 8" Long


Video of Wire Cutters with In-Handle Crimper and Bolt Cutter - 8" Long

Videos are provided as a guide only. Refer to manufacturer installation instructions and specs for complete information.


Video Transcript for Review of Performance Tool Wiring - Wire Cutters Crimper Bolt Cutter - PT43ZR

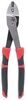
Ellen: Hey everybody. I'm Ellen here at etrailer.com and we're taking a quick look at these wire cutters. They're also going to have an in handle or a built in stripper as well as wire cutter. So it's an all around kind of multi-use wiring tool. So I want to try this out and make sure that this is going to be the right tool for you. It's a fairly comfortable handle, could be a little bit bigger on those grips.

It's a little bit narrow for my taste, but should work pretty well. It's got kind of a place for your forefinger and thumb to stop, should be good for your left hand as well, if you're a lefty.So let's try it out. I've got a couple of wires here to test this guy out and different sizes and things like that. So we'll see how it does. I'll get a big old of random wires to play with.

So let's try the cutter. I have some wire I was trying to work with earlier, so it seems like it cuts pretty well. And this is about 10 or 12 gauge wire here. So I'll try that. Seems like it strips pretty well.

Little excess wires. I'm going to cut that off. And then we've got some butt connectors here so I'm going to try this in this yellow guy and it looks like my wires are a little bit long. So cut those off. And I'm just going to play around with this just to see how well it does.

It does have a nice label to kind of help you remember what goes where, so this is going to be the crimping tool here down at the bottom. You've got a spot for insulated versus non insulated. This one is insulated, of course. And then you've also got for co-ax cable, so different sizes.I'm going to try to use this one closest to the fulcrum since I think that's the one that they want me to use here. So crimp that down, and this is a heat shrink butt connector. So did kind of punch through that material, which is something I didn't want to do. I'm going to cut this back just a little bit more. See with this wire size is probably a little bit big for this, where it's kind of on the edge of what it can really handle. Get that guy inside. Just want to make sure that you get those wires all the way in of course.So I'm going to try it on this one, kind of more towards the handle, away from the fulcrum and see how that does. Looks like that might be for smaller wire. Yeah. That one really punched through. So not sure that that's . Oh, it crimped better though. It's holding better. Let's try it on a smaller size. I already got one side of this guy crimped, but I'm just going to make a loop back on itself. So this is probably 14 or 16 gauge wire. So far, the stripper portion of this seems to be pretty comparable to any other that I've worked with. So it seems like that portion works pretty well. Now this is going to be a little tricky since I just made a loop on myself. Should be good there though. So that tool really wants to punch through which I don't want to do, but it did make a good crimp. Let's try it on even smaller wire.So this is probably a 20 gauge, maybe 22. Try it on the smallest size here. Got that a little bit long. Cut it a little short. I'm going to make . This is probably not going to work, but I'll just use it on a different butt connector here. Didn't really think about how short I was making that length. So I'm again, going to use this portion kind of again, towards the handle to try to crimp this down. Got to use a bit more force, but I feel like, didn't give me the crimp I wanted. I just don't like how this is punching through. I guess I don't have to press quite as hard to get the crimp, but then it didn't get all the way down so.That one seemed to do what I wanted it to do because it didn't punch all the way through, but it got a good crimp. So for the smaller butt connector, it seemed to do really well. For these bigger guys, it punched through that material, which I didn't really want because that's kind of the point of having an installation on there. The heat shrink, it might kind of melt back into itself, but that's something that I just noticed there. I do like how it's pretty well labeled. I'll get a little closer so you can actually see that here. So they have it pretty well labeled to help you remember what goes where, so they suggest you only cut the copper, you've got a screw or a bolt cutter here, so you can thread in some bolts, cut off the length if you don't need it.I don't have any bolts to try that out with, but they do have them labeled to make it a little easier to know what's what. Like I said, the stripper portion seems pretty good, cutter portion as well. Those seem like pretty sharp edges. You get the little pliers at the end. So if you need to grab, twist or move anything around, you could do that there. I'll turn this around so you can actually read that, got all the labels here and this is that insulated versus non insulated. So we just have the different shapes. The non insulated is supposed to kind of crimp down more on those all metal or uninsulated butt connectors with this guy and kind of see, just sort of punch through or rip through that material a little bit more than I'd like. I think it'll still work, heat shrink it up, should be fine. And then you can always throw some loom or electrical tape on there and be all right.So, all in all, I think this tool will work pretty well. If you're going to be using it day in and day out, if you're an electrician or doing a lot of electrical work, you might want to just go ahead and get something a little bit higher end. But I think this is kind of mid tier as far as stripper crimpers go. It's pretty common to what we use here in the shop a lot of times. So I think it should work out pretty well. It's better than some others that I've used, but not as good so as other ones also. So again, kind of mid tier as far as the quality of the tool, but I hope that this helped in deciding if this is the right tool for you. We do have a lot of other options available here at etrailer.com, including all kinds of wiring stuff, including butt connectors, wire, and all kinds of good stuff to get your trailers fitted out or RVs or boats or wherever you're putting this. So check those out if you're interested, I'm Ellen with etrailer.com. Thanks for watching.


Customer Reviews

Wire Cutters with In-Handle Crimper and Bolt Cutter - 8" Long - PT43ZR

Average Customer Rating:  4.8 out of 5 stars   (5 Customer Reviews)


by:

Gary E.

1/24/2024

excellant


by:


by:


by: 09/21/2022


by:


5
5

See what our Experts say about this Performance Tool Electrical Tools

  • How To Install Trailer Lighting Harness & Brake Controller on Ford E-350 Van With No Factory Wiring
    To install all necessary wiring for a 7-pin connector and a brake controller on your 2011 Ford E-350 start with the Curt # C56020 4-pole wiring harness. For installation of this harness, if you don't already have them, you will want a Powerbuilt # ALL648544 trim pad remover, and a size T-15 Torx bit driver available at any hardware store. I have included a video showing the installation of the 4-pole wiring on a E-350 which will be a good help. However, where they finish with the 4-pole...
    view full answer...
  • Replacement Trailer Connector For 7-Way RV Upgrade Kit ETBC7 and ETBC7L
    You can use the Trailer Connector Adapter # 337TC1474P to replace your connection as we do not have a replacement cover for the 7-Way RV Upgrade Kit # ETBC7L. The new connector will plug in just like your current unit and has the same 4-way and 7-way connectors. You will only need a set of Wiring Pliers # PT43ZR to cut the old power wire and install the new connector. Be sure to disconnect the battery before cutting any wiring.
    view full answer...
    Image 1 for
  • Can The Roadmaster 12v Outlet Kit Come With Two Ring Terminals
    The 12 Volt Outlet Kit # RM-9332 comes from Roadmaster as is so you would need to order a separate ring terminal # # DW05702-1 and use a pair of wire cutters # PT43ZR to cut off the old spade terminal, strip off some casing on the wire, and crimp on the new ring terminal.
    view full answer...
  • Parts Needed To Install The Thinline LED Trailer Lights # STL64RB
    The Thinline LED Trailer Tail Light # STL64RB is pretty easy to install, you'll just need some butt connectors # DW05744-10, self tapping screws to mount the lights, a couple of ring terminals # DW05702-1 to easily mount the ground wires to the frame of the trailer, and possibly some extra wiring # 16-1-1 to bridge the gap between the lights and trailer wiring. You'll need some wire strippers # PT43ZR and crimpers # PTW30764 to secure the wires to the butt connectors and ring terminals....
    view full answer...
  • Can An Advent Air RV Air Conditioner System Be Used On A Food Truck
    Technically you can install the Advent Air RV Air Conditioner System # ACM150CH but you will void your manufacturer warranty since ASA will only honor warranties if the units are installed on a camper or motorhome. If you still want a warranty to cover the any manufacturer defects then I recommend going with the Furrion Chill HE RV Air Conditioner System - White # FR92PR (black # FR32PR). This unit comes with a start capacitor already installed and an optional heat strip # FR35SR can be...
    view full answer...
  • How To Wire An Enclosed Trailer To Run Off Shore Power And Battery Power
    The first thing you'll need is a power inlet to receive power from the shore power pedestal. You'll most likely only need 30amp service since you're in an enclosed trailer so I recommend the Furrion Replacement Power Inlet # 431861. You'll need to use at minimum 10AWG wire to connect this to a distribution center. Now the you have an inlet for the power you need a distribution panel to run it to and distribute it to all of your appliances. For this I recommend the Progressive Dynamics...
    view full answer...
  • How To Install The Furrion Vision S RV Camera System On A Trailer
    If your trailer isn't prewired for Furrion then to install the Furrion Vision S Wireless RV Backup Camera System # FOS05TASF you'll first need to determine the mounting location. Typically, we wire these to the running light circuit so that you can power the camera on whenever you want instead of on when the tow vehicle is in reverse. Trailer's typically have a running light towards the top middle of the trailer, and you'll need to splice into the wiring of this light to power the camera....
    view full answer...
  • Troubleshooting A Furrion RV Camera System That Has No Power
    The Furrion Vision S Wireless RV Backup Camera # FOS43TASF is either wired to your running lights or your reverse lights, which means that the camera will only have power when your tow vehicle has the headlights on or when it's in reverse. Most likely your camera is wired to the running light circuit so that you can activate it at any time by turning on your headlights. Now if you were simply plugging the camera into the connector that's on the monitor power cord then you do have a bit...
    view full answer...
  • Will The Tekonsha Universal Trailer Wiring Harness Work With A 2016 Honda HR-V
    The Universal Wiring Harness w/ ModuLite and Brake Controller Harness # 22551 is a universal fit wiring harness so you could use it to add a 7-way onto your 2016 Honda HR-V. This is going to require you to splice in all of the wiring so you'll need some butt connectors, wire strippers # PT43ZR, and crimps # PTW30764. I recommend picking up a # 18138 as well so that you can easily mount your 7-way connector.
    view full answer...
  • How To Switch from Jenson RV Stereo JRV212T to Jensen RV Stereo JWM60A
    There is no adapter harness to convert the wiring from the Jenson JRV212T to the Jensen RV Stereo part # JWM60A. That said, this is actually pretty simple using the attached diagram. All you'll need is some wire crimpers/strippers like part # PT43ZR and butt connectors like part # DW05714. Just match wires from the old unit to the new unit by function and you're good to go.
    view full answer...
    Image 1 for Image 2 for
  • Parts Needed To Add a 7-Way Onto A 2015 Thor ACE Class A Motorhome
    To install a 7-way and brake controller on your 2015 Thor ACE Class A Motorhome you'll need the Universal Installation Kit for Trailer Brake Controller - 7-Way RV and 4-Way Flat - 10 Gauge Wires # ETBC7. The 4-way connector on the # ETBC7 will connect to the 4-way you already have in place and from there you'll just need to ground your white wire to the frame and connect your black (12v power) and blue (brake controller) wires to the included 10awg wire and run it up to your engine bay....
    view full answer...

Do you have a question about this Electrical Tool?


Info for this part was:

Employee Kathleen M
Installed by:
Kathleen M
Employee Matthew S
Written by:
Matthew S
Employee Daron K
Edited by:
Daron K

At etrailer.com we provide the best information available about the products we sell. We take the quality of our information seriously so that you can get the right part the first time. Let us know if anything is missing or if you have any questions.