
To see if this custom-fit item will work for you please tell us what vehicle you'll use it with.


Videos are provided as a guide only. Refer to manufacturer installation instructions and specs for complete information.
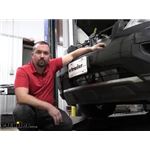
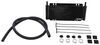
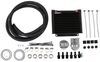
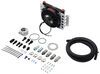
Hello neighbors, it's Brad here at etrailer and today we're taking a look at Flex-A-Lite's transmission coolers. Now these are gonna be available in a bunch of different sizes as well as different styles of fitting. So you can get a barb fitting as well as an AN fitting for those of you using it in a performance application. But either way, it's gonna just allow that transmission fluid to get extra cooling and prolong the life of your transmission. So whether you live in a hot climate, you tow, you have performance mods done to your vehicle. Either way it's just that added protection.
So your transmission lasts a long time. Now heat is the enemy of pretty much anything that's mechanical because when things get hot especially when there's fluid involved the fluid kind of starts to break down and lose its viscosity which means it's not going to work properly. And that's the cause of a lot of transmissions failing. And honestly, this is a Nissan they've had issues with the transmission and a lot of that comes down to the fluid being too hot. And this one in particular has a factory transmission cooler already and you can still put this in conjunction just to make that much better.
And that's the case for pretty much any vehicle. Even if you don't have a transmission cooler, not to worry, you can add this in and it's going to cool efficiently. But if you do have one it's just gonna add that much more to it which is beneficial. So if you live in a hot environment you have a performance vehicle or you're doing some towing or just carrying a lot of weight in the vehicle this is gonna be a great addition and it's just gonna protect your transmission long term and get cooler running temps. Transmission cooler works very similar to a radiator.
You have hot going in and that fluid's going to go through these veins where we have cooling fins in between to create a nice cooling surface. You maximize the surface area and these ones actually have perforations in each of 'em to just add more cooling. And Flex-A-Lite's been around for a while. They've always been a name that I've known because of motorsports. And this is no different for just your factory, you know, just daily driver or something that you're towing.
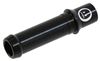
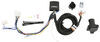
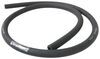
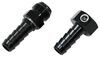
This is a great quality and when you're putting something that's used to high performance into a normal vehicle you're still gonna get great results. And this is no different. So this is all one piece. It feels really nice, it looks really nice and it's pretty light so mounting it up is not too hard to do. Now what separates Flex-A-Lite from other transmission coolers is the dimple plate technology. And it's not gonna be able to be seen like this, but in between our veins where that coolant actually goes through or any of the fluid, you're gonna have some dimples. And what that does is allows the fluid to kind of mix in between. Whereas if this is just an open vein, sometimes the cooler portions of fluid will stick to the side and then it just creates a main artery where the hot fluid flows through and that's not really gonna cool it down efficiently. You wanna mix that up so you get the most amount of cooling and that way all the fluid is getting that surface area to really cool down. This is made of aluminum so that's gonna be great for cooling. Also super lightweight, which is really nice. It also is rated at a 500 PSI burst strength, which is pretty substantial. If you know this is gonna pop at 500 PSI it's gonna be rare that not any of the hoses or any of the other components fail before that happens. So you really won't have to worry about this ever leaking or exploding under pressure. You really want maximum amount of flow through this. And you also want to maintain pressure because if you lose pressure well then that could starve the transmission of the fluid. And this one is designed to minimize oil drop nearly two and a half times more than competitors that have a similar product on the market. On a normal passenger vehicle whether it be an SUV, a car, or a truck a lot of times you're gonna have just the barb fitting that you're gonna go with and that way you can put your hose to this and then attach it to the fittings that you may have. Now you can also get this in AN fitting style. So for those of you that are some horsepower freaks out there you use the AN fittings that's gonna be a really nice option because those will go onto your stainless braided lines. Now as far as mounting this up and choosing the right one for your vehicle, you wanna make sure that you have enough space obviously to get it to fit in a nice cavity of the vehicle. A lot of times you can mount these up to factory radiators they give you the tools to be able to do that or you can really just solid mount em'. I'm gonna use a bumper beam on this one but the main thing is you're gonna wanna maximize the amount of airflow. So putting it in a spot where you have air constantly going through it is going to be key. And if you can create a nice little pocket where it has airflow wall around it, that's great. Sometimes you're not always able to do that. And in fact, sometimes you want your engine bay to be nice and open and just not have any potential for damage to something like this out on a you know, racetrack or something along those lines. So you can actually pick up a remote mount and what that's gonna do is have a fan mounted to this and that way you constantly have airflow whenever you turn that fan on. So even if you mount it inside the vehicle while on a roll cage or wherever you need to, you can get that airflow with a remote mount. Now something that really sets this aside from some of your more basic trans coolers is gonna be the fact that this is a stacked plate design, which means all of these plates are braised together but they're stacked in and flat and it creates a ton of surface area and really it's just quite a bit different than your normal tubes that you see where they just kind of snake in and out. And while they work pretty well this one has so much more area for cooling. So it's going to effectively bring those temps down a little bit better. Mounting these up, again, you wanna find a nice open spot but I mentioned earlier you can actually attach it to your condenser or your radiator. You wanna have this in front of all of those. You wanna make sure that this gets a lot of airflow. And to put those in, pretty simple, you're gonna have this nice little kind of zip cable here and it's got some nice little notches here that'll hold onto the backside of the fin as well as some foam that you can feed that through. And this pretty much just acts as like a zip tie. So when you press this through, pass it through the fins of your radiator or condenser and as you push this through it's gonna kind of zip that up and really make it nice and tight and hold it into place. Now on some of the newer vehicles though they stack these pretty tight and to get to the backside's gonna be tricky. So if it works for your application, by all means, otherwise you're gonna have to get maybe a little bit creative. You can self tap this into a lot of different things. Sometimes I recommend getting brackets. We have a bunch of those available as far as you know, mounting options here at etrailer. You can take a look at that. You can really use a lot of just scrap metal if you have that lying around and you wanna fabricate a little bit. You can get pretty creative. Because this can be mounted in any direction you're gonna want to just make sure that it's in a nice spot to get airflow. But also the hose that's included in the kit is not an excessive amount. We have this section here, so really making sure that our fittings are gonna be close to where we're gonna be tying into is key. So other transmission coolers that I've installed, I put in the center I thought looked really good and come to find out I didn't have enough hose in the kit. So you can pick up extra hose here at etrailer as well. But just something you want to think about when doing the install. If you don't want to have to purchase extra hose try to make it as close as possible. Kind of eyeball it before starting to cut. It's also gonna come with two fittings and that way if you can tie into it radiator, you can thread this in and that's gonna give you that barbed fitting allowing you to get that hose on there. And also included is gonna be those hose clamps to make sure that it's nice and snug on there. Installation is super easy and really the hardest thing I think is finding a spot to mount it which on some vehicles can be pretty simple and it kind of looks really cool once it's mounted up but also making sure you're tying into the correct line. So there's two different styles of radiator commonly that you're gonna see and that's gonna kind of help determine where you need to find those fittings at. You have your cross flow, which is gonna be normally you'll have a fitting up top and then one down below, and that kind of just cross flows until it gets to the other fitting. The other one is gonna be your downflow and that's gonna be what we have here. So I'll get this raised up and show you what the downflow looks like. So underneath the vehicle with our downflow you're gonna be able to see the fittings more than likely and they're gonna be right at the bottom. So we have one of the fittings coming out here at the barbed little weld on nipple there. And then you can see this feeds over and then there's one here. So being a downflow means that we can really easily determine which one is which because what you're gonna do is drive your vehicle, get it up to a temperature where the transmission fluid is warm and you can take a temp gun and take a look at each of those lines. And you're gonna have one that's gonna be a higher temperature because that's before it goes into the radiator. And then you also have one that's a lower temperature which is gonna be post going through the radiator so you're gonna want the cooler one. And this one in particular has a factory transmission cooler that we're gonna be tying in conjunction and that's totally fine it's gonna help pre-cool before it goes into the next one. So it's just a little making sure that it's cooling that much more. So it's really easy to determine this one because we're gonna look for the one that goes to the cooler then into the transmission. Our transmission cooler on this vehicle lives kind of in the front corner of the bumper on the driver's side. And so just tracing both of my lines I can see the one that comes out here, feeds directly into one of the barbed fittings that's on the transmission cooler. So that's where we're gonna be tying into. And we're pretty much just going to attach to this point with our new hose, put our cooler in line, put the other end into the transmission cooler and that's it. And that's the thing with our trans cooler, there is no, they work both the same. It's gonna flow through identically so whichever side works best as far as layout is gonna be the one that you're gonna tie into. So now that you've determined which line you're gonna be tying into, again, mock this up, find a nice spot for it and then take that hose and just kind of, you know, rough measure to make sure that you have enough to get to not only the fitting from the radiator but also to the fitting that's going into the transmission or in our case the external trans cooler. So once you found that spot, you know you have enough hose we're gonna go ahead and take our hoses off and that way we can start getting this installed. It is going to leak some transmission fluids, so make sure that you have, you know, obviously some rags nearby and you're gonna want to capture as much as you possibly can, that way it's not all over the place. And also make sure that it's cooled down enough. Working with hot stuff, you don't want to get burnt. So just something to think about. Let your vehicle cool down before tying into it. So pretty simple. This one has just a hose clamp on the factory line but some of them will have something called a Jesus clip as some people will call. And those can be tricky. So if you are using that, make sure that you are keeping track of that as you'll need it to get it put back in. So I'm gonna be using just some brackets I had laying around. The main thing is you want this to where it's not gonna be moving around and if you can you can attach both sides or get some brackets to be able to do that. But really I think with this mounted up I'm gonna be self tapping them into the bumper beam. I think that's gonna be solid enough to really hold it in place. It's also gonna be spaced away from everything to get maximum cooling and we're gonna have these facing downward that way it's nice and close to our fittings. I got my brackets mounted up and just self tap these in to our bumper beam. And you can see we have an airspace between our trans cooler and our AC condenser. I also have room on the bottom to be able to attach our hose and not make too severe of a curve to get to our fittings because we don't wanna pinch the hose obviously otherwise it's gonna hinder the flow. We also have it mounted up in the front right center, well offset I should say but right here to where maximum airflow is going to hit it. Again, it comes down to making sure you get your hoses set up in a spot that's gonna reach everything. And if you have to, again, you can pick up more but what I've done is actually drilled through the plastic radiator support. Just kind of make a pass through here. And also that's something to think about too is you don't want your hoses rubbing against any sharp metal that could be chafing or obviously anything that's gonna be moving like fans or anything along those lines. You want these hoses to be protected. So I've gone ahead and just passed it through the plastic and that way it's a nice safe place for it to rest and be secure. Now we are gonna take our line out. I have some rags ready and a lot of these are gonna be just a hose clamp. Now a lot of times you can use vice grips to pinch 'em open and you may have to kind of tug at them to get them off. Mine's kind of tucked up here so I'll squeeze that clip down. And once you get your vice grips to a tight setting where it kind of opens that up you should be able to move that hose clamp back a little bit. Now sometimes these can be tricky especially hoses that have never been taken off. So you may need to kind of, as you get these clips back sometimes it's gonna be fighting you a little bit. So I'm gonna be pulling on the hose a little bit as well to try to get this to separate from our barbed fitting. So just a small amount of fluid from our hose. And what I'm gonna do, since I have my vice grips here I'm just gonna crimp this onto the hose and that way it's gonna stop any flow from coming out. Now we'll take our new hose and make our connection onto our barbed fitting. And then with our hose clamp, we'll just tighten that down. So make sure you have your hose clamp on obviously before you make that connection there. So we have our one side attached. I got my hose clamps tightened down. Now we're just gonna repeat on the other one. So just trace that line. We'll take that clamp off and put it on. I've gone ahead and made our attachments on our other side put our hose clamps on and tightened it down. Now before we hit the road, we're gonna wanna start it up and I'm gonna put the vehicle in drive with the parking brake on and that way the fluid can start cycling and we can check if there's any leaks. Now after you've done your installation and you've run and you see that it's not leaking, I do recommend checking the transmission fluid. And that's not because you lose a terrible amount during the installation but because you are adding a little bit of volume to the overall system so it shouldn't drop too much and sometimes you don't even have to add any but if you can check yours, highly recommend that. That way you're not running low on fluid. So hopefully this helps you see the benefits of a transmission cooler. And again it's just to prolong the life of your transmission especially if you're towing. Our vehicle here, he's got a brake controller and he's got a hitch on the back and towing is pretty normal. So to kind of run his transmission hard while under a load all the time this is gonna just help keep it nice and cool and give a little bit more life to the transmission. And while this may not be the exact vehicle you're installing your transmission cooler on it is gonna be kind of the same concept. And then hopefully you can apply some of the tips that I gave you. And that was a look at Flex-A-Lite's line of transmission coolers.
Do you have a question about this Transmission Cooler?
Info for this part was:
At etrailer.com we provide the best information available about the products we sell. We take the quality of our information seriously so that you can get the right part the first time. Let us know if anything is missing or if you have any questions.


Thank you! Your comment has been submitted successfully. You should be able to view your question/comment here within a few days.
Error submitting comment. Please try again momentarily.