
Summer Starts Here - Save up to 70%
To see if this custom-fit item will work for you please tell us what vehicle you'll use it with.


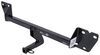
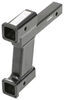
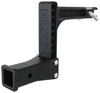
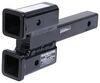
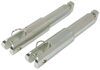
Custom designed to fit your vehicle so it can be safely towed behind your RV, this base plate has easily removable arms that offer a seamless look when you're not flat towing. Base plate bolts directly to your chassis, so no welding is required.
Features:
Specs:
This base plate's hidden design creates a clean and seamless look. The bracket arms are easily removable, creating a slick appearance when you're not flat towing. Because the arms can be removed, you also won't have to worry about banging your leg into any protruding arms when you walk by.
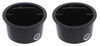
Attaching and removing the bracket arms is a breeze. To attach the arms to the base plate, simply insert them into the receivers and rotate them until they lock into place. Once you're finished towing and want to remove the arms, pull the pin to disengage the lock, rotate the arms, and remove them from the receivers. Finally, plug up the now empty receivers with the included receiver covers to help keep dirt and debris out of the base plate and provide a finished look.
Flat towing your vehicle is much more convenient than using a trailer or a tow dolly. These other options take up much more storage space, leaving you less room both at home and at the campsite. In addition, securing your vehicle to a trailer or tow dolly can be a hassle and more time consuming than hooking up with a tow bar.
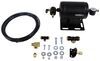
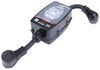
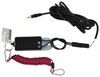
There are 5 basic components needed when flat towing a vehicle: a tow bar, a base plate kit, a safety cable set, tow bar wiring, and a supplemental braking system.
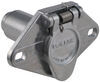
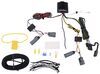
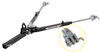
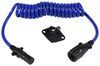
The tow bar links your towed car to your motorhome. It attaches to the custom-fit base plates that install on the frame of your towed car. Safety cables ensure that your towed car does not separate from your motorhome in the event that your tow bar becomes detached. Tow bar wiring allows your towed vehicle's signal lights to sync up with your motorhome's tail lights, which is required by law in most states. Finally, the supplemental braking system - also required in most states - brakes your towed car when the brakes in your motorhome are activated, preventing wear on the motorhome and decreasing braking distance for your entire setup.

Videos are provided as a guide only. Refer to manufacturer installation instructions and specs for complete information.
Hey everybody, Ryan here at etrailer. Today on our 2022 Buick Encore GX ST, we're going to be showing you how to install the Blue Ox Base Plate Kit with removable arms. But before we do that, will check it out and make sure that this is a setup that's going to be right for you. So before we get too carried away talking about the Base Plate, I figured it would be useful just to kind of refresh yourselves on the main components that we're gonna need to flat tow our Buick down the road in the first place. First, one's going to be your base plate. That's gonna provide us with a solid and reliable attachment point.
That way we can hook our tow bar up to it. The tow bar is going to be the physical link that actually connects the front of your Buick to the back of your motor home. Third main component is gonna be safety cables, and those are there in the event of an unlikely disconnect. Those are gonna keep everything paired together. The fourth main component is going to be your tow bar wiring.
And so that's going to be the wiring that transfers the lighting functions from the back of your motor home to the back of your Buick. Not only keeping you safe, but legal as well. And last but not least the fifth main component, it's going to be a supplemental braking system. What that's gotta do is apply the brakes in your SUV, whenever you hit the brakes in your RV. And that's gonna help bring you to a predictable and complete stop.
So first things first, what a lot of people are probably gonna wonder, I know that's something that I would wonder is how the base plate's gonna look on the front of the Buick. And honestly, it's not too bad. I mean, definitely you notice that there's an accessory there, but you know, if the being down low and it being a flat black in color, it does do a decent job and just kinda blending in. You know, are you gonna notice it Yeah. Is it gonna be like, holy cow, what happened in front of my car! No.
At least in my opinion. With that said though, as of right now, for those of you that have the GS model, unfortunately you only have one choice and that is this, this base plate. There's not all there available for it. So kinda have to work with what you got. There is other base plates available for the, just kind of the standard GS model, the GX model rather. And those are, are gonna look very similar as well, so not a ton of differences there. I have seen people being able to keep this part that runs along through here, but every vehicle is going to be set up a little bit different. You may or may not be able to do that. In our case, we did have to trim it to give us the clearance that we need. But like I said, you know, every circumstance, a little bit different, everything fits just a little bit different on every vehicle. So that's something to keep in mind as well. So there's a few things I do want to point out that, you know, I think was, was a good addition to the base plate and kind of well thought out. One of them being that we're going to have a couple of brackets already attached to base plates. So one for your breakaway switch and one for your wiring connector. Just gives you a good spot to mount everything, kinda helps simplify installation, you're not trying to custom make a bracket or anything. But this one here, if you have your front license plate on, you are going to have to just kinda bend it down a little bit, to give you the clearance that you need. Not a huge deal though. And even if we look over to where the caps go, they give you these caps and you know, it might seem kind of silly, but honestly, when you're not using your base plate, you put them in there and that's gotta help keep your cylinder here in better condition. Cause this is where your arms are going to go in and out of. So if we can keep anything out of there to help keep it in better shape, it's definitely a worthwhile, in my opinion. Whenever you are ready to hook up to your motor home, it's gonna be easy, you know, and that's, what's on a lot of people's minds. You know, you don't want something that you're going to have to fight with and be complicated. And with the removable arms, it makes it straight forward. You're gotta pull your caps out, take the arm, slide it on in and rotated about a quarter turn until that pin locks into place. Same deal with the other side. Once this are in, you're ready to hook up your tow bar. So the base plate and these arms are gotta work with blue ox tow bars, as well as some of the others. And for example, just right off the top of my head, let's say Roadmaster, tow bars. Some of tow bars that come with blue ax adapter ends. And if yours doesn't, chances are pretty good, you can find an adapter. That way you can put that different end on your tow bar and be able to hook up to your base plate. Other than that, at the end of the day, a base plate, you really can't go wrong with. You know, not only is it going to look pretty good, but it's gotta be easy to use. So really kind of asked for too much more. As far as the installation goes, I'm not gonna lie. It, it's somewhat involved. You know, you do have to remove the front fascia, which is really tight onto the vehicle. Got quite a few fasteners you need to get to. Nothing's really hard to get to. There's just quite a few of 'em and it's just, it's just time consuming. You know, there's no other way around it, but as long as you stay focused, shouldn't really run into too many issues. And along the way, I'll show you how I did some things and, and a couple of pointers to hopefully speed that process up and avoid any snags you may run into. But with that said, why don't we go ahead and get started on another. To be on an installation we're gonna be here at the front of our Buick. We're gonna pop the hood and we're going to need to get our fascia removed. So first step in that is to remove six fasteners in total, along this back edge here. So we're gonna have three on each side. So here's our fasteners. We're going to be pulling out this one, this one, and this one is a T15 Torx bit. Once I have these out and do the same thing on the other side And from this point on anything we do to one side of the vehicle we're gotta do to the other side as well cause it will be set up the same way Now if you move to our front wheel low along the front edge of the liner here, we're gonna have five T15 Torx bit screws that run up along it. And so we go ahead and grab her bit and get them pulled out. Chances are pretty good you're not gonna have a tool like this one here. So what you can do when you're doing this to make it easier, is actually turn your wheels one way or the other that will free up a lot of space and you'll be able to get kinda your standard tool inside of there. Now, if you look in front of our wheel lower, while we're going to have this trim piece right here, and we need to pull that out, it'd be about halfway up. That way we can get to some fasteners or a fastener rather. So to get this off and I like to do it, just kinda grab it and just start to wiggle it, kinda try to work it loose. Cause this is how the place by plastic fastener and if we're not careful, we can break em. But it's kind of, you know, a finesse deal here. So what I like to do is some of em, you can actually get to the backside of em and pinch em to help pull em out. It's gonna be hard to see why I'm doing this here, but once we get it out, I can show you what I was, what I was not as working with. So if you peel this back, feel in there, and try and get the same worked out here. It's gonna be tight, so we can expect that. So you can see that I got it started. This is what I was squeezing on. From the backside if he kinda squeezed the center and pull out at the same time, that's when it'll pop out. So we're just gonna carefully work our way up here. And we want to get it probably at about there. So once we have it out there, we have a light here we're going to unplug that could push out on that red tab. Push down on the connector, tab there, pull it out. And then if we look right here, we're gotta have a seven millimeter fastener. So really carefully take our wrench and ratchet, and pull that fastener out. Underneath our vehicle now on each side of it, we're gotta have two T15 Torx bit screws that we're going to pull out. We'll get that one out. As well as this one. Now here in the center of her car, along this edge, we're gonna have a total of six, seven millimeter head screws that we're gonna pull out. Now if he come to the corner here on the bottom side, you kinda pull this fender liner down. I feel like up here, we're gonna have two 13 millimeter head bolts that we need to remove. Now with an set of hands, we can get our fascia removed. I do suggest putting some painters tape around the edges here. That way, if you nick it, you know, you're not gonna have to worry about scratching the paint or anything. But what you're gotta do is start from the corner, and carefully just start to pop this out. And once we get up here, it's about the headlight, feels like it's getting pretty tight. Might have to lift up on the front. Start to just work this off. We're just gonna try to continue around. I'm trying to get this off since really tight right here. That's pretty, pretty normal. I have to try to just continue to kinda, kinda work it around until we get it to pop free. So I was kinda just looking around and kinda working this some more. And right here, I kinda just grabbed and just carefully put some pressure on em, it was pretty tight, but put that straight pressure on it and this popped off. And now with that free, we should be able to get the whole fascia off. So we'll just continue to work this around. Before you pull your fascia all the way off. Be careful cause we are gonna have some electrical wiring here on the passenger side. We'll disconnect that, pushed back on that red clip down on the center of it. And that's going to release the wiring. So with this free, we can set it off to the side, somewhere safe. With the fascia out of the way, we now need to remove our windshield washer reservoir. And up here in the engine compartment, right there, we're gotta have a plastic push pin fastener. We'll take a trim tool or a flathead screwdriver work too, but you gotta pry up ahead of that fastener, get it up a little ways, then work the base out. We've been down, where our washer fluid bottle is, I need to disconnect everything. So a couple of connectors, these are all gotta work the same as the other ones we did, you know, and you just push down on them and release em. Pull out some wiring out from the, the bottle itself. This one's separated. That one looks like you just have to take the tab and push up on it. That'll release that one. I'm trying to tack this out of the way kinda. Get em lines pulled out. And I think what I'm gonna do is maybe grab a marker. Since these lines are pretty much the same in length. I wanna mark 'em, that way we can put them back in the same spot that they we're before. That way we don't mix 'em up and have to come back and redo it. So I went ahead and just marked, you know, one and one fitting there. And now we're going to unplug, these have something to catch a fluid in ready or something to plug these out with. I actually just grabbed some of our bolts that we removed. They look like they're probably going to be the right size. But if these are too small, I happened to just grab some random bolts laying around that, you know, you can put in the, in the line and plug it. So we'll get this ready here. And with these, think I'm just going to pull them like this, and that one's actually not leaking, so that's cool, but we'll still put a bolt in there. Go ahead and do this one next. Now we can remove this. So we're gotta have two 10 millimeter nuts. Pull those off. You should be on the kinda lift up and out. Actually there's one more. There's going to be one more 10 millimeter bolt right here. We'll pull that out. And now we should be able to kinda lift up and work our washer fluid reservoir out and set off to the side. Now, if we look at this little shroud here, right underneath the bumper, you see that plastic kind of comes down. We're gonna cut that on each side. I'm just using a pair of snips here to cut through it. I got the other side cut already. And then if you live down right here, here's a clip if you will, you can push up on that clip, and pull back on the shroud. You should get this to pop out. This one is free the other side free. Now we can get this out of the way. So now moving up to our bumper beam, we're gonna have to pull the bolts out of it. We're not gonna completely remove the beam though. It should be supported by a couple of other brackets that we have going on, but we do need to take these on each side of it. So you're gotta have four 15 millimeter head bolts. I already got the other side out and as you can see, has a little bit of movement. So we'll just let it hang for the time being. Over here on the passenger side, we're gonna have the sensor, we need to disconnect. So just like the others pull back on this tab. And then this one's a little bit different. The best luck I have at these, take a small flathead, and just kinda carefully pry up inside of there. A lot of times, these are really tight and kinda difficult to get off, so kinda have a different style here. It just never fails. They always wanna fight you a little bit, but this is what I was prying up on. And once that's pried up on, you're able to remove the sensor or remove the plug. Over here on the passenger side, you're looking at the side of our vehicle, and it's oval opening. There's a couple holes in there and the top hole we're gonna need to enlarge it to the size listed in the instructions. I do suggest since our intercooler piping and stuff is right behind there, I just took a block of wood, put it in there that way when our bit goes through, we're not gonna drill into any of her hoses or anything like that. So definitely be conscious of that when you're doing this. That said, I'm gonna take our bit. So this is what's the hole is gonna look like, once you have it drilled out. So now underneath, we have this cover here. We're gonna remove the first two bolts on each side of it. There's seven millimeter. And we're just gonna let this hang down. This will give us an opening here to make it a little easier to work here in a little while. Now the next set of hands, we can take our base plate and the holes in it are gonna line up with our bumper beam holes there, and we're gonna take that factory hardware. Get it started out with the base plate it'll support itself. You wanna use some red Loctite on the threads for all the hardware that, we're gonna be using to secure the base plate. Can always grab some here at each trailer, but that said, we'll get it lined up and get all of our bolts started. It's not like to do is just get all of them started by hand. They are kinda tight, so it makes a little easier if you just grab the socket and use a little more leverage when you're, when you're turning these in. All of the hardware, hang tight we'll come back and snug it down. Then we'll grab a torque wrench and torque it all down to the amount specified in the instructions. If you don't have a torque wrench, you can grab on , or a lot of times you go to your local auto parts store, they'll have one available to rent. Now if you can grab our side plates, and these are gonna go in with this ramp side here facing towards the back of our vehicle. These two holes are gonna line up with two holes in this part of the frame. And it's a little tight. It can be kind of tricky to see, but we'll do our best here. And when we're holding this up here, you're gotta take the half inch bolt flat washer, split lock washer and run these through. So you're gotta pushing them all the way through so take this, slide it roughly into position, line the holes up, and push it through. So now we can line up these holes on our side plate with those in our base plate. So a lot of times it's not gonna just fall right into place. Sometimes it's gonna have to do is kinda pry into position. So I'm just using this primordial here to kinda hold that up. And you're gonna take these bolts, put on your Loctite. Feed that through, and then once I let off of the pry bar here, we should be lined up on this one as well, or at least really close. So not quite there, but that's okay. What we'll do is get the nuts started. This locked on, started on the one that's coming through. And now that it's holding itself, this one's so close you can probably come back with a socket and start to turn it and probably get it to come through. I started just kinda applying a little bit of pressure and tightening this up. If it's super tight, you don't wanna keep cranking, but a little bit of pressure. It's not going to damage the derives or anything. So this one's gone pretty easy. Once we have enough thread show, then we can come back and put on our nylon lock nut. And then once we get the other bolts started, I'm sorry, the other not starting it kinda start to tighten everything, it should all kinda pull together and straighten itself out. So now for the mother bolts over here on the driver's side, we have this wiring pack and this literally just popped out, but it's gonna be really tricky to see, see me do this. So I'll do my best to explain it. In this opening here, this is where our bolts pass through. So what you're gonna do is take one of these handle nuts, put a bend in it, put red Loctite on the threads. And you're gonna line this up with the bolts that are coming through and you'll come back on the backside and turn that bolt to get it tightened up. So you wanna get these going. And I try to tighten 'em up as much as I can by hand. Put some Loctite on there. First tying up as much as you can by hand, once I have both of 'em going, I'll show you what it looks like. I went ahead and got those nuts started and while I was right there, I also tightened 'em down. I just used a three quarter inch box wrench and just tighten down the heads of the bolt and kind of run everything in together, snug. But now that, that is done, we can come back to the bolts that we still have loose and get those tight out. For these bolts, I'm just gonna use the nine 16 spokes wrench and socket. Hold the nut from spinning and then tighten out the bolt. Now that all those bolts are snug need to make sure to come back with a torque wrench and tighten all these down to the amount specified in the instructions as well. Since the bolts there in the back are pretty tight. It's gonna be a little tricky to get a regular socket on there to torque them down. So you can always use a tool like this. It's a dog bone style, three quarter inch in size. You could probably also use what's called the crow's foot. Essentially, it's just kinda a low-profile type deal that can go on your, on your ratchet there to allow you to kinda sneak that up into place and torque everything down. So may consider using something like this if you have it. Over here on the passenger side, this is how these turned out, little easier to see. So I figured I'd show you. Well, once you have everything torqued, the remaining portion of the handle knots. You can just take a pair of snips and trim those off. And while you're over here, if you remember that sensor that we plug, unplugged, you can also just plug that right back in to it's original sensor, the opposite way that we removed it. So now we gotta put on our safety cables, which I have done. I just took that, wrapped it around twice this beam here and then use the provided de-link to attach it to that hole on our base plate. And since tightened down, I like to just come back with a few zip ties. I'm gonna zip tie everything up nice and tight. That way it's not gonna bounce around a whole lot when we're driving down the road and make a rattle or anything like that. So I went ahead, re-installed our washer fluid bottle and hooked everything back up the opposite way that we removed it. And now it would be a great time to install any of your other flats telling components like wiring or a braking system. And I say that because with the front end part here just makes it a lot easier to get to stuff a lot easier to wire everything and so on. So that's exactly what I'm gonna do. Then once I'm done with that, then we can come back and pull their fascia and get it trimmed out and everything. That way it'll clear our base plate. If you're not installing those components or already have them on just refer to your instructions on how to cut the fascia, trim it up and simply reinstall it the opposite way. Now that we have everything wrapped up on the front and we can get our fascia trimmed up and put back on. So I use a picture and the instructions as a reference and just held us up in place and kinda mark out where we need to trim, and our case, since you have this, ST model, this piece kinda runs right in the way. So we're gonna have to take a little material out, but what I'm gonna do is try to rescript kinda go piece by piece and we can hold it back up there and see if we can kinda get around that, that way we can cut as little as possible out, but that said, I'm gonna be using little saw like this here. Honestly, with this one being pretty thick, you could probably use a jigsaw or a Dremel tool. Whatever you have laying around more or less. So go ahead and, and start getting, get cutting So this is how everything turned out. I did have to cut a quite a bit out of it. Tried to leave some pieces in there that was just not cooperating. So sometimes it almost looks better just to get rid of it all, as opposed to having a couple of little pieces here and there that are all chopped up. So, you know, it don't look too bad actually, once it's on the ground, you're really are not gonna be able to see it. But with that said, once you get it fit back into place, you can simply plug everything back in and re-secure your whole front fascia, the opposite way that you removed it. And that'll finish up our look at and our installation of the Blue Ox Base Plate kit on our 2022 Buick Encore, GX ST..
Average Customer Rating: 4.9 out of 5 stars (7 Customer Reviews)
Custom designed to fit your vehicle so it can be safely towed behind your RV, this base plate has easily removable arms that offer a seamless look when you're not flat towing. Base plate bolts directly to your chassis, so no welding is required.Good product. Installation took about 12 hrs total. Glad I watched the video as well as written directions as there were some differences between the two, but overall good directions.

works very well installed it myself BUT did not out out the entire lower grill like the etrailer video showed. Looks almost invisible with some fine cutting of the lower grill to allow all to extend for hook up.
I was SN 12, so not a lot have been sold. Instructions were not up to the standard that I expected. Had to drill holes in the support base plate to fit my vehicle. No install videos.
I got it installed, however and it looks solid.
looks good in the box. Received very quickly. Got really good tracking info.
Do you have a question about this Base Plate?
Info for this part was:
At etrailer.com we provide the best information available about the products we sell. We take the quality of our information seriously so that you can get the right part the first time. Let us know if anything is missing or if you have any questions.


Thank you! Your comment has been submitted successfully. You should be able to view your question/comment here within a few days.
Error submitting comment. Please try again momentarily.